52 Week Mini Art Card/Tag Challenge

Thursday 27 April 2023

Sweet Poppy "Dragonfly Blooms" with in a circle card


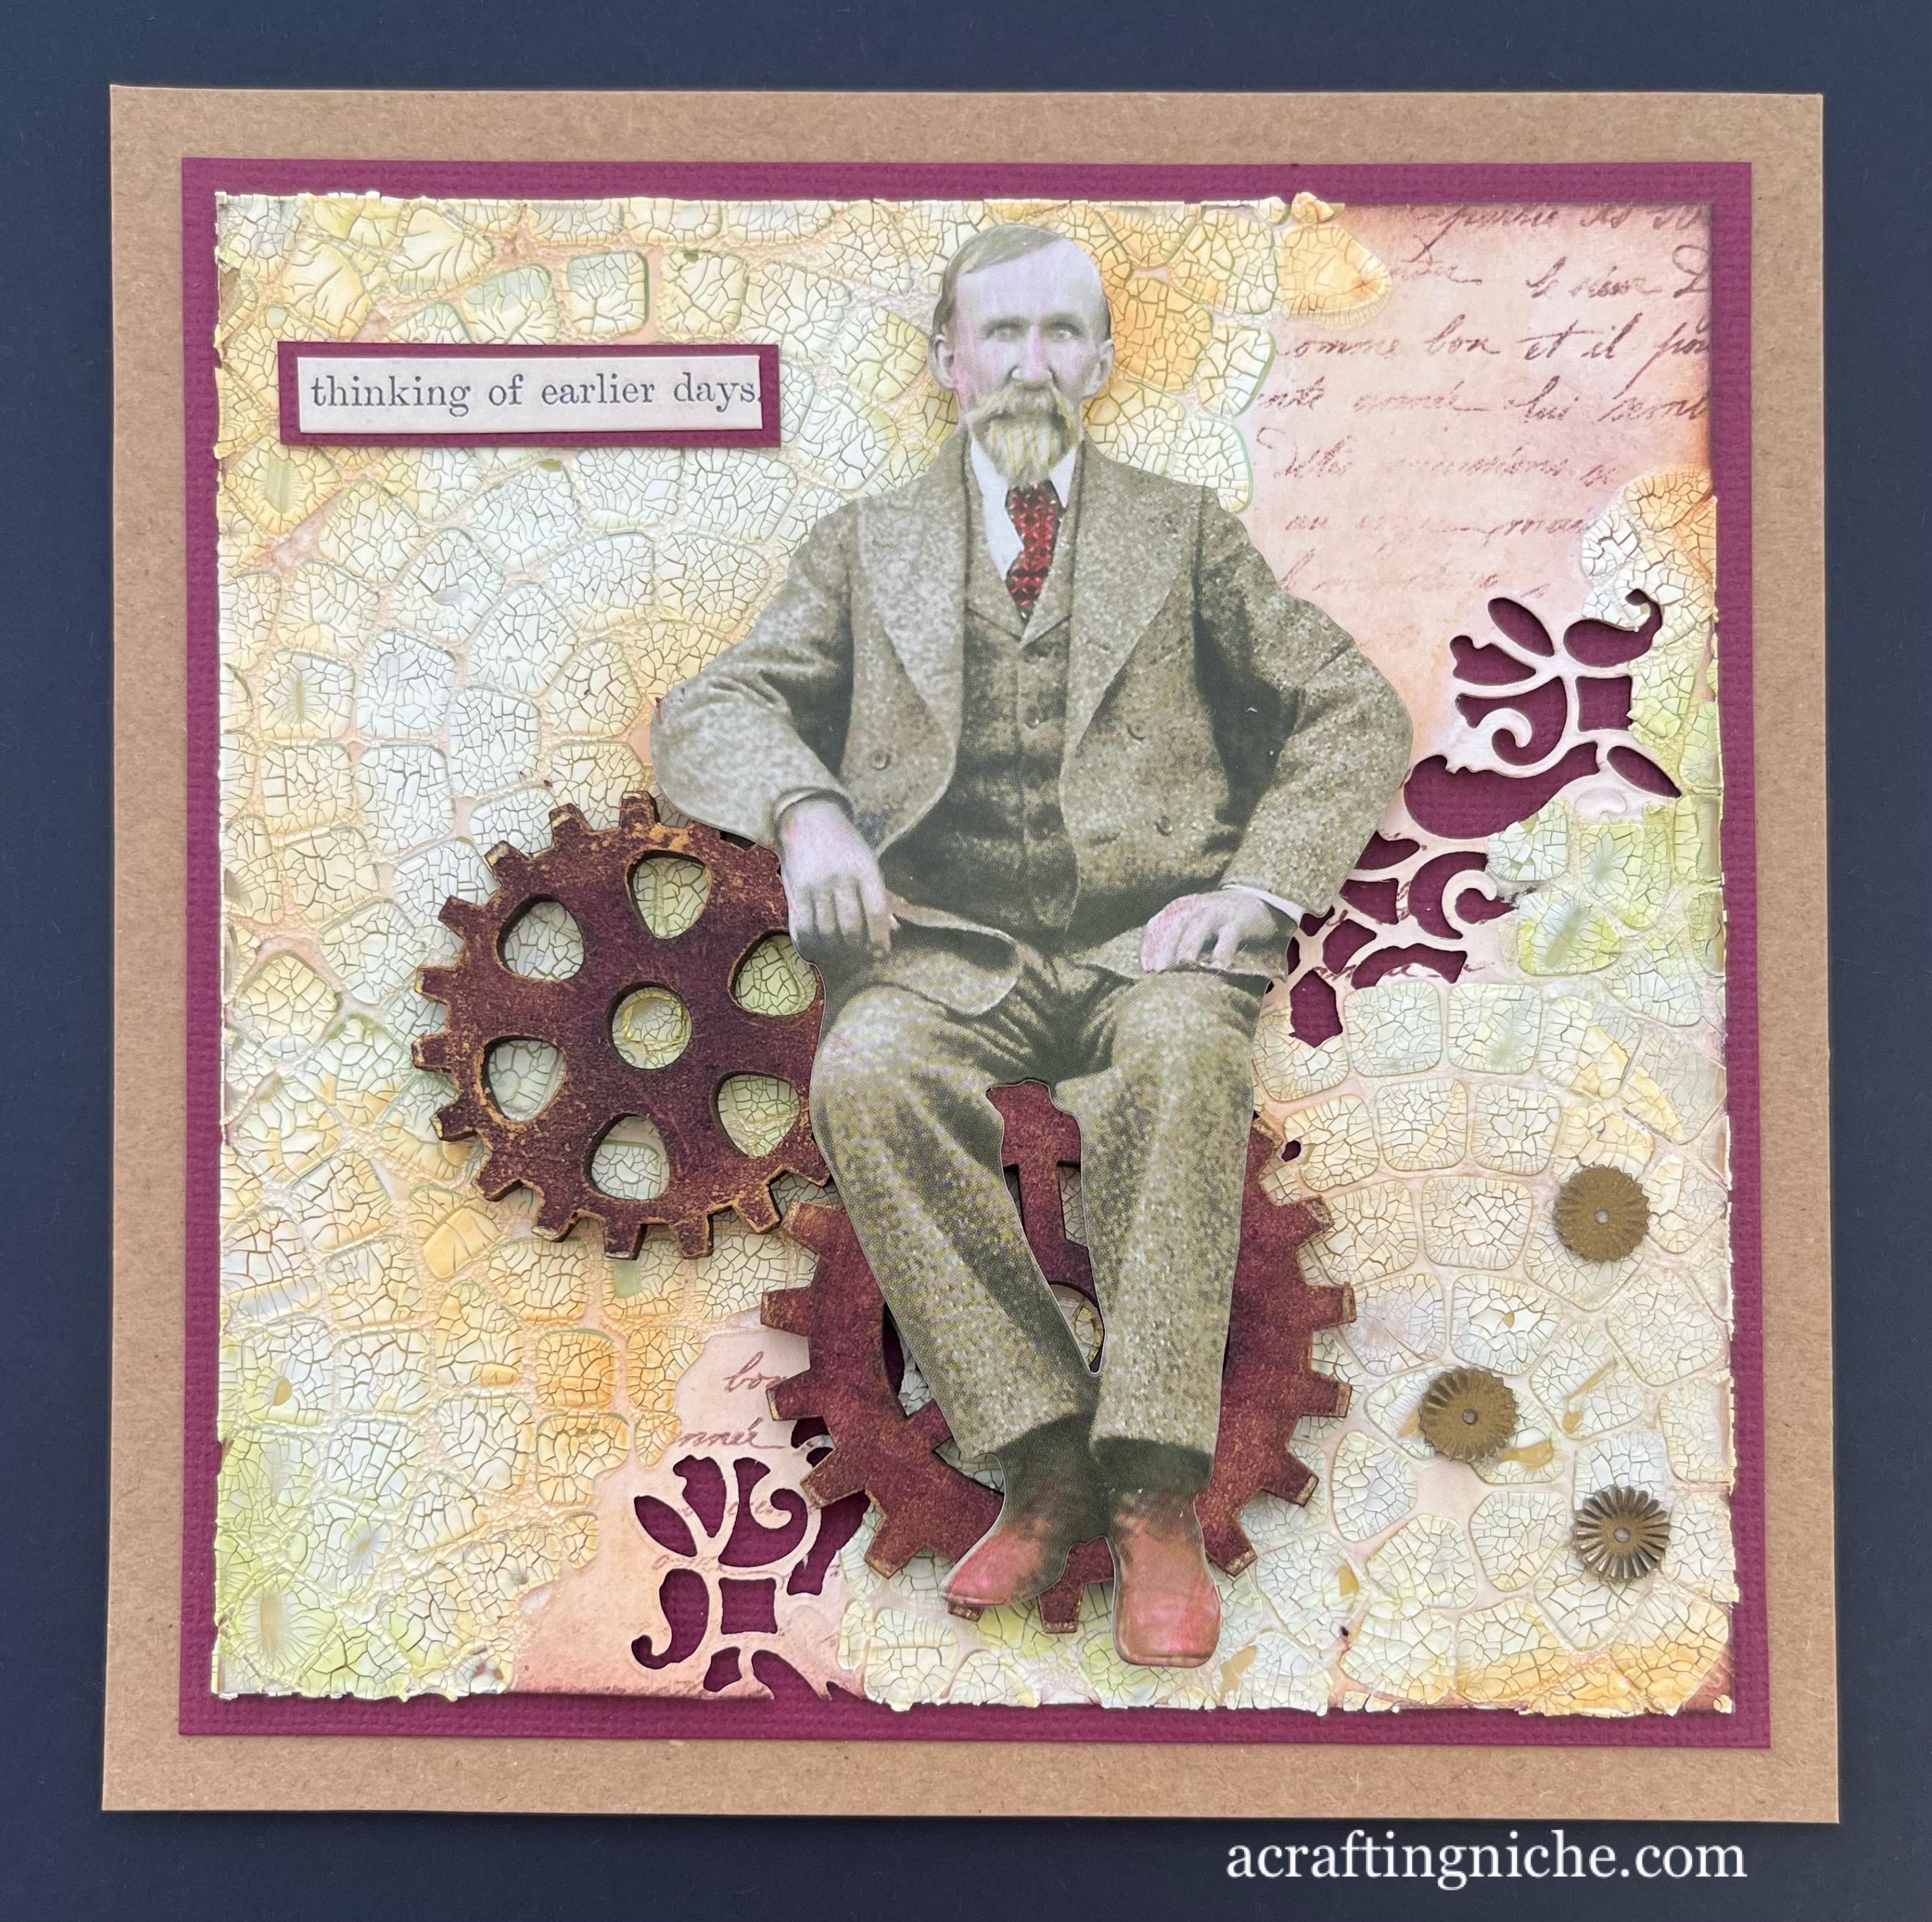
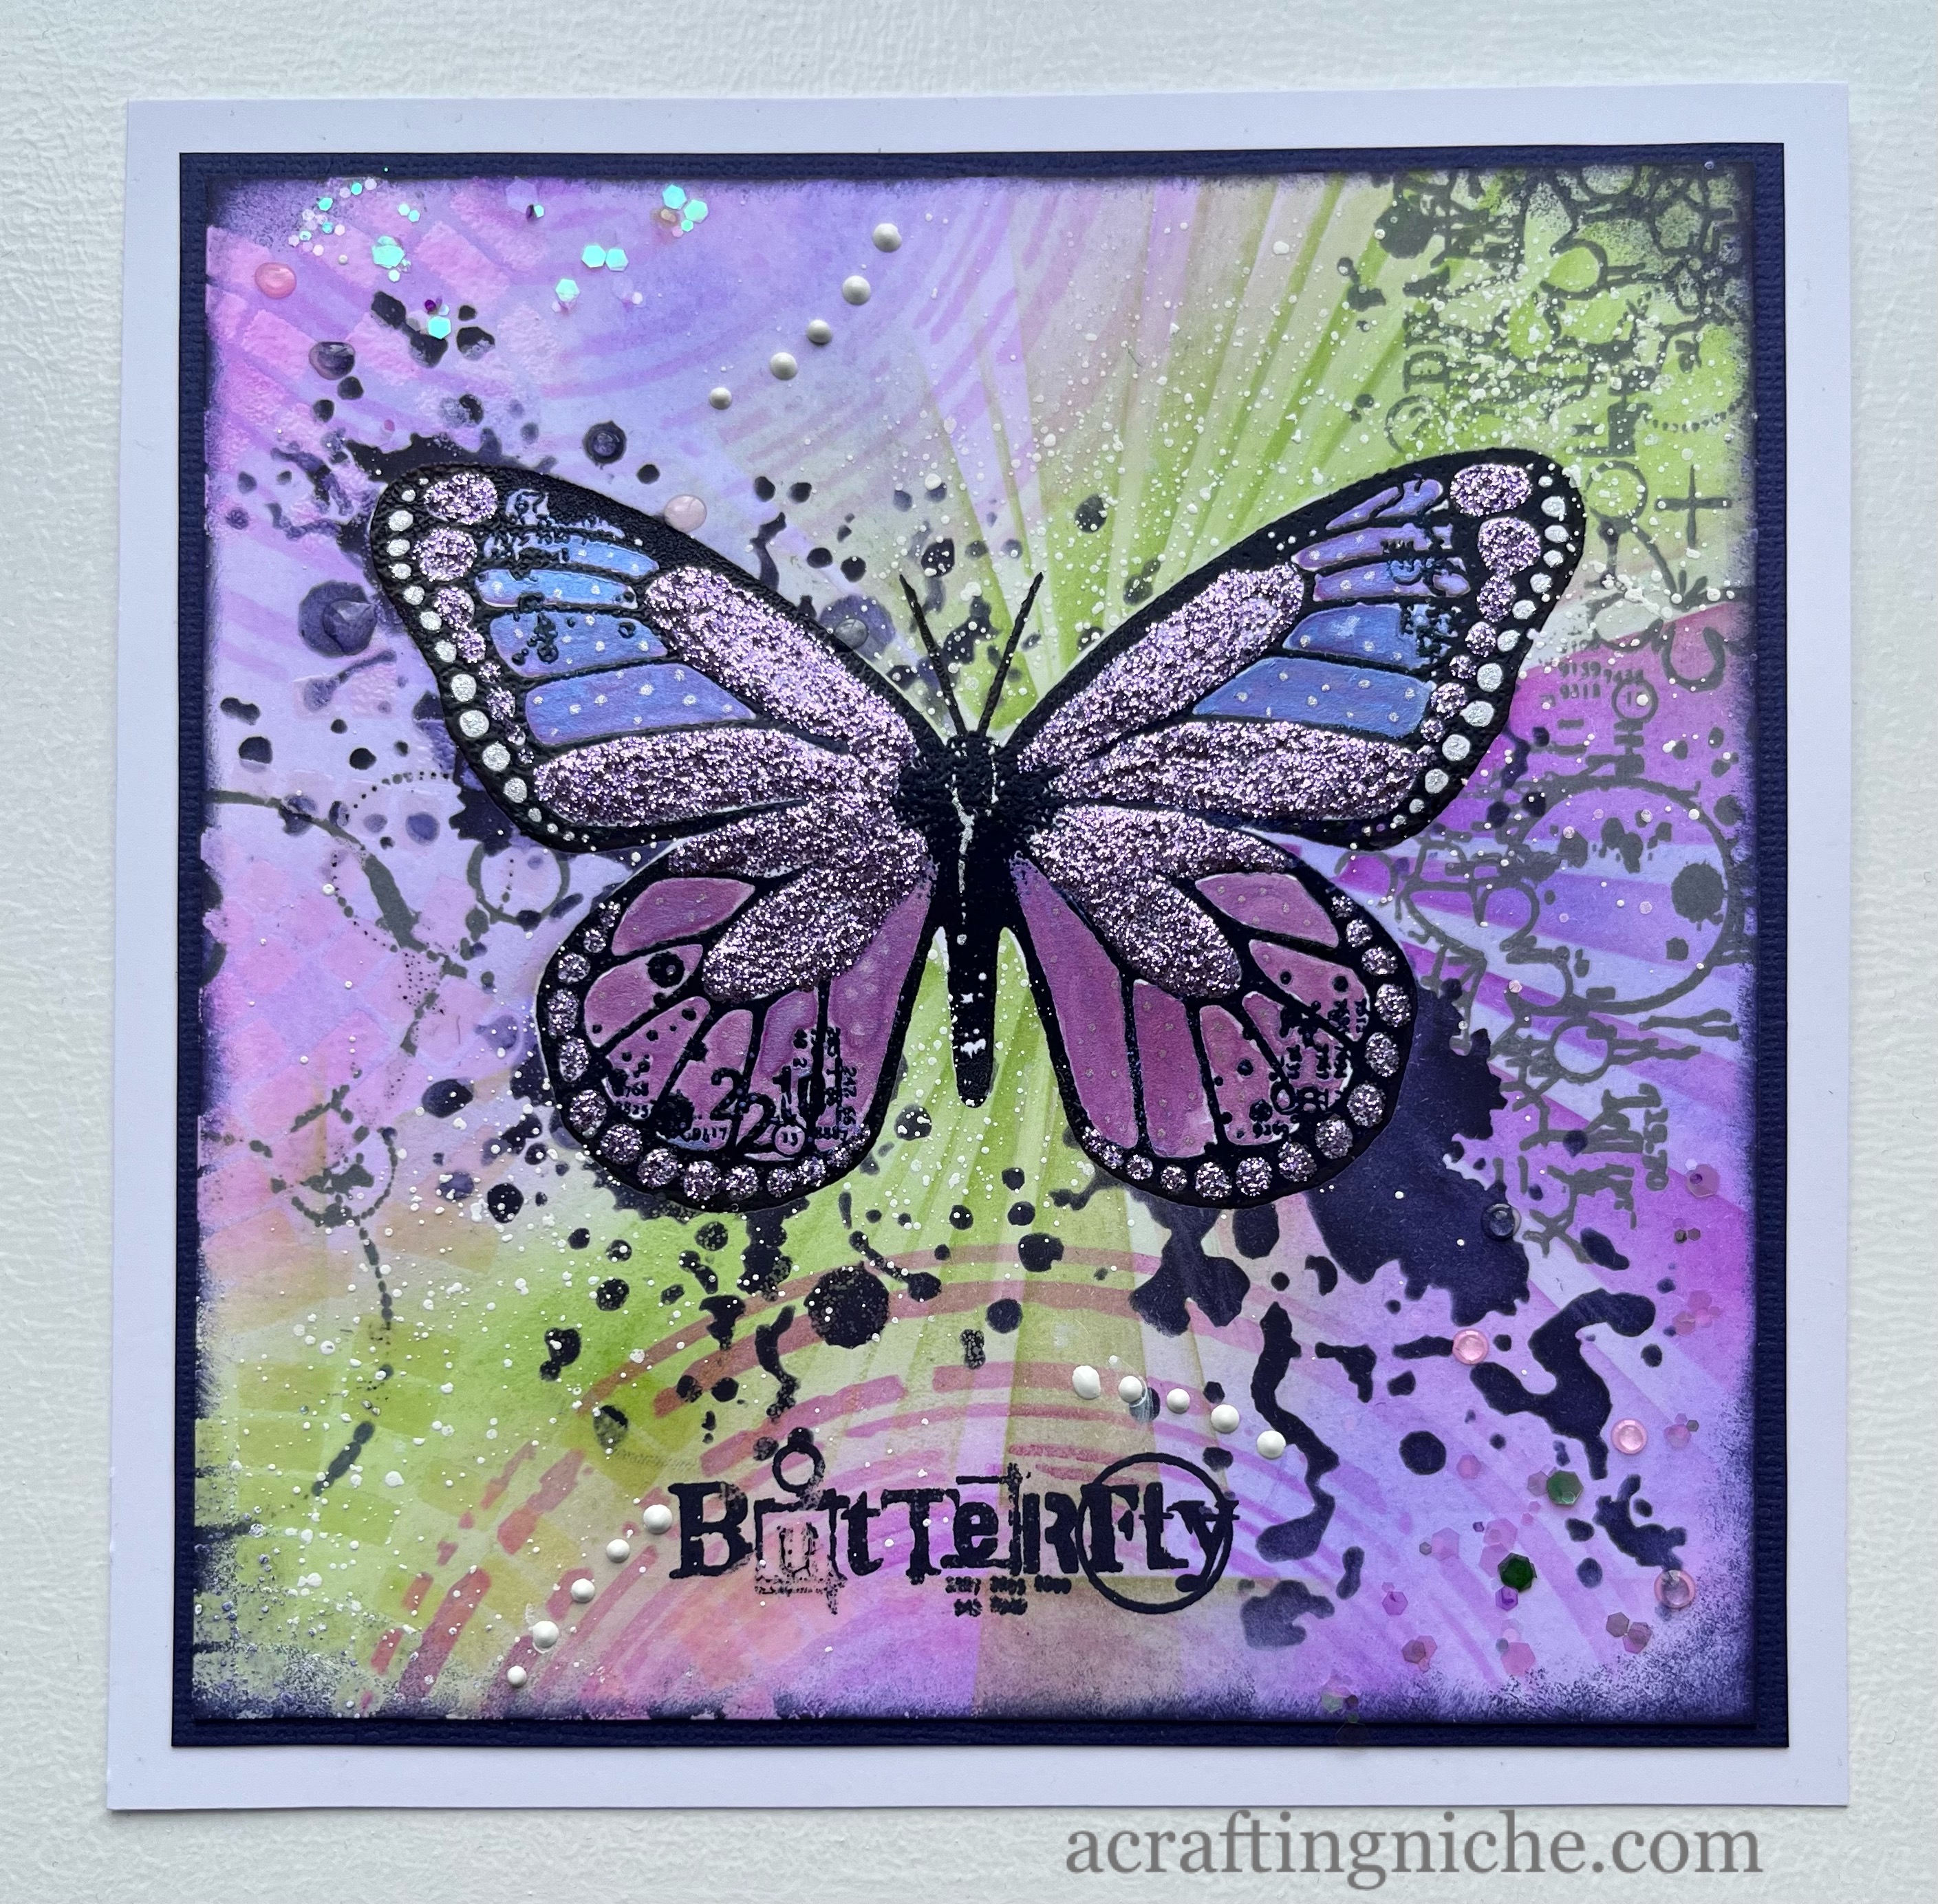
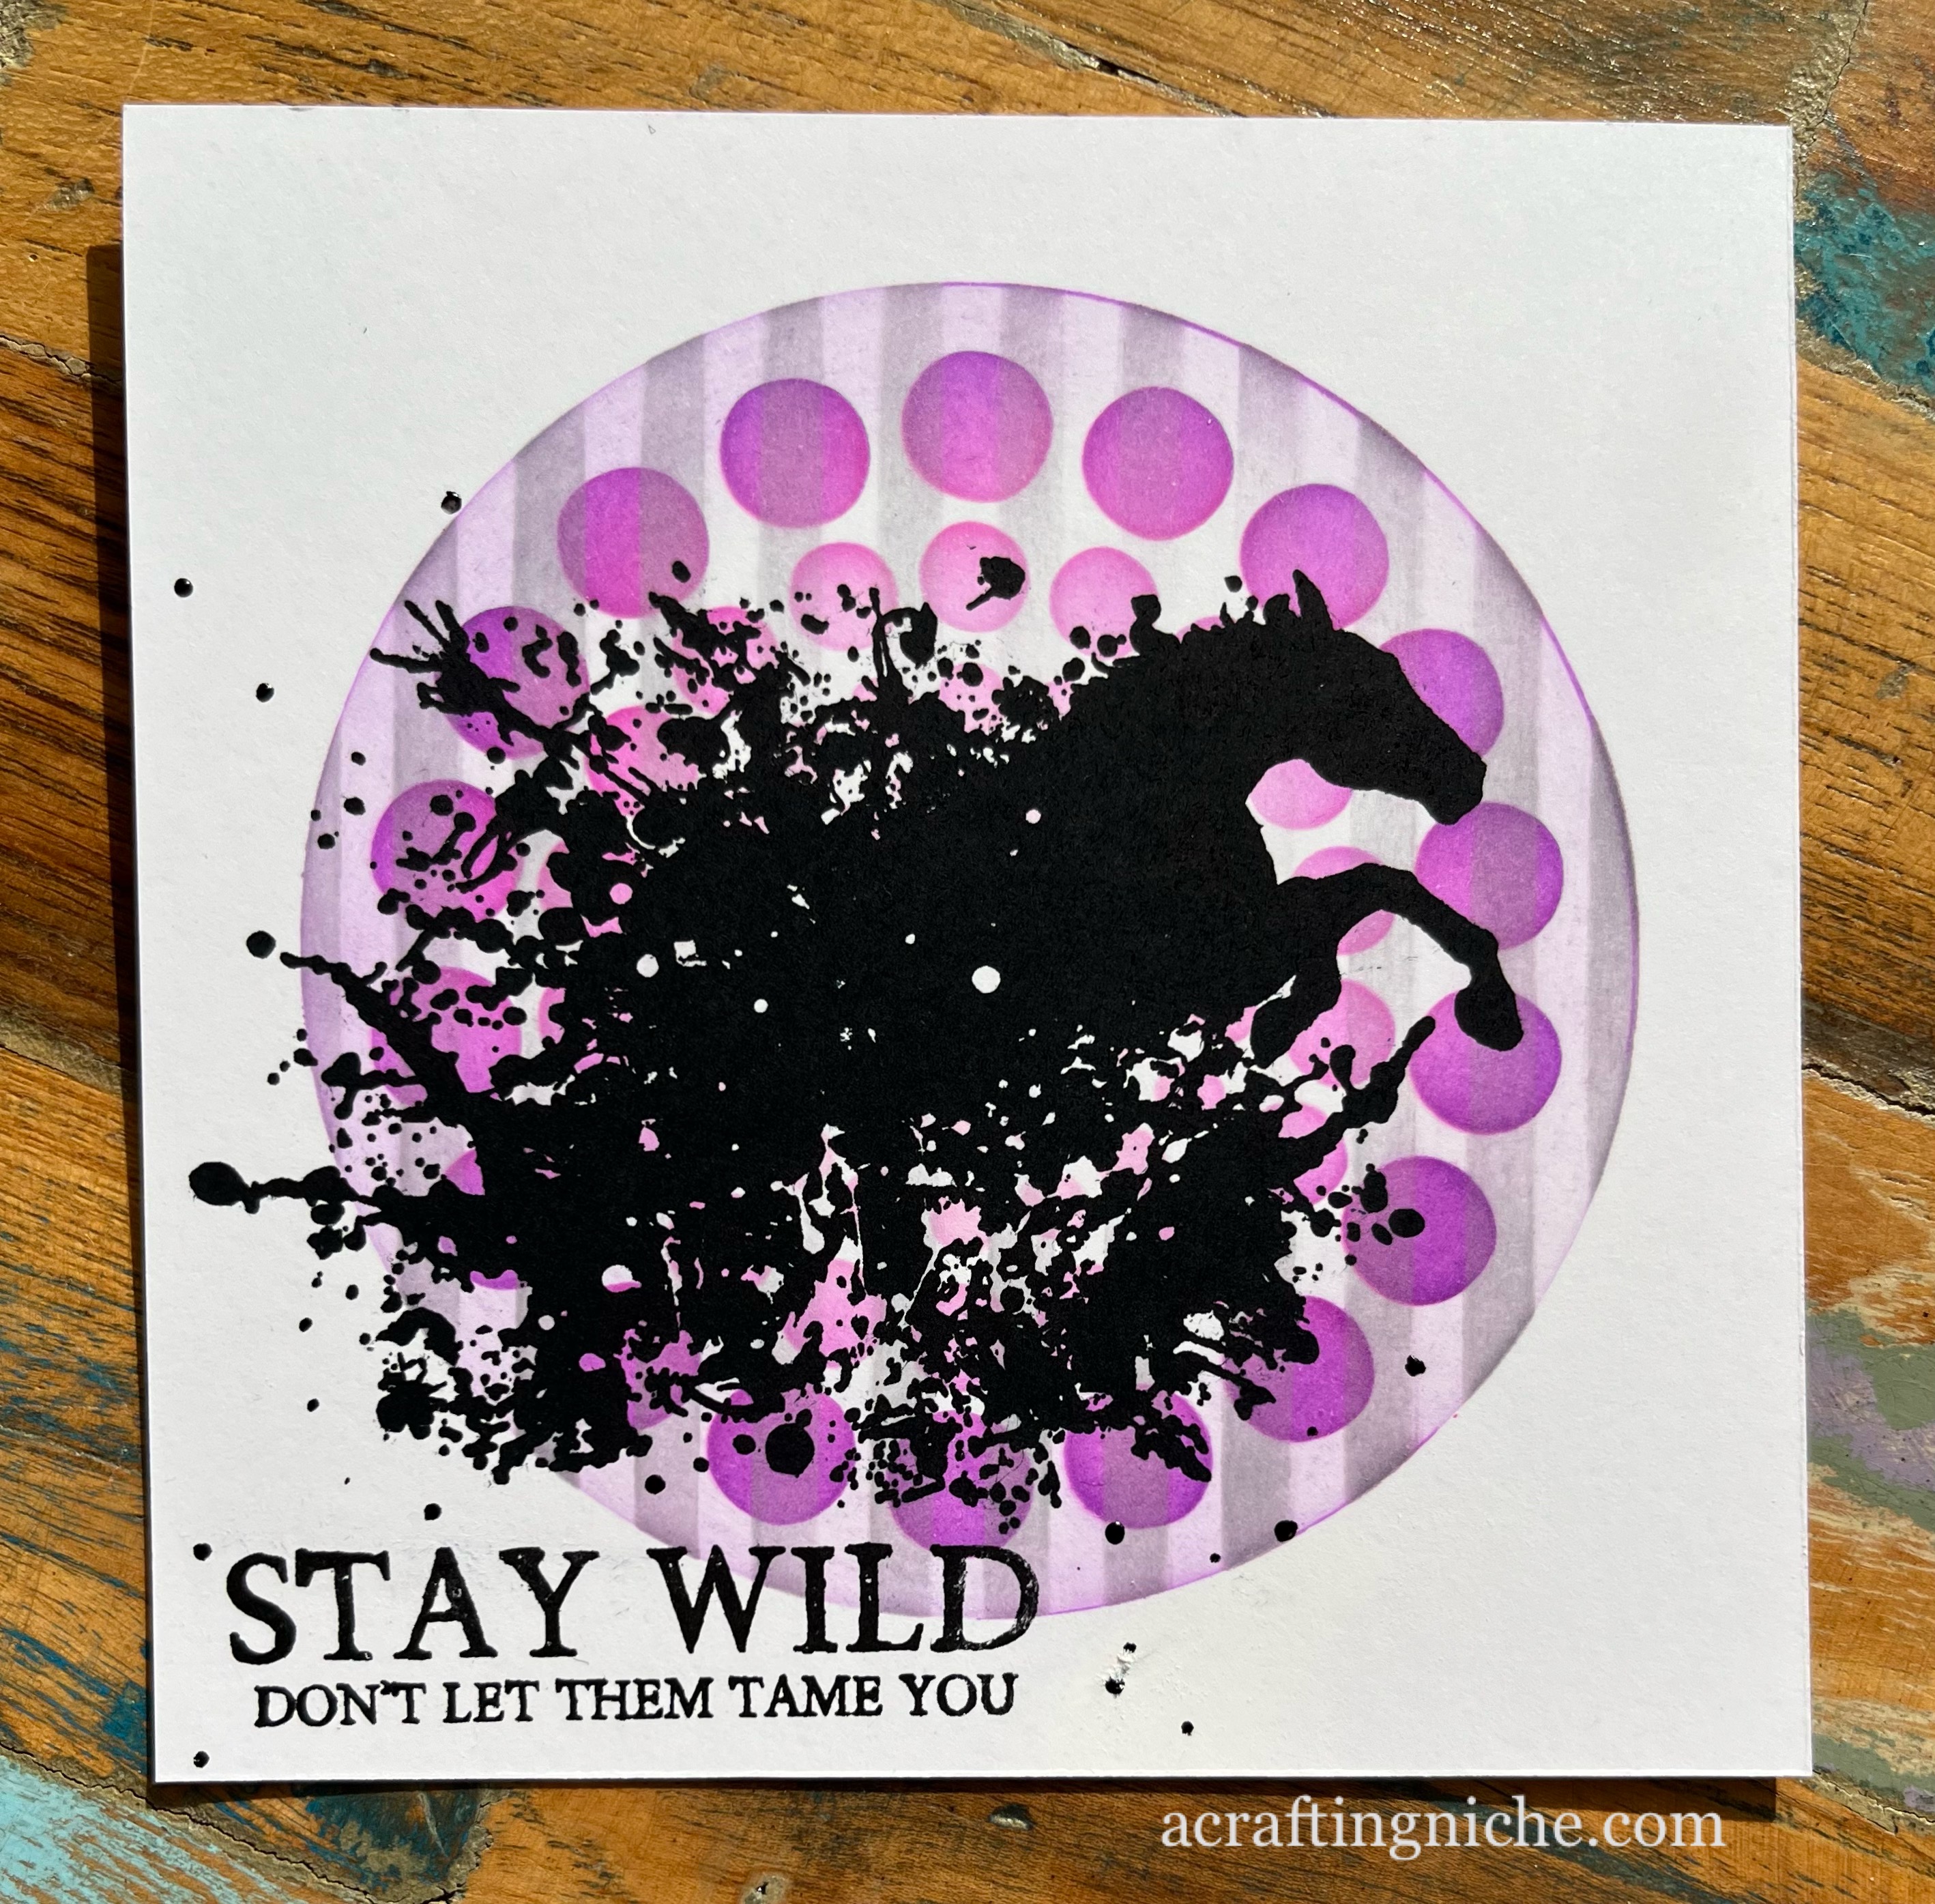
Having made a few cards with "white space" lately, I've covered every surface of this card!  One extreme to the other! Sadly the lovely sparkle and shimmer doesn't really show up in this still photograph, so I've made a short video clip so you can see it.


I started by using the Sweet Poppy Stencils (SPS) "Twisted Vines Aperture Stencil" with two shades of Archival Inks:  Peat Moss and Garden Patina through the decorative edge of the stencil to create a border.  I used the same colours for the central area using a light covering of the "Peat Moss", then lay the SPS "Faux Dragon Leather Stencil" over the top and applied the "Garden Patina" Archival Ink.


I stamped the dragonfly, which is part of the SPS "Dragonfly Blooms" stamp set, using Versafine Clair "Medieval Blue" ink.

I then painted the dragonfly using Cosmic Shimmer "Iridescent shimmering watercolour paints" and a silver glitter Signo Pen.

Around the edge of the circle, I painted a purple colour, suing "Dusty Concord" Distress Oxide Ink.  Once dry, I then edged the card with Versafine Clair "Blue Belle" ink, fading the colour out towards the circle so just a halo of the original paint colour showed.

Using a glue pen, I outlined the dragonfly and the foliage detail in the ring adding Lavinia Stamps "Moon Dust".  I then added touches of Ranger "Enamel Accents" in white and dots of Liquid Pearls in "Blackberry" and "Mermaid".


Wednesday 26 April 2023

Clarity Stamp "Swallow Journaling" white space challenge card


Today, Wednesday 26th April, Eileen Godwin set a challenge of "Lots of white space".  This is the card that I made, using the same products as the ones I used yesterday. 

I used the Clarity Stamp "Stripes" stencil with "Prickly Pear" Archival Ink as the base layer, fading it out from the middle.

I then used the Clarity Stamp set called "Swallow Journaling" to stamp the text, using Versafine Clair "Verdant" light green ink and then the foliage in Versafine Clair "Shady Lane" mid green coloured ink.

I used a white Posca Pen to splatter across the card, adding a few dots of Ranger "Enamel Accents" too.

I deliberately left this free of a sentiment, as I thought this design could work well as an emergency card for several occasions.

Tuesday 25 April 2023

Clarity Stamps "Swallow Journaling" Red, White and Blue Challenge Card


Yesterday, Eileen Godwin set a "Red, White and Blue" challenge. I've only just had an opportunity to make a card and this is it. 

I used the Clarity Stamps "Stripes" stencil with "Carnation Red" Archival Ink.  I then lifted the stencil, shifting it one line up (to cover the red), then applied "Cobalt" Archival ink through the stencil to get the multi coloured stripe look.

I used two stamps from the Clarity "Swallow Journaling" stamp set, stamped in first and second generation Versafine Clair "Twilight" ink.

I added dots of red Posca Pen and Ranger "White Enamel Accents", giving a touch of colour to the bird using Derwent Inktense pencils.

Sweet Poppy Stencils "Dragonfly Blooms" Card


This is another card started in the caravan at the weekend and finished off at home.

I've used the Sweet Poppy Stencil stamp set called "Dragonfly Blooms", stamped in Versafine Clair "Morning Mist" grey ink in second generation stamping, so that I had a very pale outline of the image.

I coloured the stamped image using Derwent Inktense pencils applied with a paint brush.  I used a 2B pencil to add shading and a white Signo Pen to add highlights. I also used a metallic silver pen for the beads and chain.

The "Just for you" sentiment is by Lavinia Stamps and is part of their "Heartfelt Verse" sentiment set, stamped in Versafine Clair "Morning Mist" grey ink. 

Monday 24 April 2023

Visible Image "Creative Chaos" CAS Card


This is the card that I had started at the caravan, but couldn't finish till I got home today. 

I started the card, by stamping the flowers from the Visible Image "Creative Chaos" stamp set in Versafine Clair "Nocturne" black ink.

I then used Derwent Inktense pencils, applied with a paint brush to colour the flowers.  I used a minty green Inktense pencil with a brush to create a very informal rectangle panel of colour behind the flowers.

I used "Weathered Wood" Distress Oxide Ink through part of the Visible Image "Supernova Stencil".

I then added extra black and white dots using Ranger "Enamel Accents". Finally mounting the card onto a piece of black paper and then on to a card blank.

Visible Image "One Kind Word" Card


I took a few crafting bits with me to the caravan, but I struggled to craft there as I only took one ink pad, stamping platform, a handful of stamps,my Derwent Inktense pencils with a paint brush.  So I ended up stamping, making this card and made half a card which I will finish at a later date.

While trawling through Social Media, I noticed how cruel and thoughtless some comments made by people were.  As I had the Visible Image "One Kind Word" stamp set with me, I decided to make a black and white card, so that the attention is brought to the wording.  I stamped using Versafine Clair "Nocturne" black ink.

Wednesday 19 April 2023

Sweet Poppy Stencil "Thistle Stem Stamp" Card


Last week, I entered an Instagram competition to "like, tag & share" their post regarding the release of their new stamps.  I was thrilled to receive a message to say that I was one of the winners.  Today I received my three stamps from the new collection.  I opted for the Foxglove, Poppy and the Thistle Stem. 


Today has been a bit busy, so I didn't get to play with the stamps till late evening.  I decided to use the "Thistle Stem" stamp first, stamping it in Versafine Clair "Morning Mist" grey ink, then colouring the image using Derwent Inktense pencils, sometimes applied with a paint brush and sometimes as a pencil.  I also used a gel pen, a 2B pencil and a Posca Pen.

In the background, I used a Sweet Poppy stencil called "Grid Plate" with "Weathered Wood" Distress Oxide Ink, blending tout he colour from right to left.

Finally, I stamped a sentiment from the Simon Says Stamp set called "Tiny Words - Birthday" in Versafine Clair "Morning Mist" grey ink.

Texture Challenge Card


Today, Wednesday 19th April, Eileen Godwin set a challenge of "Texture".  This is the card that I made.  I was totally out of my comfort zone using the texture paste! 

I started this card doing one thing but it morphed into something quite different as I wasn't sure how to use a product and winged it.  Lesson learnt, check Google first.  

I made a beautiful background thinking it would crackle, but it  didn't as I'd used "Crazing" which was clear when I applied it.  I then put the stencil back on and added the"Crackle" paste, which was very white when applied and stayed white, so I lost the nice background, which resulted in working with what I had left!

I decided to use the inks left on my blending brushes to provide colour to the crackled area.  I'd used a Funky Fossil stencil called "Broken Mosaic" with the Tim Holtz "Crackle" Texture Paste. A small area of the base remained and that was where I had stamped the Funky Fossil "Vintage Script" using Versafine Clair "Acorn" brown ink.

I decided I would die cut a section of the surface, using a Sizzix Tim Holtz die, but due to the depth only some of it actually cut, which I actually don't mind as it is more informal.

I found some MDF cogs in my stash, so coated them with "Plum" Archival Ink and then added touches of gold gilding wax.  I stuck them into position using Glossy Accents.

I used a Tim Holtz "Paper Doll" and gave the gentleman a bit of colour by using felt tips pens and rubbing off the surface ink, which left just a suggestion of colour.  I used double depth foam pads to adhere the upper body of the paper doll and Glossy Accents for the legs, positioning him as if he were sitting on the cogs.

I found a Tim Holtz/Stampers Anonymous "Sticker Word" which was suitable, mounted it on dark red card and cut to shape.  Finally, I had some little dark gold looking metal embellishments which I thought worked well, so added these by using some dots of Glossy Accents.

Funky Fossil "Free Spirit" Birthday Card


I made a quick card for a male this morning.  When I say quick, it really was.  It was made, written and in its envelope withing ten minutes!

I've used products by Funky Fossil Designs for this card, starting by stamping the horse image, which is part of the "Free Spirit" stamp set, in Versafine Clair "Twilight", which is a dark blue ink.

I then applied "Shadow Gray" Archival Ink through the "Burlap Texture Stencil" fading the colour out towards the edges.

Using Versafine Clair 'Twilight" again, I stamped the sentiment, which is part of the Funky Fossil "Small Print" stamp set.  Finally I added three sticky backed grey dots to the stamped image.

Tuesday 18 April 2023

Tuesday challenge card "Black and White"


Today, Tuesday 18th April, Eileen Godwin has set a challenge of "Black and White".  This is the card that I have made for this prompt using a selection of Visible Image products.

I stamped the main image, called "Behind Every Mask" in the middle of the card using Versafine Clair "Nocturne" black ink.  With the remaining ink on the stamp, I stamped the image on a post-it note then fussy cut the shape to create a mask.

With the mask in place, I used Versafine Clair "Morning Mist" grey ink through the Visible Image "Strobes" stencil, fading it out towards the edges.

Using Versfine Clair "Nocturne" black ink I stamped one of the Visible Image "De-stressed" stamps multiple times around the edge of the card.  I then did the same using Versafine Clair "Morning Mist" grey ink.

I then used the Visible Image "Free Your Imagination" stamp set for the feather and the sentiment, stamping both in "Nocturne" black ink.

Finally, I mounted the card on to a piece of black paper then on to a card blank.  Around the edge of the black paper, I drew a line in a white gel pen.  The last thing I did was to add dots of white Ranger "Enamel Accents" below the flight of the bird.

Butterflies Challenge Card


I'm playing catch up with the challenges I have missed, while I was away.  The Friday Eileen Godwin challenge prompt was "Butterflies", this is the card I have made. 

The central image is actually the mask I used for the "glitter" challenge a few days ago.  I couldn't bring myself to throw it away as it was so pretty - just as well I didn't!

The mask is a stamped image from the Visible Image stamp set called "Butterfly Effect", stamped in Versafine Clair "Nocturne" black ink. It's got lots of different Archival Inks and splatters on it.

In the background, I have used a stencil called "Butterfly Wreath" by Funky Fossil Designs, with "Shadow Grey" Archival Ink, using more ink in the central area and blending out so it is lighter on the edges.

I used foam pads to adhere the butterfly over the wreath.  Then stamped the sentiment, which is part of the Simon Says Stamp set called "Tiny Words - Birthday", stamped in Versafine Clair "Monarch" purple ink.

I then mounted the card on to a piece of grey paper and then on to a card blank.  Finally adding some dots of Ranger "Enamel Accents" to complete the card.

Lavinia Stamps - "Believe" challenge card


I'm home again after a few days away.  How I have missed my crafting!

Yesterday, Monday 17th April, Eileen Godwin set a challenge of using only stencils to make a card.  This is what I made. It is totally out of season, but actually quite nice to do something festive for a change.

I used a whole host of stencils by Lavinia Stamps along with Archival Inks and Wow! Embossing Powders.

I started the card by using the Lavinia "Stag" Sticker Stencil from set 4 using "Tea Rose" Archival ink go colour the stag head.  I then used the same ink through the Lavinia "Cryptic" stencil.

I used "Prickly Pear" Archival Ink around the stag head, then used the same ink and some "Leaf Green" Archival Ink through the Lavinia "Honeycomb" stencil.

I then used "Sky Blue" Archival Ink through the Lavinia "Divine" stencil.

Next I applied "Fern Green" Archival ink through the Lavinia "Red Brick" stencil.

I moved on to "Cobalt" Archival Ink with the Lavinia "Moon Mask" to create the partially shaded moon in the background.

While I had the "Cobalt" ink out,  I then used it through the the Lavinia "Faith" stencil to create the "Believe" word. Using "Cobalt" again to darken the edges of the card.

I used Wow! Embossing Ink and Wow! Clear Embossing Powder through the Lavinia "White Orbs" stencil from the top left to the bottom right and heat set.

Once the clear embossing was cool, I dusted the surface with an anti-static bag and used the same stencil with Wow! White Puff Twinkle Embossing Powder in the same area and heat set.

I added a few pencil details around the head of the stag using "Van Goch Pastel Pencils" to add some shadow to the head.


Here's a little video clip to share with you, in the hope you can see the embossing detail a little better.


Thursday 13 April 2023

Vibrant Background Challenge Card


Today, Thursday 13th April, Eileen Godwin set a challenge of creating "A background of vibrant colours'.  I think I have fulfilled the brief with this card.  

I have used a selection of colours of Archival Inks through the Clarity Stamps "Abstract Squares" stencil in the background.

I then used Versafine Clair "Nocturne" black ink through the Funky Fossil Designs stencil called "Ava".  I used the same ink to stamp the "Happy Birthday" sentiment, which is part of the Clarity stamps set called "Christmas & Celebration Words".

When I showed the completed card to Hubby, he said "that's not at all your style", which is true it isn't my normal, but I enjoyed making it all the same.  I guess that is what taking part in challenges is all about!

Wednesday 12 April 2023

Visible Image "Butterfly Ink" glitter challenge card


Eileen Godwin set a challenge today (12th April 2023) to use glitter.  This is the card that I have made. 


Starting with a plain piece of white card, I stamped the central butterfly, using the Visible Image "Butterfly Effect" stamp set, stamped in Versafine Clair "Medieval Blue" ink.  I then coated it in Wow! Clear embossing powder and heat set.

I stamped the butterfly again on a piece of copy paper, then fussy cut the shape to use as a mask while I created the background. I used a small amount of repo glue to position the mask over the top of the card.

Using blending brushes, I applied two shades of Archival Inks:  Vivid Chartreuse and Violet around the background.

I then used Cactus Flower and Vivid Chartreuse Archival inks through the Visible Image "Strobes" and "Supernova" stencils.

I then lay the Visible Image "Breakout" stencil in a couple of positions and applied "Wow!  embossing ink" with a finger dabber through the stencil, then coated in Wow! Clear Embossing Powder and heat set.

I lay the Visible Image "Butterfly Ink" stencil over the butterfly and applied Versafine Clair "Medieval Blue" ink through the stencil to creats the dark splatters.  I used the same ink to stamp the "Butterfly" sentiment which is also part of the "Butterfly Effect" stamp set.

Using Versafine Clair "Morning Mist" I stamped some rings on the left hand side of the butterfly and some random circular images on the top right, which are both part of the "Butterfly Effect" stamp set.

I used a white acrylic paint with a fan shaped paint brush to add fine white splatters, from the bottom left to the top right hand corner.  


I then removed the paper mask from the butterfly, it looks so pretty with all the colours.  If it didn't blend in so well with the background, I would have kept it in position!

I now turned my attention to decorating the butterfly itself.  I used Creative Expressions Cosmic Shimmer Iridescent paints in a blue and purple shade.  I then used "Lavender" coloured stickles for the four main sections of the wings, adding small dots of silver glitter signo pen to the dots at the ends of the wings.

In the background, I added dots of Ranger Glossy Accents and also some dots of White Enamel Accents.

Once everything was dry, I inked the edges of the card using Versafine Clair "Medieval Blue" ink, then layered it on to dark and then white card. Finally adding some very small sequins to the top left and bottom right hand corners.

Stampin' Up "Nature's Nest" Pregnancy Card


While I'm waiting for some ink and glossy accents to dry on a card, I made this CAS pregnancy card.

 I stamped the nest with eggs, which is part of the Stampin' Up "Nature's Nest" wood mounted stamp set, in Versafine Clair "Acorn" brown ink.  I then stamped the "Baby Is Brewing" sentiment, which is part of a Papertrey Ink clear stamp set called "Favor It Baby 2074" also stamped in Acorn brown ink.

I coloured the nest and eggs using Derwent Inktense pencils applied with a paint brush.

CAS Penny Black "Serene" Card


I am loving making these clean and simple cards.  It makes a nice change from all the fussy backgrounds.  This one was a very quick make, but it says what's needed "Hang in there"!

For this card, I stamped the background first, using the Lavinia Stamps "Texture 1" stamp, stamping off the edge using Versafine Clair "Warm Breeze" ink.

I then stamped the Penny Black flourish, which is part of their "Serene" stamp set, along with the Simon Says Stamp sentiment from their "Tiny Words - Encouragement" both in Versafine Clair "Nocturne" black ink.


Tuesday 11 April 2023

Visible Image "Into the woods" challenge card


I'm picking up on Eileen Godwin's challenges.  Today has a theme of "Rainbow Colours". 

I used two shades of Versafine Clair inks:  "Morning Mist" grey ink and "Nocturne" black ink to stamp the Visible Image "Into The Woods" stamp set.

For the sky, I used five shades of Elements Inks, applied with a paint brush:  Sundance, Russet Orange, Confetti, Mulberry and Violet Chalk.

Lavinia Stamps "Pipin" Congratulations Card


I've gone for a "CAS" look for this card. I rummaged through my box of dies, which I rarely use and really should make more use of them, settling on the Memory Box "Small Circle Burst - 98480" running it through my "Big Shot".  I then ran it though with another piece of card so that I had two central circles.

I mounted the white die cut card on to a piece of navy blue coloured card and then mounted it on to a white card blank.  I adhered one of the white circles the middle of the design.

I then stamped the "Congratulations" sentiment, which is part of the Simon Says Stamp "Tiny Words - Birthday" stamp set, which I stamped in Versafine Clair "Twilight" dark blue ink.

I then moved on to the spare white circle, using a pale blue and pale green Derwent Inktense pencil and applying a wash across the circle using a paint brush.

I used one of the Lavinia Stamps hares from their "Wild Hares" stamp set with "Pipin", both stamped in second generation stamping using Versafine Clair "Acorn" brown ink.

I then topped up the colour of the stamping using Van Gogh Pastel Pencil.  I used white, yellow and orange Posca Pens to create the impression of flowers.

Finally, I edged the circle with Versafine Clair "Twilight" dark blue ink and adhered it on to the card using foam pads to elevate the central area.

Monday 10 April 2023

Lavinia Stamps "Fairy Thistles" Sympathy Card


I sadly heard of the passing of one of our parents of our friend, so made a sympathy card to pop in the post first thing tomorrow.

I started this card by stamping the Lavinia Stamps "Fairy Thistle" in Versafine Clair "Monarch" purple ink.  I then coated the stamping in Wow! Clear Embossing Powder and heat set.

Over the top of the card, I lay the Lavinia "Feather Leaf" stencil, applying "Shadow Grey" Archival Ink through the stencil, fading the ink out across the card.

I stamped the sentiment, again using "Monarch" purple ink.  The sentiment is part of a Stampin' Up cling set called "Heal Your Heart".

Finally, I coloured the thistles using Derwent Inktense pencils applied with a brush and added touches of silver and purple Uniball Signo pens.

Lavinia Stamps "Fairy Bells" Hope Card


We've had family staying over the Easter weekend, which has been lovely, but has meant I've not had a chance to get crafting.  Today, my nest is empty and quiet, so an ideal time to play with some stamps.

I was behind on the Eileen Godwin "Two Colour" challenge, so decided to crack on with that.  I used "Peat Moss" Archival Ink through two Lavinia Stamps stencils "Elegance" and "Honeycomb" .

Using Versafine Clair "Nocturne" black ink, I stamped the Lavinia "Faily Bells" and one of the sentiments from the "Blessings" sentiment stamp set.

I used the torn edge of a piece of copy paper, with the "Peat Moss" archival ink to create the landscape behind the flowers.

Wednesday 5 April 2023

Penny Black "Serene" challenge card


I've had half an hour free, so made another card for Eileen Godwin's Wednesday challenge of "Circles". 

In the background, I used the Funky Fossil Designs "Bokeh Builder" stencil with four shades of Archival Inks:  Pink Peony, Chrome Yellow, Prickly Pear and Forget Me Not.

Over the top of that I applied "Watering Can" Archival Ink through the Funky Fossil Designs "In The Groove" stencil.

Using Versafine Clair "Nocturne" black ink, I stamped the foliage and sentiment, using a Penny Black stamp set called "Serene".

I added a few dots of black Ranger "Enamel Accents" to elongate the foliage sprays.

Visible Image "Ahead of our time" challenge card


Today Wednesday, Eileen Godwin has set a challenge of "Circles".  In total contrast to the last card I made, this one is very busy to look at and may make your eyes go funny, so apologies in advance!

I started by using the Funky Fossil Designs "Grid Stencil" with "Shadow Grey" Archival Ink, making it darker around the edges and lighter in the central area.

I then lay the Funky Fossil "3D Sphere" stencil over the top and applied "Cobalt" Archival Ink through the stencil, again, making it darker at the edges and lighter in the middle.

Using Versafine Clair "Nocturne" black ink with Visible Image "Ahead of our time" stamp set, I stamped the clock spiral, the falling people and the birds in flight. I then mounted the piece oon to black card.

Tuesday 4 April 2023

Funky Fossil "In The Meadow" challenge card


Earlier today, I made a card for a challenge set by Eileen Godwin.  I enjoyed the process, so made another card.

For this card, I have used "Sky Blue" Archival Ink through the Funky Fossil Designs "Pin cushion pattern stencil".

I then used "Watering Can" Archival Ink throught the Funky Fossil "Birds in flight" stencil.

Next, using Versafine Clair "Nocturne" black ink, I stamped the foliage, which is part of the Funky Fossil "In the meadow" stamp set.  

I used the same ink to stamp the sentiment of "Be Brave", which is part of the Funky Fossil "Small Print" stamp set.

Funky Fossil Designs "Good Vibes" Surfer Card


I'm on a roll with my card making today, here's another one.

I've used the Funky Fossil Designs "Waverider" and "Micro Dots" stencil with various shades of Archival inks.

I used Versafine Clair "Nocturne" black ink to stamp the camper van and sentiment, which are both part of the Funky Fossil "Good Vibes" stamp set. I coloured the van, using a Derwent Inktense pencil.

Lavinia Stamps "Easter Bunnies" card


I made a little Easter card using an assortment of Lavinia Stamps and one of their stencils. 

I stamped the "Forestcap Toadstool" in Versafine Clair "Morning Mist" grey ink.  I then stamped the "Midnight Meandering" bunnies stamp in Verafine Clair "Acorn" brown ink.

I coloured the background using a selection of blues and green shades of Distress Oxide Inks, applied with a paint brush. Over the top, I added detail using the Lavinia "Cryptic" stencil.

I coloured the toadstool using Derwent Inktense water colour pencils, applied with a brush.  

In the background, I used the "Small Branch" stamp with Versafine Clair "Shady Lane" green ink, stamped in first and second generation stamping.

I used coloured pencils and Posca Pens to create the impression of flowers around the toadstool, using Van Goch Pastel Pencils for shadows.

In the foreground, I used the Lavinia "Foliage Set" to create the long grasses in the bottom corners of the card using Versafine Clair "Shady Lane" green ink.

I added touches of Ranger "Enamel Accents" to the toadstool and "Glossy Accents" on the flowers on the trunk of the toadstool.

Visible Image "Stay Wild" challenge card


This morning on the Eileen Godwin facebook group, she set group members a challenge  saying "Make a card - start with a stencil or stencils and add a stamp or two..."

I used two Clarity Stamp stencils. Starting with the "Circle Dot Stencil" using three shades of pink Archival inks:  Pink Peony, Vibrant Fuchsia and Cactus Flower.  I then added a touch of Majestic Violet too.

Over the top of that, I used another Clarity Stamps stencil called "Stripes", applying "Shadow Grey" Archival Ink through the stencil but only around the edges of the circle.

After lifting the stencil, I decided I wanted a touch more colour to the edge of the circle, so used the brush I had applied the violet with to add a little more colour.

Using Versafine Clair "Nocturne" black ink, I stamped the horse and sentiment from the Visible Image "Stay Wild" stamp set.

I did manage to get a little smudge of ink on the white area around the card, so added a few spots of black "Enamel Accents" to cover it, which kind of tied in with the water splashes.

Sunday 2 April 2023

Lavinia Stamps "Floral Spray" Hope Card


Another card from me today using Lavinia Stamps. 

In my odds and ends box of crafty bits that I've saved, I came across a card blank where I had cut out a circle in the bottom right hand corner, I also found a small square of Lavinia Scenescape paper, so my mission today was to make use of them on one card.

On the piece of Lavinia scenescape paper, I used "Paradise Teal" Archival Ink, applied very lightly, through the Lavinia "Honeycomb" stencil.

I then used the Lavinia "White Orbs" stencil with white Pan Pastel to create lighter circular areas.

Using Versafine Clair "Blue Belle" ink, I stamped the "Floral Spray" stamp (which I believe is now a retired stamp).  Using the same ink, I stamped the word "Hope" which is part of the Lavinia "Blessings" stamp set.

I used a Derwent Inktense pencil to colour the flower, applied with a paint brush.

I added double sided sticky tape around the edge of the piece of patterned paper and positioned below the aperture in the card.

I decided at this stage, I would add a very light pattern using the "Honeycomb" stencil and the ink that remained on the blending brush.

I used a white Uniball Signo pen to add highlights to the flower.  Then used white "Enamel Accents" to add dots to the card, before mounting onto card.

Lavinia Stamps "Lavender" Hope Card


I've been away at the caravan for a few days, so there hasn't been any crafting.  I find it surprising how I get out of the rhythm of creating, when I've had a few days away.  This was the third attempt at this card, for some reason the first two were just not right!

For this card, I have used a selection of Lavinia stamps and stencils, starting with two shades of Archival Ink (Butter cup and Bright Tangello), applied very lightly through the Lavinia "Dynamic" stencil, blending out towards the edges of the card.

I then lay the Lavinia "Honeycomb" stencil over the top, applying "Sky Blue" Archival Ink very lightly in a few areas across the card surface, again blending out to the edges, so that none of the stencilling is obvious, but you just get a glimpse of the designs.

I stamped the Lavinia "Lavender" in Versafine Clair "Nocturne" black ink.  I added a few tufts of grass to the base using a black fine line pen.  

I used the torn edge of a pice of paper to create the landscape using Verafine Clair "Morning Mist" grey ink.

I then stamped the word "Hope", which is part of the Lavinia "Blessings" stamp set, in Verafine Clair "Nocturne" black ink.

I mounted the image onto a piece of grey paper then on to a white card blank, before adding a few touches of white Enamel Accents above the flowers.