52 Week Mini Art Card/Tag Challenge

Showing posts with label Clarity Stamps Stripes Stencil. Show all posts

Sunday, 27 September 2026

A crafting NIche "52 Week Mini Art Card / Tag Challenge 2026" - Week 39


The Crafting Niche 52 Week Mini Art Card/Tag Challenge 2026:

This is a weekly challenge. I provide you with a prompt/theme each Sunday morning through out the year.  The challenge is very relaxed.  You can do as much or as little as you like.  You can create cards, tags, Artist Trading Cards (ATC's) or index cards, the choice is yours. You just go with what ever is in your head at the time.  You can stamp, get inky, use patterned papers, texture, embellish it is all down to you.

There is a dedicated private Facebook Group, with a lovely bunch of people who are already sharing their makes from previous challenges.  You can find the group by clicking this link.  I'd love you to join in. 

The prompt for Week 39 is "Face"

I used a cream coloured tag, laying the stripes Clarity Stamps stencil over the top and applying "Cracking Campfire" Distress Oxide ink through the stencil.

I recently picked up a large photographic book on David Niven from a charity table, so picked a photo from there and tore it into sections and glued them on to the tag.

I then used Versafine Clair "Nocturne" black ink through the Clarity Stamps "Three Blooms" Stencil.  I added aqua coloured Posca Pen to the middle of the flowers then added a clear domed gem to give a 3D look.  I also added tiny orange gem stones across the tag.

Finally, using Versafine Clair "Nocturne" black ink, I stamped the word "smile" on a piece of white paper, adding a touch of the "Crackling Campfire" Distress Oxide ink to it and glued it into position on the tag

Sunday, 21 June 2026

Stampin' Up "Fabulous Florets" Artist Trading Card


A bit late in the day, but here's my Artist Trading Card (ATC) for the day.

For the base, I used a piece of card in a soft butter milk colour. Using "Shadow Grey" Ranger Archival Ink through the Clarity Stamps "Stripes" stencil.

I then used Versafine Clair "Green Oasis" ink to stamp one of the Stampin' Up "Fabulous Florets" stamps, using the same coloured ink to roughly ink the edges of the card.  I then topped the edges with Versafine Clair "Nocturne" black ink.

I used a gold coloured gel pen to outline the stamped flower, then added "Aqua" coloured Polka Dots across the ATC, circled with a black fine liner pen, finally adding a word sticker saying "take risks".

Friday, 22 May 2026

The 100 Day Project 2026 - Day 90


Today, is Day 90 of the 100 Day Project 2026, and it's another clean and simple design from me.  This is a challenge where you spend a short time each day creating, using the mediums of your choice.  Mine is 4x4" card, using collage, stamps and stencils.

For my Day 90, I lay a piece of low tack tape from one corner to the other on my white card base.  I used "Salvaged Patina" Distress Oxide Ink through the Clarity Stamps "Stripes" stencil.  Lifted the stencil and tap and relaied them, applying the ink through the stencil again.  This provided me with the right angled background design.

Using a black fine liner pen, I drew a circle round a lid.  Then fussy cut three Dina Wakley collage paper swallows and glued them into position.

I used two shades of Versafine Clair Inks (Morning Mist and Medieval Blue) to stamp the flowers round the circle using a couple of Lavinia Stamps "Mini Stamps".  Finally, I added a Tim Holtz "Idea-ology" word sticker saying "timeless" to the bottom right hand corner.

Saturday, 9 May 2026

The 100 Day Project 2026 - Day 77


Today, is Day 77 of the 100 Day Project 2026.  This is a challenge where you spend a short time each day creating, using the mediums of your choice.  Mine is 4x4" card, using collage, stamps and stencils.

For my Day 77, I used two shades of Distress Oxide Inks through a Clarity Stamps striped stencil.  The two colours I used are "Tumbled Glass" and "Mowed Lawn".

I then loosely cut around collage paper foliage prints by Dina Wakley, adding a Tim Holtz "idea-ology" word sticker saying "Wander".

Saturday, 1 June 2024

Clarity Stamps "Seedhead & Foliage Tiles" Stencil Card


Today, I've used Clarity stamps and stencils to make this clean and simple card.

Starting with a white 6x6" card blank.  I used the Clarity Stamps "Seedhead & Foliage Tile" stencil set. positioning the blank square in the middel of the card, securing with a piece of low tack tape.  I then used "Prickly Pear" Ranger Archival Ink to fill in the central square area.  

Over the top, I lay one of the other tile stencils form the same stencil set, again secured with a piece of low tack tape, applying "Leaf Green" Ranger Archival Ink through the stencil.

Lifting off the stencils, I then lay a square mask over the top of the stencilled area, then used "Forget me not" Ranger Archival Ink through the Clarity Stripes stencil in a vertical and a horizontal position to achieve the gingham look to the stencilling.

Next, I used Versafine Clair "Shady Lane" green ink to stamp the "Sending you love and hugs" sentiment, which is part of the Clarity "Happy Birthday Occasions Sentiment" stamp set.  Finally, I added touches of Signo Uniball gold gel pen around the stencilled area.

Monday, 20 November 2023

Clarity Stamps "Star Flower Spray" Card


Now I'm up to date on the tags, it was time for me to make a Birthday card needed shortly, so I made this card using a selection of goodies from Clarity Stamps.  It was nice to work on a square format rather than tag shape!

I started by using the Clarity "Christmas Stars" stencil with "Chrome Yellow" Ranger Archival Ink, keeping to the right hand bottom side of the card.

Next I used the Clartiy "Stripes" stencil with "Shadow Grey" Ranger Archival Ink, again keeping to the right hand side of the card, fading to the left and to the top.

I moved on to the third stencil, using the Clarity "Three Blooms Stencil" with "Orange Blossom" Ranger Archival Ink.

I then stamped the Clarity "Barbara's A6 Star Flower Spray" using Versafine Clair "Nocturne" black ink.  I added colour to the stamped areas using Posca and gel pens.

Finally, I stamped the greeting using the Clarity "Birthday Occasions Sentiment" stamp set with Versafine Clair "Morning Mist" grey ink.  I then mounted the image on to grey card and then on to a 7x7" card blank.

Wednesday, 1 November 2023

52 Week Mini Art Card/Tag Challenge - Taster Tag for November 2023


52 Week Mini Art Card / Tag Challenge

To start getting us in the mood for the 2024 weekly tag challenge, I thought I would get us in the mood by providing a monthly prompt/theme for the remaining months of 2023.  

You can use any size tag for this challenge, the ones that I use are manila in colour and measure 8x16cm, however you can make a card, an ATC (Artist Trading Card) or maybe an index card.  The choice is yours.

The prompt for November 2023 is "Stripes"

I hope you enjoy this taster and the challenge.  I'd love to see what you make.  You can share your tag/make on the Facebook group for the challenge which you can find here.

Sam x


***

So this is how I made my tag:  I drew diagonal lines lightly across the tag.  I then masked off three sections of the tag and used a Ranger Archival Ink through the Clarity Stamps "Stripes" stencil.  The four shades of Archival Inks I used were Tiger Lily, Monarch Orange, Carnation Red and Red Geranium.  After applying the ink through the stencil, I lifted the stencil and tapes, masking off other areas and repeated the process till all four triangles had a different colour on them.

I then stamped the large butterfly, which is part of the Tim Holtz Stampers Anonymous, red rubber cling stamp set called "Perspective -CMS213" in Versafine Clair "Nocturne" black ink in the middle of the tag, over the point where the four striped triangles meet.  I then stamped the butterfly again on a spare tag and fussy cut it.

Returning to the tag itself, I stamped the red large dots, using the Stampers Anonymous "Fashion Style & Art - SCS032" in Versafine Clair "Tulip Red", stamping at the top right and bottom left of the tag.

I used the Stampin' Up "Gorgeous Grunge" red rubber "multi lines" stamp and the "speckles" stamp with Versafine Clair "Nocturne" black ink

Next using wet glue, I stuck the fussy cut butterfly on to the tag, over the top of the one already in position. I deliberately didn't colour the butterfly as I fel the eye needed somewhere to rest as the background was so busy.

As a final touch, I added some black Ranger Enamel Accents to the existing speckles below the butterfly to give a little dimension.  I also added a Tim Holtz, Idea-ology word sticker to the top right hand corner, before inking the edges of the tag in Versafine Clair "Nocturne" and mounting the tag on to a piece of black card.

Wednesday, 18 October 2023

Honey Doo Crafts "Lilies" card - inspired by an Eileen Godwin workshop


I am still loving the Eileen Godwin paid workshop.  Last night, I made this card, it's inspired by Eileen but other than the inks, I think I have changed all the stencils and stamps to what I had in my stash... I call it going off piste!

Once again, because it's a paid workshop, I'm not going to go into details about the process, but have detailed the products I have used for my card below:

Ranger Archival Ink:  Chrome Yellow

Ranger Archival Ink:  Orange Blossom

Ranger Archival Ink:  Cornflower Blue

Ranger Archival Ink:  Vermillion

Versafine Clair Ink:  Nocturne

Derwent Inktense Pencils

Gel Pens:  White and Gold

Ranger Enamel Accents:  Black and White

Posca Pens:  Yellow and Orange

Clarity Stamps Stencil:  Stripes

Clarity Stamps Stencil:  Sunshine

Honey Doo Crafts stamp:  Lilies

Lavinia Stamps: Garden Poppy

Friday, 30 June 2023

Clarity Stamps "Deco Stencil" Birthday Card


A quick male birthday card from me today, using Clarity Stamp products. 

I masked off a piece of white card and then lay the Clarity Stamps "Deco" stencil over the top.  I masked off most of the stencil, so that only one line of the design was showing in the middle of the card.  I then used Versafine Clair "Medieval Blue" ink through the stencil.

I removed the deco stencil and then lay the Clarity "Stripes" stencil over the top.  I used a blending brush with "Shadow Grey" Archival Ink through the stencil.  Then removed the masking tape.

Using Versafine Clair "Medieval Blue" ink, I stamped the greeting, using Clairty "Happy Birthday Occasion Sentiment" stamp set.

Finally, at the tip of each of the deco areas I added a dot of white gel pen.  Then I added larger white dots using Ranger "Enamel Accents".

Saturday, 3 June 2023

Clarity Stamps "Kiss by Clarity Doodle Discs" Thank You Card


This morning, I have had more play with Clarity products making this thank you card. 

I started with a spray ink background I'd made some months ago using orange and yellow spray inks.

Using Versafine Clair "Medieval Blue" ink, I stamped the "Kiss by Clarity - Doodle Discs" in a row.

I then used "Bright Tangello" Archival Ink through the Clarity "Stripes" stencil.  I decided it needed something more, so used "Poppy" Archival Ink through areas of the Clarity "Orbit" stencil.

Finally I stamped the "Thank You", part of the Clarity "Entwined Sentiment stamp set" in Versafine Clair "Medieval Blue", I then inked the edges of the card in the same ink.

Wednesday, 26 April 2023

Clarity Stamp "Swallow Journaling" white space challenge card


Today, Wednesday 26th April, Eileen Godwin set a challenge of "Lots of white space".  This is the card that I made, using the same products as the ones I used yesterday. 

I used the Clarity Stamp "Stripes" stencil with "Prickly Pear" Archival Ink as the base layer, fading it out from the middle.

I then used the Clarity Stamp set called "Swallow Journaling" to stamp the text, using Versafine Clair "Verdant" light green ink and then the foliage in Versafine Clair "Shady Lane" mid green coloured ink.

I used a white Posca Pen to splatter across the card, adding a few dots of Ranger "Enamel Accents" too.

I deliberately left this free of a sentiment, as I thought this design could work well as an emergency card for several occasions.

Tuesday, 25 April 2023

Clarity Stamps "Swallow Journaling" Red, White and Blue Challenge Card


Yesterday, Eileen Godwin set a "Red, White and Blue" challenge. I've only just had an opportunity to make a card and this is it. 

I used the Clarity Stamps "Stripes" stencil with "Carnation Red" Archival Ink.  I then lifted the stencil, shifting it one line up (to cover the red), then applied "Cobalt" Archival ink through the stencil to get the multi coloured stripe look.

I used two stamps from the Clarity "Swallow Journaling" stamp set, stamped in first and second generation Versafine Clair "Twilight" ink.

I added dots of red Posca Pen and Ranger "White Enamel Accents", giving a touch of colour to the bird using Derwent Inktense pencils.

Tuesday, 4 April 2023

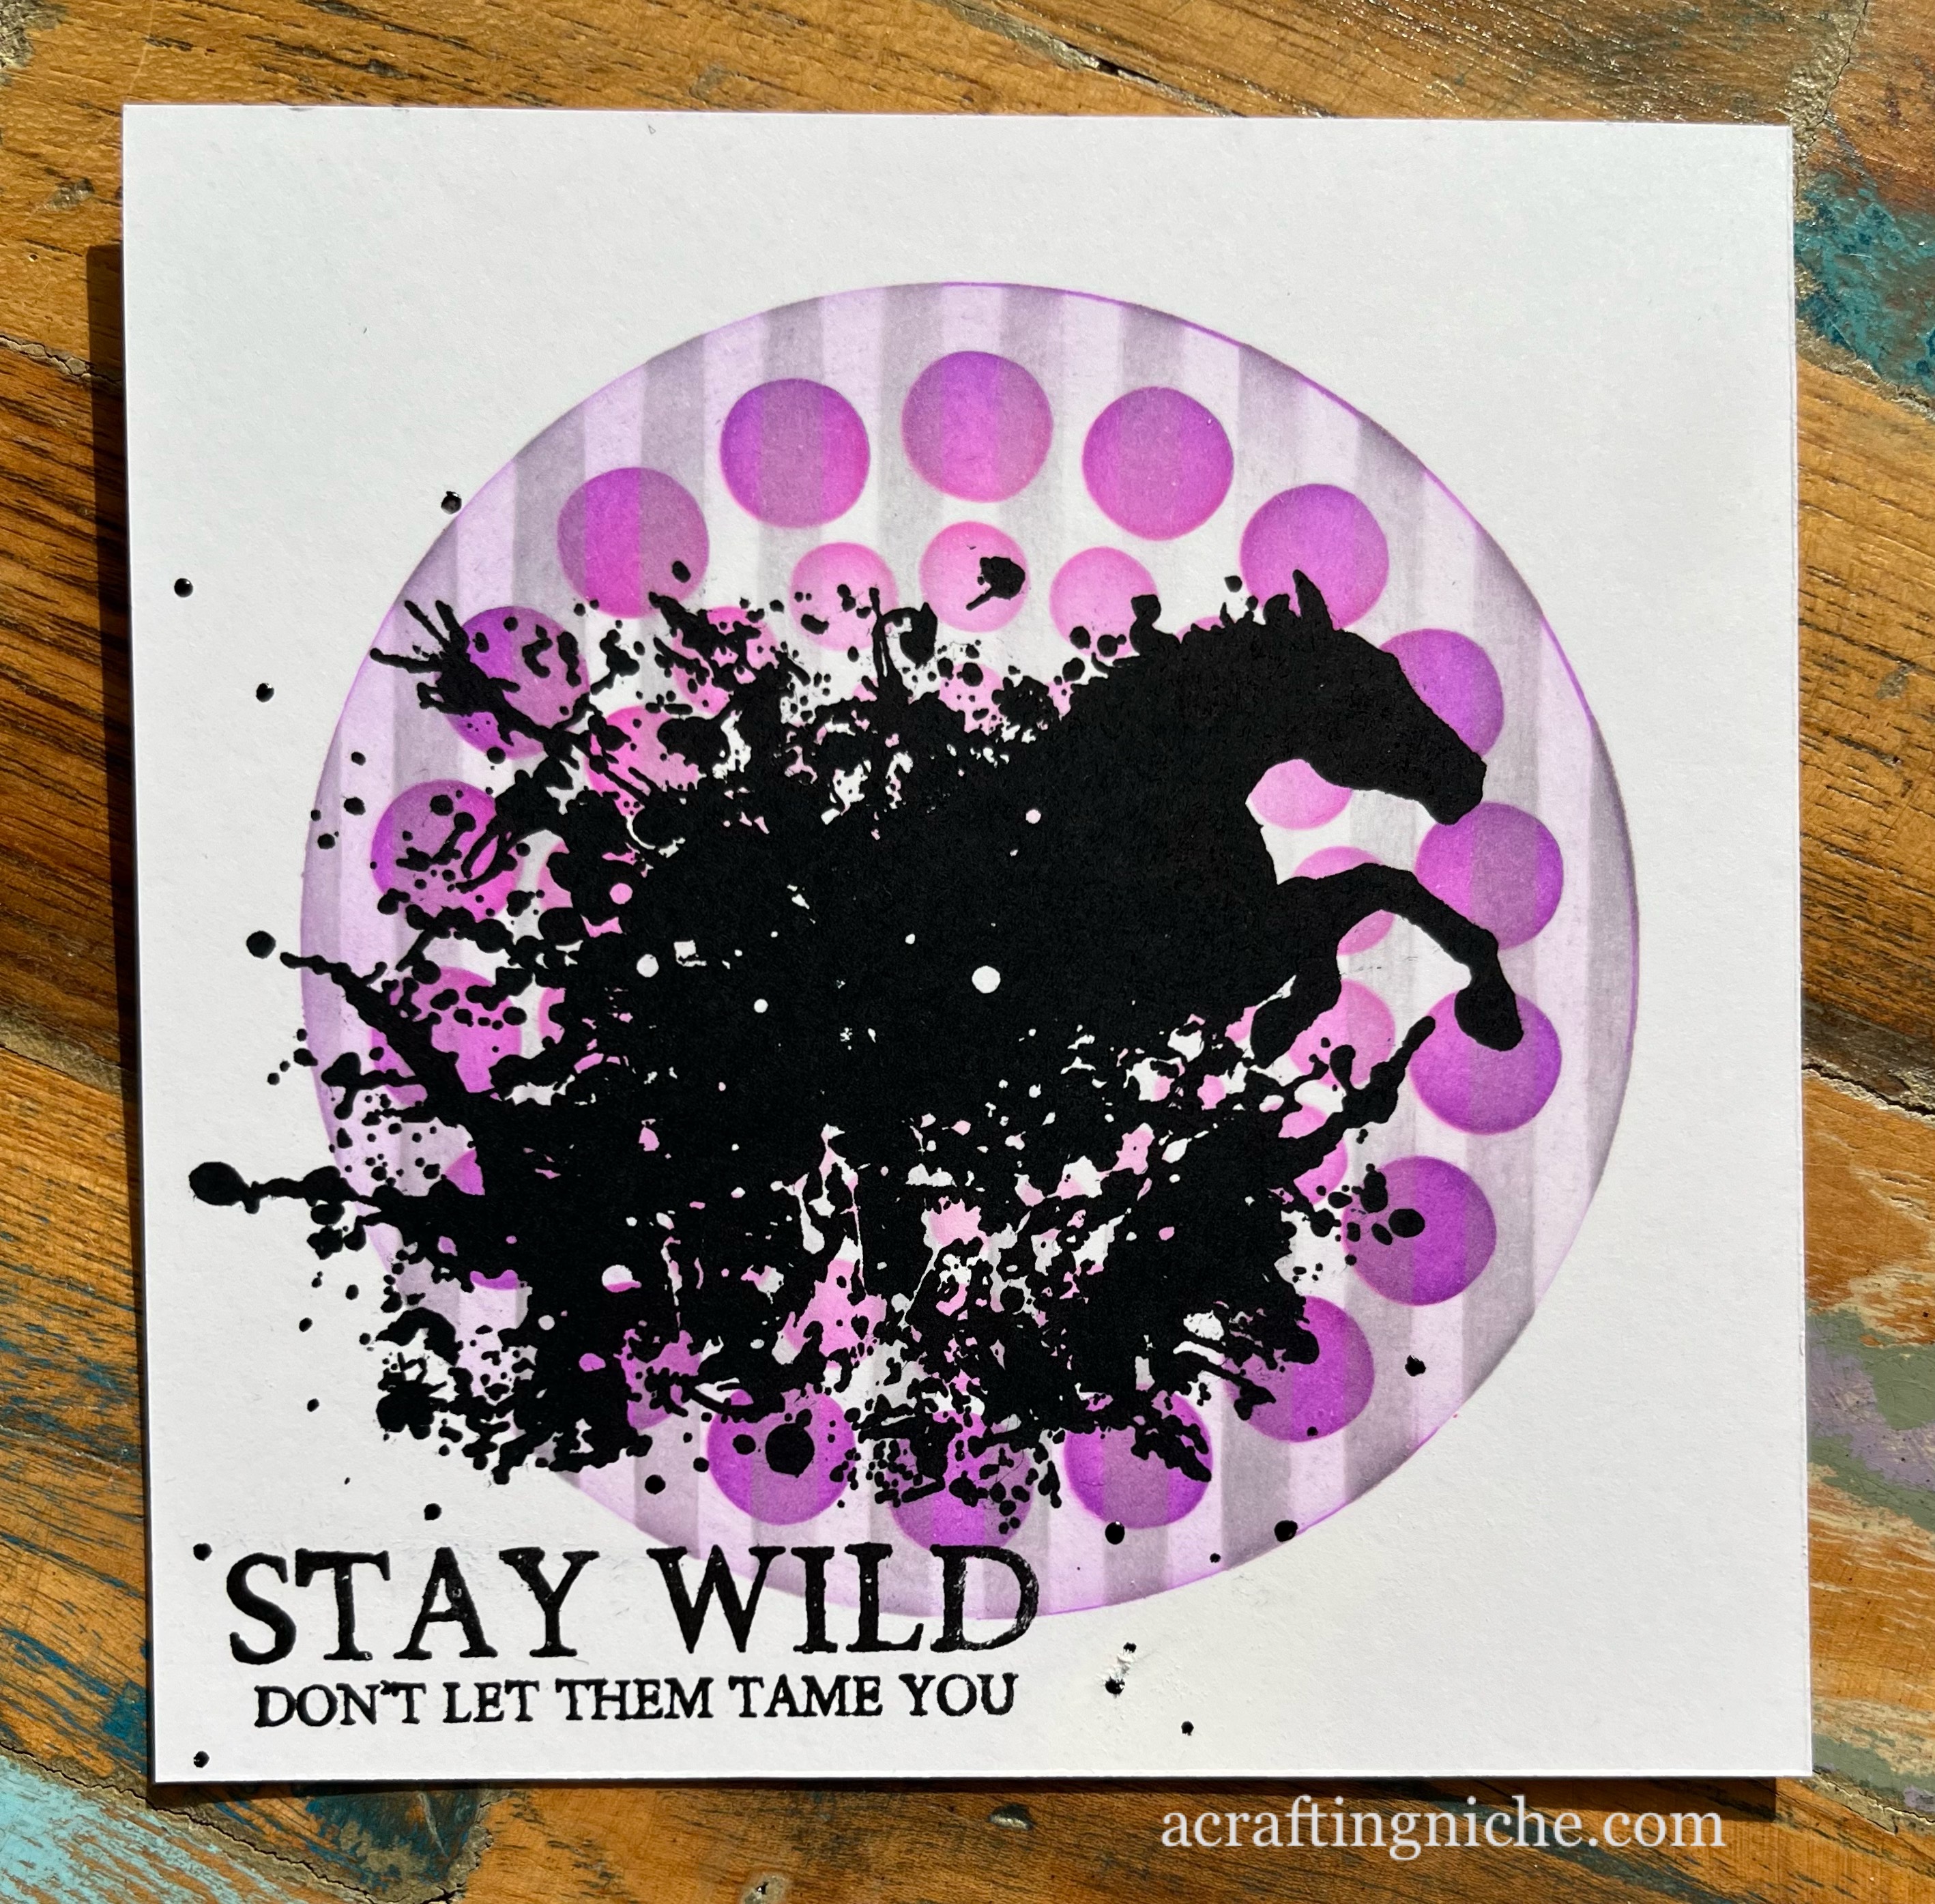
Visible Image "Stay Wild" challenge card


This morning on the Eileen Godwin facebook group, she set group members a challenge  saying "Make a card - start with a stencil or stencils and add a stamp or two..."

I used two Clarity Stamp stencils. Starting with the "Circle Dot Stencil" using three shades of pink Archival inks:  Pink Peony, Vibrant Fuchsia and Cactus Flower.  I then added a touch of Majestic Violet too.

Over the top of that, I used another Clarity Stamps stencil called "Stripes", applying "Shadow Grey" Archival Ink through the stencil but only around the edges of the circle.

After lifting the stencil, I decided I wanted a touch more colour to the edge of the circle, so used the brush I had applied the violet with to add a little more colour.

Using Versafine Clair "Nocturne" black ink, I stamped the horse and sentiment from the Visible Image "Stay Wild" stamp set.

I did manage to get a little smudge of ink on the white area around the card, so added a few spots of black "Enamel Accents" to cover it, which kind of tied in with the water splashes.