I made this little notelet by stamping the bird tile stamp, which is part of the Funky Fossil Designs "Folk Garden" stamp set. I stamped in Versafine Clair "Shady Lane", which is a mid green coloured ink. I then coated the stamped image with Wow! Clear Embossing Powder and then heat set.
I trimmed the stamped image so there was a white border, mounted it on to a piece of kraft card then on to a plain white card.
I tried something a bit different for me today, making this card.
I used a piece of black card, covering the surface with a chalk bag before stamping the Lavinia Stamps "Street Light" and "Luka" the cat in Versafine Clair "Nocturne" black ink. I then coated the stamped areas with Wow! Clear Gloss Embossing Powder and heat set.
You'll notice in the photo above, the black surface of the card has chalky residue, the reason for this is that it helps to stop the embossing powder to stick to areas you don't want it. The chalk will dust away afterwards.
I then used four shades of Pan Pastels: Titanium White, Hansa Yellow Tint, Orange and Black to create the light coming from the street light. I then set the Pan Pastel with a good spray of hair spray before adding some touches of white gel pen and black fine liner pen.
Rummaging through my file of backgrounds, I came across a small piece of card with Brusho paint on it, which I thought would lend itself well to a Christmas card. It was mainly red, with some touches of yellow and green on it.
I used Wow! Clear Embossing Ink with the Tracy Evans Boutique Designs "Mistletoe -TE19" stamp with Wow! Rich Gold Embossing Powder and heat set the mistletoe and the sentiment.
I mounted the piece on to dark red card and then on to a white card blank.
The Crafting Niche 52 Week Mini Art Card/Tag Challenge 2025:
This is a weekly challenge. I provide you with a prompt/theme each Sunday morning through out the year. The challenge is very relaxed. You can do as much or as little as you like. You can create cards, tags, Artist Trading Cards (ATC's) or index cards, the choice is yours. You just go with what ever is in your head at the time. You can stamp, get inky, use patterned papers, texture, embellish it is all down to you.
There is a dedicated private Facebook Group, with a lovely bunch of people who are already sharing their makes from previous challenges. You can find the group by clicking this link. I'd love you to join in.
The prompt for Week 10 is "Animal Print"
•••
For my Week 10 "Animal Print" tag, I started with a plain pink piece of card, stamping the Dark Room Door "Animal Print Background Stamp" in Versafine Clair "Nocturne" black ink.
I cut the piece of pink card to tag shape, then mounted it on to a piece of black card. Around the edges of the animal print pattern, I used a silver glitter gel pen, to make the pattern stand out a little more.
I dusted a small off cut of black card with an antistatic french chalk bag then stamped the "Stay Wild" sentiment using Wow! Clear Embossing Ink. (The stamp itself is from a Visible Image stamp set called '"Stay Wild"). I then coated the stamped greeting in Wow! Super Fine Silver Embossing Powder and heat set. I trimmed down the greeting, using double sided sticky tape to stick it on to the tag itself.
The Crafting Niche 52 Week Mini Art Card/Tag Challenge 2024:
This is a weekly challenge. I provide you with a prompt/theme each Sunday morning through out the year. The challenge is very relaxed. You can do as much or as little as you like. You can create cards, tags, Artist Trading Cards (ATC's) or index cards, the choice is yours. You just go with what ever is in your head at the time. You can stamp, get inky, use patterned papers, texture, embellish it is all down to you.
There is a dedicated private Facebook Group, with a lovely bunch of people who are already sharing their makes from previous challenges. You can find the group by clicking this link. I'd love you to join in.
The prompt for Week 38 is "Engineering/cogs"
***
For my Week 38 - "Engineering/cogs", I used a cream coloured tag for the base. Stamping the Funky Fossil Designs engine, part of their "Engine Room" stamp set in Versafine Clair "Acorn" brown ink. I then coated the ink with Wow! Clear Embossing Powder and heat set the image.
Next, I used Versafine Clair "Sand Dune" ink through the Funky Fossil "Mechanical" and "Micro Dots" stencils.
I then used Versafine Clair "Pine Cone" brown ink through the "In the air" stencil for the birds. I edged the tag in Versafine Clair "Chianti" dark red ink, using the same ink through the diamond section of the Funky Fossil "Make your mark III" stencil.
Finally, I used a Posca Pen to make black paint splatters across the surface of the tag and then mounted the tag on to a piece of co-ordinating card.
Here's a quick anniversary card I made this morning. I've used the Funky Fossil Designs "Heartfelt" background stamp and a sentiment from their "Stripped Back Sentiments" stamp set, using Wow! Silver super fine embossing powder, heat set. I've then used a banner die to cut the sentiment into shape.
Recently, Lavinia Stamps have released a new product called "Dinkles", they're a little similar to Brusho but are a fine powder, rather than being granular. Initially, I thought "I'm not going to buy these'! But of course I got sucked in and orderd the set. They have been sat on my craft desk for almost a week waiting to be used, so today was the day that I gave them a try.
I wasn't quite sure what I was going to do with the Dinkles or how I was going to use them, so decided I would spritz a piece of card with water (both sides so that it didn't curl), then poked holes into the lids of the Dinkles, like I did with the Brusho all those years ago and then gently tapped a little of the powder out. I used two colours "Amethyst" and "Magenta".
Initially, I put a very tiny bit of powder onto the spritzed surface, but knew I wanted a little more colour, so added another spritz of water then tapped a little more powder on. I then used my heat gun to dry the surface.
Once the card was dry, I ran an anti-static bag over the surface then stamped the Lavinia Stamps "Indian Flourish" feather on to the card. I quickly coated the stamped image with Wow! Silver Embossing Powder and heat set.
I cut the card down to an appropriate size and then added a stamped sentiment, using the Lavinia Stamps "Heartfelt Verse" stamp set in Versafine Clair "Charming Pink" ink.
I'm home again after a few days away. How I have missed my crafting!
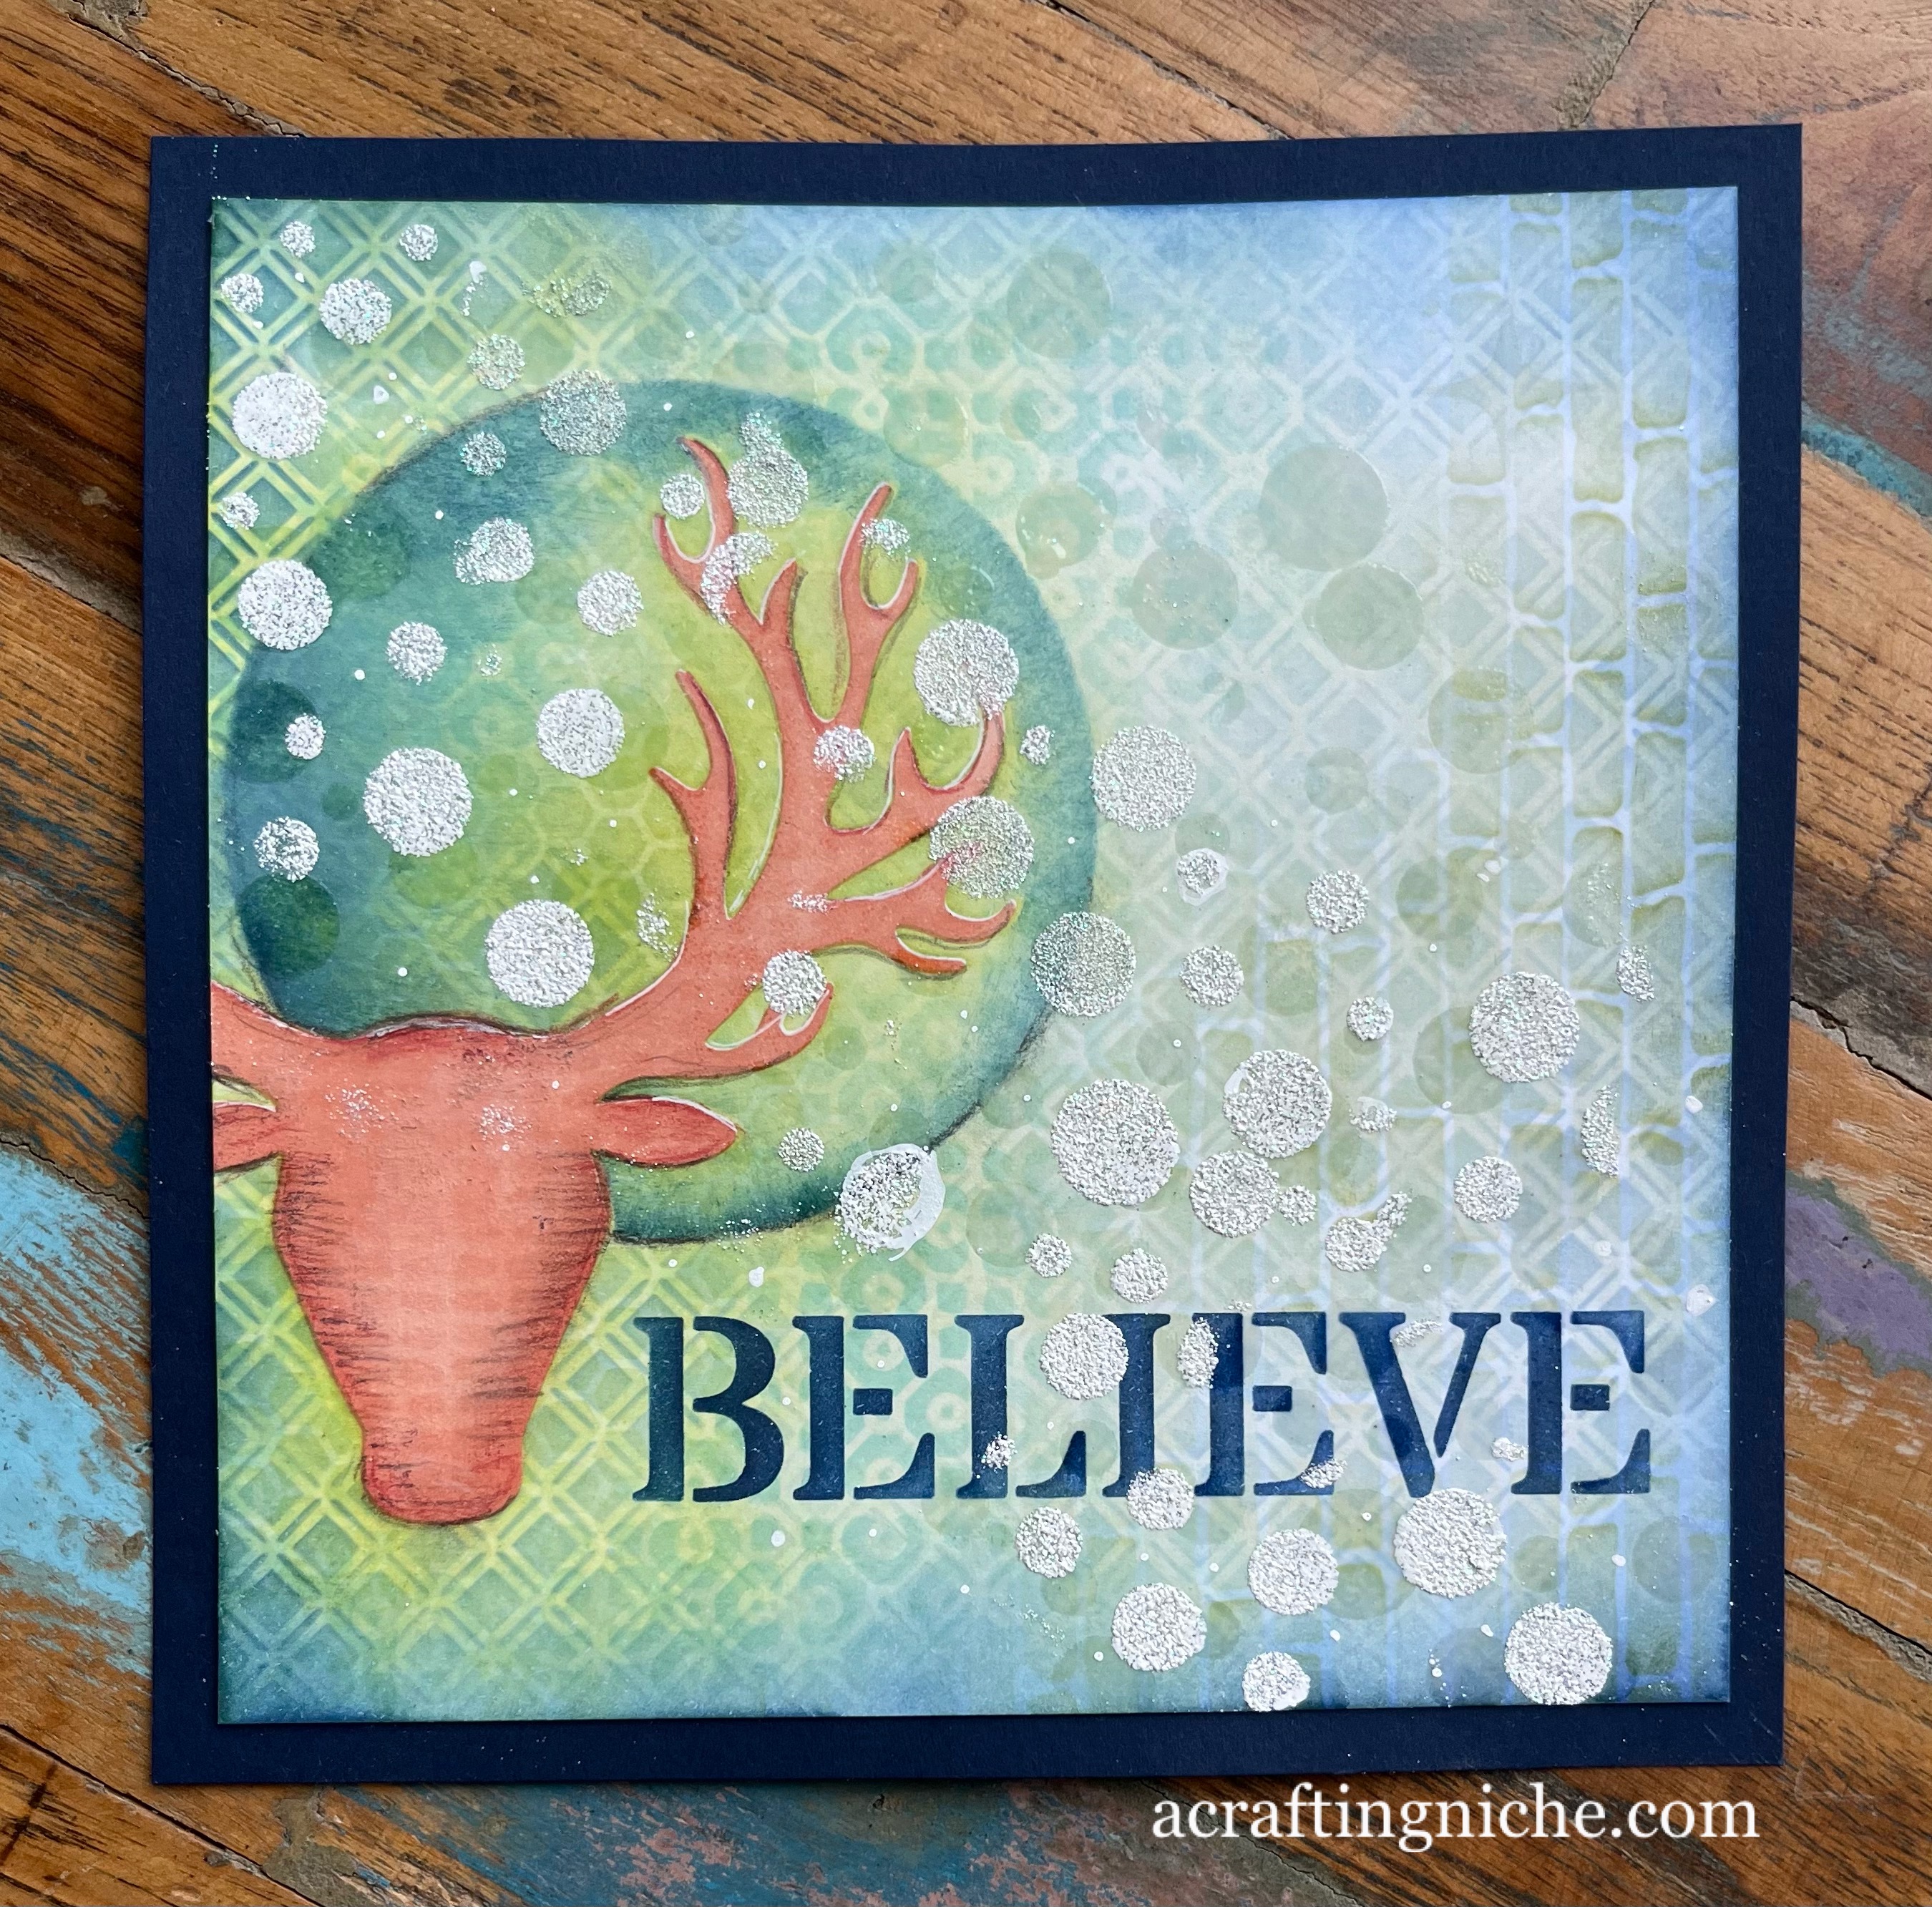
Yesterday, Monday 17th April, Eileen Godwin set a challenge of using only stencils to make a card. This is what I made. It is totally out of season, but actually quite nice to do something festive for a change.
I used a whole host of stencils by Lavinia Stamps along with Archival Inks and Wow! Embossing Powders.
I started the card by using the Lavinia "Stag" Sticker Stencil from set 4 using "Tea Rose" Archival ink go colour the stag head. I then used the same ink through the Lavinia "Cryptic" stencil.
I used "Prickly Pear" Archival Ink around the stag head, then used the same ink and some "Leaf Green" Archival Ink through the Lavinia "Honeycomb" stencil.
I then used "Sky Blue" Archival Ink through the Lavinia "Divine" stencil.
Next I applied "Fern Green" Archival ink through the Lavinia "Red Brick" stencil.
I moved on to "Cobalt" Archival Ink with the Lavinia "Moon Mask" to create the partially shaded moon in the background.
While I had the "Cobalt" ink out, I then used it through the the Lavinia "Faith" stencil to create the "Believe" word. Using "Cobalt" again to darken the edges of the card.
I used Wow! Embossing Ink and Wow! Clear Embossing Powder through the Lavinia "White Orbs" stencil from the top left to the bottom right and heat set.
Once the clear embossing was cool, I dusted the surface with an anti-static bag and used the same stencil with Wow! White Puff Twinkle Embossing Powder in the same area and heat set.
I added a few pencil details around the head of the stag using "Van Goch Pastel Pencils" to add some shadow to the head.
Here's a little video clip to share with you, in the hope you can see the embossing detail a little better.
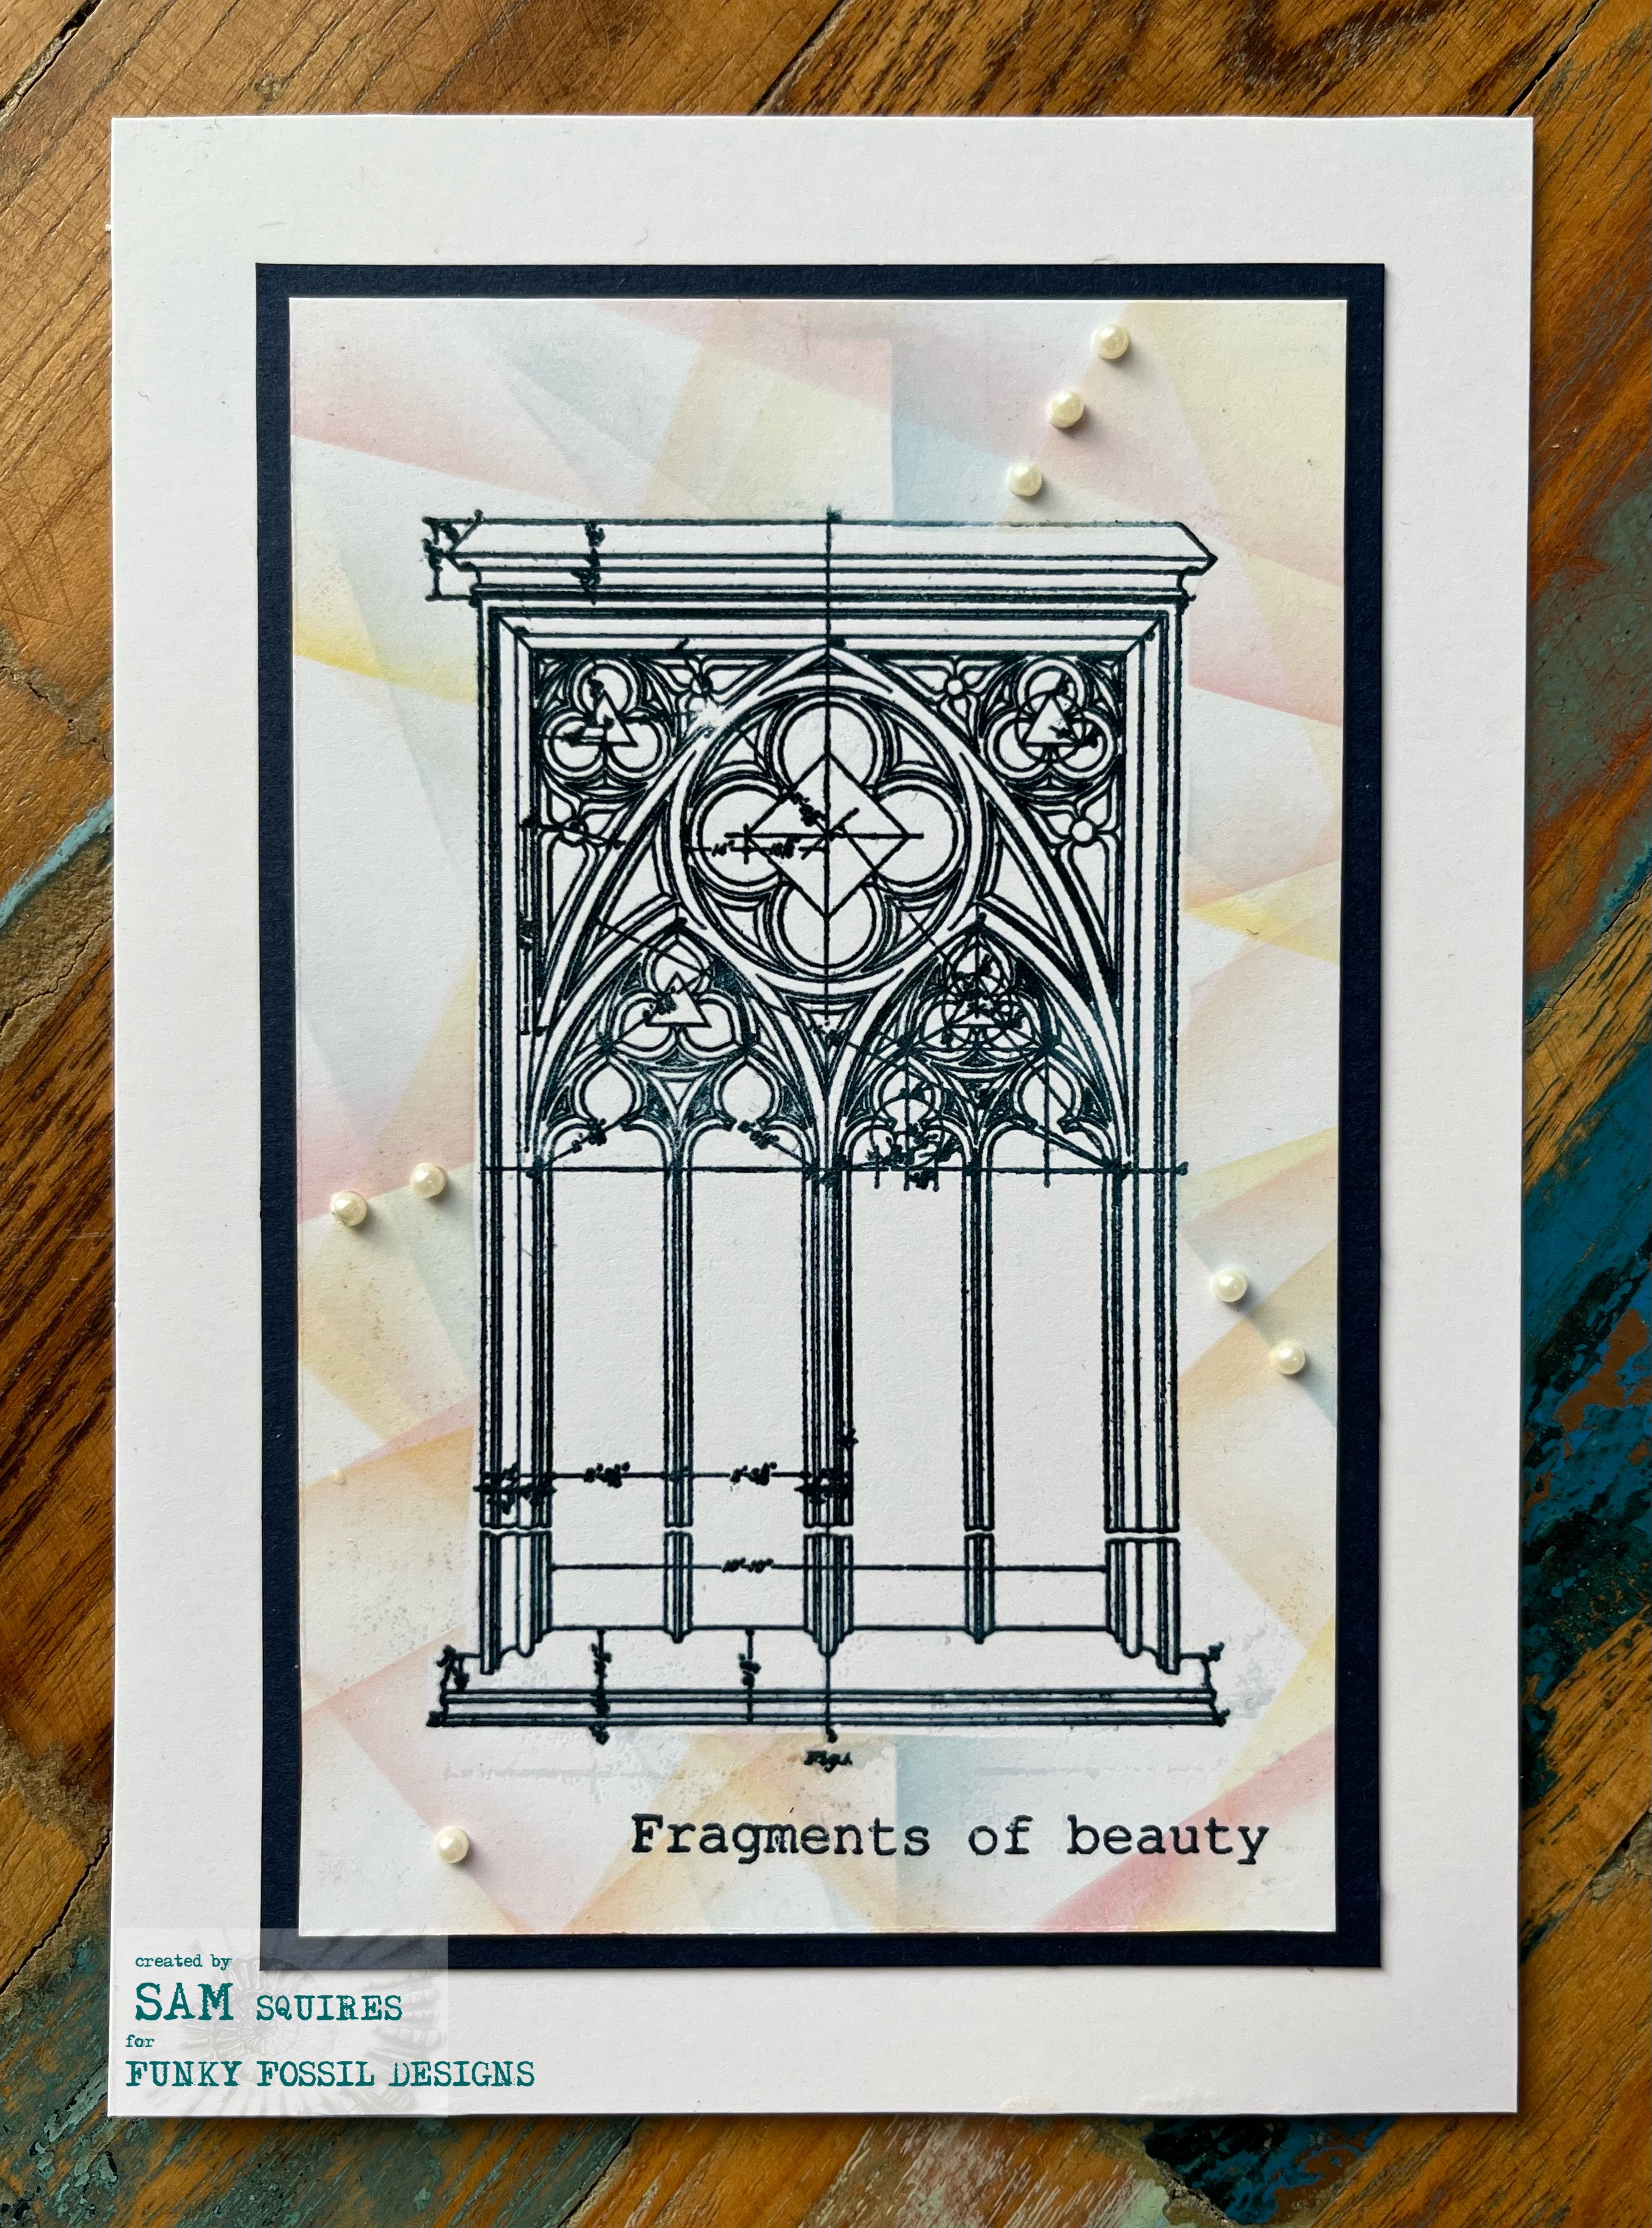
I was having trouble sleeping last night, so decided to get up and craft, making this card.
I used Versafine Clair "Twilight" dark blue ink to stamp the image, using Funky Fossil Designs "Architectural" stamp set, then used Wow! Clear Embossing Powder and heat set. Once dry and cooled, I used a mask to cover the stamped area and then used four shades of Archival Ink (Cornflower Blue, Orange Blossom, Red Geranium and Chrome Yellow) to create the patterned background, finally adding some sticky backed pearls.
Well I didn't tidy my desk away and after dinner, decided to use the Sweet Polly "Blissful" stencil again, this time heat embossing using Wow! Jealous Guy embossing powder.
I used the same embossing powder for the Waffle Flower "Happy Birthday" stamp from thier "Essential Sentiments" stamp set.
I have continued to play with heat embossing on and off today. Here's another card from the session.
It's a simple card using the Lavinia Stamps "Elegance" stencil with Wow! Embossing "Sea Mist" Embossing Powder which I've heat set. It has a lovely sheen.
I've used the "Heartfelt Verse" sentiment, staped in Versafine Clair "Morning Mist" grey ink.
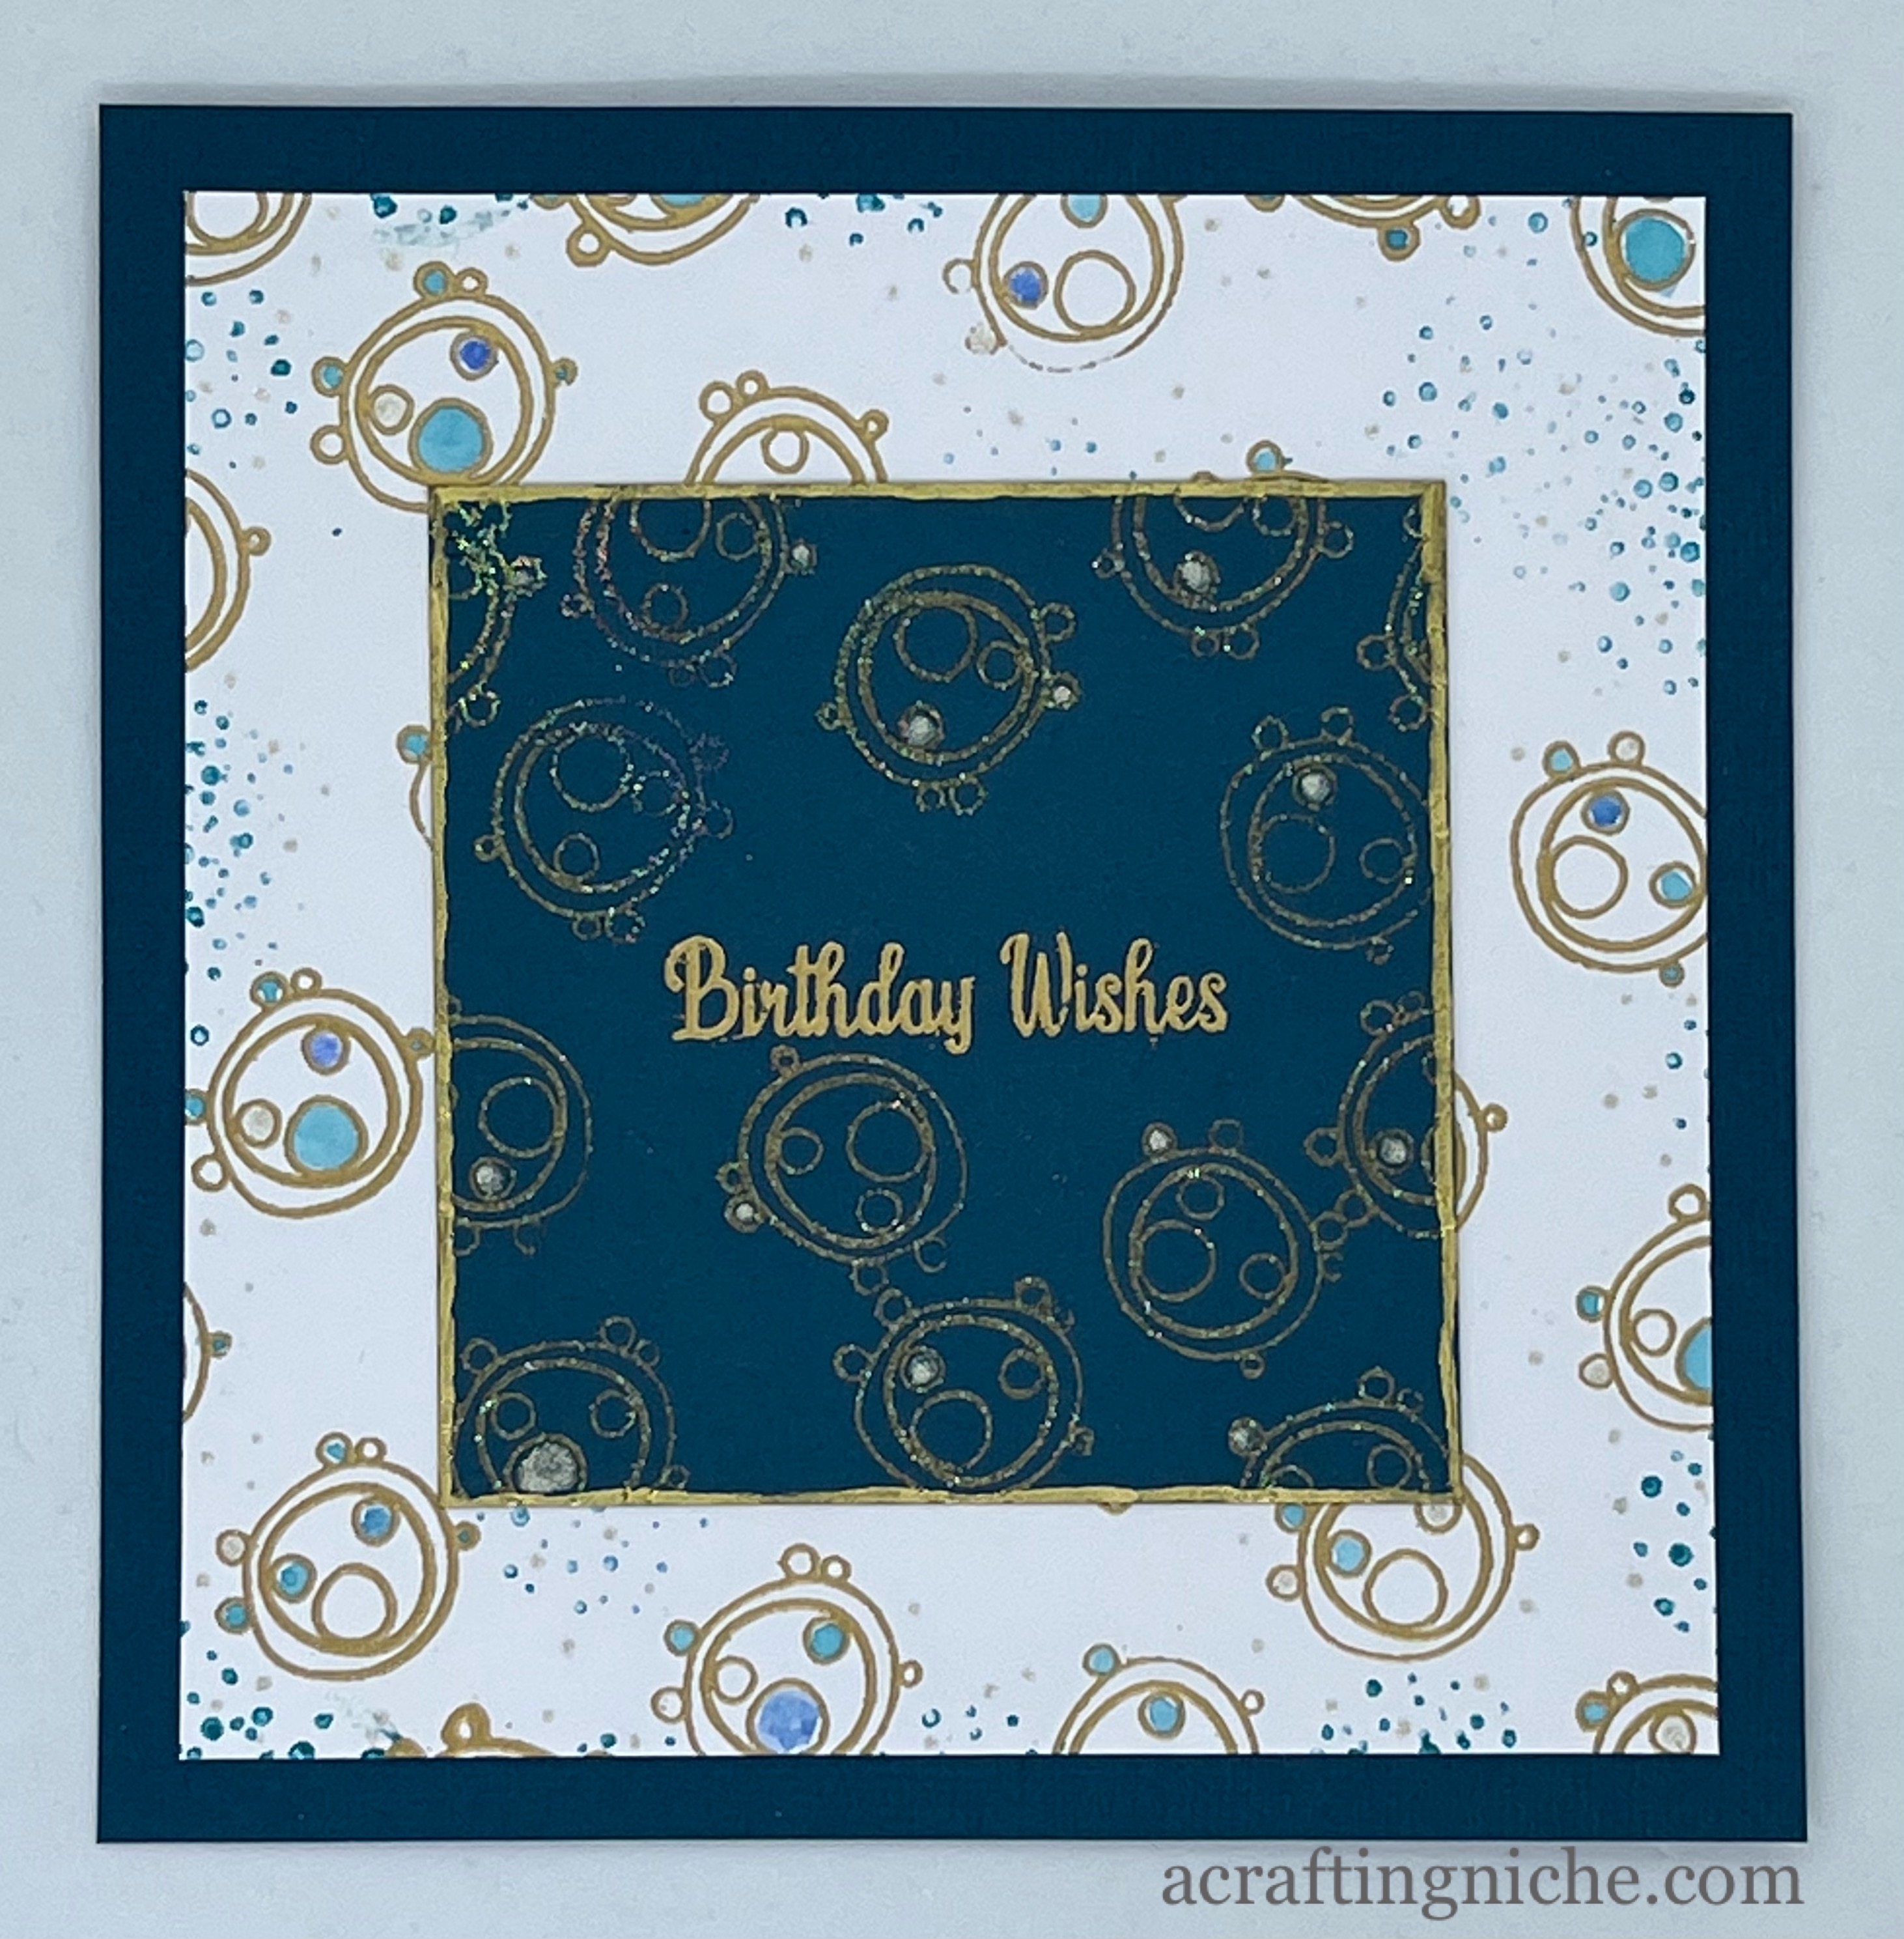
This morning, I have been heat embossing, creating this card.Unfortunately the sparkle doesn't really show very well in the photograph, so I took a little clip of it in the sunshine.
I've used three Lavinia Stamps for this card. "Heartfelf Verse" for the central sentiment. In the background I have used two Lavinia pound stamps, the "Mini Orbs" and the "Mini Dots".
I have used Wow! Embossin ink pad and "Rich Gold" embosing powder. I have also used a Papermania "Enchanted Gold" embossing powder, which gave a little sparkle to the central area of embossing on the blue section.
Sometimes, I find it nice to have a play without any agenda, no planning, just seeing what I end up with when I'm done. This is one of those makes.
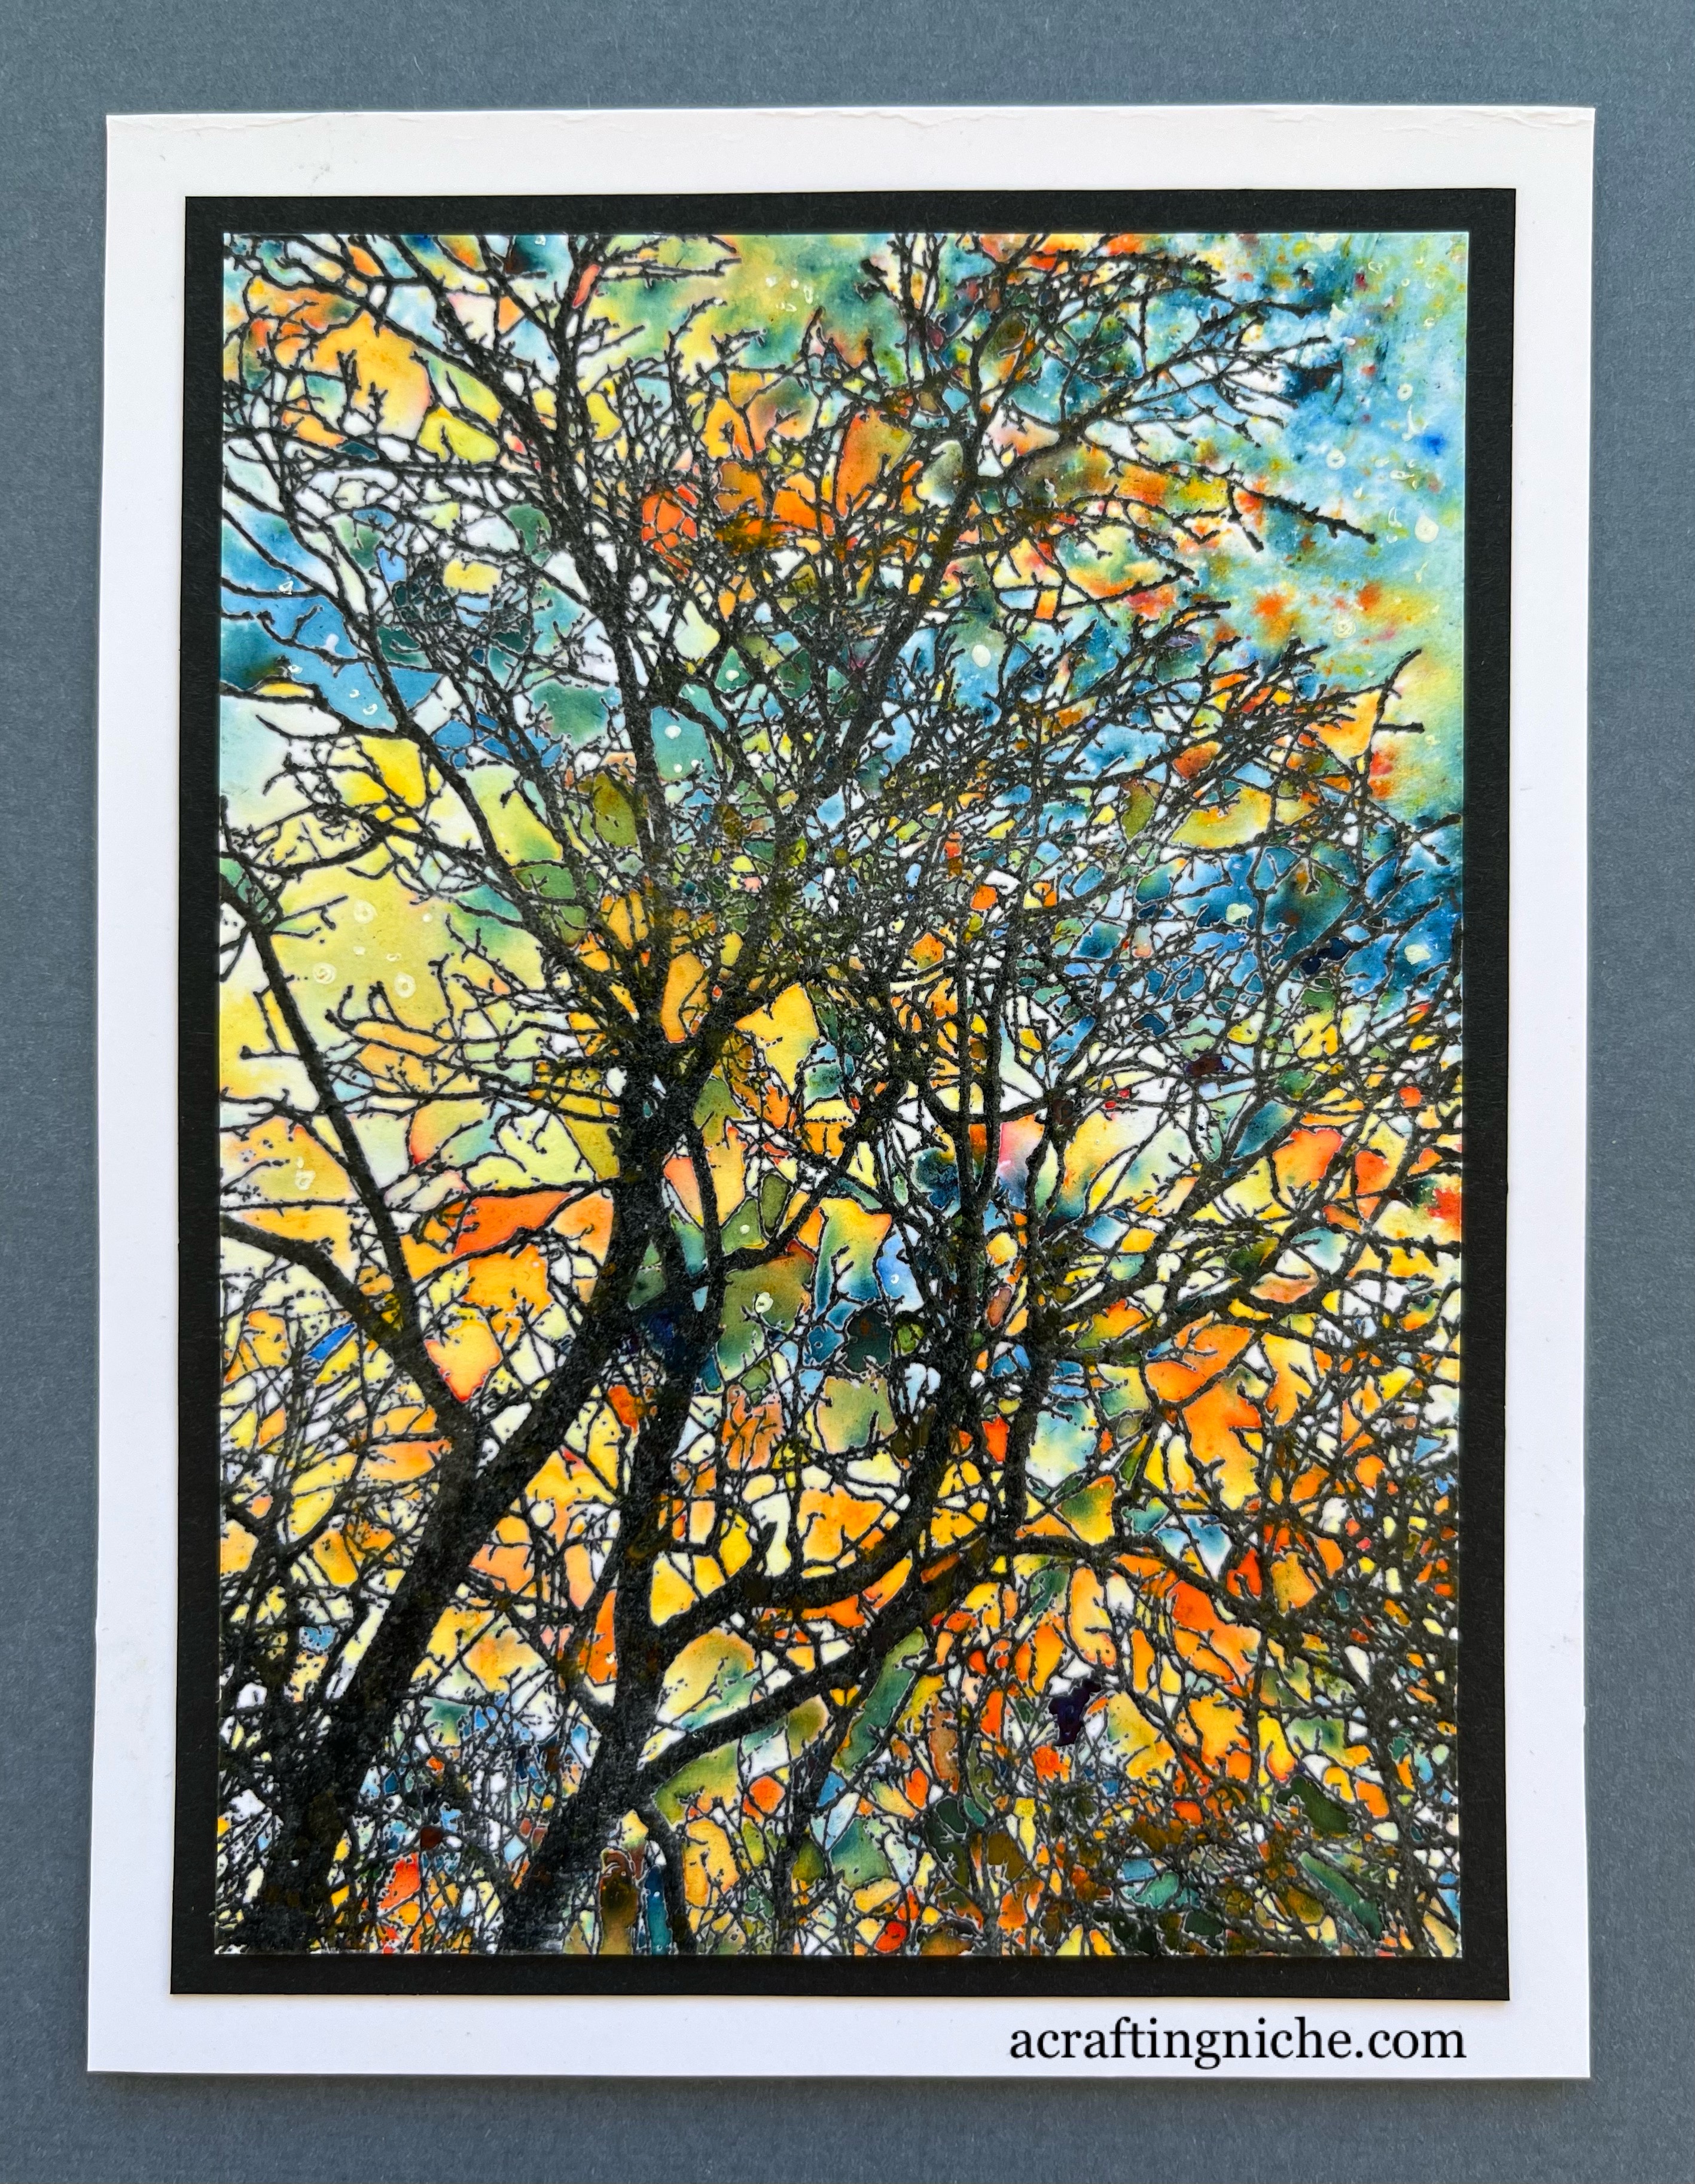
I had a quick Brusho play session, thowing colours down and seeing what I ended up with. Once dry, I really couldn't think how I could use it. But decided to stamp the tree, which is a Penny Black cling stamp called "Skyward 40-500" in Versafine Clair Nocturne, black ink. I then coated it in Wow! Clear Embossing Powder and heat set.
The more I look at this, the more it reminds me of a church window!
Yey, I've managed to get up to date, this is my Day 18 tag. I've used a Funky Fossil Designs "Snow is falling" stencil with Distress Oxide Inks (Stormy Sky, Chipped Sapphire and Villainous Potion).
I used the Funky Fossil "Elegant Ornaments" stamp set for the Christmas ornament and the sentiment, stamped in Wow! clear embossing ink and coated with Wow! Super fine metallic silver embossing powder and heat set.
I coloured the ornament using "Villainous Potion" Distress Oxide inks, applied with a paint brush.
A quick play this morning, finishing a card I started a few weeks ago, taking inspiration from a demo I saw by Jo Firth Young. Stamping in the half light I can see that the sentiment is a bit wonky, but hey ho, crafting isn't an exact process and these things happen. I wasn't going to ditch it after the work put in to create the background!
I've used PaperArtsy Fresco Finish paints in Snowflake, Carbbean Sea and Jade for the background colour.
The sentiment is a stamp by PaperArtsy JOFY - ref 107 (Jo Firth Young). I've stamped in Wow! Clear embossing ink and then coated in Wow! Rich Gold embossing powder and heat set. I have used a gold metallic pen for the drawn edge border.
Here's another sample using the brand new stamp set from Funky Fossil Designs called "Funky Fruit". This stamp set, along with other goodies will be available to purchase from the Funky Fossil web site from Friday 14th May 2021.
For this sample I stamped the sentiment (part of the new Funky Fruit stamp set) in Versafine Clair "Nocturne" black ink and then sprinkled Wow! clear embossing powder on to the wet ink and heat set.
I then stamped the fruit, masking some. I stamped in various shades of Versafine Clair inks. I coloured the fruit using assorted shades of Distress Oxide Inks, applied with a brush. Finally, I added small orange dots to the background area in between the fruit using a fine point Posca Pen.
I've made a quick birthday card today using a four shades of Distress Oxide Inks (Tumbled Glass, Shabby Shutters, Speckled Egg and Iced Spruce), through a Funky Fossil Stencil called "Broken Mosaic".
I rubbed over the image with an anti-static bag then positioned the "Happy Birthday" stamps, which are part of a Hobby Art Ltd set called "Greetings for friends - CS158D", stamped in Wow! Clear Embossing Ink and then coated with Wow! Metallic Gold Super Fine embossing powder. I then heat set the sentiment.
This is my Day 20 tag. Today the prompt was using acrylic paint on a gel plate and take a patterned impression.
I used Paperartsy Opaque Chalk Acrylics and made several backgrounds for future use. Some using a stencil, some with bubble wrap.
For this tag, I used two shades of paint Cribbean Sea and Elephant, applied to the gel plate with a brayer.
I lay Funky Fossil "Snow Flurry" stencil over the top of the gel plate and applied a little pressure. I then lifted the stencil swapping it for a piece of white card, smoothing the card over the gel plate, applying a little pressure. I then lifted the card, resulting in the tag on the top right hand side in the photo above. I washed the stencil, gel plate and brayer immediately before the paint was fully dry.
Using Versafine Clair "Twilight" dark blue ink, I stamped the snowflakes.
I used an anti-static bag across the surface of the tag then stamped the "Fa La La" sentiment (part of the Funky Fossil stampe set by the same name), in Wow! clear embossing powder.
I then covered the stamped area with Wow! Metallic Gold Super Fine embossing powder and heat set.
Using a metallic gold pen, I added an edged border to the tag and little highlights to the snowflakes.
A few days ago, you may recall I had a session of playing with Brusho, creating a few backgrounds. One of them that I made set an idea off in my head, so today I decided to put it on a tag. This was the Brusho session and for this tag, i've used the central horitontal tag.
Using Versafine Clair "Glamorous" pink ink, I stamped the Lavinia Stamps "Christmas Words" over the Brusho background colour.
Next, using Versafine Clair "Nocturne" ink, I stamped the "Mary" silhouetted figures. I created the hils using a torn edge of copy paper with "Morning Mist" Versafine Clair grey ink and grounded the figures.
I used a star stamp which is part of a Visible Image set called "Peace, Love and Hope", stamped in Wow! clear embossing ink and then coated with Wow! Metallic Gold Rich Pale super fine embossing powder, then heat set.
Using some low tack masking tape and Hero Hues "Unicorn" white ink, I created the rays coming from the star.
This is my Day 9 tag for the Karen Telfer 24 Days of Tags Challenge.
I've used Tumbled Glass and Stormy Sky Distress Oxide Inks for the colour on the background. I stamped the Lavinia Stamps "Floral Wreath" stamp in Wow! Clear Embossing Ink and then coated the stamped image with Wow! Metallic Rich Gold embossing powder and heat set the image.
Using Versafine Clair "Paradise" blue ink, I stamped the "Spirit of Christmas" verse all the way down the tag in second generation stamping.
Using a white Posca Pen, I coloured in areas not covered with the gold embossing powder. I dragged a dry brush over the tag with a small amount of white acrylic paint to lighten areas and then finally using one of the Lavinia pound star stamps, stamped the star images in Versafine Clair "Twilight" ink.
Finally, over the areas where I had lightened the berries with the Posca Pen, I added some sparkly Stickles.