52 Week Mini Art Card/Tag Challenge

Sunday 31 December 2023

52 Week Mini Art Card/Tag Challenge 2024 - Week 1


Hi, how are you doing?  Ready to see the end of 2023 and looking forward to 2024?

The way the dates have fallen, I decided to make today the start of the "52 Week Mini Art Card/Tag Challenge" for 2024.

The challenge for 2024 is weekly.  I will provide you with a prompt/theme each Sunday morning through out the year.  The challenge is very relaxed.  You can do as much or as little as you like.  You can create cards, tags, Artist Trading Cards (ATC's) or index cards, the choice is yours. You just go with what ever is in your head at the time.  You can stamp, get inky, use patterned papers, texture, embellish it is all down to you.

There is a dedicated private Facebook Group, with a lovely bunch of people who are already sharing their makes from previous challenges.  You can find the group by clicking this link.  I'd love you to join in.

The Crafting Niche 52 Week Mini Art Card/Tag Challenge 2024:

The prompt for Week 1 is "Do more of.... in '24"!

I know some of us like to make resolutions, but sometimes we disappoint ourselves if we don't keep to it, so instead I thought this was a more gentle approach.

***

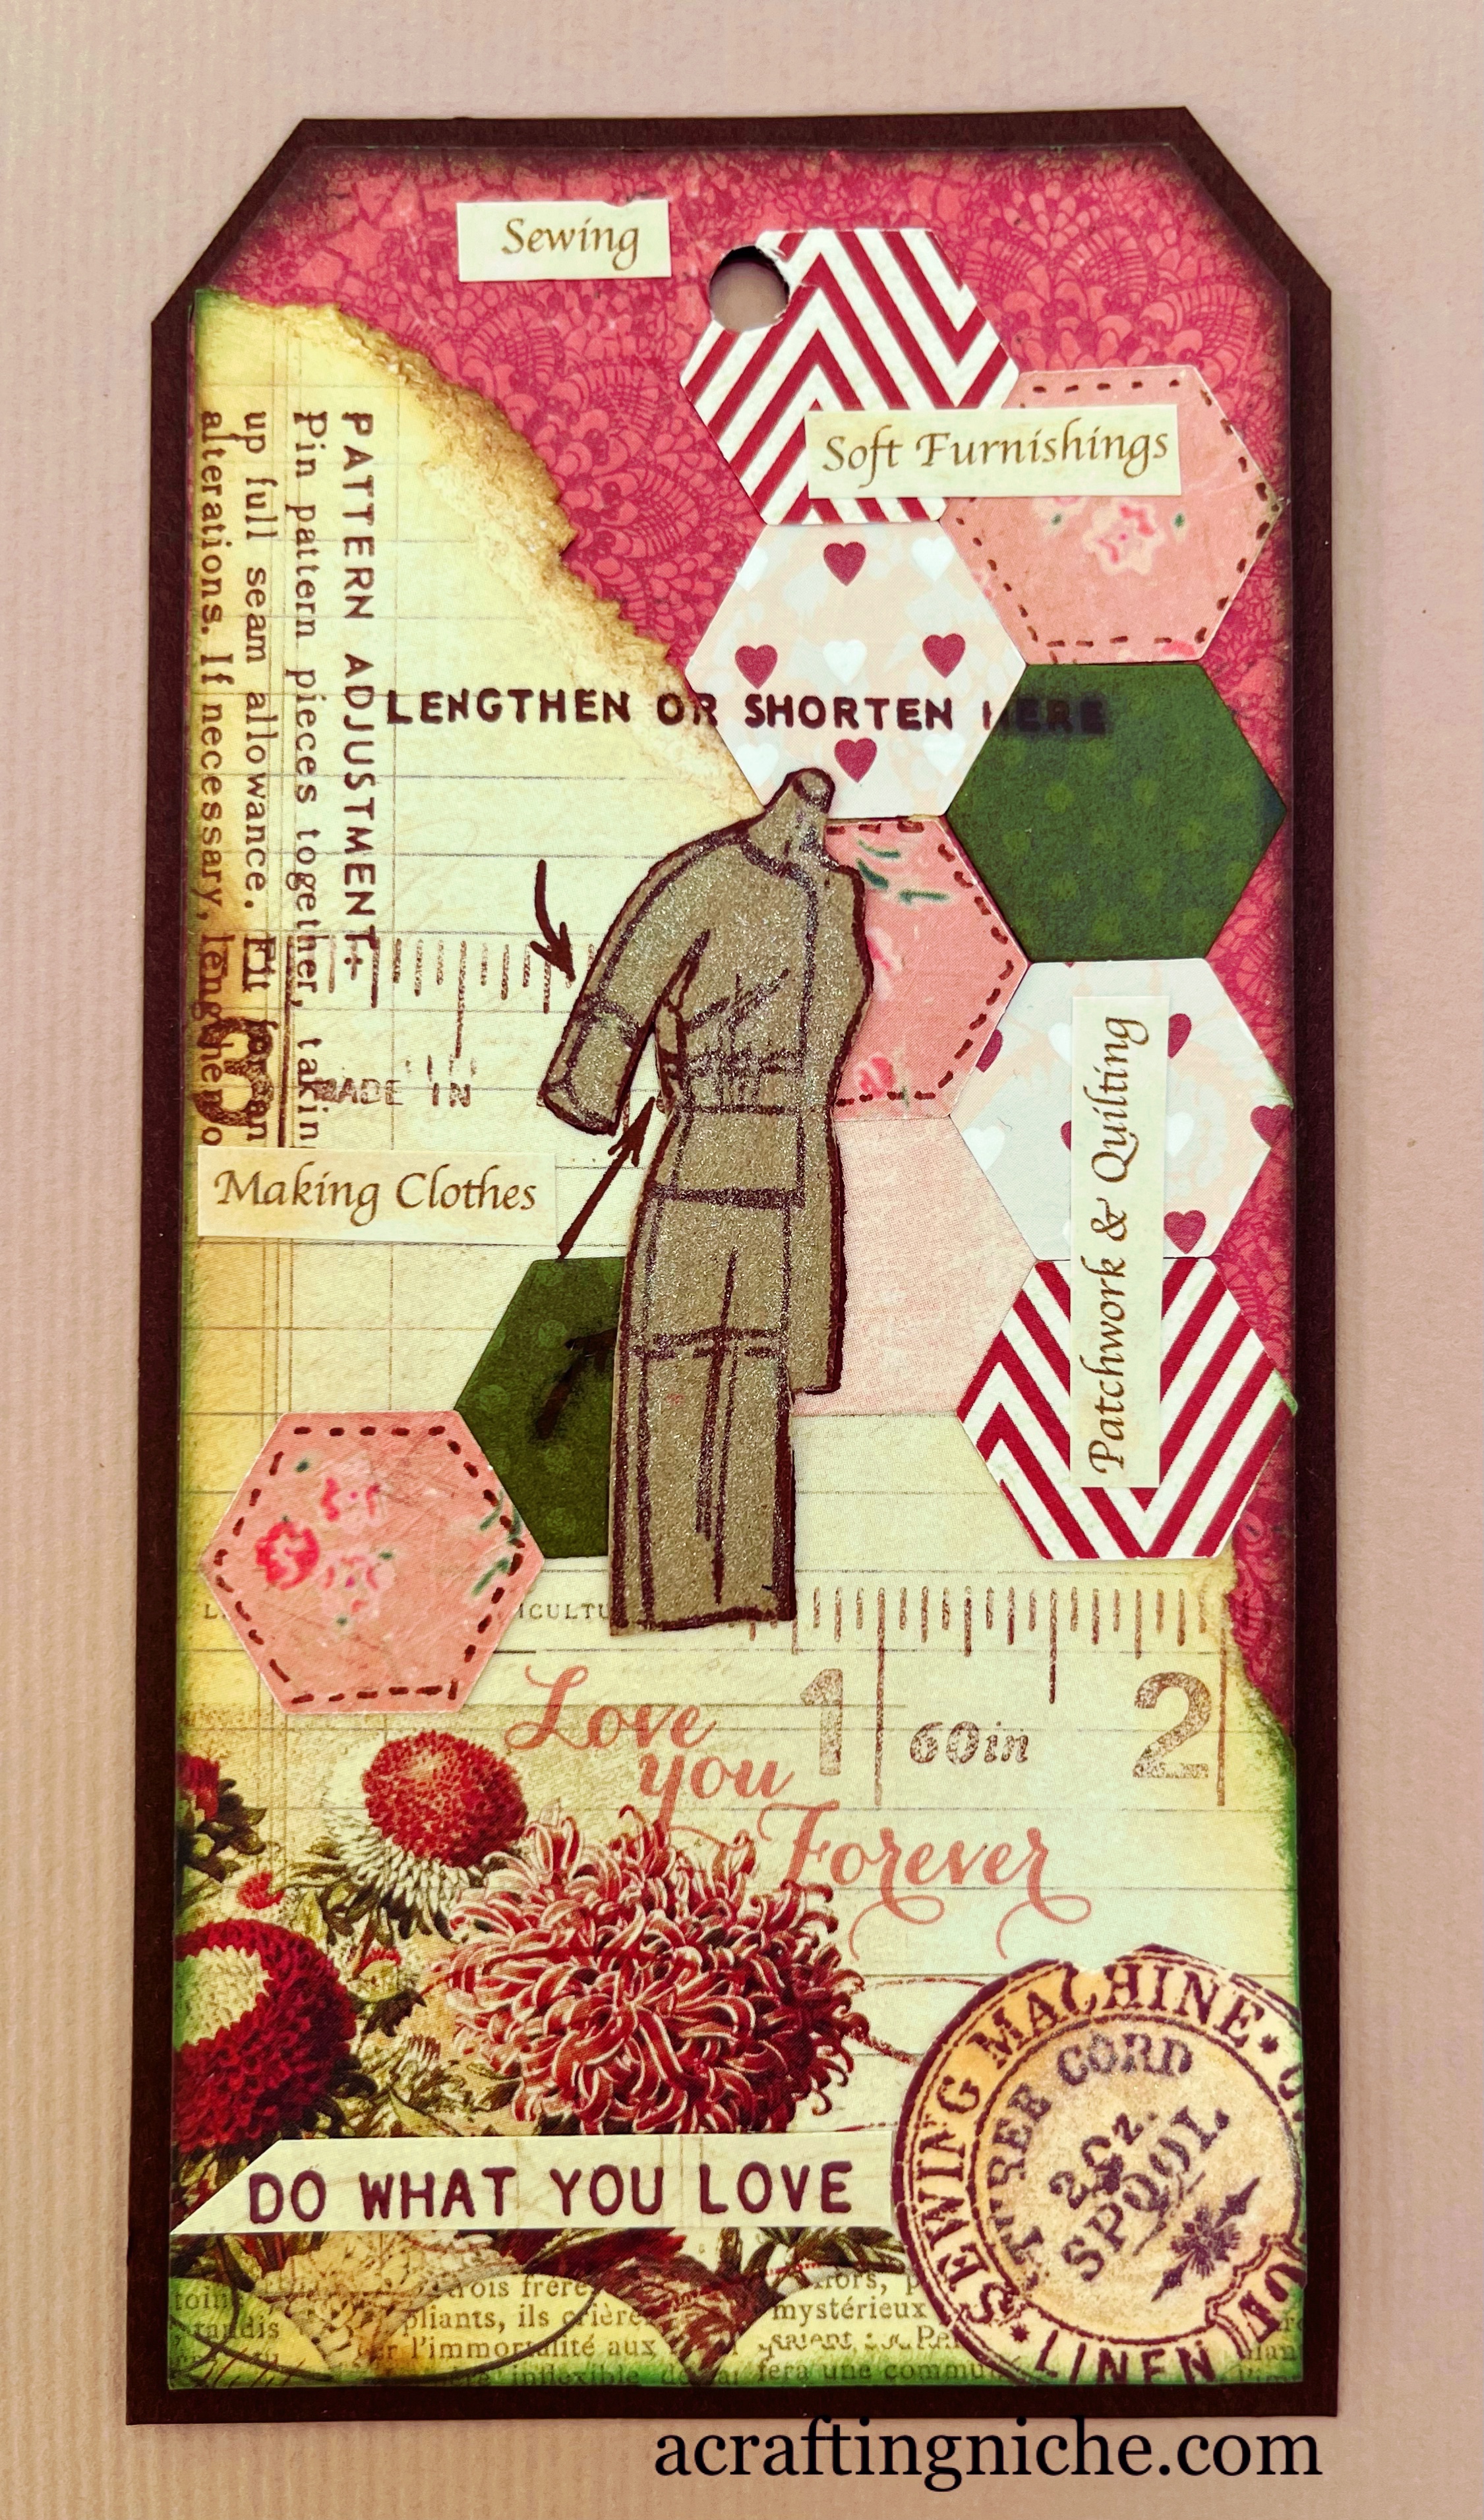
The thing that I would like to do more of in 2024 is "Sewing".  I like sewing, be it clothes, soft furnishings or patchwork & quilting and for some reason I always push away from it.  I have lots of patterns and fabrics ready to use, so this is my little nudge to do more of what I enjoy... sewing.

I started off with a standard size tag measuring 8x16cm, mine are in a manila/cream colour.

I had been rummaging through my off cuts of scrapbook patterned papers. I came across a section of a My Minds Eye patterned paper, which had flowers, a cream background with alined design and the words "Love you forever".  I decided this was the paper and colour scheme that I would work around, gathering papers together that I felt would work well together.

I stuck a dark patterned red/deep pink patterned paper on to the tag to cover it (the paper is what you can see in the top right hand side.

I then tore the edge of the My Minds Eye paper so that the tear would sit diagonally from top left to bottom right.  I inked the torn edge with "Vintage Photo" Distress Oxide ink and then stuck it in position on the tag using a wet glue.

In my stamping stash, I found a stamp with a bit of a tape measure or ruler on it (I don't recall who made the stamp as I have had it for years).  I stamped this in a couple of areas in second generation stamping, so that it was there, but not overly obvious using Versafine Clair "Acorn" brown ink.

As one of my sewing loves is patchwork and quilting, I used a Julie Hicky "Layers, Frames, Banners and Hexagon" die set to cut small hexagons in various patterned papers with a small design.  I stuck those into position too then on three added tiny stitch detail using a fine point pen.

I then moved on to stamping.  I used the Stampers Anonymous "Haberdashery - CMS105" cling stamp set to stamp the label of a cotton reel on to a piece of white card, I used Versafine Clair "Chianti" red ink.  I then coloured it with Distress Oxide "Vintage Photo" ink and fussy cut, sticking it on the bottom right hand corner.

I used the same stamp set to stamp the "Lengthen or Shorten" pattern diagram, and the "Pattern Adjustment" text which I stamped vertically,  using Versafine Clair "Acorn" ink.  I stamped the pattern diagram out again on a piece of kraft card, fussy cut it and glued it into position over the original one.  I then gave it a few brush strokes of "A Wink of Stella", to give a lovely subtle golden shimmer.

I used the Stampers Anonymous "Tiny Text - CMS394" cling stamp with Versafine Clair "Acorn" brown ink to stamp the words "Do What You Love", which I thought was quite apt.  I glued it into position at the base of the text.

I inked the edges of the tag using Versafine Clair "Acorn" brown ink then mounted the tag on to dark brown card.

Finally, using the computer I typed the word "Sewing", Soft Furnishings, Making Clothes and Patchwork and Quilting and printed the page off.  I covered the text with "Vintage Photo" Distress Oxide Ink, then cut to size and glued into position on the tag.


Saturday 16 December 2023

Stampers Anonymous festive tag


I felt the urge to use my Tim Holtz / Stampers Anonymous stamps, so made this gift tag. 

Starting with a cream coloured tag I used Versafine Clair "Pinecone" dark brown ink to stamp the pine cone branches which is part of the Tim Holtz / Stampers Anonymous stamp set called "Forest Floor CMS422. Then using Versafine Clair "Chianti" dark red ink, I stamped the berries which is from the same stamp set.

I used "Library Green" Ranger Archvial Ink through the Tim Holtz / Stampers Anonymous "Gingham Layering Stencil - THS134".

I then used "Plum" Ranger Archival Ink through the Tim Holtz / Stampers Anonymous "Flourish Layering Stencil. - THS032"

I stamped the sentiment, part of the Tim Holtz / Stampers Anonymous "Cozy Christmas - CMS444" stamp set using Versafine Clair "Chianti" dark red ink.

I used a red Posca Pen and a white gel pen to colour the berries.  I used Derwent Inktense pencils to colour the fir cones then edged some of the cones using a gold shimmer gel pen.

I edged the tag using "Ground Espresso" Distress Oxide Ink and then mounted it on to a piece of red card. Drawing around the tag itself with a gold shimmer gel pen.


Thursday 14 December 2023

Canal/Folk Art three hand painted flowers on a wooden disc


More play using some of the techniques learnt at the Canal Art & Signwriting Masterclass I recently attended.

I've used the paints I had in my stash, so I painted the twelve inch wooden disc using some Frenchic paint I'd used on a previous furniture project..

Once dry, I used Tim Holtz Distress Paints, Acrylic Paint and PaperArtsy chalk paints.

I'm still learning, but I feel I'm starting to get to grips with this style of art.

Canal / Folk Art hand painted card


You may recall, earlier in the month I went on a Canal Art / Signwriting Masterclass.  Since then I have had a little practice with the techniques I learnt, using the paint supplies I have in my craft stash.

This morning I couldn't sleep, so decided to get up and have a painting session making this card.  It is a far cry from Canal Art, I think I'd call it more "Folk Art Style".  I have a lot more practicing to do to get the brush to work in my favour, but I enjoyed the calming process of painting.

I used a selection of paints I already had, some with more success than others.  I mainly used Tim Holtz Distress Paints with some Paperartst chalk paints (which were less of a success, the white isn't solid enough, but lesson learnt).

For the sentiment, I used a stamp from a Lavinia Stamps set called "Heartfelt Verse" stamped in Versafine Clair "Glamorous" pink ink.

Sunday 10 December 2023

Daisy B "Dapper Gent" Birthday Card


Here's a card I made for a male friend.  I'm not happy with it for a couple of reasons, but maybe that is me being a bit picky - One of them being the sentiment isn't quite central, no idea how I managed that!  I doubt very much that he will notice.  My Hubby didn't when I showed him.

For the male image, I used a stamp by Daisy B called "Dapper Gent" stamped in Versafine Clair "Morning Mist" grey ink then coated with Wow! clear embossing powder and heat set. I then stamped the image again on a piece of paper, fussy cut it and used it as a mask for the stamped area, while I worked on the background.

With the mask in position I used "Chrome Yellow"  Archival Ink through the Visible Image "Strobes" stencil.

I then used "Shadow Grey" Archival Ink through the Visible Image "Halftone" stencil.

Next I used "Orange Blossom" Archival Ink throguh the Tim Holtz / Stampers Anonymous "Chevron Shifter Layering Stencil - THS127".

Then I used "Cobalt" dark blue Archival Ink with the Tim Holtz / Stampers Anonymous "Grime - THS130" stencil, edging the card with the same colour.

Removing the mask, I coloured in the stamped area of the male, using a paint brush to apply "Tattered Rose" Distress Oxide Ink for the skin and "Faded Jeans" Dsitress Oxide Ink for the clothing.

I used a silver glitter gel pen to go over the outline of the male and also added some dots of sparkle to the background too.  I then mounted the card on to a 7x7" card blank

I used Versafine Clair "Twilight" dark blue ink to stamp the sentiment, which is part of the Daisy B stamp set called "Men Sentiments".


Saturday 9 December 2023

Lavina Stamps "Robin" card


I came across a tag I had made last year, which was inspired by a tutorial by Emma-Jo of Lavinia Stamps, so decided to make a card loosely based on that.


I masked off the edges of the card using a low tack tape, then used five shades of Elements Inks for the background colours:  Sundance, Confetti, Violet Chalk, Della Blue and Dark Denim.


I used the "Dark Denim" Elements Ink through the Lavinia Stamps "Ivy Stencil. Then splattered water droplets from a fan shaped paint brush to give a more textured background. I blotted then wafted my heat gun over the surface to ensure it was dry before stamping.


Retaining the masked edges, I stamped the Lavinia Stamps "Fern Branches" off the edge of the card using Versfine Clair "Nocturne" black ink.

Using Versafine Clair "Warm Breeze" ink, I stmaped the Lavinia Stamps "Holly" leaves around the base of the card.

I then used Versafine Clair "Pinecone" dark brown ink to stamp the birds, which are part of the Lavinia Stamps "Bird Collection set", adding red Posca Pen to the breast area.

I used a white Unibal Signo Pen to draw on the snow on the branches,  A gold shimmer gel pen around the holly leaves.  A red Posca Pen for the holly berries and a yellow sparkle Posca pen for little glimmery sparkly dots across the surface of the card, which sadly don't really show up too well in the photograph.


Friday 8 December 2023

Lavinia Stamps "Wallace" Birthday Card


I made this card for my nature loving friend.  I have already given her the birthday present, a hedgehog hibernation house for the garden, so I decided the card had to reflect that gift somehow.

For the large "Happy Birthday" sentiment, I have used a "Hobby Art Ltd" stamp set called "Greetings for Friends - CS158D", stamped in Wow! embossing ink and coated with a Wow! silver coloured embossing powder and heat set.

For the small corner image, I have used three Lavinia Stamps sets.  I stamped one of the hedgehogs from "The Wallace Family" stamp set in Versafine Clair "Morning Mist" grey ink.  

I then stamped the "Lavender" and the small lavender stamp from the Lavinia "Flower Pots" stamp set in two shades of Versafine Clair, using "Shady Lane" green ink for the stems and "Monarch" purple ink for the flower heads.

I grounded the hedgehog and flowers using "Weathered Wood" Distress Oxide Ink, applied with a paint brush. I then gave the hedgehog body some colour, using "Frayed Burlap" Distress Oxide Ink.  I painted on some grass too, using "Mowed Lawn" Distress Oxide Ink.  

Finally, I added some dots of pink and purple Posca Pen to give the impression of flowers in the grass.  Then mounted the card on to a piece of grey paper and then on to a white card blank.

Wednesday 6 December 2023

Day 24 of Karen Telfer's "24 Days of Tags 2023" challenge - The Final Day


It is Day 24, the final day of Karen Telfer's "24 Days of Tags 2023" challenge and I am already missing it!  I have absolutely loved taking part this year.  Karen always has the ability to inspire me.  So I would like to say a big thank you to Karen for planning, sharing her ideas, taking the time to video her tag making and commenting on all the posts on Social Media.  Karen is a total star in my eyes.

The Day 24 tag is all about using your favourites.  I've used my favourite colours and techniques on this tag.  

Starting with a white piece of tag shaped card, I used three shades of Distress Oxide Inks, using Salvaged Patina, Mermaid Lagoon and Blueprint Sketch.

I splattered water droplets over the surface to achieve a bleached speckled look to the background.  I then splattered some silver metalic paint over the surface in the same way.  I used a heat gun to dry the surface.

Next I used the Funky Fossil Designs "Vintage Script" stamp, in second generation stamping using Versafine Clair "Morning Mist" grey ink.

The next layer to go on the tag was using "Chipped Sapphire" Distress Oxide Ink through the Visible Image "Ye Olde Christmas Stencil". I then gave it a blast of the heat gun to totally dry the surface.

The next step was using Wow! Embossing Ink and Wow! "Bright White Super Fine" embossing powder with the Visible Image "Peace, Love & Hope" stamp set for the word "peace" and the "snowflakes.

I inked the edge of the tag with Versafine Clair "Medieval Blue" ink.  I used glue tape to stick the tag to the dark blue card.  Finally, I added sticky backed gems to the snowflakes and the background for a bit of sparkle.

Tuesday 5 December 2023

Front Cover for Karen Telfer's "24 Days of Tags 2023" challenge


Now that the end of Karen Telfer's tag challenge is in sight, the last tag is tomorrow. I decided I needed to create a front and back cover for my book ring of 2023 tags.  This is what I made.

I've used a design very similar to one I made recently, but this time there isn't a stag but instead I created a line of text in matching ink and printed it out, cut it to size and then use a gold gel pen to decorate around the Stampin' Up "Merry Patterns" sentiment, stamped in Versafine Clair "Chianti" dark red ink.

Day 23 of Karen Telfer's "24 Days of Tags 2023" Challenge.


Well it has been a bit of a marathon, but I am now up to date with my tags, ready for the final one tomorrow.

The main image is part of a Woodware stamp called "Poinsettia Corner - JGS360", which I have heat embossed using Wow! Rich gold embossing powder on the tag, but also on two small pieces of card.

I used the same Wow! embossing powder to stamp and heat set the sentiment, which is part of the Simon Says Stamp set called "Tiny Words - Christmas".

I coloured the stamped poinsettia images using Distress Oxide Inks, the colours I used are:  Peeled Paint and Rustic Wilderness for the leaves and Festive Berries and Candied Apple for the petals.

I fussy cut the two flowers on the small pieces of card.  I used foam pads on the underside of the petals and wet glue in the middle.  Once in postion I added some Ranger "Glossy Accents" to the very middle of the flower and dropped some tiny bronze coloured beads into it.

I mounted the card on to a piece of green card then coloured the berries using a red Posca Pen and a white gel pen for highlights.

Day 22 of Karen Telfer's "24 Days of Tags 2023" Challenge


This is my Day 22 tag of Karen Telfer's "24 Days of Tags 2023" challenge.

For the tag, I have used the candles, fir branch and the sentiment from the Stampin' Up stamp set called "Merry Patterns".

I stamped the candles and sentiment in Versafine Clair "Morning Mist" grey ink, stamping the fir branch in Versafine Clair "Rain Forest" green ink.

I coloured the background with two shades of Distress Oxide Inks, using "Antique Linen" for the inner area, edging with "Festive Berries" Distress Oxide Ink.

Masking off the candles, I used Versafine Clair "Morning Mist" grey ink with the Funky Fossil Designs "Vintage Script" stamp, stamped in second generation stamping.

I coloured the candles with a paint brush using "Festive Berries" Distress Oxide Ink and yellow and orange Posca Pens for the flame.

I grounded the candles by painting a shadow using "Weathered Wood" Distress Oxide Ink and added berries to the fir branch using a red Posca Pen.  Finally, mounting the tag on to a piece of grey card.

Day 21 of Karen Telfer's "24 Days of Tags 2023" challenge


I'm still playing catch up with my tags after a few days away, but I am getting there! This is my Day 21 tag of Karen Telfer's "24 Days of Tags 2023" challenge.

I've used a plain white tag, covering the surface in "Antique Linen" Distress Oxide Ink and then edging the tag with "Festive Berries" Distress Oxide Ink.

I lay a Funky Fossil Designs stencil over the top of the tag, securing it in position with a piece of low tack tape.  I then used four shades of Ranger Archival Inks through the stencil.  The colours that I used are:  Watering Can, Plum, Library Green and Red Geranium.

At the base of the tag, I stamped the "Yuletide Greetings" sentiment, which is part of the Simon Says Stamp set called "Tiny Words - Christmas".  Finally, I mounted the tag on to a piece of pinkish coloured card.


Day 20 of Karen Telfer's "24 Days of Tags 2023" Challenge


This is my Day 20 of Karen Telfer's "24 Days of Tags 2023" challenge.

On a plain white tag, I used Versafine Clair "Glamorous" pink ink to stamp the Funky Fossil Designs "Fa La La" stamp.  I used the same ink to edge the tag too.

I used a selection of colours of Paper Artsy Fresco Finish "Chalk Arcylic" paints to paint the squares and rectangles to create the impression of gifts.  I used gel and Poscal Pens to decorated the gift shapes and then mounted the tag on to a piece of purple card.

Monday 4 December 2023

A Two Day Canal Art and Sign Writing Course with Andy Russell and Phil Speight


I have long had an interest in canal art, both the history of it and the design aspect. Back in August of this year, we attended a charity auction, one of the lots was a two day Master Class with Phil Speight and Andy Russell to learn the basics of sign writing and canal art.  Hubby was the successful bidder and said it was my Christmas/Birthday present.  I was thrilled.

The course was held this weekend at the workshop at Overwater Marina, in Cheshire.  There were around fifteen of us on the course, a real mix of ages, abilities and reason for being there.  The first day we did sign writing, lead by Andy Russell. The second day we learnt the basics of the traditional roses.

I loved every minute of the course and am quite happy with what I have achieved.  There are aspects that I struggled with, I've never worked in that medium of paint.  I'm more used to water colours, inks and acrylic paints not these smelly ones that appeared to "go off" quite quickly.

The word "Talwrn" is the name of the village that I live in, the board is about one and half metres wide.

Now I am back home, I need to practice what I have learnt.  I have a large galvanised old fashioned looking watering can that I want to paint, but I will leave it until I am better at the craft.

Day 19 of Karen Telfer's "24 Days of Tags 2023" challenge.


I'm playing catch up on my tags again as I was away at the weekend attending a course.  I'll share with you what I was up to in my next post.

This is my Day 19 tag of "Karen Telfer's 24 Days of Tags 2023" challenge.

For my tag, I used two Lavinia Stamps the "Mystic Swirl" and "Christmas Charms", stamped in Wow! clear embossing ink, coated in Wow! Rich Gold Embossing Powder and then heat set.

I then created the background colour using two shades of Distress Oxide Inks:  "Twisted Citron" and "Lucky Clover".  I deliberately kept the darker ink away from the hanging star, to give the impression that the star is shining light. I rubbed over the heat embossing with a cloth to remove any ink that was over it.

Next, I used a fan shaped paint brush, dipped in water and tapping the brush over the surface of the tag, creating tiny droplets, I then blotted the water, which left a lovely bleached splattered look.

I used the same technique with metalic gold paint to add tiny gold flecks across the surface of the tag.

Finally, I mounted the tag on to a piece of red card and outlined the inner tag with a metalic gold pen.

Friday 1 December 2023

52 Week Mini Art Card/Tag Challenge - Taster Tag for December 2023


Here we are on the 1st December already, this year has passed at such a scary rate.  This is the fifth and final taster tag of 2023.  From January 2024, I will be providing you with a weekly prompt at 7:30am on a Sunday morning.  

The challenge is very relaxed, you can do as much or as little as you would like.  I know how life can get in the way, but I really hope you will join in.  There is a Facebook group for this challenge where you can share your tags with the other members taking part of lurking.  Here is the link to the Facebook group.

The prompt/theme of the December 2023 challenge is "Festive".  I'm aware not everybody celebrates Christmas, so if you are one of those people, just put your own spin on it.

***

This is the tag that I have made for the December challenge with a prompt theme of "Festive".

I used a manila coloured tag for the base, colouring it with "Confetti" Elements inks.  I then used the same ink through the Visible Image Stamps stencil called "Distressed Bricks".

Next, I used "Emperor Red" Elements Inks through the Visible Image "Ye Olde Christmas" stencil, which is like an old fashioned font of writing.

I used Versafine Clair "Nocturne" black ink to stamp the Visible Image "Christmas Carol" number area on the bottom left hand side of the tag.  I used "Nocturne" again to stamp the Visible Image "Holly" too.

On a piece of white card, I stamped the Visible Image "Holly" again, but this time using Versafine Clair "Green Oasis" ink.  I then coloured the holly with three shades of Derwent Inktense pencils, using Beech Green, Vivid Green and Fern colours.  I used a red Sharpie pen to colour the berries,before fussy cutting the holly and sticking it into position over the exisiting stamped holly.

I added highlights to the holly and berries using a white gel pen, then coated the holly leaves in "A wink of Stella" which provided a lovely golden shimmer to the leaves.

I inked the edges of the tag using Versafine Clair "Green Oasis" ink and then mounted the tag on to green card,

Finally, I added Ranger "Glossy Accents" to the berries and also to the area on the bottom left where the number 25 is.


Thursday 30 November 2023

Day 18 of Karen Telfer's "24 Days of Tags 2023" Challenge


This is my Day 18 tag of Karen Telfer's "24 Days of Tags 2023" challenge.

For this tag, I blended two Distress Oxide colours, using "Mustard Seed" and "Festive Berries" to cover the tag base.

I used white Gesso through the Tim Holtz / Stampers Anonymous "Tiny Poinsettia Stencil THS165", applied with a finger dabber.

I then splattered white paint from a fan shaped paint brush to create the white dots.

Next, I used Ranger black "Archival Ink", applied with a finger dabber through the Tim Holtz / Stampers Anonymous "Poinsettia Duo stencil THS153".

I mounted the tag on to a piece of black card, finally adding some white dots of Ranger "Enamel Accents" to the middle of the flowers.

Lavinia Stamps "Fairy Dandelion" Card


After the epic amount of stamping of my previous card, this one is more minimal, opting for a clean and simple look.

I masked off three sides of the card, to protect from inky marks.

I've used three shades of Ranger Archival (Majestic Violet, Cactus Flower and Vibrant Fuchsia) through the Lavinia Stamps "Red Brick Stencil" to create the panel of colour.

Using Versafine Clair "Nocturne" black ink, I stamped the Lavinia Stamps "Fairy Dandelion" and the sentiment, which is part of the Lavinia Stamps "Heartfelt Verse" stamp set.

...and that's it!  Definitely a simple card.

Wednesday 29 November 2023

Sweet Poppy Stencils Botanicals Christmas Card


I got a bit carried away with the stamping on this card, but I think it was worth the effort for the result.  All stamps are by Sweet Poppy Stencils.

I started with a piece of cream coloured cut, cut to 6x6".  In the middle of the card, I stamped the Sweet Poppy Stencils sentiment, part of thier "Festive Phrases" stamp set in Wow! clear embossing ink and then coated with Wow! Rich Gold embossing powder and heat set.

I then used the Swet Poppy Eucalyptus stamp with "Bundled Sage" Distress Oxide Ink,  I then coloured the leaves with a diluted solution of the same ink, using a heat gun to dry the surface.

Next, I multiple stamped the Sweet Poppy "Fir Tree Sprigs" in two corners of the card, this time using "Evergreen Bough" Distress Oxide Ink to stamp and colour the needles.

I then stamped the Sweet Poppy "Holly Sprigs" using a mix of "Pine Needle" Distress Oxide Ink and Versafine Clair "Rain Forest" dark green ink.  I then coloured the holly leaves with "Beech Green" Derwent Inktense pencil applied with a paint brush.

I used a red Posca Pen to colour the holly berries.  Then used a metalic gold pen to edge the card, the holly and the berries.  I added white highlights to the berries using a Unibal Signo Pen. Finally, I added a bit of sparkle by using a gold shimmer gel pen around the Eucalyptus leaves.

Stampin' Up "Merry Patterns" Christmas Tag


Another Christmas gift tag from me.  This time, I have used the Stampin' Up stamp set called "Merry Patterns" with Versafine Clair "Chianti" dark red ink, to stamp the sentiment and the reindeer.

I wasn't very sure where I was going with this tag, but I knew I needed to fill in the background some how, so I opted to use a metalic gold gel pen to draw wavy lines vertically on the tag, edging the tag in gold too.

I then used the Lavinia Stamps "White Orbs stencil" to draw around some of the circles again with the metalic gold gel pen, then filled the circles in with colour.  Finally, mounting the tag on to  a co-ordinating colour card.

Day 17 of Karen Tefer's "24 Days of Tags 2023" Challenge.


This is my Day 17 tag of Karen Telfer's "24 Days of Tags 2023" challenge.

I've used similar, but different stamps than those used by Karen, but overall if you don't look to closely it looks the same!

I swooshed a white tag through "Peacock Feathers" Distress ink, drying with a heat gun and then swooshing again to get a build up of colour. 

Once dry, I used Versafine Clair "Morning Mist" to stamp the music notes which is part of the Tim Holtz / Stampers Anonymous "Butterfly Menage" stamp set.

Using the same stamp set, I stamped the butterfly/moths down the middle of the tag, using Versafine Clair "Nocturne" black ink.  I used the same ink to stamp the "25th December" but I don't recall who made that stamp!

Next, I used "Blueprint Sketch" Distress Oxide Ink to go around the edges of the tag.

Finally, adding a drift of white dots, using a Signo Pen, before mounting on to dark blue card.

Tuesday 28 November 2023

Visible Image "Peace, Love & Hope" Christmas Gift Tag


Today, there isn't a Karen Telfer tag, every eight days there is a days break to allow people to catch up - today is that day.  Instead, I've made my own Christmas gift tag.

I've used the Visible Image "Strobe" stencil with a gold and beige colour that was left over on my blending brushes from an ealier project, so I decided to make the most of what was there, using darker ink in the middle, getting lighter towards the edges.

I used Versafine Clair "Chianti" dark red ink, with the Visible Image stamp set called "Peace, Love & Hope", for all the stamping, using first and second generation stamping for the trees and edging the tag in the same colour too.

I found some matching card and mounted the tag on to it, then used a gold gel pen to add a little subtle shimmer to areas of the tag.

Penny Black "Sparkles 40-625" Heart Christmas Card


Another Christmas card, this time using a selection of products from different manufacturers.

For the hanging heart,  I have used one of the Penny Black baubles from their "Sparkles 40-625" slapstick/cling stamp set, stamped and coloured in "Festive Berries" Distress Oxide Ink.  I gave it some brush strokes of "A Wink of Stella" to give it a lovely gold shimmer to the surface.

I used "Shadow Grey" Ranger Archival Ink through the Sweet Poppy Stencils "Holly Backplate". 

I mounted the card on to a piece of red card and then on to a white card blank, finally adding the  sentiment of "All I want for Christmas is you", which is part of a Simon Says Stamp set called "Tiny Words - Christmas", stamped in Versfine Clair "Morning Mist" grey ink.

Monday 27 November 2023

Lavinia Stamps "Lupin the silhouette Hare" Tag


I recently saw a post on Instagram where somebody used Q-tips to create a bokeh look and also used the Q-tips for stamping.  Sorry, I don't recall who inspired me, but thank you, I had to give it a go and this tag is the result of my effort.

I had a small piece of water colour card left over from a previous project, so decided to use that for the base.  I used a wash of water and "Faded Jeans" Distress Oxide Ink, applied with a wide paint brush in rough strokes horizontally.  I then ran the heat gun over the surface to dry it.

Using a wet Q-tip, I painted dots of water across the surface, rubbing the Q-tip in the middle of the dots to achieve a lighter look.  I then used a fan shaped paint brush to create smaller splatters of water, dabbing them off with a piece of kitchen roll.  These two techniques created the mottled background you see.

I used a fine tipped black pen to draw branches dangling down from the top right hand side of the tag.

I then dipped a Q-tip into "Festive Berries" Distress Oxide Ink and dobbed the Q-tip to create round berry shapes.  I extended the branches on to the berries to make them look more realistic.

At this stage, I really wasn't sure if I was just going to stamp a sentiment or create an actual image, I decided on the latter.

I used the Lavinia Stamps "Lupin the Silhouette Hare" stamp, stamped in two shades of Versafine Clair inks (Acorn and Pine Cone).

I used the Lavinia Stamps "Hill Mask" to create the landscape using Versafine Clair "Morning Mist" grey ink.

I added colour to the hare using Van Goch pastel pencils.  I then added highlights to the hare and the berries using a white gel pen.

Finally, I mounted the tag on to a piece of dark red card to match the shade of the berries.


Day 16 of Karen Telfer's "24 Days of Tags 2023" challenge


It's Day 16 of Karen Telfer's "24 Days of Tags 2023" challenge.  Today the tag has a theme of "Splashes of Colour".  For my tag I've used a stamp set and stencil from Funky Fossil Designs.

I started by stamping the paint brush and tube of paint, both are part of the Funky Fossil Designs stamp set called "Artsy" which I think may now be retired.  I used Versafine Clair "Morning Mist".


I coated the stamped image in "Pebeo" Drawing Gum / Masking Fluid and set aside for a few minutes to dry.

Once dry, I lay the Funky Fossil Designs "Splatters" over the tag and made various coloured splatters over the tag using Distress Oxide Inks.  The colours that I used are:

  • Salvaged Patina
  • Cracked Pistachio
  • Mermaid Lagoon 
  • Wilted Violet
I then went around the edge of the tag with "Blueprint Sketch" Distress Oxide Ink.

Once dry, I used the Frisk "Maskaway" eraser to rub off the masking fluid from the paint brush and tube image.

I used Derwent Inktense pencils to colour the paint brush and paint tube, also using a metalic silver gel pen in places too.

Next, using Versafine Clair "Nocturne" black ink, I stamped the sentiment on the paint tube.  The sentiment is also part of the Funky Fossil "Artsy" stamp set.  Finally, I mounted the tag on a piece of dark blue card.

Penny Black Stamps "Winter Wander 40-356" Card


Well it is grim outside.  I woke to hear the rain lashing down, so I've made a bright and cheerful card.

For the vibrant background colouring, I have blended a selection of Lavinia Element inks.  These are the inks that I used, in the order I used them in from the bottom of the card:  

  • Sundance
  • Sahara
  • Russet Orange
  • Confetti
  • Emperor Red
  • Merlot
  • Mulberry
  • Dark Denim
  • Graphite
I wafted the heat gun over the surface to ensure it was dry before the I used Versafine Clair 'Nocturne" black ink to stamp the Penny Black "Winter Wander 40-356" stamp, using my stamping platform, which allowed me to re-ink the stamp to get full black coverage of ink.

Finally, I mounted the image on to a piece of black card and then on to a bright yellow card blank.

Sunday 26 November 2023

Day 15 of Karen Telfer's "24 Days of Tags 2023" challenge


It's Day 15 of Karen Telfer's '24 Days of Tags 2023" challenge.  Today it's about heat embossing on black card.

For my tag, I have used a Christmas tree stamp from the Pink Ink Designs "Beary Christmas" stamp set.  The sentiment is from the Simon Says Stamp set called "Tiny words -  Christmas".  For  both stamps I used a Wow! clear ink pad to stamp the images and then coated with Wow! Rich Gold super fine embossing powder and heat set.

I coloured the baubles on the Christmas tree using red and orange glitter gel pens.

I used a metalic gold gel pen to add a wavy edge to the black tag and added gold snowflakes using the gel pen too.  I then mounted the tag on to a piece of red card.

Clarity Stamps "Star Flower Spray" Card


Another stamp and stencil card, this time using Clarity Stamp products. 

I have deliberately left this card sentiment free, as it's to go in my "just in case' cards stash.  You know how it is, sometimes you need a card and then you find you don't have anything suitable. I thought this could be used for birthday, anniversary or sympathy.  If needs be I can add a sentiment at a later date.

Back to the card itself, I masked off the edges of the card, to ensure I didn't get ink where it shouldn't be... from experience, I have learnt it is better to be safe than sorry!

I used two shades of Ranger Archival Ink through the Clarity "Peacock Pattern" stencil.  Starting with "Sky Blue" Archival Ink towards the base and right hand side, then "Shadow Grey" Archival Ink towards the top and the left hand side, fading out to nothing towards the top left.

Using Versafine Clair "Medieval Blue" ink, I stamped the Clarity "Star Flower Spray" stamp.  As there was more background colour at the base of the card, I decided to use the "leaf in-fill stamp" from the same set, to kind of ground the bunch of flowers.

Finally, I added three dots of white Ranger Enamel Accents.

Saturday 25 November 2023

Day 14 of Karen Telfer's "24 Days of Tags 2023" challenge


I'm an early bird getting my tag done and out of the way today.  This is my Day 14 tag of Karen Telfer's "24 Days of Tage 2023" challenge, with a theme of "vintage".

For the background, I used a page from an old second hand Welsh hymn book.

I used Versafine Clair "Acorn" brown ink to stamp the Stampscapes "Pines & Rocks 195G" image.  I used a pale blue Derwent Inktense pencil to add touches of colour, then I inked areas using "Coffee" Ranger Archival Ink.

I edged the tag with Versafine Clair "Pinecone" dark brown ink and then used a "Destress Tool" to roughen up the edges, before I glued the tag on to a piece of blue card.

Sweet Poppy Stencils "Small Bell" Christmas Card


More play with Sweet Poppy Stencils making this Christmas card.

I've used Versafine Clair "Chianti" dark red ink through the Sweet Poppy "Small Bell" stencil. 

I then masked off the edges of the card, using low tack tape.

Next I used "Shadow Grey" Ranger Archival ink through the Sweet Poppy "Holly Back Plate" stencil, lightly adding ink around the edge of the masking tape, to give a subtle line of colour.  I then removed the masking tape.

Finally, I used Versafine Clair "Chianti" dark red ink again to stamp the sentiment, which is part of Simon Says Stamp "Tiny Words - Christmas" stamp set.  Then added some touches of gold gel pen to areas of the holly to give a lovely shimmer.

Friday 24 November 2023

Day 13 of Karen Telfer's "24 Days of Tags 2023" challenge


This is my Day 13 tag make of Karen Telfer's "24 Days of Tags 2023" challenge.  It was a really quick make using strips of washi tape that had been lingering in my stash for years.

To add a little more interest, I used a Wow! Embossing Pad and Wow!  Bright White Embossing Powder to stamp and heat set the Simon Says Stamp sentiment, which is part of their "Tiny Words - Christmas" stamp set.


Thursday 23 November 2023

Sweet Poppy Stencils "Fir Trees" Christmas Card


Another Christmas card, this time using Sweet Poppy Stencils goodies.

For this card, I started by stamping the Sweet Poppy stencils large and small "Fir Trees" in Versafine Clair "Shady Lane" green ink using first and second generation stamping.

I used some remaining ink on a finger dabber with the Lavinia Stamps "Hill Mask" to create the landscape and ground the trees.

I then used "Shadow Grey" Ranger Archival Ink through the Sweet Popp7 "Holly Back Plate Stencil" fading the ink out towards the top and the left of the card.

I used Versafine Clair "Shady Lane" green ink to stamp the sentiment, which is also by Sweet Poppy and is part of their "Festive Phrases" stamp set.

I mounted the image on to red card ,then on to a white card blank.

Finally, I added dots of Liquid Pearls to the trees, to look like Chrismtas baubles.  The colours I used are: Ruby Red, Brilliant, Blackberry and Gold Pearl.

Day 12 of Karen Telfer's "24 Days of Tags 2023" challenge


This is my Day 12 tag of Karen Telfer's "24 Days of Tags 2023" challenge - the half way point.  As you may have notices, I am loving making these tags.

Water colour card was used for the base of this tag.  I used three shades of Distress Oxide Inks (Wilted Violet, Blueprint Sketch and Uncharted Mariner) on the Sweet Poppy "Large and Small Spruce" Stamp, then spritzed the stamp then stamped it on to the card.  I repeated the process three times for each tree, drying it with a heat gun each time.

Once dry, I went around the edge with "Shaded Lilac" Distress Oxide Ink, edging the tag in "Wilted Violet" Distress Oxide Ink.  I created the landscape/grounded the trees using the same ink.

I used "Prize Ribbon" Distress Oxide ink to add splatters to the surface of the tag.

Next I stamped the Simon Says Stamp sentiment, part of their "Tiny Words - Christmas" stamp set, using Versafine Clair "Nocturne" black ink.


Finally I coloured some card with "Wilted Violet" Distress Oxide Ink and used a punch to make a hole reinforcer and stuck it into position before mounting the tag on co-ordinating card.


Wednesday 22 November 2023

Day 11 of Karen Telfer's "24 Days of Tags 2023" Challenge


This is my take on Day 11 of "Karen Telfer's 24 Days of Tags 2023" challenge, making an alternative Christmas tag, for those in warmer climates across the world.

For my tag, I have used "Chrome Yellow" Ranger Archival Ink through the Visible Image Stamps "Strobes" stencil, fading the colour out towards teh right hand side of the tag.

Using Versafine Clair inks, I stamped the bunch of daisies, which is part of the Visible Image "Daisy Grunge Stamp Set".  I've used the following colours of Distress Oxide Inks, applied with a paint brush to colour the flowers:  Spiced Marmalade, Carved Pumpkin, Gathered Twig and Mowed Lawn.

I used Versafine Clair "Nocturne" black ink to stamp the sentiment and the star, both are part of the Visible Image stamp set called "Peace, Love and Hope".  Finally, I mounted the tag on to a piece of black card.

Wow! "Winter Wishes" Christmas Gift Tag


More stencil play from me, making this Christmas gift tag.

For the background design, I used 'Mowed Lawn" and "Rustic Wilderness" through the Tim Holtz / Stampers Anonymous "Gingham Layering Stencil.

Over the top of that I used "Lumberjack Plaid" Distress Oxide Ink through the Tim Holtz / Stampers Anonymous "Tiny Poinsettia" stencil.

The next layer was using "Blueprint Sketch" Distress Oxide Ink through the Tim Holtz / Stampers Anonymous "Sparkle Layering Stencil".

I used a fan shaped paint brush to splatter white paint, using Dr PH Martin's white bleed proof paint.

Once totally dry, I ran an anti-static chalk bag over the surface.  I used the Wow! clear embossing pad to stamp the Wow! "Winter Wishes & Snowflake Kisses" sentiment.  I then coated it with Wow! Bright White Embossing Powder and heat set.

I inked the edges of the tag using Versafine Clair "Rain Forest" dark green ink and then mounted the tag on to a piece of white card.

Tuesday 21 November 2023

Day 10 of Karen Telfer's "24 Days of Tags 2023" Challenge


Here's the tag I made for Day 10 of Karen Telfer's "24 Days of Tags 2023" challenge.  It had a theme of "Bold & Bright" and I think I hit the brief!

Starting with a white tag, I used several colours of Distress Oxide Ink to cover the surface of the tag.  The shades I used were:  Mustard Seed, Spiced Marmalade, Cracked Pistachio, Blueprint Sketch and Wilted Violet.

I then used the same colours through a selection of Tim Holtz / Stampers Anonymous stencils.  The stencils I used are:  Chevron Shifter Layering Stencil, String Layering Stencil, THMM104 stencil, Dot Fade Layering Stencil and the Sparkle Layering Stencil.

Using Versafine Clair "Nocturne" black ink, I stamped flowers and leaves from Hobby Art Ltd "Abstract Flowers CS175D" stamp set on to white card.  

I coloured the middle of the flowers with two shades of Distress Oxide Inks:  Mustard Seed and Spiced Marmalade, giving the colour a coat of "A Wink of Stella" to add a lovely golden shimmer.  I then fussy cut the flowers and leaves and glued them into position on the tag.

Monday 20 November 2023

Monochrome Foil Tape "Stag" Christmas Card


I seem to be on a roll with my crafting today, here's a monochrome Christmas card using "Karen Warneka's / Oarsum Crafts" Tape a tag technique.

I used a Sizzix die from their thinlits set called "Woodland Deer".  I glued the die cut on to a piece of 4x4" mount board then covered it with sticky backed foil. 

I smoothed out the surface then used a paper stump to determine the edges of the stag. I then used a small ball ended metal tool to go round the outline of the stag and make the vertical lines in the background.

I used a wide tipped black Sharpie pen to cover the entire square.  Once covered, I buffed the surface with a piece of kitchen roll, till the silver stag was exposed but leaving a very textural background.

Next, I mounted the piece on to a square of black card and then used sticky tape to adhere it to a white card blank.

I used Versafine Clair "Nocturne" black ink to stamp the Simon Says Stamp Christmas greeting, which is part of their "Tiny Words - Christmas" stamp set.


Clarity Stamps "Star Flower Spray" Card


Now I'm up to date on the tags, it was time for me to make a Birthday card needed shortly, so I made this card using a selection of goodies from Clarity Stamps.  It was nice to work on a square format rather than tag shape!

I started by using the Clarity "Christmas Stars" stencil with "Chrome Yellow" Ranger Archival Ink, keeping to the right hand bottom side of the card.

Next I used the Clartiy "Stripes" stencil with "Shadow Grey" Ranger Archival Ink, again keeping to the right hand side of the card, fading to the left and to the top.

I moved on to the third stencil, using the Clarity "Three Blooms Stencil" with "Orange Blossom" Ranger Archival Ink.

I then stamped the Clarity "Barbara's A6 Star Flower Spray" using Versafine Clair "Nocturne" black ink.  I added colour to the stamped areas using Posca and gel pens.

Finally, I stamped the greeting using the Clarity "Birthday Occasions Sentiment" stamp set with Versafine Clair "Morning Mist" grey ink.  I then mounted the image on to grey card and then on to a 7x7" card blank.

Day 9 of "Karen Telfer's 24 Days of Tags 2023" challenge


This is my take on the Day 9 tag of Karen Telfer's "24 Days of Tags 2023" challenge.

For the background colour, I have used two shades of Distress Oxide inks on a spritzed piece of card.  I used "Salvaged Patina" and "Peacock Feathers".

Once dry, I used the "Peacock Feathers" Distress Oxide Ink to stamp the Lavinia "Snowflakes (small) across the surface of the background.  I then gave the surface a very fine splattering of white paint, to break up the surface colour a little.

Using a 300 gsm white card and the Sizzix / Tim Holtz "Flurry #1 - 663105" die, I cut two large snowflakes.  I then cut them up into sections and glued into position so that the background design was still visible.

I mounted the tag on to a white piece of backtorund card, then cut a ring re-inforcer in white using a We R Memory Keepers punch and stuck into position.

I went around the edge of the coloured area with a silver gel pen to add a little subtle sparkle and then added clear and pearl gem stones to compliment the colours I had already used on the tag.

Day 8 of Karen Telfer's "24 Days of Tags 2023" Challenge


Yey, I'm up to date with my tags.  This is my Day 8 tag with a theme of "patterned papers and pockets".


I dug into my stash and found some Christmas patterned papers which I was able to die cut into smaller tags.  I decorated them with die cuts and gel pens.

For the main tag, I covered the whole tag in a plaid patterned paper and patterned matched the pocket on the front, adding a strip of patterned paper horizontally and adding a line of liquid pearls.  On the front of the pocket I added more die cuts and some holly leaves, finishing with red Liquid Pearls for the berries.

Day 7 of "Karen Telfer's 24 Days of Tags 2023" challenge.


I'm still playing catch up with my tags, but I am nearly back on track.  This is my Day 7 tag of "Karen Telfer's 24 Days of Tags 2023" challenge.

Using Kraft card for the base, I splattered Dr PH Martins white bleed proof paint from a fan shaped paint brush to replicate the snow.

Once dry, I stamped the bird which is part of the Tim Holtz / Stampers Anonymous stamp set called "Crazy Birds, using Versafine Clair "Nocturne" black ink. I then stamped the bird again on a piece of white card. I coloured the stamped image on the white card using Derwent Inktense pencils, applied with a paint brush. then fussy cut the body and stuck it over the image on the tag.

I used a Woodware stamp with Versafine Clair "Rain Forest" dark green ink to stamp the holly leaves.  Again, I used Derwent Inktense pencils to colour the leaves then fussy cut them, sticking them into position below the bird.

I used more Dr Ph Martin's white paint to add snow to the edges of the holly leaves, applied with a very fine paint brush.  I then added a little dusting of Pin Flair "Ice Diamond", (it's looks a bit like ice/snow).  I then added some sticky backed red gems for the berries.

I used a Simon Says Stamp for the sentiment, it's part of their "Tiny Words - Christmas" stamp set, stamped in Versafine Clair "Nocturne" black ink.

Finally, to add a little sparkle, I added tiny areas of Lavinia "Moon Dust" silver glitter.


Sunday 19 November 2023

Day 6 of Karen Telfer's "24 Days of Tags 2023" challenge.


I'm playing catch up again after being away for a few days.  This is my Day 6 tag for the Karen Telfer's "24 Days of Tags 2023" challenge with a brief of "gel plate" background.


Rather than just make one background, I made half a dozen as they're always handy to have in my stash for later use. Above are the six backgrounds I made.

I used Paperartsy chalk paints on my gel plate and a fern and an olive branch picked from the garden for the foliage pattern.  In the background I have used the Lavinia Stamps "Cryptic" stencil, then taken a press.

I used a Sweet Poppy Stencils sentiment from their "Festive Phrases" stamp set, stamped in Wow! Bright White embossing powder and heat set.

I mounted the tag on to a white background and then went around the edge of the tag and some foliage using a silver glitter gel pen.