52 Week Mini Art Card/Tag Challenge

Tuesday 31 October 2023

Lavinia Stamps "Forest Leaf" gift tag


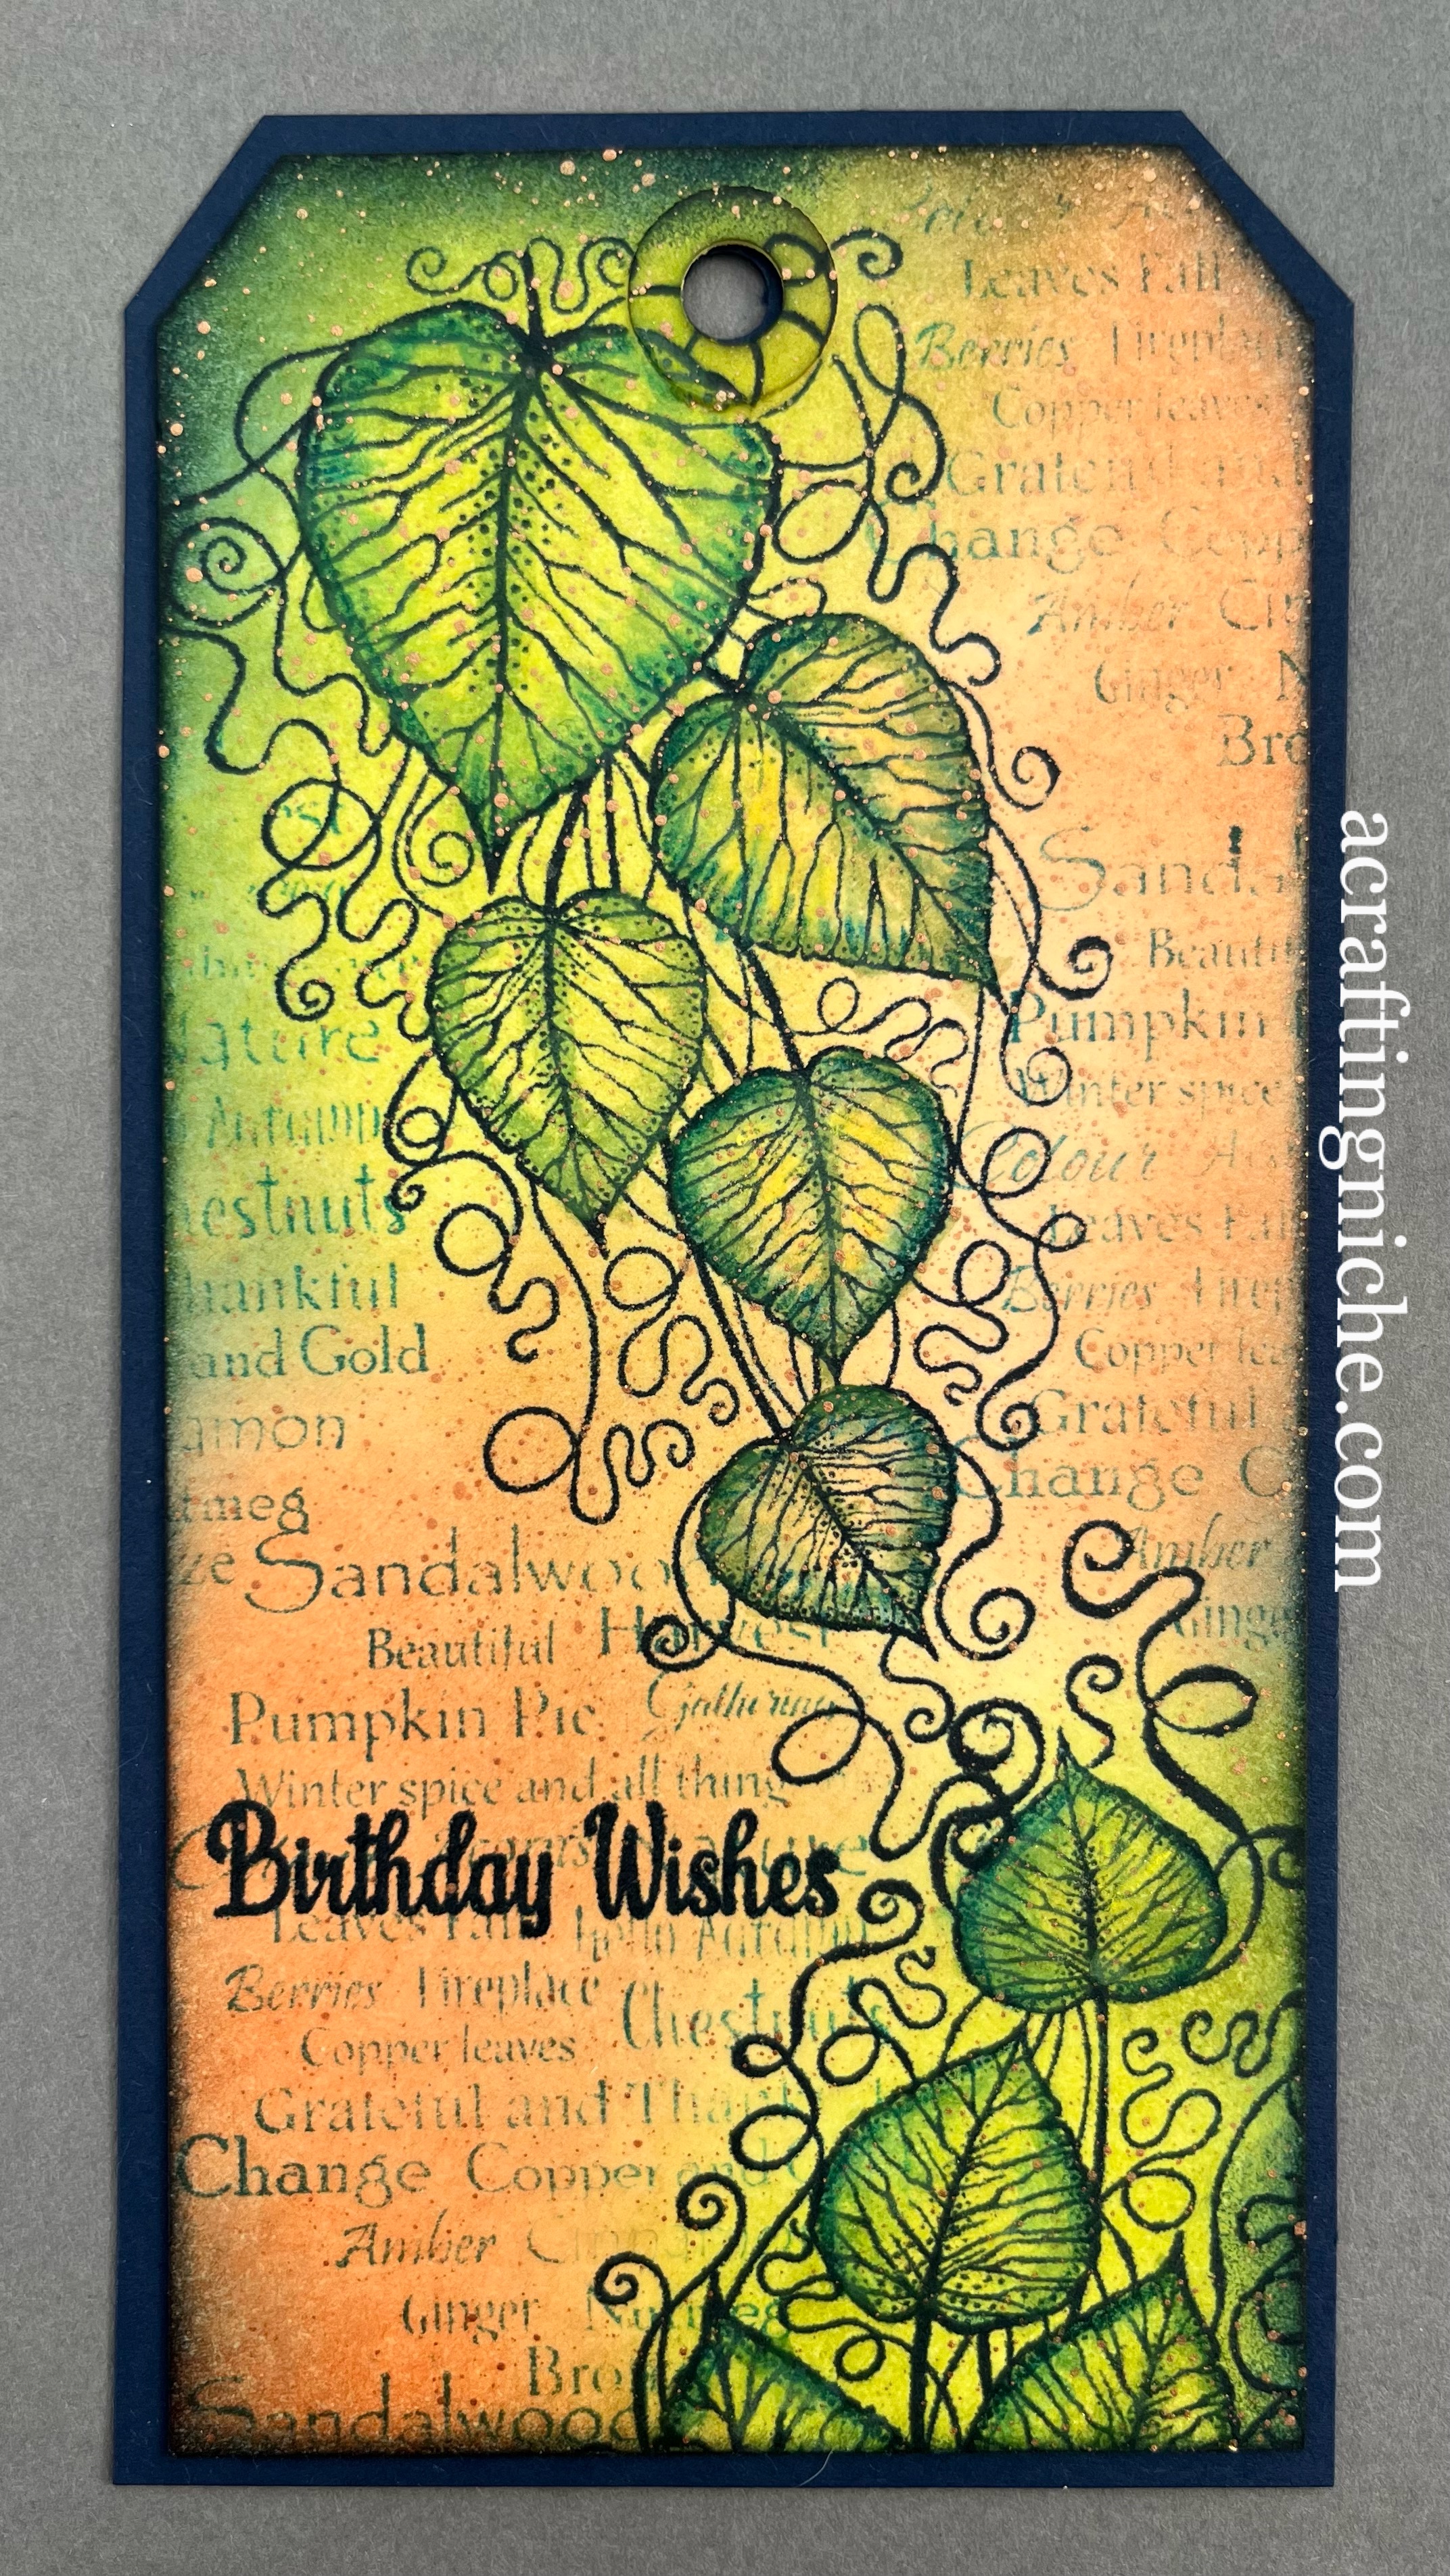
Over at Lavinia Stamps this weekend, Tracey Dutton, Jo Rice and Sarah Anderson had a craft off, making a tag using the new Lavinia Stamps "Forest Leaf" stamp, so that prompted me to have a play too, making this tag.

I used a manila coloured tag for the base then used two shades of green and two shades of orange Ranger Archival Inks.  The colours I used are:  Prickly Pear, Fern Green, Monarch Orange and Bright Tangello.

Using Versafine Clair "Twilight" dark blue ink, I stamped the "Forest Leaf" stamp in the top left corner and then again in the bottom right corner.  While the "Twilight" ink was out, I inked the edges of the tag.

I used Versafine Clair  "Warm Breeze" turquoise ink to stamp the "Winter Spice" verse over the peachy/orange coloured areas.

I then used Versafine Clair "Twilight" to stamp the sentiment, which is part of the Lavinia Stamps "Heartfelt Verse" stamp set.

I then started to colour the leaves using Derwent Inktense pencils, applied with a paint brush.  I gave the lighter areas of the leaves a few brush strokes of "A Wink of Stella" to give some shimmer to the leaves.

I then used some copper coloured metallic paint and a fan shaped paint brush, tapped to produce tiny splatters of colour across the tag.  I gave the surface a waft of the heat gun to ensure it was fully dry, before mounting the tag on to some dark blue card.

Lavinia Stamps "Wild Poppies" Sympathy Card


A quick sympathy card from me today.

Using low tack tape, I masked off a vertical striped area for me to work within, to ensure I didn't get any ink where I didn't want it.

I used "Chrome Yellow" Ranger Archival ink with a blending brush to fill the stripe.

I lay the Lavinia Stamps "Elegance" stencil over the top of the card, securing with a piece of tape.  I then used "Orange Blossom" Ranger Archival Ink through the stencil, again applied with a blending brush.

Using Versafine Clair "Nocturne" black ink, I stamped the tall Lavinia "Garden Poppies" and then the "Wild Poppies" below them.

While the black ink was out, I stamped the sentiment, which is part of a Simon Says Stamp set called "Tiny Words".  

To ground the poppies, I used a black pastel pencil.  I then added a few touches of white gel pen to the poppies too.


Monday 30 October 2023

Lavinia Stamps "Starr" & "Wild Pine" card


While tidying my card and papers, I came across a Lavinia Stamps "Live the dream" Scenescapes paper.  As it was starting to look a bit tatty - it's been hanging around a while, I decided to put it to use.

I started by stamping the Lavinia Stamps "Small Pine Trees" using Versafine Clair "Warm Breeze" ink.

I then stamped the Lavinia "Wild Pine" tree in Versafine Clair "Medieval Blue" ink

Next I stamped the Lavinia "Starr" fairy using Versafine Clair "Twilight" dark blue ink.

I used one of the Lavinia "Hill Masks" to create more landscapes using Versafine Clair "Monarch" purple Ink, "Warm Breeze" turquoise ink and inking the edges of the card using "Monarch" purple ink and Chianti" dark red ink.

I then started filling in areas with colour.  I used a selection of gel pens and Posca Pens until I was happy with the finished scene.

Sunday 29 October 2023

Lavinia Stamps Winter Scene Christmas Card


I had decided I wasn't going to do any more crafting as there is cleaning to be done in the house in readiness for visitors tomorrow, but I couldn't resist.  The dust can wait! 

I started by masking off the edges of a 7x7" piece of card, so that I could keep it clean of any inky accidents.

Using a Lavinia Stamps "Hill Mask" with "Forget-Me-Not" Archival ink to create the landscape.  I had some Ranger "Vibrant Fuchsia" Archival Ink left on my pink blending brush so used that to create the pink sky.  I did the same with the grey at the top of the card using"Shadow Grey" Archival Ink.

I used Versafine Clair "Morning Mist" grey ink to stamp the trees, which are part of the new Lavinia stamp set called "Small Pine Trees".  I used the same ink with the Lavina "Moon Mask" to edge the circle to create the moon.  I had a little bit of blue left on my blending brush from making the landscape, so added a touch of that around the edge too.

I used Versafine Clair "Twilight" dark blue ink, to stamp the Lavinia "Small Reindeer|, Stag and the owl, which is part of the Brodwin/Maylin stamp set.  

Around the lower edges of the card, using first and second generation stamping with Versafine Clair "Nocturne" black ink, I stamped the Lavinia "Small Branch".  I then added touches or red gel pen to the end of the branches to replicate berries.

Next, I used Dr. Ph Martin's bleed proof white paint with a fan shaped paint brush, tapping the brush with a pencil to create the impression of a snow fall.  I added touches of the paint to the trees and to some of the landscape too.

Finally, using Versafine Clair "Twilight" ink, I stamped the sentiment, which is part of the new Lavinia "Christmas Greetings" stamp set.  Removing the masking tape around the edges, I then mounted the scene on to a piece of navy blue card.

Lavinia Stamps "Winter Whispers release" Christmas Joy Tree Card


This is my tenth make using the new Lavinia Stamps "Winter Whispers" release of stamps.  I can't believe I've made so many since Friday tea time!

I started off with a 6x6" white piece of card and masked off the edges. I lay the Lavinia Stamps "Feather Leaf Stencil" over the top and applied "Shadow Grey" Ranger Archival Ink through the stencil using a blending brush.  I deliberately made the central area lighter as I didn't want the pattern to detract from the lovely design of the tree. I then removed the masking.

Using Versafine Clair "Medieval Blue" ink, I stamped the new "Christmas Joy" tree and one of sentiments from the "Christmas Greetings" stamp set.

I used a pastel pencil to ground the tree.  I then used a selection of colours of gel pens to colour the baubles on the tree.

Lavinia Stamps "Winter Whispers" Snowflake Aperture Card


Still playing with the new Lavinia Stamps, this time using a gel plate background.

I started off with a gel plate background, where I had used Distress Inks, spritzed with water then took the press.  By memory, I think I used Squeezed Lemonade, Picked Raspberry, Mowed Lawn and Pine Needles shades of Distress Ink.

I ran an anti-static pad over the inked surface, then using a Wow! ink pad I stamped the new Lavinia Stamps large and small "Snowflakes" and then coated the inked images with Wow! Bright White super fine embossing powders and heat set.

I cut a circle aperture in to a piece of white card and the exposed circle shape over the inked and embossed background, sticking in position with sticky tape.  I then mounted it on to a piece of dark red card and then on to a white card blank.

I stamped the sentiment using one of the new Lavinia Stamps "Christmas Greetings" stamp.  I first stamped it in Versafine Clair "Chianti" but I wasn't happy with the colour match, so added some Versafine Clair "Acorn" brown ink over the top.

Finally, I added some dots of white gel pen between the snowflakes and added some silver sticky backed gems to the middle of each snowflake for extra dimension.

Lavinia Stamps "Winter Whispers" Christmas Joy Card


I'm still playing with the new release from Lavinia Stamps, making this quick card.

For the background, I used Vibrant Fuchsia, blending it from the right hand side across to the left.  I then lay the Lavinia Stamps "Waffle" stencil over the top and applied the same ink through the stencil.

Using Versafine Clair "Shady Lane" green ink, I stamped the new "Christmas Joy" tree and the "Seasons Greetings" which is part of the new Lavinia Stamps "Christmas Greetings" stamp set.

I coloured the tree using a selection of gel pens.  I then added a light dusting of white acrylic paint splatters before mounting the card on to a piece of green paper and then on to a white card blank.

Saturday 28 October 2023

Lavinia Stamps "Winter Whispers" Fairy Catkins wreath card


This is project number six using the new release "Winter Whispers" stamp set from Lavinia Stamps, I think this shows how much I like this collection.  It just works so well with the existing Lavinia range.

For this card, I used the Lavinia aperture circle from the "Sticker Stencils - Set 5" with "Lost Shadow" Distress Ink to give a quiet background circle for the wreath.

I then moved on to the stamping, starting with the stamp from the new release called "Fairy Catkins" stamped in Versafine Clair "Acorn" a mid warm brown ink.

Next, I moved on to stamping the leaves using the Lavinia Stamps "Oak Leaves" stamp, stamped in two shades of Versafine Clair Ink:  "Summertime" an orange coloured ink and "Acorn" the brown ink.

I coloured the leaves with a selection of Derwent Inktense pencils and a gold gel pen.

I moved on to stamping the berries, I think this berry stamp came with another Lavinia Stamp, but I don't recall which one.  I stamped the berries in Versafine Clair "Chianti" dark red ink.  Once dry, I then coated the berries in red Posca Pen, adding dots of white gel pen, where I thought the light might hit the berries.

Using Versafine Clair "Summertime" orange coloured ink, I stamped the sentiment in the middle of the wreath.  The verse is called "Winter Spice".

Finally, I added some dots of gold gel pen and added a few highlights to various areas of the wreath using a white gel pen.

Lavinia Stamps "Winter Whispers" Eve Card


Another card using some of the new Lavinia Stamps.

I made a circlur gel plate background using Distress Inks, I used Squeezed Lemonade, Picked Raspberry, Blueprint Sketch and another, but I don't recall the colour.

Once the background was dry, I stamped the Lavinia Stamps new "Eve" fairy in Versafine Clair "Monarch" purple ink.

I then used a couple of the new Lavinia "Small Pine Trees" stamp set, stamping them in first and second generation stamping using Versafine Clair "Morning Mist" grey ink.

Masking off the bottom area, I added some white ink, I used Hero Arts "Hero Hues in Unicorn" applied with a finger dabber to give the impression of a light snowfall on the ground.

I coloured the fairy using gel pens and Derwent Inktense Pencils.  I added white to the trees using a gel pen too.  

I lightly masked the fairy and then splattered white paint to replicate snowfall.

Finally, in the bottom left hand corner, I stamped "Just for you" which is part of the Lavinia "Heartfelt Verse" sentiment stamp set.

Lavinia Stamps "Winter Whispers" Wild Pine Noel Card


Here's a very quick CAS Christmas card to make.

I used Versafine Clair "Medieval Blue" ink to stamp the new Lavinia Stamps "Wild Pine" tree and the "Noel" sentiiment, which is part of their "Seasonal Words" stamp set.

I then used a selection of gel and Posca Pens to decorate it, creating the look of coloured baubles. I used a purple pastel pencil to ground the tree.

Lavinia Stamps "Winter Whispers" "Starr and the Wild Pine Card


I'm still playing with my new Lavinia Stamps, this time I used three of the stamps I've not already used.

Starting with a background from my stash, I had fortunately written down on the back of it what I had used.  In this case, it was a selection of Elements Inks on a gel plate.  These are the colours I used:  Confetti, Violet Chalk, Bermuda, Della Blue and Blue Lagoon.

I started the by stamping "Starr" and the "Wild Pine" in Versafine Clair "Medieval Blue" ink.

Next, I used a Lavinia "Moon Mask" and edged it with Versafine Clair "Monarch" purple ink.

I used "Monarch" again with a Lavinia "Hill Mask" to create the landscape.

Next, I positioned the new Lavinia Stamp called 'Leaf Bouquet" horizontally and stamped it along the left hand bottom of the card using Versafine Clair "Monarch" ink.  I repeated the process on the right hand side, but this time with the stamp in a vertical position.

I inked the edges of the card using Versafine Clair "Twilight" dark blue ink, then mounted the card on to a dark blue mount.

I then started to add the finishing touches.  I used an assortment of gel pens, Posca Pens and Pastel Pencils to add colour to the scene.  Then mounted the card on to a white card blank.


My Mind's Eye "Heirloom Papers" Anniversary Card


This is an anniversary card I have made for our Son and his wife.  

I've raided my patterned papers to create this card.  The majority of the papers used are part of a My Mind's Eye collection called "Heirloom" which are maybe 15 years old?

For the hearts, I used a die, which again I have had for years, but I think it was part of a Tonic Studios die set.

The die cut foliage is using a die from the Sizzix / Tim Holtz die set called "Wild Flower Stems #1

I used a Tim Holtz "Idea-ology" word sticker for the setiment.

Lavinia Stamps "Winter Whispers" snowflake kraft Christmas card


A quick CAS card made using some of the new Lavinia Stamps.

I used a piece of kraft card for the base of this card, then drew a circle in the middle using a white pastel pencil.  I used this circle as my stamping guide.

I used the large and the small new  "Snowflake" stamps, paired with one of Lavinia Stamps older snowflake stamp sets for the tiny snowflakes at eack end.  I also used the new Lavinia "Christmas Greetings" sentiment stamp set too.

I ran an anti static bag over the surface of the card then used a Wow! ink pad and the Wow! White Puff Twinkle embossing powder and heat set.

Friday 27 October 2023

Lavinia Stamps "Winter Whispers" Forest Leaf gift tag


While the new release by Lavinia Stamps, called "Winter Whisper" stamps were out on my desk, I decided to make a tag.

I stamped the new "Forest Leaf" stamp in Versafine Clair "Shady Lane" green ink.  I then coloured the leaves using rwo shades of Derwent Intense pencils (Apple Green and Mineral Blue). I then coated the leaves with "A Wink of Stella".

 I used one of the small Lavinia Stamps blending brushes, to apply "Shadow Grey" Archival ink through the Lavina "Waffle Stencil".  I then used the remaining blue ink on a large blending brush to fade the colour out towards the top and the left hand side.

I used a small Lavinia "Berry" stamp with "Chianti" Versafine Clair ink, I then coated the berries in red Posca Pen and added some touches of white to give the impression of light hitting them.

Finally, using a fan shaped paint brush, I splattered the surface of the tag with small dots of gold paint.  Once dry, I then mounted the tag on to a piece of dark green card.

Lavinia Stamps "Winter Whispers" Eve Card


Today, I was fortunate to be passing reasonably closely to the Lavinia Stamps shop, so asked Hubby to make a detour via Ruthin, so that I could purchase the new "Winter Whispers" stamp release.


I've not been to the shop since it's opening day, four years ago, which I attended as part of the Lavinia Stamps Design Team, so it was nice to get back there and see all their lovely goodies.  I was greeted by the super helpful Jack on the counter and then had a jangle with Sarah Anderson and Jo Rice, who were both on the Design Team at the same time as myself.


I knew I was purchasing the new "Winter Whispers" stamp bundle, but there were some other bits and bobs that I needed too.  You can see my goodies in the photo above - it was quite a haul!

Obviously, as soon as I got home, I catalogued and repackaged the stamps how I like them and then got busy making a card!

I started by using Distress Oxide Inks:  Mustard Seed, Dried Marigold, Shabby Shutters and Faded Jeans. 

I used two Lavinia Stamps stencils:  Filigree and Flower Mask".

I used two of the brand new Lavinia Stamps, using the new fairy called "Eve" stamped in Verafine Clair "Nocturne" black ink and the new "Forest Leaf" stamped in Versafine Clair "Shady Lane green ink.

I used Wow! Embossing pad and Rich Gold Embossing Powder with the Lavinia "Mystic Swirls" stamp and the "Star Cluster" stamp.


I coloured the card using Derwent Inktense pencils, Posca Pens and gel pens, also adding more sparkle and shimmer using "A Wink of Stella" too.

Monday 23 October 2023

Funky Fossil Designs "Urchin" Good Luck Card


A quick good luck card featurning a stencil and stamp from Funky Fossil Designs.

I masked off an area of card, then used the Funky Fossil "Urchin" stencil with two shades of Ranger Archival Inks, starting with "Orange Blossom" ink, I then moved the stencil and used "Red Geranium" ink through the stencil. Over the top of the darker flower petals, I added "A Wink of Stella" to give a lovely shimmer to the flowers, adding dots of yellow Posca pen to the centres too.

I cut two thin strips of black paper and added them to two edges of the stencilled area, sticking in position using glue tape.

On a black piece of card, I used Wow! embossing ink to stamp the word "Good Luck" which is part of a Funky Fossil stamp set, called "Stripped Back Sentiments".  I coated the stamped area with Wow! Bright White Embossing Powder and heat set.  I then used a banner die to cut the sentiment to shape, using black sticky pads to stick the sentiment in position.

Finally adding three dots of black Ranger Enamel Accents.

Sunday 22 October 2023

IndigoBlu "Anenome Corner" Sympathy Card


Sadly it's another sympathy card needed, this time for the loss of the most gorgeous Golden Retriever that was fourteen years old and belongs to our friends.  Charlie Boy, you will be missed so much! 

It's a strange situation when you lose a pet.  You sometimes get the impression that people you know are thinking "get over it", but the pet is such a huge part of the family and the grief you feel is real.  We were in that situation six years ago tomorrow and I still miss my lovely Polly, even though we now have Rosie.  Because of this, I wanted to acknowledge the loss of Charlie.

For this card, I have used Versafine Clair "Medieval Blue" ink to stamp the IndigoBlu "Anemone Corner" (Dinkie Code A-D).  I coloured the flower with a Derwent Inktense Pencil, applied with a paint brush, adding touches yellow Posca Pen to the centre of the flower and white gel pen too.

Below the flower, I stamped the "Thinking of you" greeting, which is part of the Simon Says Stamp set called "Tiny Words", also stamped in Versafine Clair "Medieval Blue" ink.

From the bottom right hand corner, fading out to the top and the left hand side of the card, I used "Lost Shadow" Distress Ink through a Funky Fossil "Pawprint Background Stencil".

Saturday 21 October 2023

A tag inspired by an Eileen Godwin workshop


I have been itching to get back to my craft desk and get inky, so I made this tag.  It is inspired by two projects on an Eileen Godwin workshop.

As it was a paid workshop, I won't go in to detail of how I made it, but I have listed the products I used:

Distress Oxide Ink:  Mustard Seed, Faded Jeans, Rusty Hinge, Spiced Marmalade & Frayed Burlap.

Archival Inks:  Jet. Black & Red Geranium

Visible Image Stencils:  Strobes & Butterfly Ink

Hobby Art Ltd Stamp:  CS160D Janie's Oliver Owl

Woodware Stamp:  Teasels JGS329

Visible Image Stamp:  Distressed Christmas

Wow Embossing Powder:  Opaque Bright White Super Fine

Friday 20 October 2023

Stampin' Up Sympathy Cards


Sadly, I needed to make a couple of quick sympathy cards, making these two using Stampin' Up stamps.

For the top card, I used the wood mounted Stampin' Up set called "Faith In Nature" for the flower, stamped in Versafine Clair "Twilight" dark blue ink and given a subtle hint of pink using the ink left on my blending brush.  I used a Simon Says Stamp sentiment from their "Tiny Words" stamp set, also stamped in Versafine Clair "Twilight" ink.  I added some dots of yellow and orange Posca pens to the central area of the flower.

For the lower card, I used Versafine Clair "Twilight" dark blue ink to stamp the flower and sentiment which are both part of the Stampin' up wood mounted stamp set called "Hopeful Thoughts".

Wednesday 18 October 2023

Honey Doo Crafts "Lilies" card - inspired by an Eileen Godwin workshop


I am still loving the Eileen Godwin paid workshop.  Last night, I made this card, it's inspired by Eileen but other than the inks, I think I have changed all the stencils and stamps to what I had in my stash... I call it going off piste!

Once again, because it's a paid workshop, I'm not going to go into details about the process, but have detailed the products I have used for my card below:

Ranger Archival Ink:  Chrome Yellow

Ranger Archival Ink:  Orange Blossom

Ranger Archival Ink:  Cornflower Blue

Ranger Archival Ink:  Vermillion

Versafine Clair Ink:  Nocturne

Derwent Inktense Pencils

Gel Pens:  White and Gold

Ranger Enamel Accents:  Black and White

Posca Pens:  Yellow and Orange

Clarity Stamps Stencil:  Stripes

Clarity Stamps Stencil:  Sunshine

Honey Doo Crafts stamp:  Lilies

Lavinia Stamps: Garden Poppy

Tuesday 17 October 2023

Visible Image "Creative Chaos" Card - Inspired by Eileen Godwin On-line Workshop


I couldnt sleep so decided to get up and craft.  I watched another of Eileen Godwin's on-line workshops and decided to try it myself.  This is my take on Project 4 of Workshop 15. 

As before, I won't go into the process of making this card as it is from one of Eileen's paid workshops.  However, I will detail the products that I have used for this card (I didn't have everything that Eileen used, so have improvised).

Visible Image "Atomic Flower" Stencil

Visible Image "Set the tone" stamp set

Visible Image "Grunge Flourish" stamp

Visible Image "Creative Chaos" stamp set

Visible Image "Distressed Christmas" stamp set

Lavinia Stamps "Filigree" stencil

Lavinia Stamps "Wreath Flourish - left" stamp

Wow! Embossing Powders and inks

Versafine Clair Inks

Distress Inks

Derwent Inktense Pencils

Gel Pens

Sweet Poppy Stencils "Pumpkin & Pumpkin Vine" Card - inspired by an Eileen Godwin on-line workshop


Eileen Godwin has inspired me over the years in so many ways.  I decided to book one of her on-line workshops that she had advertised recently, as I really liked the pieces she had made. The workshop I subscribed to was #15 - all about inky layers. 

Because this was a workshop, I am not going to detail the process to make the card.  I have swapped out the background script stamp and the main feature stamps that Eileen used as I didn't have them, so although the background is reasonably close to that of Eileen's sample, the over all finished card looks quite different.

Here's a list of the products I used

Distress Oxide Inks

Distress Inks

Ranger Archival Ink

Element Ink

Hero Art Ink

Wow! Embossing ink and powder

Funky Fossil "Simply Stripes" stencil

Visible Image "Butterfly Ink" Stencil

Visible Image "Distressed Christmas" stamp

Sweet Poppy Stencils "Pumpkin" & "Pumpkin Vine" stamp

Metallic paint

Metallic gold gel pen


Saturday 14 October 2023

Clarity Stamps "Three Blooms" stencilled card


This morning, I have had a play with a new stencil from Clarity Stamps, making this card.

I started with a piece of water colour card.  I spritzed both sides with water, then using a mop paint brush and "Saltwater Taffy" and "Pummice Stone" Distress Oxide Ink", I painted stripes of colour along the card, building up the colour.  I then used the heat gun to dry the card completely.

I lay the Clarity Stamps "Curly Strip Stencil" over the coloured background and applied "Shadow Grey" Archival Ink through the stencil.

Next I lay the new Clarity Stamps "Three Blooms Stencil" over the background and used "Thistile" Archival Ink through the stencil using the two smaller flowers.

I mounted the card on to a piece of grey paper and then on to a white card blank.

I used Versafine Clair "Morning Mist" grey ink to stamp the "So proud of you" greeting, which is part of the Clarity "Congratulations Occasions Sentiment" stamp set.

Finally, I added touched of silver glitter gel pen to areas around the flowers and on the background for a bit of sparkle.

Monday 9 October 2023

Stampers Anonymous "Crazy Bird" Birthday Card


Another card made using one of my older stamp sets that's not seen the light of day for some time. 

I've stamped the Tim Holtz / Stampers Anonymous "Crazy Bird" in Versafine Clair "Morning Mist" grey ink.  I already had a mask for it, so popped that over the stamped image so I could cover it while using the stencils.

I used the Tim Holtz / Stampers Anonymous "Chevron Layering Stencil" with Ranger "Prickly Pear" Archival Ink.

Over the top of that, I then used the Tim Holtz / Stampers Anonymous "Dot Fade Layering Stencil" with "Lost Shadow" Distress Ink.

I then went around the edge of the card working inwards towards teh stamped image with Ranger "Garden Patina" Archival Ink.

I mounted the topper on to blue card and then on to a kraft card blank.

I stamped the sentiment, also part of the "Crazy Bird" stamp set in Versafine Clair "Morning Mist" grey ink.

I coloured the bird using three Derwent Inktense Pencils, applied with a paint brush.  I used "Golden Sun", "Cadmium Orange" and "Malibu" for the eyes.  I added touches of white gel pen too.

I grounded the bird using "Weathered Wood" Distress Oxide Ink and a 2B pencil.  I added some dots of yellow and orange Posca Pens to replicate flowers.

Finally, I added some dots of Ranger "Glossy Accents" to the eyes of the bird and set aside to dry.

Visible Image "Follow Your Heart" Card


Another card I've made today, this time using Visible Image products.

In the background I've used a selection of "Elements Inks" swooshing the card through the colours till it was covered.  These are the shades of ink I used:

  • Confetti
  • Violet Chalk
  • Bermuda
  • Della Blue
  • Blue Lagoon 
  • Dark Denim
I then stamped the Visible Image "Follow Your Hear" stamp in Versafine Clair "Twilight" dark blue ink in the middle of the square card.

Next, I used the Visible Image "Supanova Stencil" with "Majestic Violet" Ranger Archival Ink, uisng the same ink to darken the corners.  

I then inked the edges of the card with Versafine Clair "Twilight" ink and mounted it on to dark blue card and then on to the card blank.

Finally, I embellished the stamped image by using a white and pink Posca Pen and also added some white dots of Ranger "Enamel Accents".

Penny Black "Delicate Florals 40-103" Birthday Card


Another early start today, but I quite like the quiet and stillness of early morning.  It allows my mind to drift without the interference of the tv, radio or the dog barking.  I had a lovely little play session making this pretty card. 

I used a Penny Black cling stamp for the image called "Delicate Florals 40-103".  I coloured the stamp with three shades of Distress Markers (Shabby Shutters, Peeled Paint and Worn Lipstick), I spritzed the stamp with water then stamped the image on to water colour card.  I gave it a quick blast of the heat gun to dry the surface.

I used a wet paintbrush to bring some of the colour to other areas of the stamped image and then used three shades of Derwent Inktense Pencils (Spring Green, Leaf Green and Pink Flamingo), applied with a paint brush for extra depth of colour.  I gave it another blast of the heat gun then added a touch of subtle shimmer using a gold sparkle gel pen.

Finally, I used Versafine Clair "Shady Lane" green ink to stamp the sentiment, which is also by Penny Black and is part of their "Not older, Better 30-896" clear stamp set.

Sunday 8 October 2023

Tim Holtz / Stampers Anonymous "Urban Tapestry CMS061" Anniversary Card


Continuing my play with Tim Holtz / Stampers Anonymous stamps and stencils, I made this anniversary card.

I started with a piece of white card measuring four and a half inches square.  Over the bottom right hand area, blending up towards the top left I used "Sundance" Element Ink.  

I then lay the Tim Holtz / Stampers Anonymous "Bouquet Layering Stencil THS143" over the top and applied "Russet Orange" Element ink through the stencil with a blending brush.

I used "Pine Cone" Versafine Clair ink to stamp the undergrowth area in the bottom right hand corner.  The stamp is part of one of my oldest Stampers Anonymous stamp sets, it's called "Urban Tapestry CMS061".

Once I was certain that the ink was dry, I used the Tim Holtz / Stampers Anonymous "String Layering Stencil THS004" with "Red Geranium" Versafine Clair ink.

I inked the edges of the card using Versafine Clair "Acorn brown ink and then added some red dots around the stamped area using a Posca Pen.

Finally, I stamped the "Happy Anniversary" sentiment which is part of a Hobby Arts stamp set called "General Greetings CS016D" stamped in Versafine Clair "Pinecone" Dark Brown Ink.

Saturday 7 October 2023

Tim Holtz / Stampers Anonymous "Mini Bouquet - CMS269" stencilled tag


I've entered this tag in to the "Country View Crafts" October challenge.  It has a theme of "Autumn Magic".

I used a manila coloured tag, using the Tim Holtz / Stampers Anonymous "String Layering" stencil  with "Orange Blossom" Ranger Archival Ink.

I then used the Tim Holtz / Stampers Anonymous "Bouquet Layering" stencil with "Monarch Orange" Ranger Archival Ink.

Next, I used the Tim Holtz / Stampers Anonymous "Rosette" stencil with "Red Geranium" Ranger Archival Ink.

Finally Adding some a grunge look using the Tim Holtz / Stampers Anonymous "Grime" stencil with Versafien Clair "Fallen Leaves" a dark brown ink.

I used Versafine Clair "Acorn" brown ink to stamp the three flowers, which are part of the Tim Holtz / Stampers Anonymous stamp set called "Mini Bouquet - CMS269".  I stamped the flower heads again on an off cut of card and coloured them with Derwent Inktense pencils, Posca Pens and gel pens.  I fussy cut the flowers and stuck them on to the tag.

I added some touches of gold gel pen to areas of the tag, some green Pastel Pencil and some black Ranger "Enamel Accents" too.

Friday 6 October 2023

Clarity Stamps "Birds on Branches" Congratulations Card


The rain has been lashing against the windows, so I'm up at silly o' clock again, making a card.  

I used a couple of Clarity stencils for this card.  The first one, on the right in the background, is the "Birds Decorative Panel" stencil.  I used the pink ink that was left on my stencil brush to achieve the soft colour.

The second stencil is the "Birds On Branches" stencil, I used just one of the branches on the stencil, coloured with two shades of Ranger "Archival Inks".  I used "Watering Can" grey ink and then added a touch of "Vibrant Fuchsia" pink ink on the chest area.

I used one of the Clarity "Occasions Sentiments Congratulations" stamps, stamped in "Charming Pink" Versafine Clair ink for the sentiment.

Wednesday 4 October 2023

Lavinia Stamps "Poppies" Thinking of You Card


I had a stencil and stamp play this morning making this sympathy card.  Fortunately, I don't need it at the moment, but I always keep a few to hand... just in case!

I started with a piece of white card.  I lay the Lavinia Stamps "Red Brick" stencil over the top, so that the stripes ran vertically and secured with a low tack tape.  I then added rows of tape so that I had two sections that I could ink up on the left hand side of the card.  

On the far right I used "Lost Shadow" Distress Ink.  On the far left I used "Garden Patina" Ranger Archival Ink. I then lifted the tape and repositioned it so that I could colour the central area, this time I used "Violet" Ranger Archival Ink.

After lifting and cleaning the "Red Brick Stencil", I then lay another Lavinia stencil over the top of the card, this time using the "Ornate Stencil" again, securing the stencil with low tack tape.  Working from the left hand side and fading out to the right, I applied "Watering Can" Ranger Archival Ink with a blending brush.  This resulted with the pattern being stronger over the coloured background and gradually getting lighter to the right hand side of the card.

I then moved on to the stamping.  I selected two Lavinia stamps:  the "Garden Poppy" which is the taller of the two and the "Wild Poppies" stamp.  I stamped both in Versafine Clair "Nocturne" black ink.  Stamping the Garden Poppy first, so that I had the correct height and then the "Wild Poppies" either side.

While the "Nocturne" was out, I also stamped the "Thinking of You" sentiment which is part of the Funky Fossil Designs stamp set called "Stripped Back Sentiments".

I mounted the card on to a piece of black paper and then on to a card blank.  Finally, I added some touches of white gel pen and yellow Posca Pen to the poppy heads.

Tuesday 3 October 2023

Tim Holtz Idea-ology "Paper Dolls Christmas 2023" Tag


Yesterday, I placed an order with Country View Crafts, I was amazed when it arrived this morning.  You can't get better service than that!  Here's a photo of my goodies.  I got a couple of stencils and a pack of Idea-ology Paper Dolls.  Because the order was a little over £20 I also got free postage!


I obviously couldn't wait to have a play so made this tag.  Starting with a manilla coloured tag, I swooshed it through "Tea Dye" Distress Ink spritzed with water.

I used the Tim Holtz / Stampers Anonymous "Chevron Layering Stencil - THS127" with two shades of Ranger Archival Ink, using "Peat Moss" and "Vermillion" shades.

I then lay the Tim Holtz / Stampers Anonymous "Rosette" stencil - THS092" over the top and used "Red Geranium" Ranger Archival Ink through the stencil.

Over some of the plainer areas, I used a stamp with a crazing design, from the Tim Holtz / Stampers Anonymous cling stamp set called "Mini Holidays - CMS142", which I stamped in Versafine Clair "Acorn" Brown ink.

I inked the edges of the tag using "Acorn" and "Chianti" Versafine Clair inks.  I then used some metallic gold paint to splatter gold speckles across the surface of the tag.

I picked out a couple of designs from the Tim Holtz Idea-ology "Layers & Paper Dolls, Christmas 2023" set and coloured the figure using Derwent Inktense pencils, adding colour to the cheeks, lips hair and buttons.  I then stuck the figure in to position and layered the flower on top.

Finally, I chose a phrase from the Tim Holtz Idea-ology "Clipping Stickers" saying "Diary of Events" and stuck that down.  Then mounted the tag on to some green card.


Netgalley Book Review - "That Festive Feeling" by Heidi Swain


I am a huge fan of Heidi Swain's writing so I was very fortunate to read this book before pulication via Netgalley and I am so glat that I did.

This book was such a treat to read, packed with lots of festive feel good feelings and a romance too.  It's a stand-alone book, but can also be read within a series of books written by Heidi Swain.  

The book takes us back to to Nightingale Square, where newly divorced and homeless Holly, is house sitting for friends over the Christmas period.  A chance meeting with an eccentric lady called May, while walking around the lake one morning, changes both their lives as they throw themselves into helping the community project called "The Chapel" and the forthcoming Christmas panto.

I really enjoyed this book, I had to ration my reading of it so that I could enjoy it for longer.  A lovely book that I highly recommend.

Sunday 1 October 2023

Country View Crafts "October - Autumn Magic" challenge entry card


Country View Crafts are now holding their challenges on a dedicated Facebook group rather than their blog.  October is the first challenge on the group and has a theme of "Autumn Magic".  This is my challenge entry.

I started by using a gel plate background. using a 4" round gel plate with Lavinia "Sundance" and "Olive" Element inks. I splattered water droplets across the surface of the gel print which bleached the area where the droplets were and dabbed dry with a piece of kitchen roll and then used my heat gun to completely dry the surface.

I ran an anti-static bag over the surface of the card before stamping the leaf over the gel print.  The leaf is part of a Tim Holtz / Stampers Anonymous cling stamp set called "Pressed Foliage - CMS376".  I stamped in Versafine Clair "Acorn" brown ink, then coated the stamping with Wow! Embossing "Metallic Rich Gold" embossing powder and heat set with the heat gun.

I used assorted gel pens and two Derwent Inktense pencils to add colour to the leaf area.  I also added gold dots to the gel plate area too.

In the background, I used two Tim Holtz/ Stampers Anonymous stencils.  I used Versafine Clair "Shady Lane" green ink through the "Stripes Layering Stencil - THS004" and "Rusty Hinge" Distress Ink through the "Dot Layering stencil - THS006".

I inked the edge of the card using Versafine Clair "Shady Lane" green ink and then added some gold gel pen too.

I mounted the card on to a piece of brown card, then on to a white card blank.  Finally, I added a Tim Holtz Idea-ology "Small Talk" sentiment sticker.


52 Week Mini Art Card/Tag Challenge - Taster Tag for October 2023


Well here we are on the 1st October.  I have no idea where these months are disappearing to.  As it's the first of the month, it means it is time for another prompt for the 52 Week Mini Art Card/Tag Challenge.

The Prompt for October is:  Vintage/shabby

Just a reminder, if you would like to take part in the challenge, check out the Facebook Group, where lots of lovely people are already sharing their tags and cards.  Here's the link to the group.

***

Here's how I made my tag:

I started by using a Stamping Up Scalloped Edge punch to create the decorative bottom of the tag.  I then coated the decorative edge with Versafine Clair "Glamorous" ink.

I found a scrap of patterned paper that I thought had a vintage vibe.  I used double sided sticky tape to stick it to the tag and cut it to size.  I then inked the edges of the tag with Versafine Clair "Glamorous" ink. Once dry, I went over the edges with a metallic gold pen, colouring the ring re-inforcer with the same colour too.

I used Versafine Clair "Warm Breeze" ink to stamp the Lavinia Stamps "Sacred Spells' text across the surface of the tag.

I then decided to distress the patterned paper a little more, by using Versafine Clair "Glamorous" ink through the Clarity Stamps "Stripes Stencil".  This look reminded me of 80's style wallpaper!

I used metallic gold paint and a fan paint brush to splatter the paint from the bottom left corner to the top right hand corner.

Once the paint was dry, using double sided sticky tape, I added a small piece of cream coloured braid along the join of the patterned paper and the tag. I then added gold dots to the middle of the scallops at the bottom.

At this stage, I mounted the tag on to a background of cream coloured card, as I knew it would be more tricky once the flowers were in place.

I die cut some leaves using two die sets (Sizzix "661206 Golden Greens" and Stamping Up "Botanical Blooms") using two shades of green cardstock.  I used a wet glue to stick them to the tag, as it allowed me a little movement into the correct position.

In my stash, I found some paper roses.  They were a bit too pink, so I toned them down by painting "Crimson" Derwent Inktense on to areas of the flowers.  I curled the metal stems around a pencil then stuck the flowers to the tag, using Ranger "Glossy Accents" to keep them in place.

Finally, I found a couple of Tim Holtz Idea-ology Clipping Stickers with words I felt that suited the tag:  "to keep" and "in my heart" and stuck them on to the tag.  I added a few small gold metal discs to the surface too.