52 Week Mini Art Card/Tag Challenge

Friday 30 June 2023

Sweet Poppy Stencils Christmas Botanicals "Snowberries" Card


The weather here seems to have reverted to a more Autumnal feel with it being blustery and raining.  I think this has swung me into Christamas mode!

I started with a 6x6" piece of white card.  Using Versafine Clair "Cheerful", I stamped the sentiment, which is part of the Sweet Poppy Stencils "Festive Phrases" stamp set.

Using Versafine Clair "Shady Lane" green ink, I multi stamped the Sweet Poppy "Snowberries" around the "Merry Christmas" sentiment.

I used "Fern Green" Archival Ink to blend the edges of the card, then edged it with Versafine Clair "Shady Lane" green ink.

To colour the leaves, I used Derwent Inktense pencils, using "Fern" as the base layer then adding highlights using "Beech Green".  For the branches I used "Baked Earth".

At this stage, I decided I wanted the sentiment to be golden, so went over the stamped image with a metallic gold pen.

I then coloured the berries using "Antique Linen" Distress Oxide Ink, applied with a brush.

Finally, I went around the majority of the leaves using a gold shimmer gel pen.

Clarity Stamps "Deco Stencil" Birthday Card


A quick male birthday card from me today, using Clarity Stamp products. 

I masked off a piece of white card and then lay the Clarity Stamps "Deco" stencil over the top.  I masked off most of the stencil, so that only one line of the design was showing in the middle of the card.  I then used Versafine Clair "Medieval Blue" ink through the stencil.

I removed the deco stencil and then lay the Clarity "Stripes" stencil over the top.  I used a blending brush with "Shadow Grey" Archival Ink through the stencil.  Then removed the masking tape.

Using Versafine Clair "Medieval Blue" ink, I stamped the greeting, using Clairty "Happy Birthday Occasion Sentiment" stamp set.

Finally, at the tip of each of the deco areas I added a dot of white gel pen.  Then I added larger white dots using Ranger "Enamel Accents".

Thursday 29 June 2023

Lavinia Stamps "Large Heart" Anniversary Card


Here's an anniversary card I've made using goodie by Lavinia Stamps. 

I started with a piece of white card measuring four and a half inches square, laying the Lavinia "Replenish" stencil over the top and applying "Pink Peony" and "Violet" Ranger Archival Ink through the stencil.  Around the edge of the card I used a blending brush with "Dusty Concorde" Distress Oxide Ink.

In the middle of the card, I stamped the Lavinia "Large Heart" in Versafine Clair "Morning Mist" grey ink.  I then stamped the heart again on a piece of white card, then coated the stamped image in Wow! Clear Embossing Powder and heat set.

I coloured the heart on the white piece of card using "Fuchsia" Derwent Inktense pencil, applied with a paint brush.  Once dry, I cut out the heart close to the stamped edge.  I then inked the cut edge of the heart using Versafine Clair " Morning Mist" grey ink then put the heart to one side.

Returning to the piece of card with the stencilled background and the stamped heart in the middle, I then used the Lavinia "Texture 4" stamp with Versafine Clair "Morning Mist" grey ink to stamp the stone detail , ensuring it extended past the edge of the heart stamp. I then painted the stone texture pattern, using "Weathered Wood" Distress Oxide ink.

I added wet glue to the back of the heart and stuck it into postion over the stamped heart in the middle of the card.  I then used the "With Love" sentiment from the Lavinia "Heartfelt Verse" sentiment set, stamped in the bottom right hand corner.  Finally, I added some touches of silver glitter pen to areas of the card and some dots of Ranger White "Enamel Accents".


Wednesday 28 June 2023

Honey Doo Crafts "Delicious Dahlia" Birthday Card


Another card ticked off my "to make list", this time using a stamp by Honey Doo Crafts.

For the main floral image, I used Versafine Clair "Purple Delight" ink to stamp the "Delicious Dahlia" stamp by Honey Doo Crafts.  Once stamped, I quickly coated the stamped area with Wow! clear embossing powder and then heat set.

I used two shades of Ranger Archival Inks:  Pink Peony and Shadow Grey through the Lavinia Stamps "Dynamic Stencil" to create the background pattern, fading the colour out towards the edges.

I coloured the dahlia blooms using an "Amethyst" Derwent Inktense pencil applied with a pencil.  I then added some splatters of the same colour, across the surface of the card.

Once dry, I used Versafine Clair "Purple Delight" ink to stamp the "Happy Birthday" sentiment and the small outline hearts using a stamp set by Lawn Fawn called "Simply Sentiments".

I then started to add the finishing touches.  I used a yellow and orange Posca Pen for the central areas of the flowers and added dots of Range White Enamel Accents to areas around the stamped flowers.

Stencilled "New Home" Card


Do you find that some months are busier than others when it comes to things to celebrate.  July is one of those months and on top of the usual birthdays and anniversaries there are a couple of new home cards needed too. 

Today, I decided to be disciplined and at least tick one of the cards off the list of pending makes. For this card, I have used products from several copanies.

I started by using two shades of Archival Inks (Pink Peony and Violet) through the Lavinia Stamps "Replenish Stencil" on the outer edges of a white card blank.

I then cut a piece of white card 4" square and used low tack masking tape to mask off the edges.I used the same shades of Archival  Inks through the same stencil in the central area of the card. Then removed the masking tape.

Next I die cut the little house shape.  The die is part of the Papertrey Ink stamp an die set called "Love Lives Here".  I cut two houses, sandwiching them together with glue.  I then coated the top one with Versafine Clair "Purple Delight" ink.  I then stuck the house into the central stencilled area of the card.

I used Versafine Clair "Purple Delight" to stamp the sentiment, which is part of the Funky Fossil Designs stamp set called "Home".

I then assembled the card, mounting the inner area on a co-ordinating piece of card before sticking it on to the stencilled card front.


Tuesday 27 June 2023

Clarity Stamps "Simple Rose" Brusho Birthday Card


Back home again after a few days away and was happy to find my subscription stencil from Clarity Stamps through the letterbox.  I obviously had to play once the first load of washing was in the machine. 

I rummaged in my pre prepared backgrounds file and came across a gel plate background in light blue and grey tones, so though that would be ideal for this.

I lay the "Simple Rose Stencil #109", over the background, then sprinkled "Leaf Green" Brusho granules, lightly over the leaf area. Over the roses area, I then sprinkled Terracotta and Crimson Brusho. I then lightly spritzed the area till the granules took the water and started to spread.  I then dabbed the surface water from the area.  Removing the stencil, I then used my heat tool to dry the surface.

Some of the colours had run further than the area I wanted them in, so I decided to cut the area down.  I then fussy cut the shape following the line of the stencil and stuck on to a piece of Kraft card.

Using Versafine Clair "Shady Lane" green ink, I stamped the greeting, using the A6 Clarity "Happy Birthday Occasions Sentiment" stamp set.  I then die cut into a banner shape and stuck in the middle of the card, using foam pads to elevate the sentiment.

Thursday 22 June 2023

Sweet Poppy Stencils "Festive Phrases" Card


A quick stencil play making this card using Sweet Poppy Stencil products. 

I masked off the edges of a piece of 7x7" card using a low tack tape, to ensure they stayed clean.  I then positioned the Sweet Poppy "Aperture Circle Stencil".  

Over the top of that I lay the Sweet Poppy "Plaid Back Plate stencil" and applied Versafine Clair "Verdant" light green ink through the stencil.

I lifted and repositioned the Plaid stencil, applying Versafine Clair "Shady Lane" a mid green coloured ink, through the stencil to create a green tonal tartan look.

I lifted both the Plaid and circle stencil, then lay the Sweet Poppy "Holly Back Plate Stencil" over the card.  I used Versafine Clair "Rain Forest" dark green ink applied with a blending brush through the stencil.

Removing the stencil, I left the piece to dry before dragging an anti-static bag over the surface of the card.

I then used the "Merry Christmas stamp", part of the Sweet Poppy "Festive Phrases" stamp set, stamped in Versafine Clair "Chianti", which is a rich red colour.

I quickly coated the stamped image with Wow! Clear Embossing Powder and then heat set.

Finally, I removed the tape around the edge of the card and then added red to the berries of the holly using a Posca Pen.

Wednesday 21 June 2023

Stencil Girl "Pretty as a peacock" gel plate card


I've had a play this morning, using a background I'd made on the gel plate months ago.  I really liked the look of it and I kept putting off using it for another occasion.  I decided today would be the day I used it.  I'd created it by adding orange, blue and grey Pan Pastels to make it.

I paired my lovely background with a new to me stencil, by Stencil Girl Products, called "Pretty as a peacock stencil.

I lay the stencil over the background and secured all edges with low tack tape.  I then added blobs of That's Crafty "Black Texture Paste" along the top of the tape and then dragged the straight edge of a piece of metal across the surface, repeating the process till all areas were covered.

I set aside the stencil and the piece of metal in a tub of water so that I could clean it afterwards.  If you don't do this, you'll find them hard to clean.

I set aside to dry the image and then cut it to size.  A few areas of the background had a few white areas, so I topped up the colour in those areas by using Pastel Pencils.

Tuesday 20 June 2023

Sweet Poppy Stencils "Ivy Flourish" Christmas Card


My order of the new Christmas "Botanicals" stamps arrived from Sweet Poppy Stencils, so I wasted no time in trying one of the new stamps out. 

I used Versafine Clair "Shady Lane" green ink to stamp the "Ivy Flourish" stamp, colouring it with four shades of Derwent Inktense pencils, applied with a brush.  I used Lime Green, Spring Green, Light Olive and Leaf green.  I then created a slight shadow for the lower leaves by going around the bottom edges of the leaves with a 2B pencil.  I then used a metallic gold gel pen for the veins of the leaves.

I lay the Sweet Poppy "Grid Plate" over the top.  Using a blending brush with "Old Paper" Distress Ink I created a quiet background for the ivy.

I didn't have any suitable Sweet Poppy sentiments, so I used one from a Simon Says Stamp set called "Tiny Words - Christmas", stamped in Versafine Clair "Shady Lane" green ink.

Clarity Stamps "Queen Anne's Lace Striped" card


I couldn't resist a little ebay purchase of a pair of Clarity stencils.  They arrived today, so of course I had to have a little play.  I've used one of the new ones (to me) on this card. 

I used two shades of Archival Inks:  Sunflower and Orange Blossom, through an area of the Clarity 7x7 "Queen Anne's Lace" stencil.

Over the top of that, I lay the Clarity "Stripes" stencil, applying "Monarch Orange" Archival Ink through the stencil making the bottom darker and the top lighter.

Using Versafine Clair "Morning Mist" grey ink, I stamped the greeting which is part of the Clarity "Entwined Sentiment" stamp set.  

I stamped the sentiment again on a post it note, fussy cut it and popped it over the sentiment on the card.  I then used a fan shaped paint brush to add fine splatters of Dr PH Martin's Bleed Proof white paint.  I then removed the mask and mounted the card onto a grey mat and then a white card blank.

Lavinia Stamps "Seren" and the fairy dust card


It was a Lavinia Stamps session first thing this morning, making this card. 

I found a small 4x4" off cut of Lavinia Scenescapes paper, so decided to work within that space to make a card.

In the central area I used "Leaf Green" Archival ink through the Lavinia "Honeycomb Stencil".

I then used white "Pan Pastel" through the Lavinia "White Orbs" stencil around the top two thirds of the card.

Using Versafine Clair "Medieval Blue" ink, I stamped the Lavinia "Seren" the fairy, "Mrs Wallace" the hedgehog, the "Fairy Dust" sentiment and the "Small Branch" on either side of the card.

Using Versafine Clair "Rain Forest" and "Green Oasis" I darkened the top right hand corner of the card.

I then created the landscape by using a Lavinia "Hill Mask" with Versafine Clair "Rain Forest" ink.

I added lighter areas using Van Goch pastel pencils.  I added white dots to the "Small Branches" to replicate white berries.

I then used a yellow and orange Posca Pen, to brighten the lantern, using a pastel pencils on the outer edge of the lantern.

I used Versafine Clair "Green Oasis" with one of the stamps from the "Foliage Set" of stamps.  I then used yellow and orange Posca Pens to create the impressions of flowers on the foliage.  

I used a gold shimmer gel pen on the fairy and the spines of the hedgehog.

Monday 19 June 2023

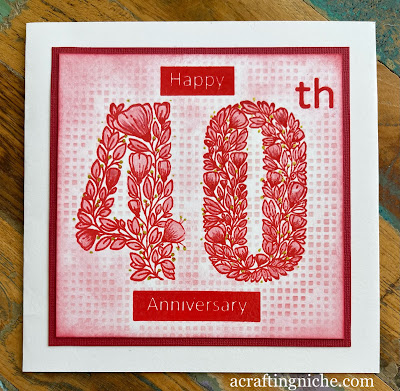
Funky Fossil "Blooming Numbers" Ruby Anniversary Card


I've made this Ruby Anniversary card by stamping the Funky Fossil Designs "Blooming Numbers" stamps in Versafine Clair "Tulip Red" ink and then coating with Wow! Clear Embossing Powder and heat set.

I then inked the edges of the card, lightly blending towards the numbers using "Lumberjack Plaid" Distress Oxide Ink.  I then lay the Funky Fossil "Micro Square Stencil" over the top and applied the same ink through the stencil using a blending brush.

Finally, I coloured the flowers and leaves using Derwent Inktense pencils, applied with a paint brush and added dots of gold for the berries.

Honey Doo Crafts "Lilies" Get Well Soon Card


I've been sorting through some of my stamps, with a view to selling some of the ones I rarely use these days and came across one stamp set that I felt the urge to use, so made this card. 

I started with the base using three shades of Archival Inks (Chrome Yellow, Sunflower and Orange Blossom), through the "Abstract Flowers Stencil" by Funky Fossil Designs.

Using Versafine Clair "Nocturne" black ink I stamped the Lily (part of the Lilies stamp set) by Honey Doo Crafts.  While the ink was out, I also stamped the "Get Well Soon" greeting which is part of the "Stripped Back Sentiments" stamp set by Funky Fossil Designs.

I used two shades of Derwent Inktense pencils, applied with a brush to colour the liy.  I then used a gold shimmer gel pen over the surface for extra interest.

Finally, I added three dots of black Ranger "Enamel Accents" for added dimension.

Sunday 18 June 2023

Sweet Poppy Stencil "Oriental Cherry Blossom" Birthday Card


This morning I have made a birthday card using a couple of Sweet Poppy Stencils.

I used the Sweet Poppy "Plaid Back Plate" with "Shadow Grey" Archival Ink, fading the colour out to the edges.

I then positioned the Sweet Poppy "Oriental Cherry Blossom" stencil over the top and used the following shades of Archival Ink through the stencil, applied with blending brushes:  Vivid Chartreuse, Pink Peony, Fern Green, Vibrant Fuchsia and Violet.

For the middle of the flowers, I used a green pastel pencils,  

Using Versafine Clair "Morning Mist" grey ink, I stamped the sentiment, which is part of the Sweet Poppy "Autumn Leaves" stamp set.  

Finally, I added some dots of Ranger white "Enamel Accents" for extra detail.

Saturday 17 June 2023

Lavinia Stamps "Tilly and Tango" Card


This was a quick monochrome card using Lavinia Stamps and a Funky Fossil stencil. Throughout all of this card, I have used Versafine Clair "Monarch" purple ink.

I used the Funky Fossil "In the Spotlight" stencil with Versafine Clair "Monarch" to create the background "spotlight" area'.  I then used the same ink through the Lavinia Stamps "Filigree" stencil over the top to get the over all pattern.

Using "Monarch" again, I stamped the Lavinia mouse pair called "Tilly and Tango".  I then stamped the Lavinia "Star Cluster" and finally the sentiment, which is part of the Lavinia "Heartfelt Verse" set of stamps.

I added a few dots of white gel pen to the stars and for the eye area, with a touch of pastel pencil to ground the mice.

Friday 16 June 2023

Sweet Poppy Stencils "Botanicals Thistle Stem" Tag


I
t seems quite some time since I last made a tag, so I decided to have a play making this one. 

I started with a cream coloured blank tag.  On my glass mat, I dabbed the following Distress Oxide inks:  Dried Marigold, Rusty Hinge, Stormy Sky and Chipped Sapphire. I strized each one with a little water then ran the tag through the colours, after each colour, I used the heat gun to dry the tag.  I continued doing this till the surface was covered.

I inked the edges of the tag with "Chipped Sapphire" Distress Oxide Ink and then edged it with Versafine Clair "Nocturne" black ink.

Using Versafine Clair "Nocturne" I multi stamped the Sweet Poppy "Botanical Thistle Stem Stamp". I coloured the image with Van Goch Pastel Pencils and a white gel pen.


*Edited to add

I forgot to mention the spotlight area.  I used a die cut circle of plastic and Versafine Clair "Nocturne" black ink with a finger dabber to create the dark ring around the thistle and bee.
Starting in the middle and working my way outwards and rotating the tag, so that I was always working in the same direction.

I used a white gel pen around the inner edge.  I also used a white Pastel Pencil to lighten the area within the circle.

Thursday 15 June 2023

Clarity Stamps "Vases" Thank You Card


I've made another card today, using a selection of Clarity Stamp products. 

I started by masking off the vase and laying the Clarity "Leonie Pujal Circle Edge Stencil" with "Sky Blue" Archival Ink, blending the colour outwards.

I then lifted the stencil and mask and replaced with the Clarity "Vases Stencil", using "Tea Rose" and "Shadow Grey" Archival Inks through the stencil.

I then stamped the Clarity "Dandelions" in first and second generation stamping using "Versafine Clair "Morning Mist" grey ink.  I used the same ink to stamp the sentiment, which is part of the Clarity "Occasion Sentiment Thank You" stamp set.

Finally, I used a Unibal Signo Gold Metallic pan to colour the dandelions.

Sweet Poppy Stencils "Sweet Pea" Card


Father's Day is just around the corner.  Sadly my Dad is no longer with us and I miss him every day.  His favourite flower was the "Sweet Pea", so I decided to make a card for him regardless.

I have used the Sweet Poppy Stencils "Botanical Sweet Pea" stamp, stamped in second generation stamping using Versafine Clair "Morning Mist" grey ink.  

I coloured the image using Derwent Inktense pencils, applied with a brush and a white gel pen.

I used the Sweet Poppy "Hugs and Kisses" stamp, stamped in Versafine Clair "Morning Mist" grey ink, then finally added three white dots, using Ranger "Enamel Accents".

Monday 5 June 2023

Lavinia Stamps "Zia" and the "Tree of Dreams".


I have no idea where this card came from in my head.  The only thing that I had in my mind was to use the Lavinia Stamps "Zia" as I've never used her before and she has been in my stash since the Steampunk collection were released.

I stamped "Zia" in Versafine Clair "Acorn" in second generation stamping, so that the image was quite light.  I then stamped another "zia" on a piece of scrap paper, fussy cut it and placed over the other one to use as a mask.

I then stamped the Lavinia "Texture 1" stamp in Versafine Clair "Morning Mist" either side of the face.

While the mask was in position, I stamped the "Tree of Dreams" in Versafine Clair "Acorn" brown ink. I used the same ink to multi stamp teh "Small Branch".

Over the Texture area and the "Tree of Dreams , I used a blending brush with "Antique Linen" Distress Oxide ink.  I decided to add a little brown and green to the background by using the Archival Inks called "Coffee" and "Leaf Green"

I removed the mask and coloured Zia's face using three shades of Distress Oxide Inks:  Tatterred Rose, Spun Sugar and Picked Raspberry applied with a brush.  I coloured her lips and eyes using a green Derwent Inktense Pencils.

I then started work on the hair area using the small Lavinia Pound stamp called "Mini Leaf Creeper" stamped in first and second generation stamping in Versafine Clair "Verdant" and Shady Lane.

I edged the card using "Bluebird" Archival Ink.  I then stamped the bird, part of the Lavinia "Birds Collection" in Versafine Clair "Acorn" brown ink.  

Finally, I added touches of white gel pens to the hair/leaf area.  I added the sentiment of "Dream" which is part of the "Inspire Me" stamp set, stamped in Verafine Clair "Morning Mist" grey ink.

Clarity Stamps "Dandelions" Sympathy Card


Sadly I needed a sympathy card, so made this one using Clarity Stamps and one of their stencils. 

I used the Clarity Stamps "Abstract Droplet Stencil" with Versafine Clair "Cheerful" yellow ink, fading the colour from the bottom right hand corner to the top left.

Using Versafine Clair "Blue Belle" ink, I stamped the Clarity "Dandelions" and the greeting from the "Entwined Sentiment" stamp set.

Finally, I added a few dots of white Ranger "Enamel Accents".

Sunday 4 June 2023

Clarity Stamps "Abstrace Squares" Male Birthday Card


I was looking at the Clarity "Abstract Squares" stencil and decided it would make a good male birthday card, so had a quick play.

Rather than using the whole Clarity Stamps 7x7" Abstract Squares Stencil, I opted to used less than half, placing it off the edge of the card.  Through the shapes, I used an assortment of Archival Inks.  The shades I used were:  Fern Green, Peat Moss, Garden Patina, Shadow Grey, Cobalt and Coffee.

I used Versafine Clair "Twilight" dark blue ink to stamp the sentiment, which is part of the Clarity "Christmas & Celebration Words" stamp set.  I used the same ink to stamp the "Kiss by Clarity - Doodle Discs and Framers" for the circular inked area.

Lavinia Stamps Textured Seascape Card


Last Friday, the lovely Amanda Branston did a demo of using texture paste with the new Lavinia Stamps Dinkles.  I was impressed, so decided to have a go myself. 


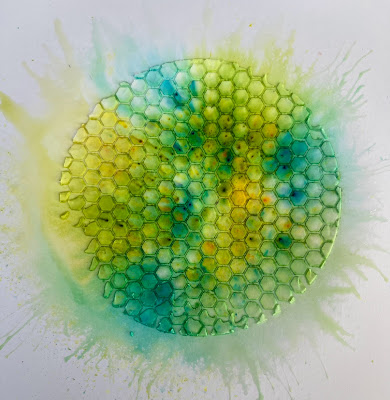
I lay a Sweet Poppy aperture circle stencil over my piece of card, then lay the Lavinia Stamps "Honeycomb Stencil" over the top, securing it with a piece of low tack tape.  I then applied Tim Holtz/Ranger Matte Distress Texture Paste with a palette knife.  I then used my heat gun to dry it. 


Once I was happy the paste was set, I repositioned the circular Sweet Poppy metal stencil and then spritzed the inner area of the circle with water. I then tapped small amounts of three shades of Lavinia Stamps "Dinkles" on to the spritzed surface, using Deep Yellow, Lime Divine and Sea Blue shades.  I gave an added spritz of water t ensure the powder dispersed then used my Tim Holtz hand held air puffer (I can't remember the proper name for it, but it's in the photo above), to blow the surplus water off the textureed area onto the white card. I continued to rotate the card so that the ink was blown outwards all the way round. I used a heat gun to dry off the area.


At this stage, I really wasn't sure what I was going to do with this textured circle, then I thought of a fishing net and that gave me the idea of a seascape.

I stamped a selection of Lavinia Stamps ocean stamps (Shoal of fish, Fish Set, Seaweed 2, Seaweed and Urchins) in Versafine Clair inks. I coloured them with Derwent Inktense pencils and then fussy cut and stuck the images on to the textured card.

Finally, I added some touches of silver glitter gel pen and then mounted the card on to a dark mauve piece of cardstock and then on to a card blank.

Saturday 3 June 2023

Funky Fossil Designs "Doodle Alpha Blocks" Diet Journal Cover Page


Funky Fossil Designs recently released a stamp set, that shouted to me to use in my diet journal.  The stamp set arrived in the post today, so I got busy creating a page... I appear to be in orange mode today, this being the second orange coloured make of the day!

I started by digging around in my background folder, where I found two backgrounds using Funky Fossil stencils with Pan Pastels.  I used the "In the grove stencil" and the "Lots of pips stencil", I don't recall which Pan Pastel colours I used.

I distressed the "Lots of pips" background by using a white pastel pencil and dragging a green Versafine Clair ink over it.  I then stamped the Funky Fossil "A7 Sea Life stamp in Versafine Clair "Rain Forest".

I did cut the "In the grove" background and inked the edges of it in Versafine Clair "Rain Forest" green ink and then stamped the Funky Fossil "Doodle Alpha Blocks" in the same ink. I used a wet glue to stick the circle on to the "pips" background and then stamped the word "Journal" in the same ink.

Finally, I added touches of white gel pen to areas of the letters and dots of "Outrageous" Liquid Pearls to the "Sea Life" pattern in the background.

Clarity Stamps "Kiss by Clarity Doodle Discs" Thank You Card


This morning, I have had more play with Clarity products making this thank you card. 

I started with a spray ink background I'd made some months ago using orange and yellow spray inks.

Using Versafine Clair "Medieval Blue" ink, I stamped the "Kiss by Clarity - Doodle Discs" in a row.

I then used "Bright Tangello" Archival Ink through the Clarity "Stripes" stencil.  I decided it needed something more, so used "Poppy" Archival Ink through areas of the Clarity "Orbit" stencil.

Finally I stamped the "Thank You", part of the Clarity "Entwined Sentiment stamp set" in Versafine Clair "Medieval Blue", I then inked the edges of the card in the same ink.

Friday 2 June 2023

Clarity Stamps "Treescape Stencil" card


I seem to be on a roll with my crafting today, each make has been quite different, which I like.

I had an urge to do something with trees and came across a stencil by Clarity Stamps that I had purchased second hand from Ebay, called "7x7 Treescape", so decided I would put it to use for the first time.

I had a rummage through my file of prepared backgrounds and came across one that I thought would be suitable.  It was a variation of mid green shades, which I thought I would be able to manipulate.

I ended up using the following Versafine Clair Inks, used in this order for the area above the ground:  Warm Breeze, Monarch and Medieval Blue.  For the groundscape area, I used two shades of green Versafine Clair Inks:  Verdant and Shady Lane.

I used my Van Goch Pastel Pencils to create light and shade areas, adding touches of white using a white gel pen.   

Lavinia Stamps "Indian Flourish" on a "Dinkles" Background


Recently, Lavinia Stamps have released a new product called "Dinkles", they're a little similar to Brusho but are a fine powder, rather than being granular.  Initially, I thought "I'm not going to buy these'!  But of course I got sucked in and orderd the set.  They have been sat on my craft desk for almost a week waiting to be used, so today was the day that I gave them a try. 

I wasn't quite sure what I was going to do with the Dinkles or how I was going to use them, so decided I would spritz a piece of card with water (both sides so that it didn't curl), then poked holes into the lids of the Dinkles, like I did with the Brusho all those years ago and then gently tapped a little of the powder out.  I used two colours "Amethyst" and "Magenta".  

Initially, I put a very tiny bit of powder onto the spritzed surface, but knew I wanted a little more colour, so added another spritz of water then tapped a little more powder on.  I then used my heat gun to dry the surface.

Once the card was dry, I ran an anti-static bag over the surface then stamped the Lavinia Stamps "Indian Flourish" feather on to the card.  I quickly coated the stamped image with Wow! Silver Embossing Powder and heat set.

I cut the card down to an appropriate size and then added a stamped sentiment, using the Lavinia Stamps "Heartfelt Verse" stamp set in Versafine Clair "Charming Pink" ink.

Funky Fossil Designs "Shellebration - We're on the move" card


I've used a similar background to the card I made yesterday to make this card, again using Funky Fossil products. 

With this card, I have used the torn edge of copy paper with Versafine Clair "Verdant" green ink.  I've then used "Tumbled Glass" Distress Oxide ink with the Funky Fossil "In the clouds" stencil.

I stamped the sentiment and the snail image, part of the Funky Fossil "Shellebration" stamp set in Versafine Clair "Morning Mist" grey ink.  I then stamped the snail image again on a piece of white card.

Using the stamped snail image on the white card, I coloured it using Derwent Inktense pencils.  I then fussy cut it and stuck over the stamped image on the landscape.

I added touches of shading, grass and flowers using a 2B pencil and gel pens.

Thursday 1 June 2023

Funky Fossil "Spring in the forest" card


I've made another card using older stamps and stencils from Funky Fossil Designs, making this card. 

To create the landscape I used Versafine Clair "Verdant" green ink with a Lavinia Stamps "Hill Mask'.

For the sky, I used "Tumbled Glass" Distress Oxide Ink with the Funky Fossil "In the clouds stencil".

I used the Funky Fossil "Spring in the forest" stamp set, stamping the tree in second generation Versafine Clair "Shady Lane" green ink, stamping the flowers in Versafine Clair "Verdant" light green ink.

I coloured the image using Derwent Inktense pencils and a few touches of 2B pencil and gel pens too.

Funky Fossil Designs "African Woman" Card


This morning, I was in the mood for some stencil play, so pulled out some of my older Funky Fossil stencils to make this card.

I found a gel plate background in my file that I'd made a while back using Distress Oxide inks on a gel plate, so thought that would be a nice bright background to use.

I placed the Funky Fossil "African Woman" stencil over the top of the background and applied Versafine Clair "Nocturne" black ink through the stencil.

Next I used the Funky Fossil "Abstract Pattern Stencil" with Versafine Clair "Summertime" orange ink.

I felt it needed something else, so I pulled out one of my most used stencils, the Funky Fossil "Micro Dots Stencil" and used "Vibrant Fuchsia" Archival ink through the stencil to provide an extra dimension.

I mounted it on black card to pull the eye in to the image.