52 Week Mini Art Card/Tag Challenge

Tuesday 24 January 2023

Lavinia Stamps "Bell Flower Vine" Birthday Card


I made a quick birthday card this morning, using water colour card as the base.  I spritzed it both sides so that it would lay flat, then used a wash (on the top two thirds) of three shades of Lavinia Stamps Elements Inks, using Blue Lagoon, Blue Atoll and Della Blue.

I ueds a heat gun to dry the surface then stamped the Lavinia Stamps "Bell Flower Vine" in Versafine Clair "Shady Lane" green ink.  I then stamped the birthday sentiment, which is part of the "Heartfelt Verse" stamp set in Versafine Clair "Morning Mist" grey ink

Finally, I coloured the vine using Derwent Inktense water colour pencils applied with a brush, adding a few dots of metallic silver glitter Signo Pen around the vine.

Sunday 22 January 2023

Lavinia Stamps "Reindeer" Snow Scene Card


With the recent cold snap, I decided to make a snowy forest scene using Lavinia Stamps.

Because I wanted to start this piece with a wash of colour, I spritzed the back and the front of a piece of water colour paper.  (Spritzing the back of the paper means that it doesn't curl as much). I opted to use the smoother side of the card.

With a very wet paint brush, I brushed three shades of Elements Inks over the top two thirds of the card.  I used Blue Lagoon, Mulberry and Merlot.  Before I intensified the colour, I placed a small moon mask into position to keep that area slightly lighter.

I gave the card a very quick blast of the heat gun to take the excess moisture away, but leaving the surface still damp.  I positioned the torn edge of a piece of copy paper, then stamped the two sizes of Lavinia "Red Pines". First I stamped in "Iced Spruce" Distress Oxide Ink, then in Versafine Clair "Morning Mist" grey ink. Removing the piece of copy paper, I then stamped more of the grey trees and then used Versafine Clair "Fantasia" for the mid trees and "Medieval Blue" for the trees in the foreground.

Using "Tumbled Glass" Distress Oxide Ink with a finger dabber, I dabbed along the edge between the sky/tree trunks and the snow.  I then used a torn edge of copy paper to add some landscape to the snow area, also using "Iced Spruce" Distress Oxide Ink.

I stamped the Lavinai "Stag" and "Reindeer" in Versafine Clair "Pinecone" and "Morning Mist" so that the colour wasn't a solid black.

I then added some foliage poking through the snow, using Versafine Clair "Morning Mist" grey ink to stamp, using the "Foliage Set" and the top of one ot the "Skeleton Tree Scene set".

I removed the moon mask and using Van Goch Pastel Pencils I added extra contrast to the sky and colour to the moon.  I did the same to the snowy area.

I used a white acrylic paint to add snow detail to the trees, the stag and the reindeer. I then used the same paint and a fan shaped paint brush to create splatters to replicate snow.

Finally, I edged the card in Versafine Clair "Medieval Blue" ink before mounting it on dark blue card and then on to a white card blank.

Saturday 21 January 2023

Lavinia Stamps "Logan the hare" Card


I had a play with the alcohol lift technique using a green and butterscotch colour ink to create the background.

I stamped Lavinia Stamps "Locan the hare" in Versafine Clair "Pinecone" dark brown ink.  I stamped him again on a large post-it note and cut around the shape and placed over logan on the card to create a mask.

Using a sheet of copy paper and Versafine Clair "Shady Lane" green ink, I created the landscape that Logan runs on.

Using Versafine Clair "Shady Lane" green ink I stamped the "Leafy Spray" stamp in various positions, using first and second generation stamping.

I then used Versafine Clair "Pine Cone" to ink up the very top of the Lavinia ""Small Branch" stamp to create foliage in the background.

Lifting the mask off Logan, I coloured him using Derwent Inktense pencils.  I then added colour to the foliage using Posca Pens and gel pens, finally adding white highlights to Logan using a Signo Pen.

Lavinia Stamps "Just For You" Maple Leaf Gift Card


You know when you need to write a little bit more on a gift card, but you don't want a full size card and a standard gift card is too small?  That was the situation I was in, so I made this in-between size card which is ideal for the job. 

I started by lining up three rows of masking tape and then lifting the middle strip to reveal a line of white card.

I used three shades of archival inks, starting on the left hand side using "Shadow Grey".  In the middle I used "Sky Blue" and on the right hand side "Leaf Green", ensuring each colour blended seamlessly into the next.  I then removed the two remaining strips of masking tape.

Using Versafine Clair "Shady Lane" green ink in first and second generation stamping, I stamped the Lavinia Stamps "Maple Leaf" and the "Mini Maple Leaf".

I used Versafine Clair "Morning Mist" grey ink to stamp the "Just For You" sentiment which is part of the Lavinia Stamps "Heartfelt Verse" stamp set.

Finally, using a gold shimmer type gel pen  and a white gel pen, I added details to the leaves and dots around the foliage.

Friday 20 January 2023

Lavinia Stamps "Lupin the hare" Kraft Card


A few weeks before Christmas, I watched a live demonstration by Lavinia Stamps "Amanda Branston".  I was very taken with the way she created the halo around a hare on her card, so decided to give it a go this morning, making this card. 

On a kraft card base, I stamped Lavinia Stamps "Lupin" the hare, using Versafine Clair "Pinecone" dark brown ink.

Using a roll of sticky tape and a white water colour pencil, I drew round the inner and the outer circles, shading in the circle towards the hare and making the outer circle a little thicker.

Using Derwent Inktense Water Colour Pencils, I coloured the hare (I didn't apply water, just used the pencils), building up the colour, using a white, a pink for the ears and t wo shades of brown for the coat of the hare.  I used a dark grey colour to ground the hare.

Finally, I added the Lavinia sentiment, stamped in Versafine Clair "Pinecone" ink and mounted the kraft card on to a white card blank.

Thursday 19 January 2023

Lavinia Stamps "Indra" on a spray ink background


Today, I have been using my Lavinia Stamps again to create this card.

 I used Wow! Clear embossing ink and the Lavinia Stamps "Indra" the moth stamp on white card, coating the stamped image with "Wow! Angel Eyes Embossing Powder and heat set.

Over the stamped image I brushed on Pabeo Drawing Gum.  This provides a protective coating to what ever is being covered, which once dry can be rubbed off at a later date.


I then put the piece of card in my spray box and spritzed three shades of Dylusion Spray inks on to the surface.  The colours I used were London Blue, Crushed Grape and Fresh Lime.  Any ink left on the surface, I puffed away using a Tim Holtz hand puffer thing sending the ink to the edges of the card.  I set the card to one side for a couple of hours to dry while I took the dog for a walk.

Once dry, I was able to rub off the drawing gum using my finger.  This revealed the original white card base and the turquoise embossed image.

Using the same Wow! ink pad and embossing powder, I added the heat embossed Lavinia Stamps sentiment, which is called "let your spirit take flight".

In the bottom right hand corner and up part way of the right hand side, I stamped the "Vine Flourish" using Versafine Clair "Nocturne" black ink.  I used the same ink to edge the card too.

Next, I used the Lavinia Stamps "White Orbs stencil" with white Pan Pastels to create the idea of movement.  I dotted a white Posca Pen and a silver glitter Signo Pen for added detail to Indra and to the background.  Then mounting the card on to a piece of black card and then a white card blank.

Wednesday 18 January 2023

Funky Fossil Designs "Free Spirit" on a gel plate background


I'm still in "stash busting" mode and found a gel plate background I'd made months ago, so decided to create something with it today.

If I remember correctly, I used Pan Pastels on the circular gel plate with the Funky Fossil "In the groove" stencil, which made this wonderful print.  I liked it so much, I had been putting off using it, but hey the deed is done now!

I paired the background with the horse head in the Funky Fossil Designs "Free Spirit Stamp Set", stamping the image in Versafine Clair "Nocturne" black ink then coating it with Wow! clear embossing powder and heat setting.

I coloured the image with a green Van Goch pastel pencil.  Mounting it onto black card and then on to a card blank.  Finally adding a few black gems to the surface.

Tuesday 17 January 2023

Lavinia Stamps "Summer Meadow" Card


This evening I've made a "Summer Meadow" card using Lavinia Stamps.

I started by using two shades of Archival Inks (Prickly Pear and Vivid Chartreuse) through the Lavinia Stamps "Elegance Stencil" in the bottom right hand corner of the card.

Then using first and second generation stamping I stamped the "Leafy Spray" and :Meadow Grass" in Versafine Clair "Verdant" and "Shady Lane" green inks

I then stamped the "Tall Dandelions" and one of the "Open Dandelions" in Versafine Clair "Shady Lane" green ink and "Morning Mist" grey inks.

Next, using Versafine Clair "Green Oasis" I stamped some foliage from the "Foliage Set".

I used a selection of Posca Pens and Gel Pens to add colour to the dandelions and the foliage.

I decided I wanted to make the line between stamping and the card softer, so using a blending brush and Versafine Clair "Shady Lane" I added a touch of soft green colour to the bottom right hand corner of the card.  Finally stamping the "Just For You" sentiment, which is part of the Lavinia "Heartfelt Verse" stamp set.


Funky Fossil Designs "Free Spirit" Card


Funky Fossil Designs recently released a stamp set that I was really taken with, so of course I had to order it.  It's the "Free Spirit Stamp Set" designs by Ankit Kumar, which arrived with me yesterday. I obviously had to play with it as soon as I could, making this card.

Still "stash busting" I found a sheet of patterned paper that I had had at a craft crop/group. It was a big battered around the edges, but I was able to use the central area of it.  I stamped the horse in Versafine Clair "Nocturne" black ink and then covered it in Wow! clear embossing powder and heat set.

Using Derwent Inktense Water Colour Pencils, I coloured the horse.  I then used a gold metallic pen to add extra details.

I created the landscape using a torn piece of copy paper and Versafine Clair "Morning Mist" grey ink then added extra colour and details using Van Goch Pastel Pencils.


Funky Fossil "You Are My Happy Place" Card


I've been playing with the new "Heartfelt" stamp by Funky Fossil Designs, pairing it with a couple of stencils and a sentiment stamp to create this card. 

For 2023, I am attempting to use up some of the crafting bits and bobs that I have hoarded for years.  Today, I found a small piece of card with yellow spray ink on it, so decided that this would be the canvas for the card I made.

I used "Mowed Lawn" Distress Oxide Ink through the Funky Fossil Designs "Striped Circle Mask".

Next,  I used "Blueprint Sketch" Distress Oxide Ink through the Funky Fossil Designs "Wonky Hearts Stencil".

I then used Versafine Clair "Twilight" dark blue ink with the Funky Fossil Designs "Heartfelt" stamp over the top of the stencilled background.

Not finished with stamping, I used the Funky Fossil Designs "Vintage Script" stamp with Versafine Clair "Warm Breeze" turquoise/teal coloured ink, stamped in second generation, so there is just a hint of it in the background.

I decided it was looking a bit dark, so splattered some white paint (Dr. Ph Martin's Bleed Proof white paint), across the surface and gave it a quick blast of the heat gun.

I Inked the edges of the card using Versafine Clair "Warm Breeze" ink, then mounted it on to a card blank.  

Finally, I stamped the "You are my happy place" sentiment, which is part of the Funky Fossil Designs "Small Print 2" stamp set, using Versafine Clair "Warm Breeze" ink.

Monday 16 January 2023

Funky Fossil Designs "Heartfelt" Card


When I was planning my previous cards using the Funky Fossil Designs "Brushed Roses" stencil, I tried the three Distress Oxide Inks combination of colours of Dried Marigold, Saltweater Taffy and Picked Raspberry through the stencil on a small off cut of card first, to see if I was happy with the way it looked.

This piece of card lay on my desk when my order from Funky Fossil arrived this afternoon, so I decided I would use the piece of card, rather than it hanging about and ending up in the bin.

I cut it to 3" square and then used the Funky Fossil "Heartfelt by Art Journal Love" stamp, stamped in Versafine Clair "Purple Delight" ink.  I then edged the square in the same ink.  I layered the image on to a pink piece of card and stuck it to a card blank.

Using Versafine Clair "Purple Delight" ink, I stamped the sentiment which is part of the Funky Fossil "Small Print 2" stamp set.  Finally, I added some sticky backed gems to the central area between the hearts.

Funky Fossil Designs "Brushed Roses" Card Tutorial


Earlier today, I was playing with the Funky Fossil Designs "Brushed Roses" stencil, creating these three cards.

Because I enjoyed the process.  I decided to do a little video tutorial which you can see here.


For these cards, I used the following items:


Distress Oxide Inks:  Dried Marigold, Saltwater Taffy and Picked Raspberry 


Sunday 15 January 2023

January 2023 Mini Booklet Challenge with Karen Telfer

Yesterday, I shared a sneak peek of the monthly little booklet challenge 2023 with Karen Telfer.  I have now finished my booklet with a theme of "Circles".  

I've made a video of the booklet. but I have also taken still photographs too.


This is the cover for the booklet.   I used two Funky Fossil stencils (Broken Mosaic and Micro Dots) with three shades of Distress Oxide Inks:  Cracked Pistachio, Peacock Feathers and Blueprint Sketch.  These happen to be one of my favourite colour combinations.

I've used patterned papers for the inside page, using sticky letters to spell out "Welcome" making a little pouch for the tag to sit in.

Page 1 is a piece of copy paper.  I found two white die cuts in my stash, one was like a scroll the other was the dove of peace, so I went for a white on white theme.

Page 2, another stash find, was a Brusho background with stamped circles from a Carabelle Studio stamp set in Versafine Clair "Warm Breeze" ink.  I stuck a circular Tim Holtz Idea-ology disc to the middle and used one of his word stickers too.

Pages 3 & 4 use a piece of velum with a text script on it.  I've used some die cut arrows and word stickers.

Page 5 i've used a gel plate background from my stash.  I used a moon mask in the middle with Blueprint Sketch Distress Oxide ink to create the window.  In the middle I stuck a Lavinia Stamps sticker, a word sticker and a few sequins.

Page 6 is more use of patterned paper and a vertical pocket to hold heart shaped embossed tags.


Pages 7,8,9 & 10 are all vellum, with a circle design.  I've used dotty washi tape and stuck die cut houses, foliage and word stickers on to each page.


Page 11 is more patterned papers with a vertical pocket to hold embossed tags.

Page 12 is again a gel plate background, using a moon mask to highlight the central area and a Lavinia Stamps sticker.


Pages 13 & 14 again with Vellum, I punched a circle out of it as a nod to the theme of the booket and added word stickers to each side.
Page 15 is a piece of Yupo paper with a lovely alcohol ink image.  I've been keeping this to one side for a couple of years, so decided it would be ideal to add to this little booklet. I've added green and clear gems to the surface along with a word sticker.


Page 16 is white copy paper with a couple of die cuts and the word grateful, plus a sprinkle of sequins.


Page 17, the last page is again patterned papers, this time with a horizontal pocket for a tag.  I've added letter stickers and sequins to the circles of the patterned paper.


Saturday 14 January 2023

Sneak Peek of January Booklet 2023


Karen Telfer is running a monthly booklet challenge on her Facebook page. Each month you make a booklet using lots of different techniques.  You can see her January video here. 

I am in the process of making my booklet.  Here's a little video giving you a sneak peek at what I'm making.  It's quick so blink and you'll miss it!  More photos and a longer video will follow when I'm further along with the booklet.


Lavinia Stamps "Fairy Chain" Card


I've used another one of the backgrounds I made the other day using Amanda Branston's alcohol inks on gel plate technique to make this card.

Again, I have used a selection of Lavinia Stamps:  Fairy Chain (large), Red Pines (large and small), Forest So Green verse, Small Branch and Foliage Set.  I've also used the Lavinia Moon and Hill masks.

I've used five shades of Versafine Clair Inks:  Nocturne black, Morning Mist grey, Shady Lane green, Warm Breeze teal/turquoise and Purple Delight.

I've added extra colour to the picture using Van Goch Pastel Pencils, Posca Pens and assorted gel glitter pens.


Thursday 12 January 2023

Lavinia Stamps "Wild Flower" Birthday Card


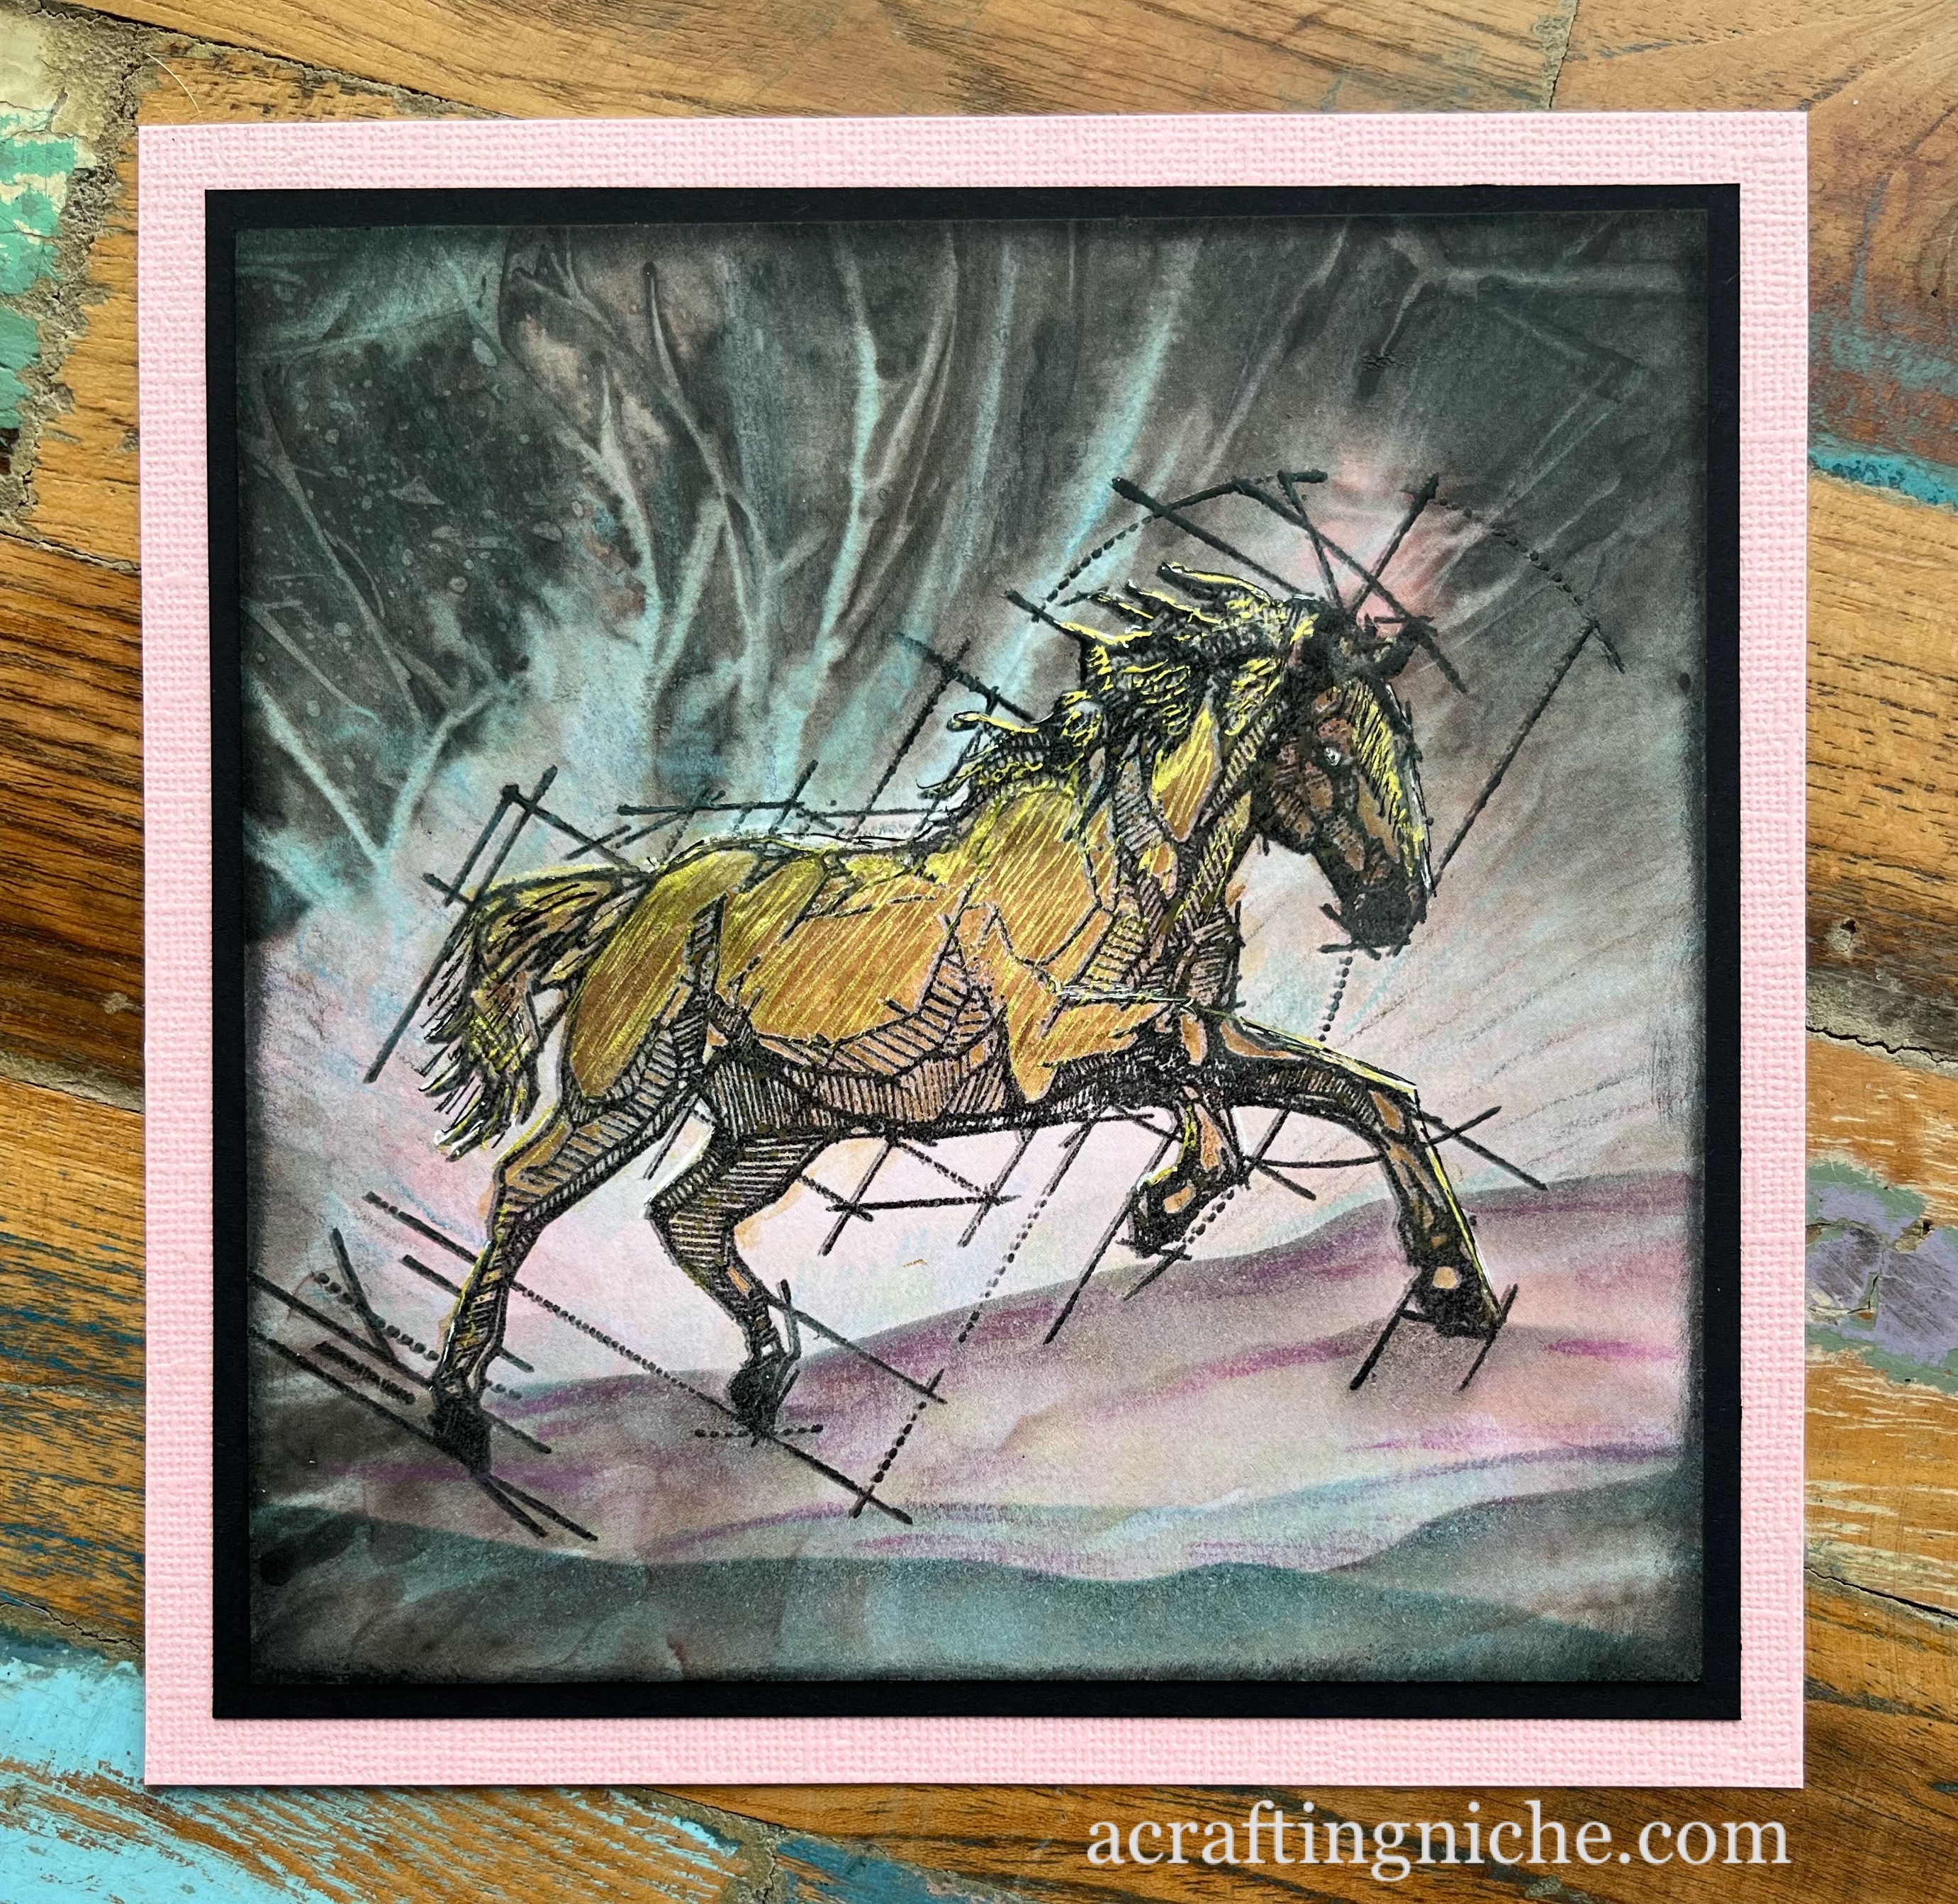
Each Friday evening, Lavinia Stamps Design Team member Amanda Branston, does a Facebook Live demonstration.  Last week she showed how to use alcohol inks on a gel plate, so I decided I needed to try out the technique, resulting in this card.

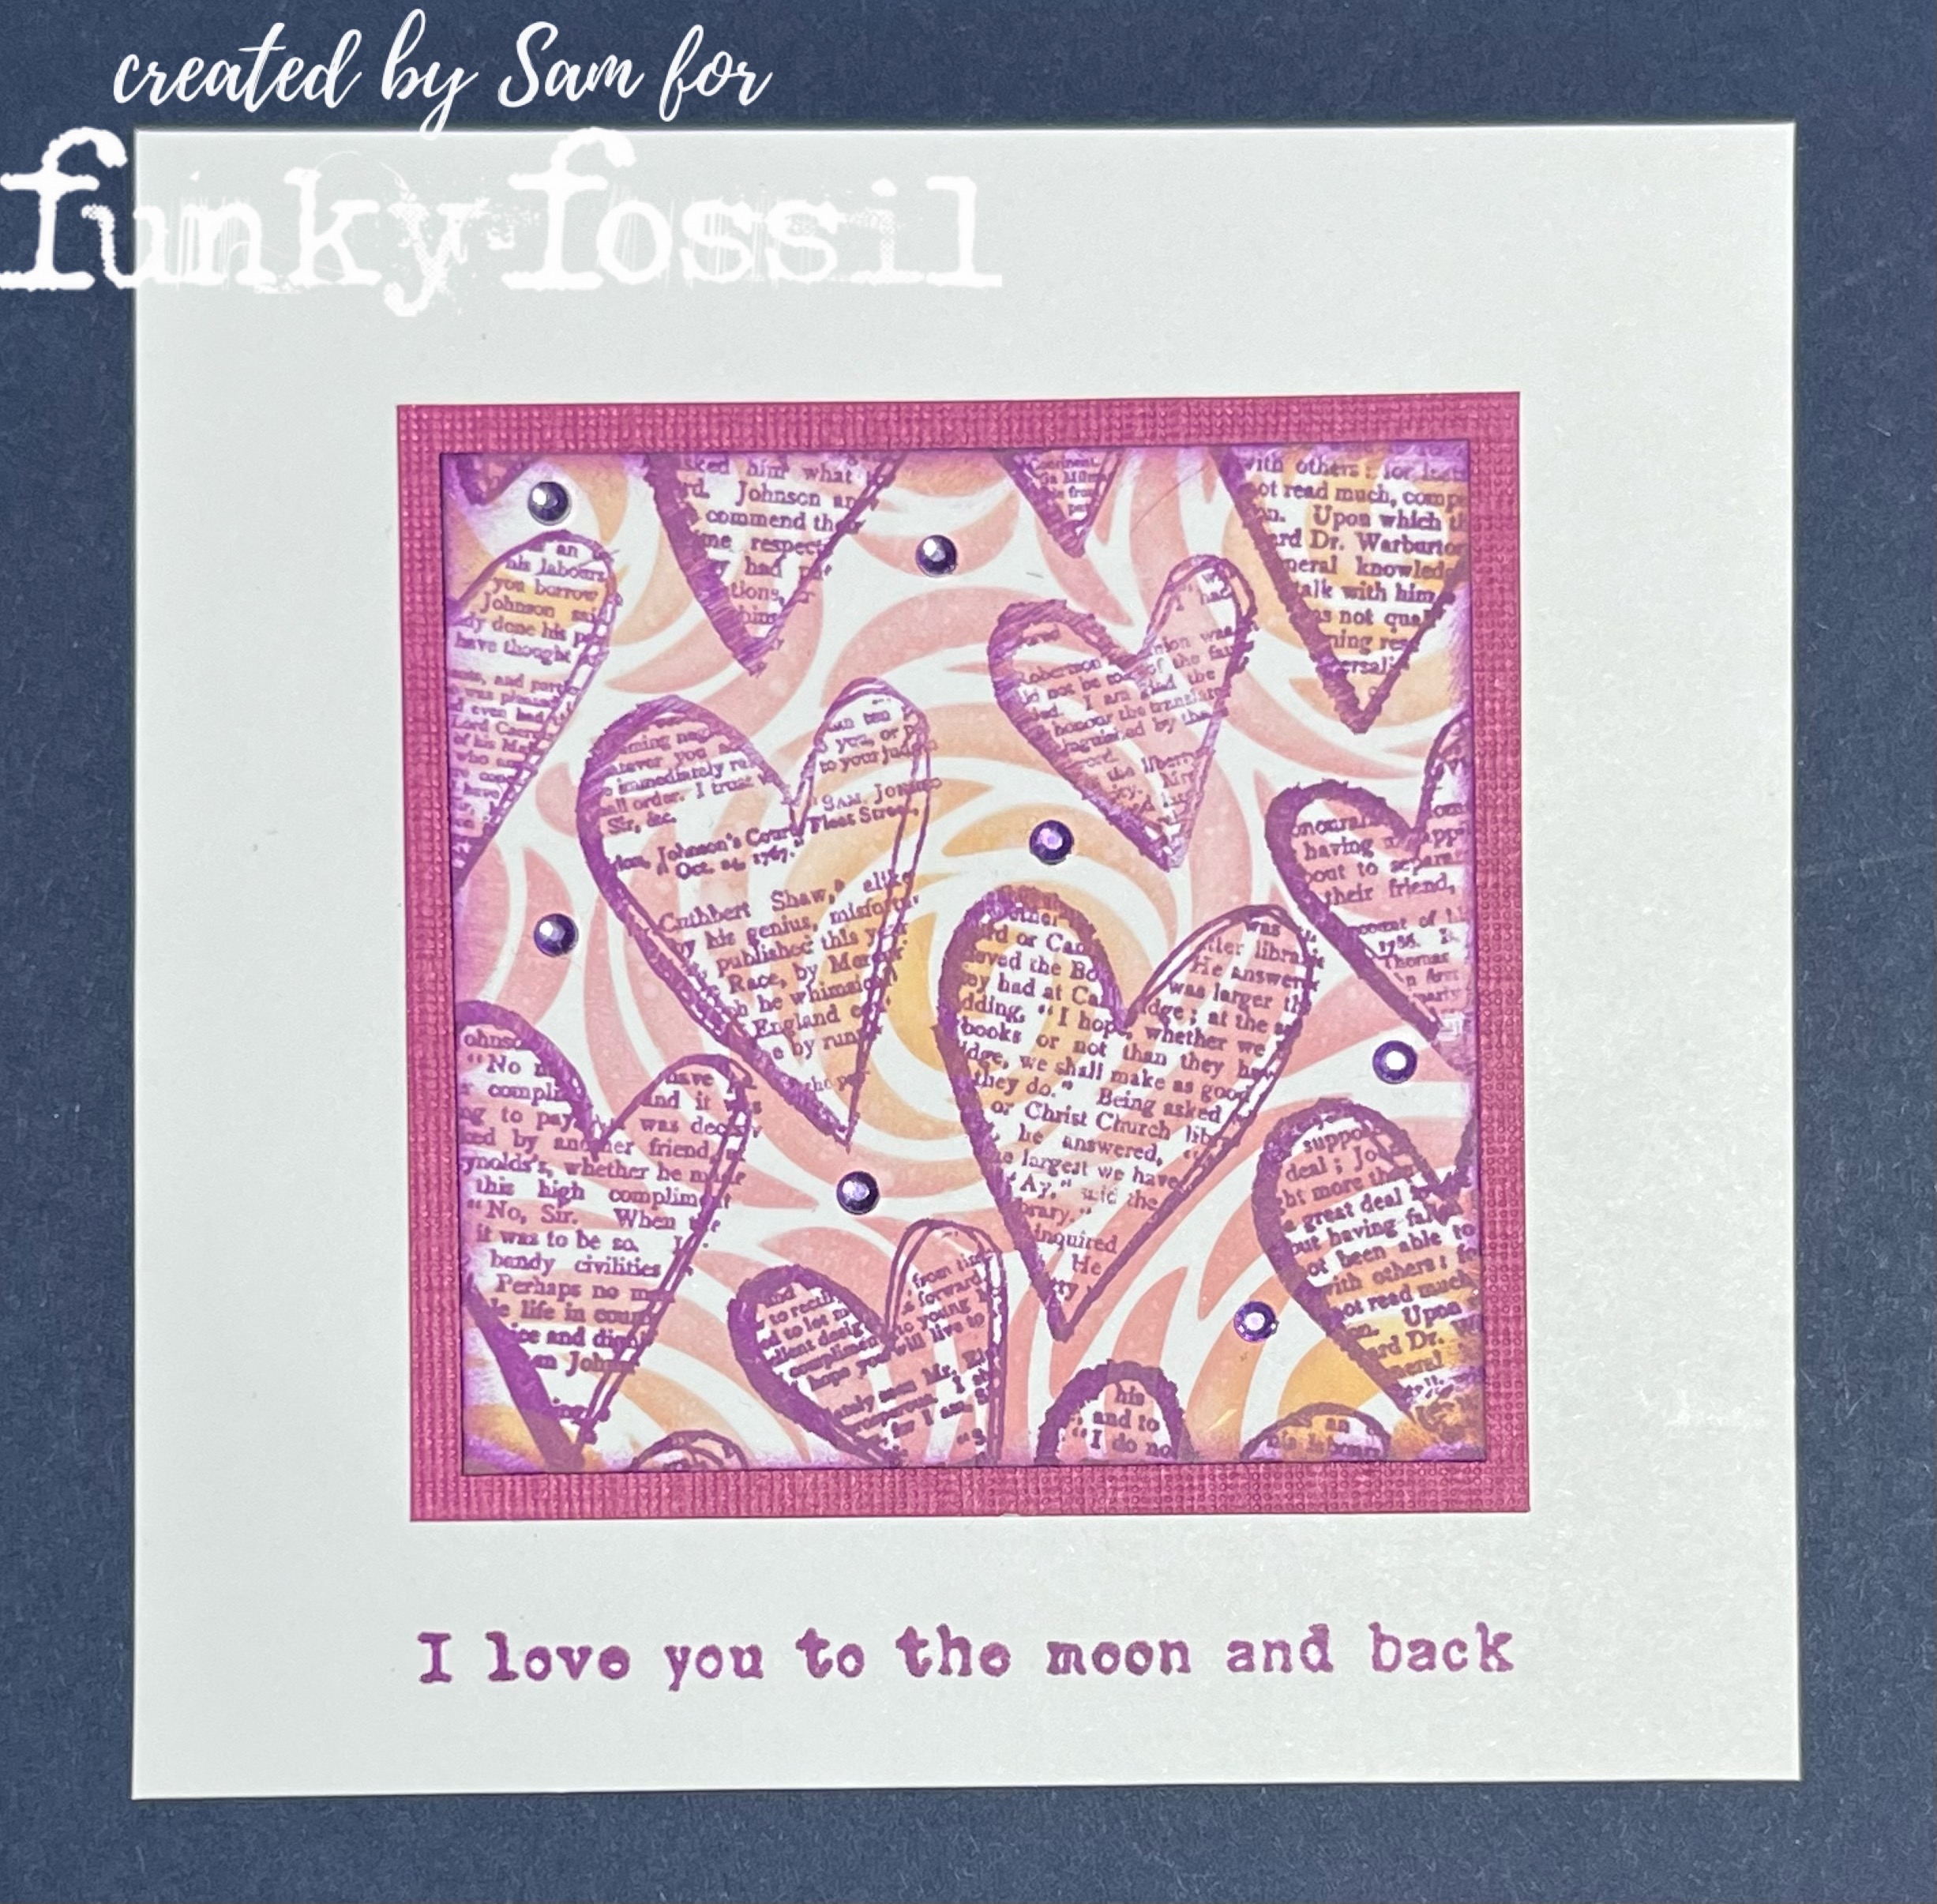
I pulled out my gel plates, alcohol inks and alcohol blending solution ready to play.  I decided to opt for three shades of Alcohol Inks:  a yellow, a green and a blue.  I didn't make a note of which ones I used but I do remember that the yellow one was a pearlescent one, so has left a lovely sheen on the card.

With the gel plate on my glass mat, I squeezed some "Alcohol Ink Blending Solution" on to the gel plate, then dotted the three colours on top, starting with the lighter, working to the darker.  I added a little more blending solution to the gel plate then used the hand puffer - sorry I don't know what the proper term is, it's like a little fire belllow!  The puffer distributes the ink around the gel plate.  I then pressed a card over the gel plate, leaving in position for about a minute, before lifting to see the image it had created.

I tried this technique several times.   By the third attempt I had got the hang of it!  Lighter inks or less of the darker shades seem to work better... for me at least.

To clean the gel plate, I initially used my water spritzer, but there were still areas of ink left, so used some alcohol gel hand sanitizer which lifted the ink.  I then washed and dried the gel plate before returning to its storage tin.

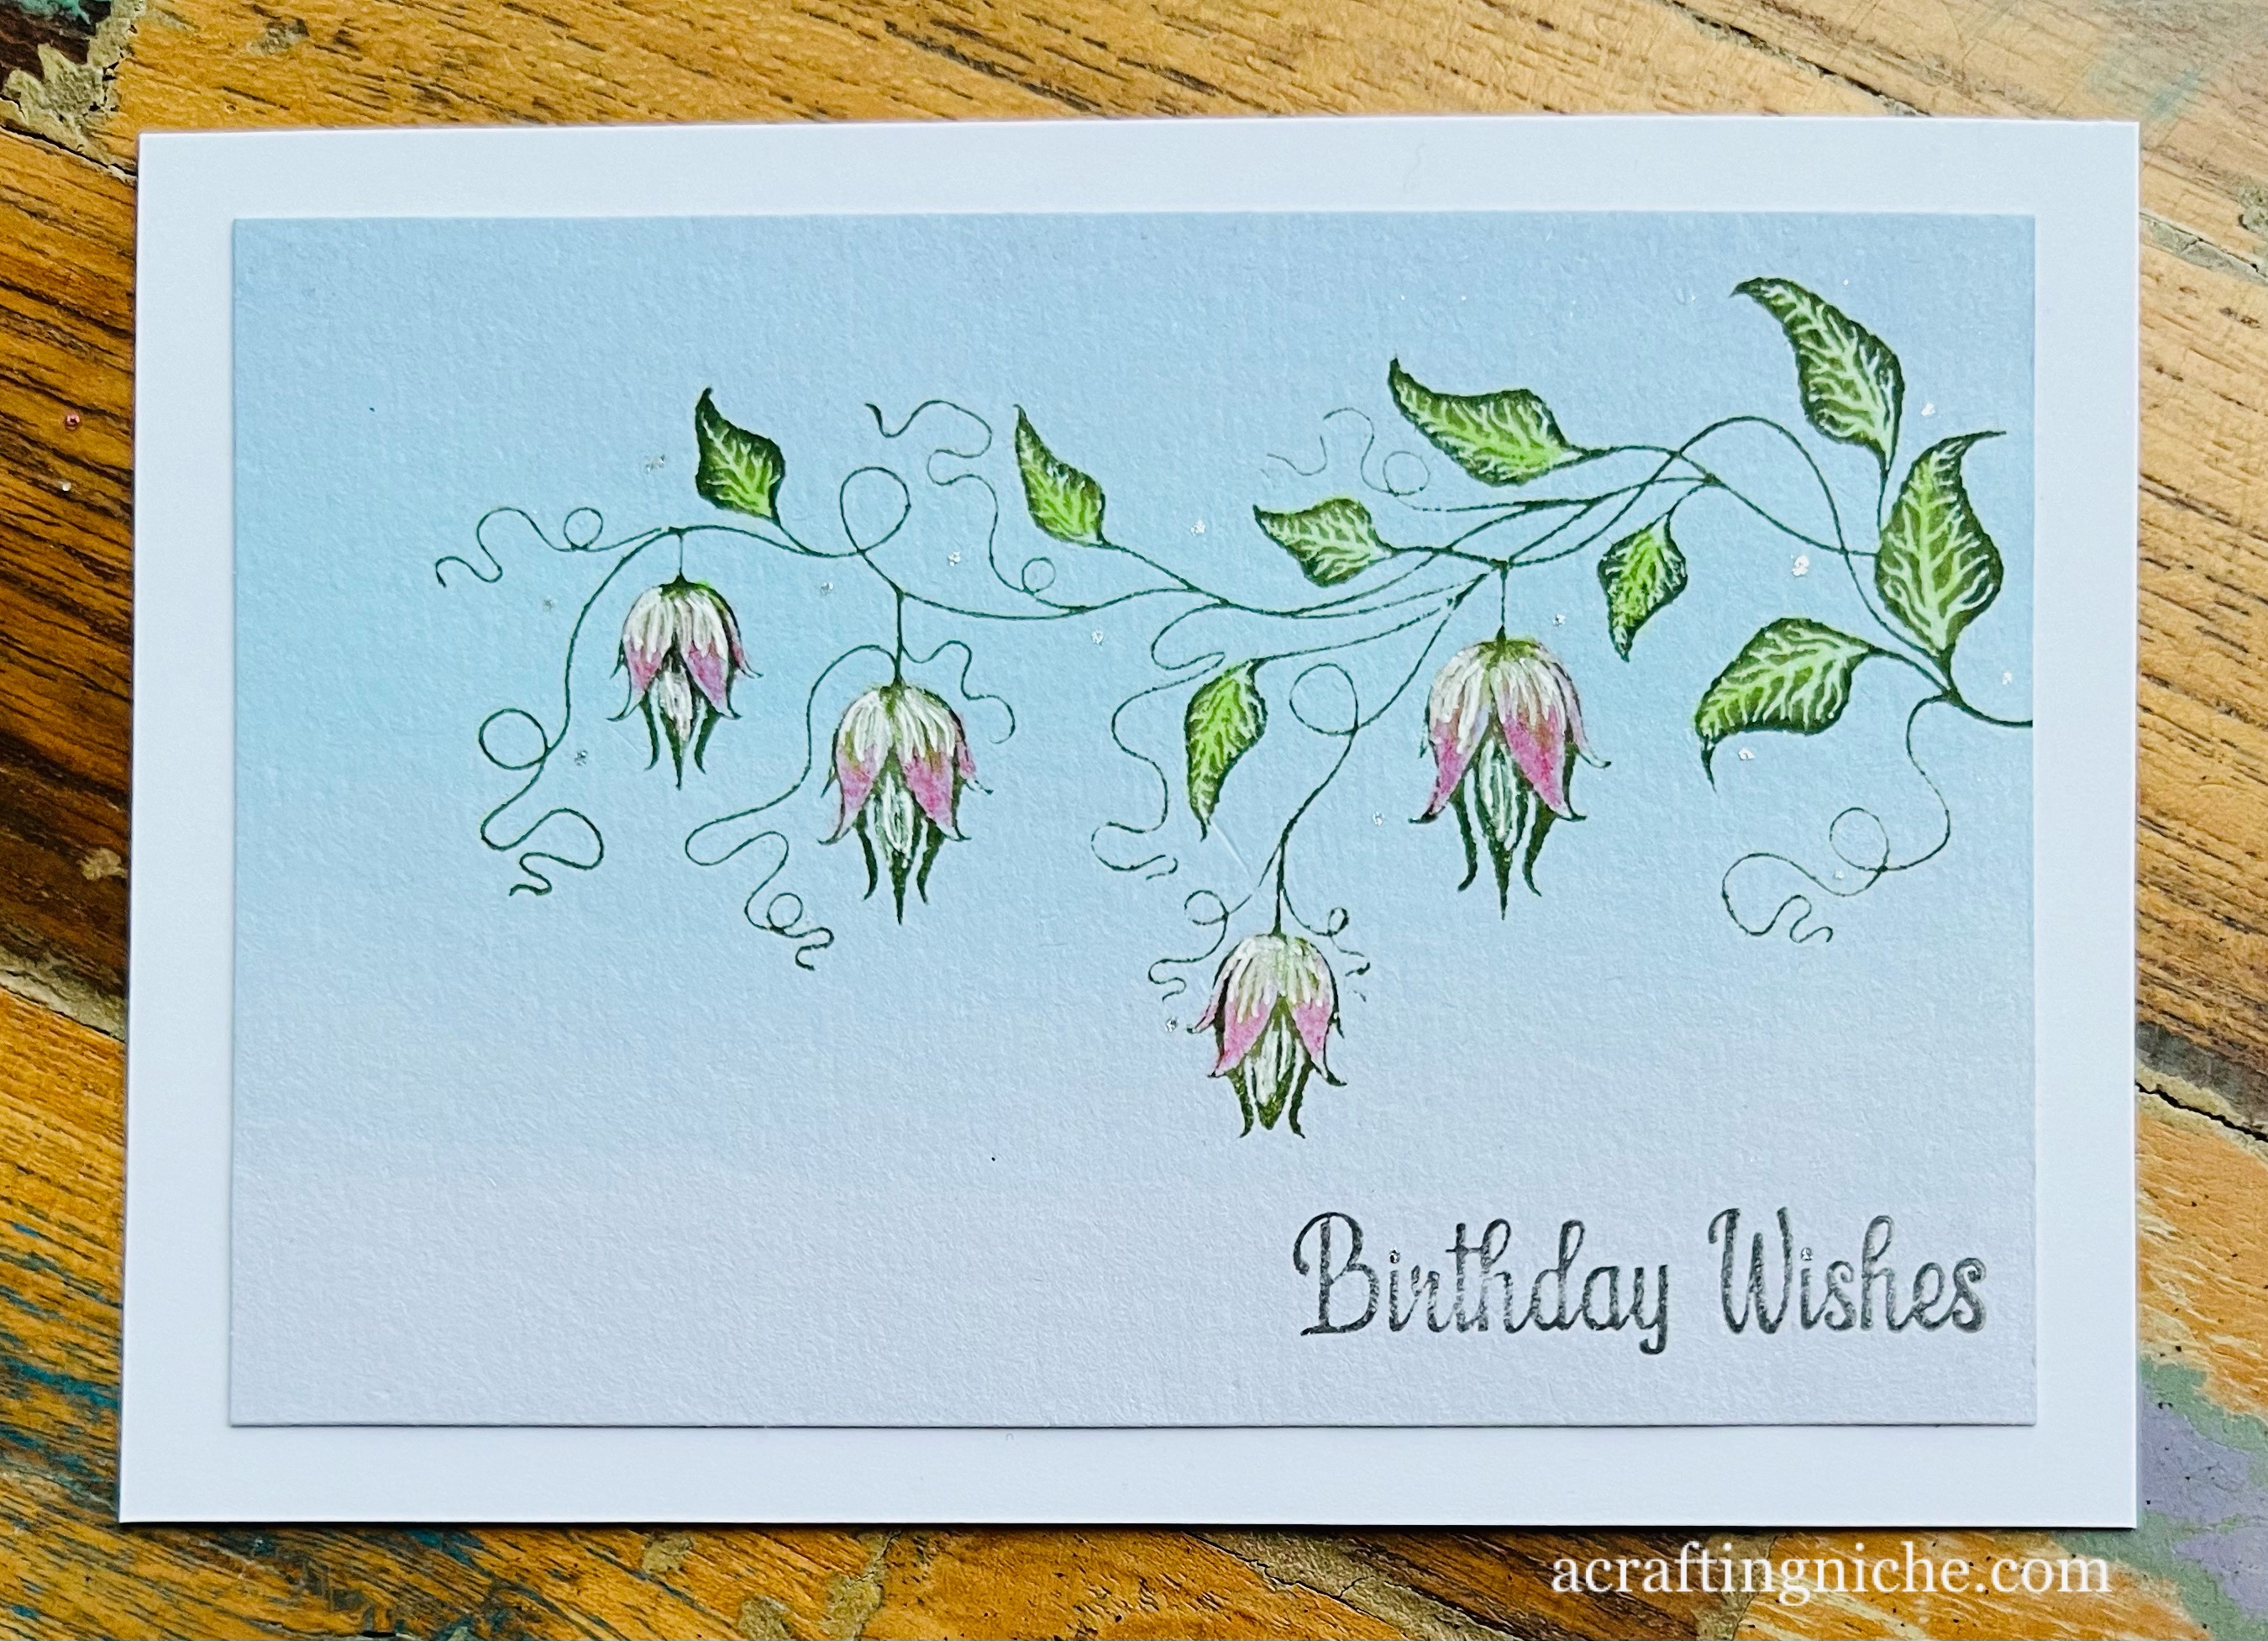
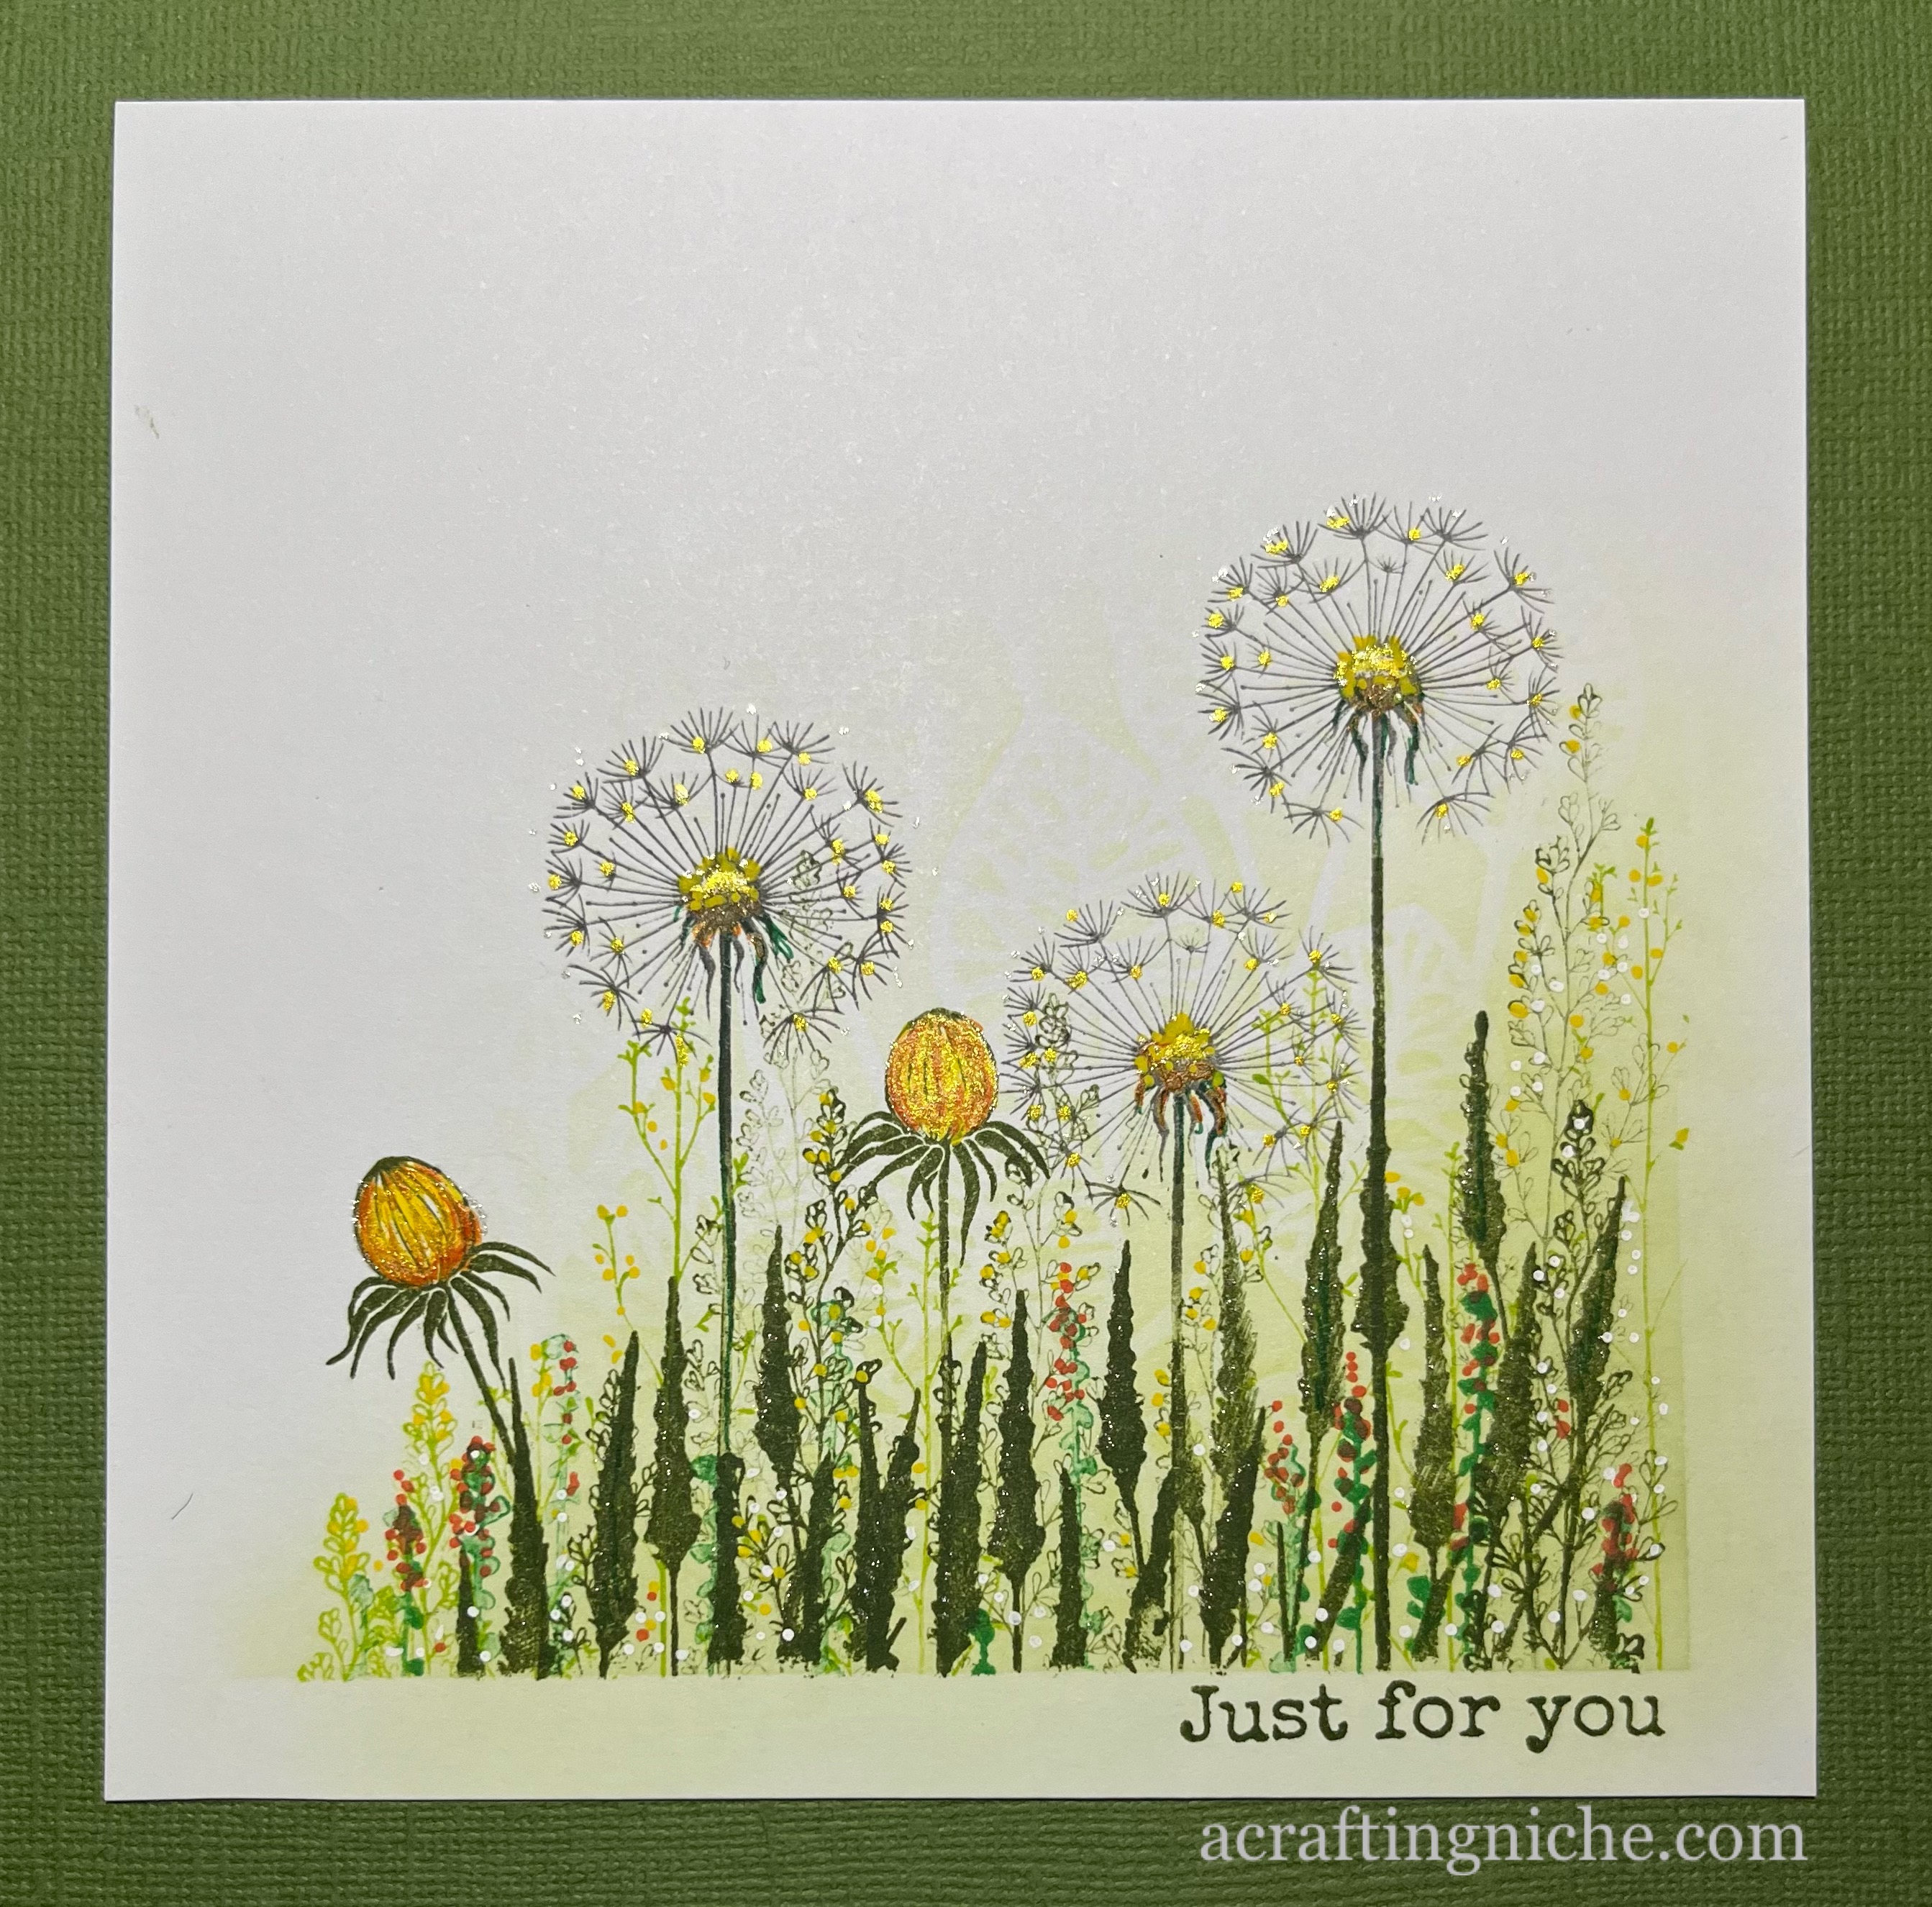
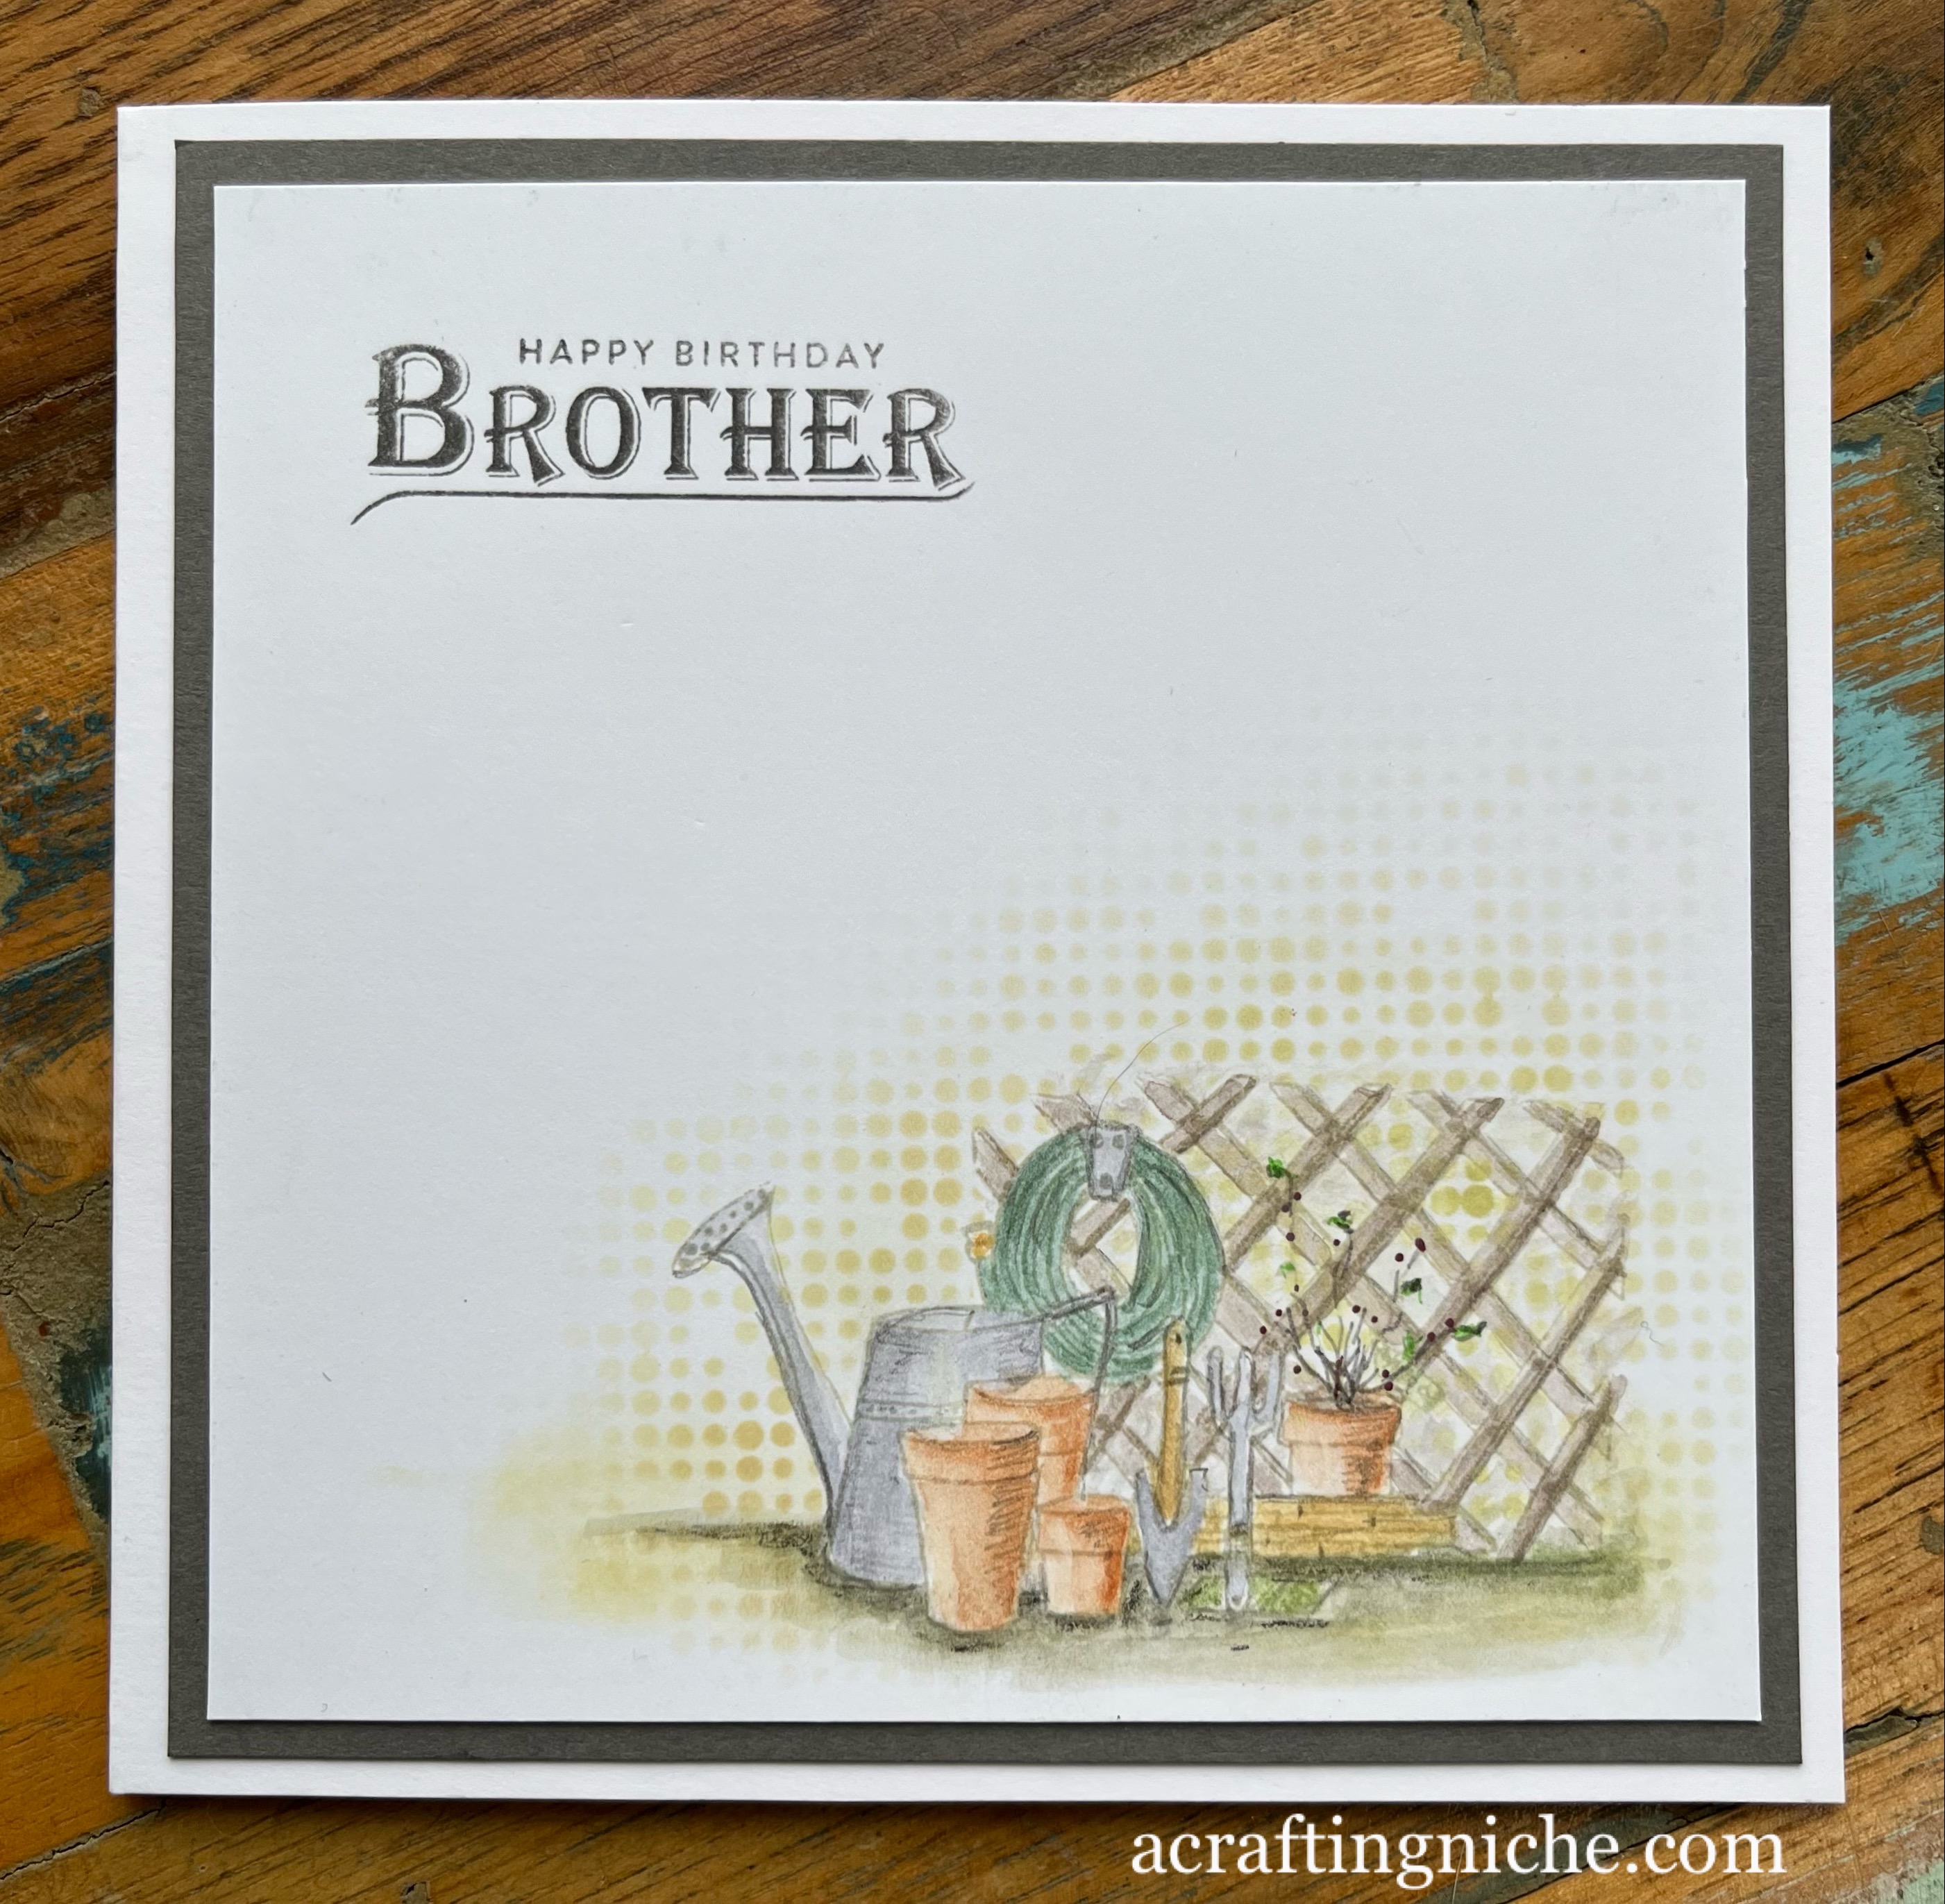
I stamped the Lavinia Stamps in three shades of Versafine Clair inks, using:  Shady Lane green ink for the "Leafy Spray", Warm Breeze turquoise ink for the "Wild Flowers" and Nocturne, black ink for the dandelions.  I actually used four different Lavinia Stamps:  Open Dandelions, Drooping Dandelion, Make a Dandelion and Tall Dandelion.

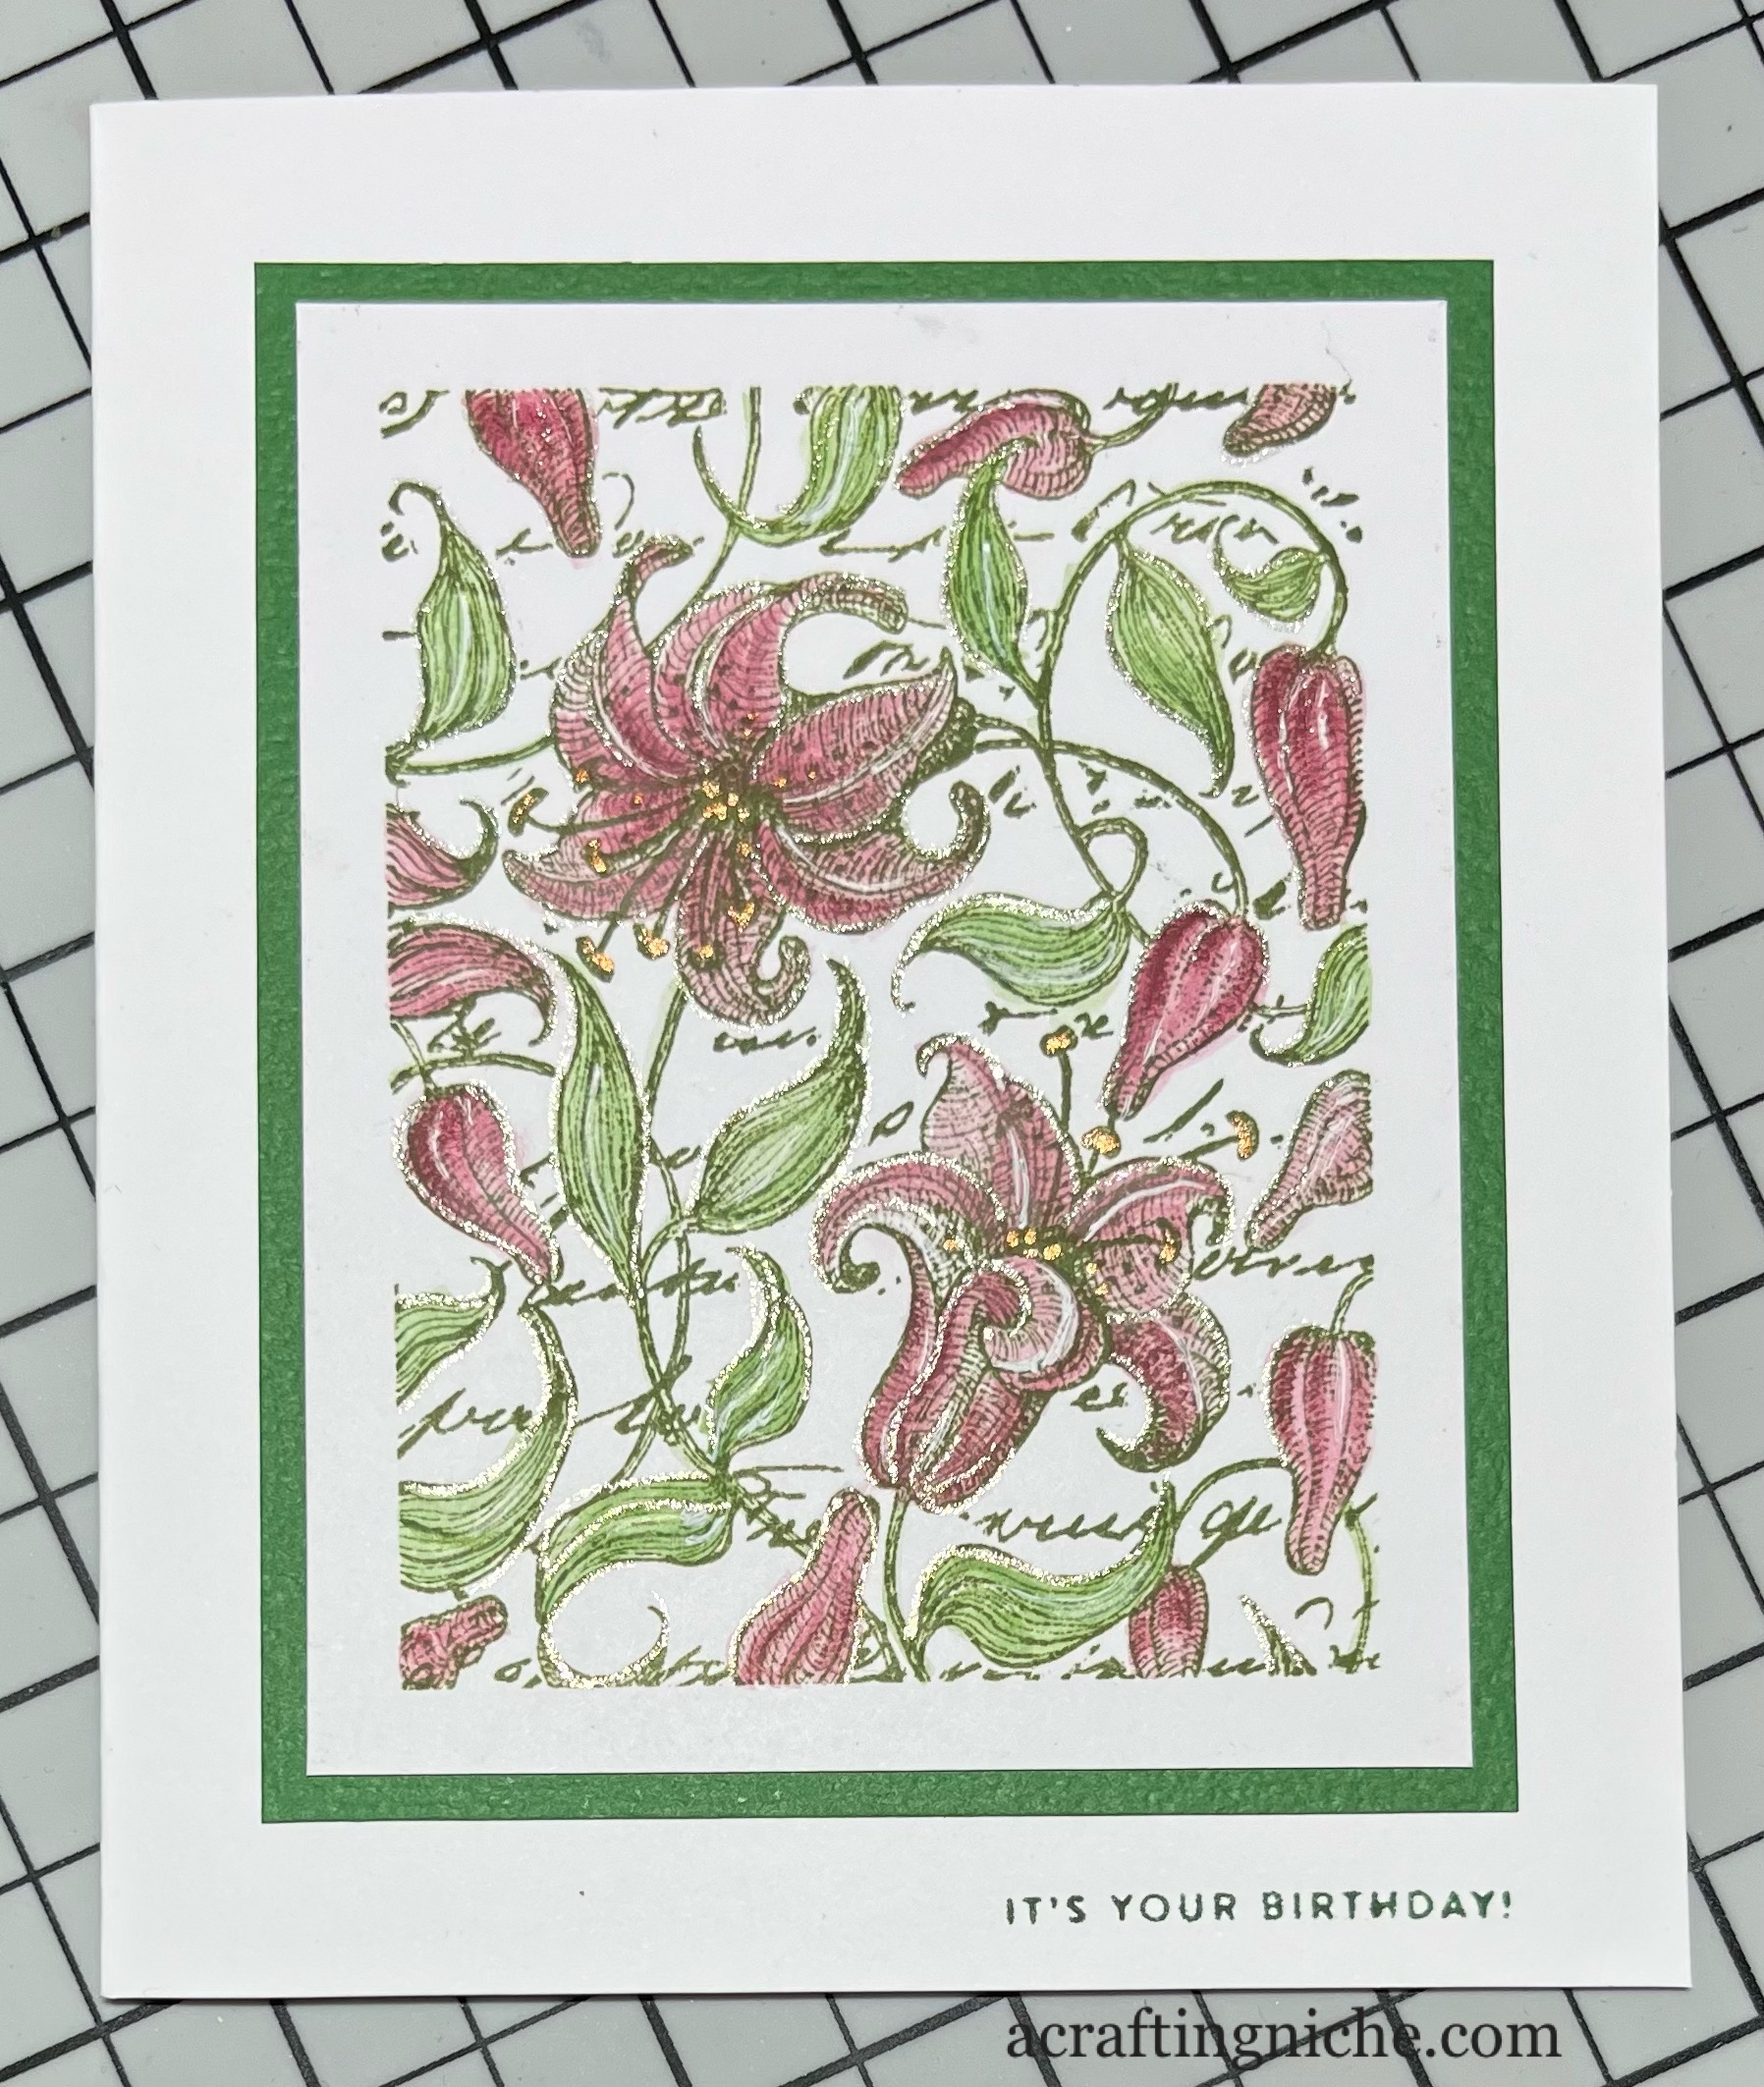
I coloured the flowers with a mixture of Posca Pens, Signo glitter gel pens, Derwent Inktense pencils and Van Goch Pastel Pencils.  There is actually a lot of sheen and sparkle on this card, which sadly is not captured by the photograh.

I used Versafine Clair "Nocturne" black ink to stamp the "Happy Birthday" sentiment, which is part of the Waffle Flower "Essential Sentiments" stamp set.

Katy Sue Designs "Fabulous Fellas" Brother Birthday Card


I'm trying to get ahead with birthday cards for the next couple of weeks, making this "Brother Birthday Card".

I used a stamp from the Katy Sue Designs "Fabulous Fellas" stamp set, stamped in a fade out ink.

I coloured the stamped image using Derwent Inktense water colour pencils and a 2B pencil.

Around the image, I used a mix of two Distress Oxide Inks (Tea Dye and Shabby Shutters) through the Funky Fossil Designs "Micro Dot Stencil".

The "Brother" sentiment is part of the Katy Sue Designs" "Fabulous Fellas" stamp set, which I stamped in Versafine Clair "Morning Mist" grey ink.  Using the same ink, I stamped the "Happy Birthday" which is part of the Simon Says Stamp set called "Tiny words - Birthday".

Tuesday 10 January 2023

Visible Image "Dragonfly Tranquility" card


I found a small piece of card with a Brusho Ink background in my stash that I decided to use today.  it had lovely greeny blue shades and to me shouted water.

I decided to use a Visible Image stamp set that I've not used for a long time.  It's called "Live in the moment" and has a beautiful dragonfly stamp, among others. 

I dusted the surface of the card with an anti-static bag, then stamped the large dragonfly using Wow! Clear Embossing Ink, then coated the area with "Wow! Metallic Silver Super Fine" embossing powder.  I used the same process with the two smaller drafonflies then heat set the images.

Using the Visible Image "Ripples" stencil and "Blue Atoll" Elements Inks, I created the ripples on the central area of the card.  I used the same ink to colour in the wings of the dragonfly too.

I used Van Goch Pastel Pencils to give more depth to the ripples, then stamped the word "Tranquiltiy" in Versafine Clair "Warm Breeze" ink. The word is part of another Visible Image stamp set called "Random Art Of Kindness".

I mounted the stamped square on to dark blue card and then white card, going around the edges of the card with a silver glitter Signo gel pen.  I also added details to the dragonflies and also edged the "tranquility" word in the same ink.  I smeared some "Crystal" Stickles on to the dragonfly wings using the tip of my finger, do give a subtle sparkle.  Sadly this can't be seen in this photograph.  If the weather is brighter tomorrow, I will take a little video of the sparkles.

Finally, using the same "Ripples" stencil with "Peacock Feathers" and "Cracked Pistachio" Distress Oxide ink, I created lighter shades of ripples on the white card mount.

Monday 9 January 2023

Playing with techniques for Tag 23 & 24


You may remember that I took part in Karen Telfer's "24 Days of Tags 2022" challenge.  Tags 23 and 24 used the same technique but one had a more vintage look and one was pastel colours.  I decided to expand my play session by trying the technique out on different types of card, including Kraft card stock.

The first thing I noticed using Kraft cardwas that the embossing doesn't look as obvious as it does on the white card, likely due to the weight of it being less and also the fibres within it.  The Kraft card also absorbed the colours of the inks.  I used "Rusty Hinge" and " Cracked Pistachio" Distress Oxide inks, but you can barely see either.

I decided to decorate this experimental background, creating this tag.  I splattered black, white, brown and blue Posca Pen paint across the surface.

I added a band of Washi Tape on the lower third and inked the edges of the tag using Versfaine Clair "Warm Breeze" ink.  I then stuck some paper roses and leaves on to the tag.  Finally adding some pearls and beads to embellish the surface.

Lavinia Stamps "Block Print Stencil" hare card


I'm back from three nights away at the caravan and I have missed my crafting, so while the first load of washing was in the machine, I sat down and made this card using a Lavinia Stamps stencil and a handful of their stamps. 


I used three shades of Archival Inks:  Vivid Chartreuse, Leaf Green and Forget-Me-Knot through the Lavinia Stamps "Block Print" stencil, using the greens at the base and the blue at the top to replicate the idea of land and sky.

Using Versafine Clair "Acorn" and "Morning Mist" I stamped the Lavinia Stamps "Tree of Hope", colouring it with Derwent Inktense Water Colour Pencils.

To fill the void under the tree, I used Versafine Clair "Verdant" light green ink to stampe the "Words of Spring" verse.

Next I stamped the hares.  Both are part of the Lavinia Stamps "Wild Hare Set", stamped in second generation stamping using Versafine Clair "Acorn" brown ink.  I then added extra colour using Derwent Inktense pencils and Van Goch Pastel Pencils.

I stamped the "Just For You" sentiment in Versafine Clair "Morning Mist" grey ink. The stamp is part of the Lavinia Stamps "Heartfelt Verse" stamp set.

Finally, I used one of the Lavinia Stamps "Hill Masksa" to create the landscape with Versafine Clair "Morning Mist" grey ink.  I added touches of Posca Pen in yellow and orange to give the impression of flowers in the grass.  I also used a white gel pen to add highlights to the hares and the tree.


Thursday 5 January 2023

Crafty Individuals Birthday Card


Today I have made a traditional looking Birthday card that reminds me of a Portmeirion pottery design.

The red rubber stamp is one that I have had for years and is mounted on easy mount.  I don't have the packaging, but in the back of my head I think it is by Crafty Individuals.

I stamped the image in Versafine Clair "Shady Lane" green ink and coloured using Derwent Inktense water colour pencils and gel pens.

The sentiment is by Simon Says Stamp and is part of their "Tiny Words - Birthday" stamp set, stamped in Versafine Clair "Rain Forest" green ink.

Tim Holtz Idea-ology Paper Dolls Tag


You may remember yesterday the tutorial for Karen Telfer's "24 Days of Tags 2022" was creating a background using Distress Inks and an embossing folder, (you can see the video here). 

While I had everything out to make my tags, I made a few extra backgrounds, as they will always come in handy in the future. I used one of these backgrounds for this tag.  Inking the edges in Versafine Clair "Acorn" brown ink and arranging some Tim Holtz "Idea-ology" stickers and a paper doll too, to create this vintage looking tag, mounted on to a piece of kraft cardstock.

My "24 Days of Tags" 2022 with Karen Telfer - round up


Well there are no tags to make now that the 2022 challenge has come to an end.  I have loved every one of the tags I have made.

I made a little video to show the tags all together hanging on their book ring.  Here it is. I hope you enjoy looking back at them.


Wednesday 4 January 2023

Day 23 and 24 of Karen Telfer's "24 Days of Tags 2022"


Here's they are the last two tags of the Karen Telfer's "24 Days of Tags 2022" challenge.   If you would like to see Karens demo, then click this link.

Day 23 - the pink/puple tag, I used three Distress Oxide Ink colours:  Picked Raspberry, Wilted Violet and Blueprint Sketch with a Provocraft/Cuttlebug embossing folder, with a bird and scroll design.  I splattered a white Posca Pen across the surface to life it a little. I used a Tim Holtz Idea-ology sticker saying "do your best" in the bottom corner.

Day 24 - the vintage looking tag, I used Cracked Pistachio, Rusty Hinge and Frayed Burlap Distress Oxide Inks with another Provocraft/Cuttlebug embossing folder with a music design.  Again I used a Tim Holt Idea-ology sticker saying "Contented Spirit" and splattered a brown Posca pen across the surface of the tag.


Tuesday 3 January 2023

Lavinia Stamps "Sky" on an "Ambiance" background


More Lavinia Stamps play making this card.

I masked off the area around a circle and used the Lavinia Stamps "Ambiance" stencil with two shades of Archival Inks:  Peony Pink and Violet.  Around the very edge of the circle, I used Versafine Clair "Purple Delight" ink to pull the eye to the central area.

I used Versafine Clair "Monarch" purple ink to stamp the fairy "Sky".  I used the same ink to create the landscape Sky sits on.

I used Versafine Clair "Morning Mist" grey ink and "Monarch" purple ink to stamp the "Small Branches" to create the look of foliage growing.

I coloured the wings of Sky using Derwent Inktense Water Colour Pencils.  

I added dots of colour to the landscape using a white and pink gel pen and a yellow Posca Pen.  Adding touches of glitter and shimmer to the image using gel pens.

Day 22 of the Karen Telfer "24 Days of Tags 2022"


It's Day 22 of the Karen Telfer "24 Days of Tags". This tag is about dots. You can see Karen's demo for her tag here.

I've used three shades of Distress Oxide Inks: "Picked Raspberry", "Peacock Feathers" and "Wilted Violet" through one of the holes in the Funky Fossil Designs "Bokeh Builder Stencil".

I used a mix of acrylic paints, glitter gel pen and Posca Pen to add dotty details to the coloured circles and to the edge of the tag, edging with Versafine Clair "Twilight" dark blue ink.

In the middle of the central purple circle, I added a Prima Marketing sticky backed pebble with a dot surround that I found in my craft stash.

Monday 2 January 2023

Lavinia Stamps "Bird on a Floral Wreath" card


I felt the urge to make a less is more type of card, resulting in this one using Lavinia products. 

I used two shades of Archival Inks (Pink Peony and Forget-Me-Not) through the Lavinia Stamps "Elegance" stencil.  Focusing in one corner and fading out towards the edges.

I used Versafine Clair "Monarch" purple ink to stamp the Lavinia "Floral Wreath".

I used the same ink to stamp the Waffle Flower Stamps sentiment, part of their "Essential Sentiments" stamp set.

I used two shades of Versafine Clair Inks.  "Twilight" stamped in second generation stamping and then "Warm Breeze" to stamp the little bird, which is part of the Lavinia Stamps "Bird Collection" stamp set.

I coloured the wreath and the bird with Derwent Inktense Water Colour Pencils.  I added extra details with some Posca Pen splatters and also a gold shimmer and silver glitter pen.