52 Week Mini Art Card/Tag Challenge

Showing posts with label Birthday Card. Show all posts

Monday, 29 June 2026

Stampin' Up "Dragonfly Dreams" Birthday Card


Time for a birthday card, I made this about a week ago, but don't share the posts till later on the day of the birthday.  I don't like feeling pressured to create anything.  For me, it takes the joy away from crafting.

Starting with a white piece of card, I used Versafine Clair "Verdant", a lime green coloured ink to stamp the dots around the edge of the card.  The dots are part of a Stampin' Up stamp set called "Dragonfly Dreams".  I then used the same ink with a blending brush to colour the edges of the card.

I used "Sky Blue" Ranger Archival Ink with a blending brush to colour the central area of the card.  Then using Versafine Clair "Warm Breeze" ink and a cotton but, I stamped dots and edged the card in the same ink.

I used Versafine Clair "Twilight", a dark blue ink to stamp the dragonfly, which is also part of the "Dragonfly Dreams" stamp set.  I used the same ink to stamp the sentiment, which is party of a 7 piece stamp set, by Chloes Creative Cards, which came free with Simply Cards & Papercraft Magazine, Issue 283.I then used three gel glitter pens, a silver, a green colour and blue colour to add sparkle and shimmer to the card surface.

Saturday, 1 January 2022

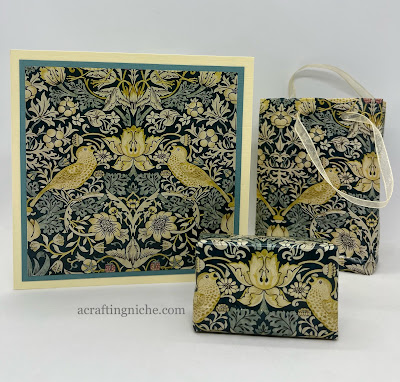
Recycled Wrapping Paper Gift Bag and Card


Happy New Year to you.  Thank you for taking a look at my little blog of makes.  Your interactions are always very much appreciated and I wish you well for 2022!

A few days ago, I celebrated my Birthday.  One of my friends called round with a present for me wrapped is some beautiful wrapping paper, which had a William Morris design.  I commented on it and she said that she had actually recycled it from a present she had received, saying that she was attempting to recycle as much gift wrappings as possible. 

After I had unwrapped my gift, I put the paper to one side, wonding what I could do with it.  Then inspiration struck.  My friends birthday is in a couple of weeks, so I decided to reuse the pretty wrapping paper.

Some of the paper had been well used.  I started by removing as much sticky tape as I could and then cut off the most tatty areas of the wrapping paper.  I then ironed the paper on a medium heat to try to remove the fold lines from previous use.  There are still a few, but because the pattern is quite busy, it does hide most of them.

I decided I would make a gift bag for her present.  I wasn't really sure where to start, but I did find a little tutorial on-line to help me.  This is the one that I watched.  It was simple enough to create.  I found some co-ordinating ribbon to thread through for the handles.  I then wrapped her gift in the same paper.

I had deliberately retained a large flat area of wrapping paper for the card front, I cut it square, mounted it on some nice grey/green card and then on to a cream card blank.

I'm really happy with the way the trio look and I'm certain my friend will appreciate my recycling efforts too.

Maybe 2022 will be the year of reduce, reuse and recycle for me!

Sunday, 12 December 2021

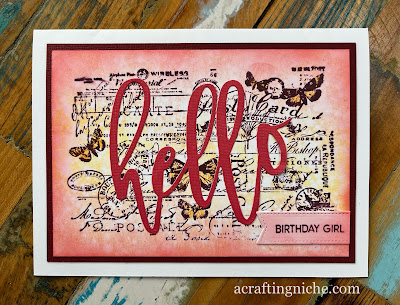
Carabelle Studio "Postcard" Birthday Card


Here's a Birthday card I made this morning, using a number of techniques.  It has a gel plate background, there's stamping, die cutting and heat embossing too! 

I used Distress Oxide Inks on the gel plate to create the background.  I then used the Carabelle Studio "Background Postcard", stamped in Versafine Clair "Chianti" ink.  I then coloured the butterflies with an orange coloured pencil.

I then die cut the "Hello" sentiment, using the Waffle Flower "Oversized Hello".  I stamped a sentiment from the same stamp and die set in Versafine Clair "Chianti" and heat embossed using Wow! clear embossing powder.

I used "Abandoned Coral" Distress Oxide Ink around the edges of the card, before mounting it on to a darker card to create a border.

Saturday, 27 November 2021

Card-io "Wild Flowers" half wreath card


This is a card I have made for a dear friend, who celebrates a significant birthday today.

First, I used a circle stencil on the left side, I drew a light pencil line around the edge, on the right hand side, I used "Bundled Sage" Distress Oxide Ink to create a soft coloured edge, to give the impression of the continued wreath.

For the wreath, I used two Card-io stamp sets "Wild Flowers" and "Sweet Hearts", stamped in various shades of Memento and Distress Oxide Inks.  I then added some touches of Posca Pen to the middle of the flowers for extra detail.

Both the sentiments used are by Simon Says Stamps, using two of their sets:  "Tiny Words Birthday" and "Tiny Words Encouragement", both stamped in Versafine Clair "Morning Mist" grey ink.

Sunday, 26 April 2020

Funky Fossil - "In The Spotlight Stencil with Stampers Anonymous Crazy Bird Stamp


Funky Fossil Designs is always bringing out new stencils to tempt me with.  I immediately fell for the "In the spotlight stencil" so it was a must for a card I needed to make for a young man that likes to do a bit of acting.

I used a black card and "Squeezed Lemonade" Distress Oxide Ink through the spotlight stencil.  When applying it had a slight yellow, but once dry it is more grey with a hint of yellow, which is fine for this purpose.

I used a bird from the Stampers Anonymous set called "Crazy Bird" stamped in Versafine Clair "Nocturne" ink into the middle of the spotlight and also on to a piece of white card.

I coloured the image on the white card using two shades of Distress Oxide Inks (Antique Linen and Rusty Hinge) and then fussy cut the shape and adehered over the stamped image on the spotlight area.

I used a Lawn Fawn stamp set called "Simply Sentiments" for the sentiment, stamped and embossed using Wow! embossing products.


Thursday, 16 April 2020

Visible Image "Robot Data" Birthday Card


I've had a play with the Visible Image "Robot Data" stamp set today, making this card.

For the background, I used black card, splattered with "Spiced Marmalade" and "Picked Raspberry" Distress Oxide Spray Ink.  I added extra splatters by tapping white and blue Posca Pens.

I stamped the robot and other areas using Versafine Clair "Nocturne" ink.  I then stamped the robot again on a piece of white card.

I coloured the robot image on the white card using Arteza Inkonic Pens, I then cut the image out, went around the edges with a black sharpie pen (so there were no white edges) and adhered over the one on the card.

Thursday, 9 April 2020

Funky Fossil - Funky Florals Birthday Card


I've made bright Birthday card today using an assortment of Funky Fossil products.

I used "Picked Raspberry" Distress Oxide Ink through the Funky Fossil "Dotty Grid Stencil".

Using Versafine Clair "Nocturne" black ink, I stamped the floral cluster from the Funky Fossil "Funky Florals" stamp set.  I coloured the image with Arteza Brush Pens. I fussy cut the image, then adhered it to the dotty background.

Using Versafine Clair "Monarch" purple coloured ink, I stamped the two words using the Funky Fossil "Happy Words" stamp set.

Thursday, 2 April 2020

Funky Fossil - "Wild Things" Elephant Birthday Card


I've made a birthday card for a little one today using the Funky Fossil "Wild Things" stamp set.  

I used a leafy embossing folder that came with a magazine for the background and covered it with two shades of Distress Oxide Inks.  First with "Cracked Pistachio" and then on the leaf areas I used "Mowed Lawn".

I stamped the elephant in the middle of the green base and also on a piece of plain white card, using Versafine Clair "Morning Mist" grey ink.

I then stamped the sentiment, using a Personal Impressions stamp set called "Double Sayings" in Versafine Clair "Nocturne" ink.

I then painted the elephant on the white piece of card, using two shades of Distress Oxide Inks:  Weathered Wood and Spun Sugar.  I fussy cut the coloured elephant shape and adhered it onto the card over the outline image of the elephant.

Tuesday, 3 March 2020

Visible Image - Into The Woods Birthday Card


I've played with an older Visible Image stamp set today to create this card.


Some months ago, I had a messy session with some Dylusion Ink Sprays creating some stunning backgrounds.  This is one of them, which I felt was an ideal marriage with the Visible Image "Into The Woods" stamp set.

I stamped the tree scene and owl using Versafine Clair "Nocturne" ink.  

I created the stars in the sky by using a fan brush with some white Gesso and tapping the brush lightly to gain the look of stars in the sky.

I heat embossed the "My Favourite Things" sentiment, which is part of their "Essential Sentiments" set, using Wow! Embossing pad and Wow! Super fine Metallic Silver embossing powder.

Tuesday, 18 February 2020

Visible Image "Night Owl" Birthday Card


I have played with a Visible Image stencil and stamp set to create this card for a male birthday.

I used Distress Oxide Inks (Antique Linen, Stormy Sky and Blueprint Sketch),to create the background below the strobe, by swooshing the card through the ink.  I then used the "Chipped Sapphire" Distress ink through the Visible Image "Strobe" stencil.

I used the owl image from the Visible Image set called "Night Owl" to stamp over the strobe background using Versafine ink.

I swooshed a piece of  white card with the owl image through three shades of Distress Oxide inks (Antique Linen, Tea Dye and Rusty Hinge), drying with a heat gun.  I then stamped the owl image on this coloured background using Versafine Clair "Acorn" brown ink.  I coloured the owl using a Sakura Gelly Roll pen in a copper colour.  I also added some white highlights to the eye area.  Finally I fussy cut the image and adhered it over the stamped image on the strobe background.

I used a white Posca pen on the lighter areas of the strobe along with a silver glitter Signo Pen and a black fine liner pen, adding dots of colour.

I mounted the image onto blue card and then onto a white card blank, adding a stamped sentiment using a sentiment from a Personal Impressions set called "Double Sayings", stamped in Versafine Clair "Nocturne" ink.

Friday, 31 January 2020

4th Birthday Card - Hobby Arts "Dogs" stamp and Funky Fossil stencil


Here's a card I've made for a little boy who will be four years old next week.

I used "Peacock Feather" Distress Oxide Inks through the "Funky Circle Stencil" from Funky Fossil Designs to create the background pattern.

I stamped the dog image, which is part of the Hobby Arts Ltd "Dogs - CS130D" stamp set, coloured with coloured pencils, then fussy cut and adhered over the stencil.

Using Versafine Clair "Nocturne" black ink, I stamped the "Happy Birthday" sentiment, which is part of the "Stylish Sentiments" stamp set by Papertrey Ink.

Wednesday, 27 November 2019

Lavinia Stamps Raven - Birthday Card


My friend celebrates her birthday later this week.  Some months ago, when she was looking at the cards that I had made, she commented on how she liked the Lavinia Stamps "Rory & Darcy" and that if I made a birthday card for her, could I include them on it.  Fast forward six months and i've created what she asked for.  Hope she likes it.


For this card, I used a gel plate background that I had created some time ago, with a blue and mauve colours.

I started stamping the bottom green area, using the "Ivy Border Stamp" stamped one row on top of the other using Versafine Clair "Verdant" green ink.

I then stamped the "Sacred Spells" verse in the background using Versafine "Smokey Gray" ink, I stamped it three times across the card. At this stage, I masked off a spot light/moon area using Versafine Clair "Charming Pink" shade of ink.

Using Versafine Clair "Fantasia" purple ink, I stamped "Raven" on her branch the  extra branches using the"Tree Branch" and the "Birds".

I used the "Fairy Barnacle" stamp, stamped at the base of the card using Versafine Clair "Charming Pink" ink.  I then stamped the "Fern Heads" in Versafine Clair "Shady Lane" green ink.

I stamped the "Rory and Darcy (the set)" characters, standing on the Fern Heads.  I stamped Rory and Darcy in Versafine Clair "Fantasia" purple ink.  Using the same ink, I stamped the "Climbing Ivy" in the bottom right hand corner.

Using Versafine Clair "Purple Delight" shade of ink (which is more pink than purple), I stamped the "Star Burst" pods.  I used the same ink to edge the card with.

Finally, I used a white and a silver glitter Signo pen to add highlight areas.  I also used Lavinia Stamps "Holographic Moon Dust" to areas of the fairy wings and the Star Burst Pods to add sparkle to the card.


Sunday, 24 November 2019

Art Impressions - Girlfriends, Chocolate Therapy Birthday Card


I've not made one of these Art Impression "Girlfriends" cards for a while and decided it would be an ideal image for a family member who celebrates her birthday this week.

I stamped the image, (Art Impressions "Girlfriends" Chocolate Therapy - AICS28) in Versafine "Smokey Gray" ink.

I used a selection of Distress Oxide Inks applied with a paint brush, along with a couple of Sakura Gelly Roll Pens.

Tuesday, 12 November 2019

Lavinia Stamps - Grand-daughter Birthday Card


Willow, our eldest Grand-daughter will be celebrating her 6th birthday in a couple of days.  I've included lots of her favourite things - dragons, fairies, wolves and horses on this card, which I've created using a whole selection of Lavinia Stamps and Distress Oxide inks applied with a brush.

I started by creating the background sky using the following Distress Oxide inks:  Antique Linen, Tumbled Glass and Broken China.

I moved on to the grassy areas using Shabby Shutters, Twisted Citron and Mowed Lawn Distress Oxides.

I stamped the "Tree Root"  in Versafine "Vintage Sepia" ink.  I then stamped the "Skeleton Tree" in Versafine "Smokey Gray" ink.  Using the torn edge of a piece of copy paper, I created the landscape lines using Versafine "Olympia Green" shade of ink.

Using Versafine Clair "Nocturne" black ink I stamped the "Twilight" fairy, "Maka" the wolf and the hedghog, which is part of the "Wallace Family" 

I stamped the dragon, which is part of the "Dragon Set" in Versafine Clair "Morning Mist" grey ink.  I stamped the "Horse & Foal" in Versafine Clair "Acorn" brown ink.

I painted the tree trunk with a selection of greens and brown coloured Distress Oxide Inks.  I used a white Signo Pen and an orange Posca pen to creat the flowers on the grass.  I also used the Signo Pen to add highlights to some of the figures.

I stamped the "Field Grass" at the base of the card using Versafine Clair "Nocturne" black ink.  Finally, I stamped the sentiment using a magnetic Rubbadubbaoo stamp set.

Friday, 13 September 2019

Male Birthday Card using the Funky Fossil Mini Cube Stencil


I often struggle making cards for males.  Considering they are half the population I don't know why it is so difficult, but I find it so, especially if you don't want to go the typical route of sport and beers.


I used a Distress Oxide Ink in a blue/green shade called "Peacock Feathers" through Funky Fossil Designs stencil called "Mini Cubes".  I did it first on a pale blue background card and then again on the front of a white 5"x5" card blank.

I stamped the birthday sentiment on the pale blue background, using Hobby Arts Ltd stamp set called "Greetings for a friend - SC158D" using Versafine Clair "Nocturne" ink, which is a lovely black ink to use.  I then cut the panel down and mounted it onto black card before adding it to the top of the patterned front of the card.

I always clean my stencils after each use.  I usually use an off-cut of card to rest the stencil on, but this time decided to open up the card and clean the stencil on the inside right hand side of the card.  

Using a wet wipe I gently wiped the ink away, in doing so the ink on the stencil fills the pattern gaps creating a toned down replica of the stencil pattern, so it nicely matches the front cover.


I used a Papertrey Ink stamp from their "Stylish Sentiments" set for the internal sentiment, again using Versafine Clair "Nocturne" ink.

Tuesday, 20 August 2019

Birthday Card (using Stampin' Up Beautiful Friends Set)


I seem to have made so many Lavinia makes recently, it was nice to make something totally different with a "Clean and Simple" (CAS) look.

I used the Stampin' Up set called "Beautiful Friendship" to create the floral arrangement, using the following shades of Distress Oxide Inks:  Victorian Velvet, Picked Raspberry, Milled Lavender and Shabby Shutters.

The "Happy Birthday" sentiment is part of a Hobby Art Ltd set called "Greetings For Friends - CS158D" which I stamped in Versafine Clair "Morning Mist" shade of ink.

Thursday, 15 August 2019

Lavinia Stamps "Dancing Till Dawn" Birthday Card


My friend is celebrating her birthday this week, as she is also a paper crafter, I thought it only right that her card be made of Lavinia Stamp products.

I used Distress Oxide Inks to create the land and skyscape using:  Antique Linen, Tumbled Glass, Broken China and Salty Ocean for the sky.  I used Antique Linen, Twisted Citron, Crushed Olive and Peeled Paint for the ground area.

I started by stamping the "Trees" to separate the sky from the land, stamping in Versafine Clair "Morning Mist" shade of ink.

I then stamped the fir trees, using "Small Fairy Fir Tree" and "Small Fairy Fir Tree 2", stamped in two inks (Distress Oxide "Peeled Paint" and Versafine Clair "Shady Lane" ink).

I then stamped the "Dancing Till Dawn" figures, the "Fern Heads" and the Papertrey Ink sentiment from thier "Stylish Sentiments" set using Versafine Clair "Nocturne" black ink.

I added little daisies to the grass by dotting white and orange shades of Posca Pen.  I added a silver shimmer to various areas of the card by using a Signo Pen.

Wednesday, 10 July 2019

Camper Van Birthday Card with a stencilled background


My Hubby celebrates his birthday today, so as we are in the process of buying a camper van, it seems apt to make a card to that theme.


I started by creating the background.  Using a blending tool and Distress Oxide Inks in the shades of Tumbled Glass, Salty Ocean and Mermaid Lagoon.


I then positioned the Creative Expressions stencil called "Mica Masks Falling" over the prepared background and secured with low tack masking tape.  Through the stencil, I used another Distress Oxide Ink in the shade of "Blueprint Sketch".


This is how it looks when you carefully peal back the masking tape and remove the stencil.


I cleaned my stencil by placing it on a spare piece of cardstock and used a wet wipe to clean the surface.  The ink on the stencil transfers to the gaps within the stencil, replicating the pattern but in softer shades.

The camper van image is from a set of stamps that came free with issue 54 of Creative Stamping Magazine.  I stamped the van onto the prepared background and also onto a piece of white card using Versafine Clair "Twilight" shade of ink.  I also stamped the sentiment in the same ink.

I then matted and layered the base onto a co-ordinating piece of card and then onto a card blank.

Returning to the camper van image stamped on the white card.  I cut the image out and cut the wing mirrors off.  Using black foam pads, I stuck the main image over the previously stamped image on the background.  Using a touch of wet glue, I positioned the wing mirrors, to provide the impression of depth.


Saturday, 18 May 2019

Alice's Adventures In Wonderland Birthday Card


A friend is celebrating her "special" birthday with a themed party of "Alice In Wonderland".  Unfortunately, we are not able to attend, as we both have different plans organised for the weekend.

This is the card I made for her.  I had saved a pack of small playing cards from a Christmas cracker, so used these as the base.  I'm not sure where the "Alice" stamps came from or who made them.  The sentiment is from a Papertrey Ink set called "Stylish Sentiments" stamped in Versafine "Black Onyx' ink.

Monday, 13 May 2019

Visible Image Butterfly Ink Stencil Card


Today I decided to use one of my gelliplate backgrounds I made a week or so back.  

You may remember that I had seen a video link using Pan Pastels through stencils.  Well today I used the first pull image (the one that was a bit blurry).  Here's it is, it's the one on the left of the photo.


I decided to use the Visible Image "Butterfly Ink" stencil.  I used low-tack masking tape to keep the stencil in position on the gelliplate background.

First I ran round the edge of the stencil with a thin point pen (also filled the inky dots too).

Using Distress Inks, in the shade of "Black Soot" I inked the edge of the butterfly drawing the ink from the stencil onto the inside edge/outer edge of the butterfly itself.  

Using a finger dabber, I used Distress Ink in the shade of "Chipped Sapphire" up to the "Black Soot" area.  

Finally, I filled the rest of the butterfly using a Distress Ink called "Wilted Violet" with a finger dabber.  Because  have only lightly inked the area you can still see the gelli plate pattern which I quite like.

I felt the butterfly area needed something else, so I pulled out the Visible Image "Two Tone" Stencil and added some dots using a Memento Luxe ink called "Wedding Dress".  I think the dots just add a subtle additional layer.

Finally, using Versafine Clair ink in the shade of "Nocturne" I stamped the sentiments.  Both are from the Visible Image set called "Somewhere In Time".  I edged the top of the butterfly using a shimmery gold Sakura Gelly Roll pen.