52 Week Mini Art Card/Tag Challenge

Showing posts with label Lavinia Stamps Laurel Stencil. Show all posts

Tuesday, 4 August 2026

Lavinia Stamps "Sunflower 1 - LAV991" in the meadow card.


This is a very long over due Lavinia Stamps make.  For some reason I've not used my Lavinia goodies for a long time, so it was nice to re-acquaint myself and have a play, creating this scene.

I started by stamping the Lavinia Stamps "Sunflower 1" in two shades of Versafine Clair inks.  I used "Shady Lane" for the stem and leaves and "Summertime" for the flower head.  I then painted Pebeo Drawing Gum over the stamped image to mask it from other inks.

I then painted the background colour, using a paint brush with diluted Distress Oxide inks.  The colours I used are:  Peeled Paint and Mowed Lawn for the ground scape and Tumbled Glass, Speckled Egg and Weathered Wood.  I then used Tumbled glass and Peeled Paint through the Lavinia Stamps "Laurel" stencil.

I used Versafine Clair "Shady Lane" green ink to stamp the Lavinia Stamps "Willow".  I used the same ink to stamp the Lavinia Stamps "Wild Summer Flowers".  I then used Versafine Clair "Acorn" brown ink to stamp the Lavinia Stamps "Flora Set".  Next, I used Versafine Clair "Morning Mist" grey ink to stamp the Lavinia "Small Pixy Houses".

I moved on to adding more detail, removing the masking fluid and colouring the sunflower with Derwent Inktense Pencils and a gold gel pen.  I used a white Posca Pen to add flower heads t the "Wild summer flowers".  Pencil detail for smoke from the chimneys of the Pixy Houses  and a black fine liner pen for shading in various areas.

Sunday, 2 August 2026

A Crafting Niche "52 Week Mini Art Card / Tag Challenge 2026" - Week 31


The Crafting Niche 52 Week Mini Art Card/Tag Challenge 2026:

This is a weekly challenge. I provide you with a prompt/theme each Sunday morning through out the year.  The challenge is very relaxed.  You can do as much or as little as you like.  You can create cards, tags, Artist Trading Cards (ATC's) or index cards, the choice is yours. You just go with what ever is in your head at the time.  You can stamp, get inky, use patterned papers, texture, embellish it is all down to you.

There is a dedicated private Facebook Group, with a lovely bunch of people who are already sharing their makes from previous challenges.  You can find the group by clicking this link.  I'd love you to join in. 

The prompt for Week 31 is "Floral Background"

For my floral background, I covered a plain tag with a piece of floral patterned paper.  The paper is by Stampin' Up and is part of their "Dainty Flowers 12x12 Designer Papers" pack.

Then, using Versafine Clair "Medieval Blue", an almost purple coloured ink, I stamped the bird, which is part of the "Life Is Beautiful" stamp set from Visible Image Stamps.

I then used the Lavinia Stamps "Laurel Stencil" with "Leaf Green" Ranger Archival Ink round the edge of the birds and over the flowers..

I added more colour to the bird, using Derwent Inktense Pencil, applied with a paint brush.  I outlined the bird in a black fine liner pen and a white gel pen.  I added exra flowers using Posca Pens too.  Finally, I added some white splatters of Dr. Ph Martins bleed proof white paint.


Monday, 1 July 2024

Lavinia Stamps "Mae" and the crystal ball


Last night, I watched the super talented Eileen Godwin do a live tutorial.  I was up early this morning, so decided to have a go myself.  I didn't take any notes, so this is made by memory.  I've used a couple of different stamps to Eileen too.

I used a brayer to put Versafine Clair "Sand Dune" ink on to a gel plate. Then I used the Lavinia "Maple Leaf" stamp to stamp leaves around the edge, using two shades of Ranger Archival Inks.  The colours I used were "Cornflower Blue" and "Rose Madder". I then took a print from the gel plate.

Using Versafine Clair "Twilight" dark blue ink, I stamped the Lavinia fairy called "Mae" and also the "Small Lily Flourish".

I used "Rose Madder" Ranger Archival Ink with a Lavinia "Moon Mask" edging the moon with the pink colour.  I then used the same coloured ink through the Lavinia "Laurel" stencil".

Next I stamped the Lavinia "Luna Lights" that hang on the top right of the card, in Versafine Clair "Twilight" dark blue ink.  I used the same ink to edge the card too.

I used the Lavinia "Bubbles" stamp set, using the smallest bubble for the crystal ball, stamped in Versafine Clair "Arctic" and then given touches of 2B pencil and white gel pen.

I coloured the flowers using "Malibu" coloured Derwent Inktense pencil.  I used a gold pen to colour in the "Luna Lights" and a gold shimmer pen to outline some of the leaves.  I added "A Wink of Stella" to the wings of the fairy and then finally added some dots of white Ranger Enamel Accents round the moon.

Thursday, 22 December 2022

Lavinia Stamps "Laurel Stencil" gift tag


I followed Lavinia Stamps, Emma Jo's "Jolly Holly" tag tutorial, making this tag.

I loosely followed the tutorial, choosing some different Element Inks for the background colour, the same Lavinia "Laurel Leaf stencil", but the same colours of Posca Pens.

I used a stamp from the Lavinia "Heartfelt Verse" stamp set with Wow! Silver embossing powder and heat set.  I then die cut the sentiment and stuck it on to the tag.  

I really like the look of this tag and can see me replicating it for male and female birthday gift tags.

Wednesday, 26 January 2022

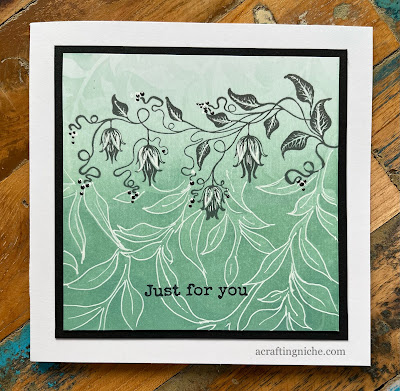
Lavinia Stamps new "Bell Flower Vine" Card


This morning I've had a chance to play with another new "Lavinia Stamp" the "Bell Flower Vine" stamp.

Using a blending brush, I graduated the blending of "Evergreen Bough" Distress Oxide ink.  I then used the same colour ink through the Lavinia Stamps "Laurel" stencil.

I then stamped the flower/vine design and the sentiment using Versafine Clair "Morning Mist" grey ink.

Finally, I used a white gelly roll pen to go around the outline of the stencil design on the lower section of the card.

Thursday, 29 October 2020

Lavinia Stamps "Celeste" Fairy Card


You may have noticed, I have not shared many cards or makes this past month.  I had totally lost my crafting mojo and couldn't bring myself to even consider crafting.  I find it odd that I should feel like this as crafting is what I do!  Thank goodness I had an urge to dust off my Lavinia Stamps and create this card.

The background was inspired by a technique created by the super talented Eileen Godwin using (Squeezed Lemonade and Abandoned Coral) Distress Oxide Inks.  I then used "Picked Raspberry" Distress Oxide ink through the Lavinia "Laurel" Stencil.

I moved on to the stamping, first stamping the script, which is a Lavinia Stamp called "See a fairy, make a wish", stamped in Versafine Clair "Morning Mist" grey ink.  I then used Versafine Clair "Nocturne" black ink to stamp "Celeste" the fairy and the "Mystic Swirls" to each side of the fairy.

Friday, 21 August 2020

50th Eclipse Birthday Card


Our friend celebrates her 50th birthday next week.  I suspect she isn't aware that I know it's a milestone birthday, so have made this eclipse style card for her.

I started by using a Lavinia Stamps "Laurel" stencil with "Bundled Sage" Distress Oxide Ink just in the central area, fading to the edge.

I then used number dies through my Sizzix Big Shot die cutter to cut the two numbers out of the middle.  I then mounted the piece of card on to a dark pink background.  With the die cut numbers still in position, I adhered the middle of the "zero" flat onto the coloured card stock and then removed the remainder of the number.

I used a Hobby Art Stamp set called "Greetings for friends", stamped in Versafine Clair "Purple Delight" ink.

Next I cut some double sided thin foam strips and stuck them where the numbers would be.  I then layered the die cut number on top.  This means that the actual numbers are slightly raised and from the side, you get a little hint of the colour below.  This is the bit which is called "eclipse".


Tuesday, 4 August 2020

Lavinia Stamps Dream Catcher Card


I've had another play with Lavinia stamps and stencil to make this card.  


I used three Dylusion Ink Sprays (Lemon Zest, Pure Sunshine and Squeezed Oranges) to create the initial background colour.


I then lay the Lavinia Stamps "Laurel" stencil over the top of the background and used "Abandoned Coral" Distress Oxide Ink through the  stencil.


I used a circle stencil with Wow! Embossing Powders (clear and Sunburst) to create the raised circles.  I used the Lavinia Stamps "Sacred Spells" with Versafine Clair "Charming Pink" ink for the background text detail.

I then moved on to stamping the main areas using Versafine Clair "Nocturne" ink to stamp the Lavinia Stamps "Dream Catchers", "Creeping Ivy" and the "Every Dream" sentiment.

I used a couple of Signo Glitter pens (bronze and red colours)and a metallic gold pen to colour the "Dream Catchers".  Finally, I inked the edges o the card in Versafine Clair "Nocturne" ink.

Wednesday, 1 July 2020

Lavinia Stamps new stencil play session


Last week, Lavinia Stamps launched 12 new stencils along with 13 new stamps.  Being a bit of an addict, I had to get every one of them.


As you will have seen, I have been playing with the stamps qute a lot, but this morning I decided to use the stencils with a gelli plate.

I started by using a brayer with acylic paint on top of the gelli plate to create a thin even layer.  I then put the stencil over the top.  Using a foam pad, I applied Pan Pastels in a couple of colours.  Once I'd covered the area, I then lifted the stencil (and immediately popped it in a bowl of water), and then brayered a thin even layer of white acrylic paint.  I smoothed card over the top of the paint and added a slight pressure.  I then lifted the card to reveal the image.

You can get a second pull of the image by applying another thin layer of acrylic paint and again smooth card over the gelli plate and lift.  This second pull will be a more subtle, less obvious print of the image.

For my session this morning, I used the Lavinia Stamps Pods, Pebbles and Laurel stencils. I will use these backgrounds for future projects.