52 Week Mini Art Card/Tag Challenge

Showing posts with label Lavinia Elements Ink. Show all posts

Sunday, 7 September 2025

52 Week Mini Art Card / Tag Challenge 2025 - Week 36


The Crafting Niche 52 Week Mini Art Card/Tag Challenge 2025:

This is a weekly challenge. I provide you with a prompt/theme each Sunday morning through out the year.  The challenge is very relaxed.  You can do as much or as little as you like.  You can create cards, tags, Artist Trading Cards (ATC's) or index cards, the choice is yours. You just go with what ever is in your head at the time.  You can stamp, get inky, use patterned papers, texture, embellish it is all down to you.

There is a dedicated private Facebook Group, with a lovely bunch of people who are already sharing their makes from previous challenges.  You can find the group by clicking this link.  I'd love you to join in.

The prompt for Week 36 "Book Print"

I have about five old books that I often tear pages out of to use in my crafting.  One is just normal text, two are hymn books with words and the music notes, one an old dictionary and the other is an accountancy book (lots of text and balance sheets).  These provide me with a good choice.

I used Lavinia "Elements Inks" to colour my book page.  The colours I used are: Lemon Drop, Russet Orange, Green Parrot, Blue Atoll and Pine inks.  I then stuck the page on to a plain tag, trimming to size. 

Once the ink was dry, I added some splatters of white Posca Pen across the surface of the tag.

On a white piece of card, using Versafine Clair "Nocturne" black ink, I stamped the two heads, which are part of a Visible Image stamp set called "Love is Love".  I then fussy cut the heads and stuck on to the tag, again trimming to size.

After mounting the tag on to a piece of black card, I added a word sticker from my stash that says ""listen to your heart, it will show you the way".

Thursday, 12 September 2024

Lavinia Stamps "Blue Moon" Witches Card


I've surprised myself, a third card in one day!  This was supposed to be a birthday card, but Hubby reckons it's "a bit dark" for a birthday card, so I will make another one.

For this card, I started off with a white piece of square card and stamped the Lavinia Stamps "Tree of courage" and "Tree of hope" using Versafine Clair "Nocturne" black ink.

I popped a moon mask in postion then used Lavinia "Sundance" Elements Ink with a blending brush within the tree area.  At the base of the tree, I used "Lime Punch" Element Ink to add more of a green tinge.

Next, I used a further three Element inks, around the edge using Dark Denim, Violet Chalk and Midnight Blue colours in that order.

I used Versafine Clair "Nocturne" black ink to stamp the three witches, which are part of the Lavinia Stamps "Blue Moon" stamp set.

I used Derwent Inktense pencils with a paint brush to colour the tree trunk and to add some background foliage and green shadows.

I then used a white gel pen and a black fine liner pen to add highlights and low lights to the tree areas.  I also used the black fine liner pen to add extra shadow.

Finally, removing the moon mask, I used "Antique Linen" Distress Oxide Ink to colour in the moon with a blending brush.

Monday, 27 November 2023

Penny Black Stamps "Winter Wander 40-356" Card


Well it is grim outside.  I woke to hear the rain lashing down, so I've made a bright and cheerful card.

For the vibrant background colouring, I have blended a selection of Lavinia Element inks.  These are the inks that I used, in the order I used them in from the bottom of the card:  

  • Sundance
  • Sahara
  • Russet Orange
  • Confetti
  • Emperor Red
  • Merlot
  • Mulberry
  • Dark Denim
  • Graphite
I wafted the heat gun over the surface to ensure it was dry before the I used Versafine Clair 'Nocturne" black ink to stamp the Penny Black "Winter Wander 40-356" stamp, using my stamping platform, which allowed me to re-ink the stamp to get full black coverage of ink.

Finally, I mounted the image on to a piece of black card and then on to a bright yellow card blank.

Wednesday, 19 July 2023

Lavinia Stamps "Forest Flower" Card


So from going with really soft colours with the Clarity card I made last night, this morning I have gone for vibrant.

I started by creating the base, using three shades of Lavinia Element's Inks:  Lime Punch, Blue Atoll and Della Blue applied with a very wet mop brush so that the colours mingled.

Once dry, I then lay the Lavinia "Dynamic" stencil over the top and added "Lime Punch" and "Della Blue" Elements Inks through areas of the stencil.

I then moved on to the stamping, starting with Versafine Clair "Twilight" to stamp the new Lavinia Stamps "Forest Flowers".

I then used Versafine Clair "Verdant" and "Warm Breeze" to stamp the ferns, using the Lavinia "Fern Heads" stamps.

Using a couple of Lavinia Stamps "Hill Masks" I created the landscape using Versafine Clair "Blue Belle" and "Twilight".

I then added some foliage to the base of flowers using Versafine Clair "Twilight" dark blue ink with the new "Vine Set" and the older "Foliage Set".

I then inked the edges of the card using Verafine Clair "Fantasia" to give it a purple look.

I then moved on to the finishing touches, using Posca Pens and gel pens to colour the "Forest Flowers" and to add colour to the foliage at the base.  I used a white and a silver glitter gel pen to add highlights to areas too.

Tuesday, 24 January 2023

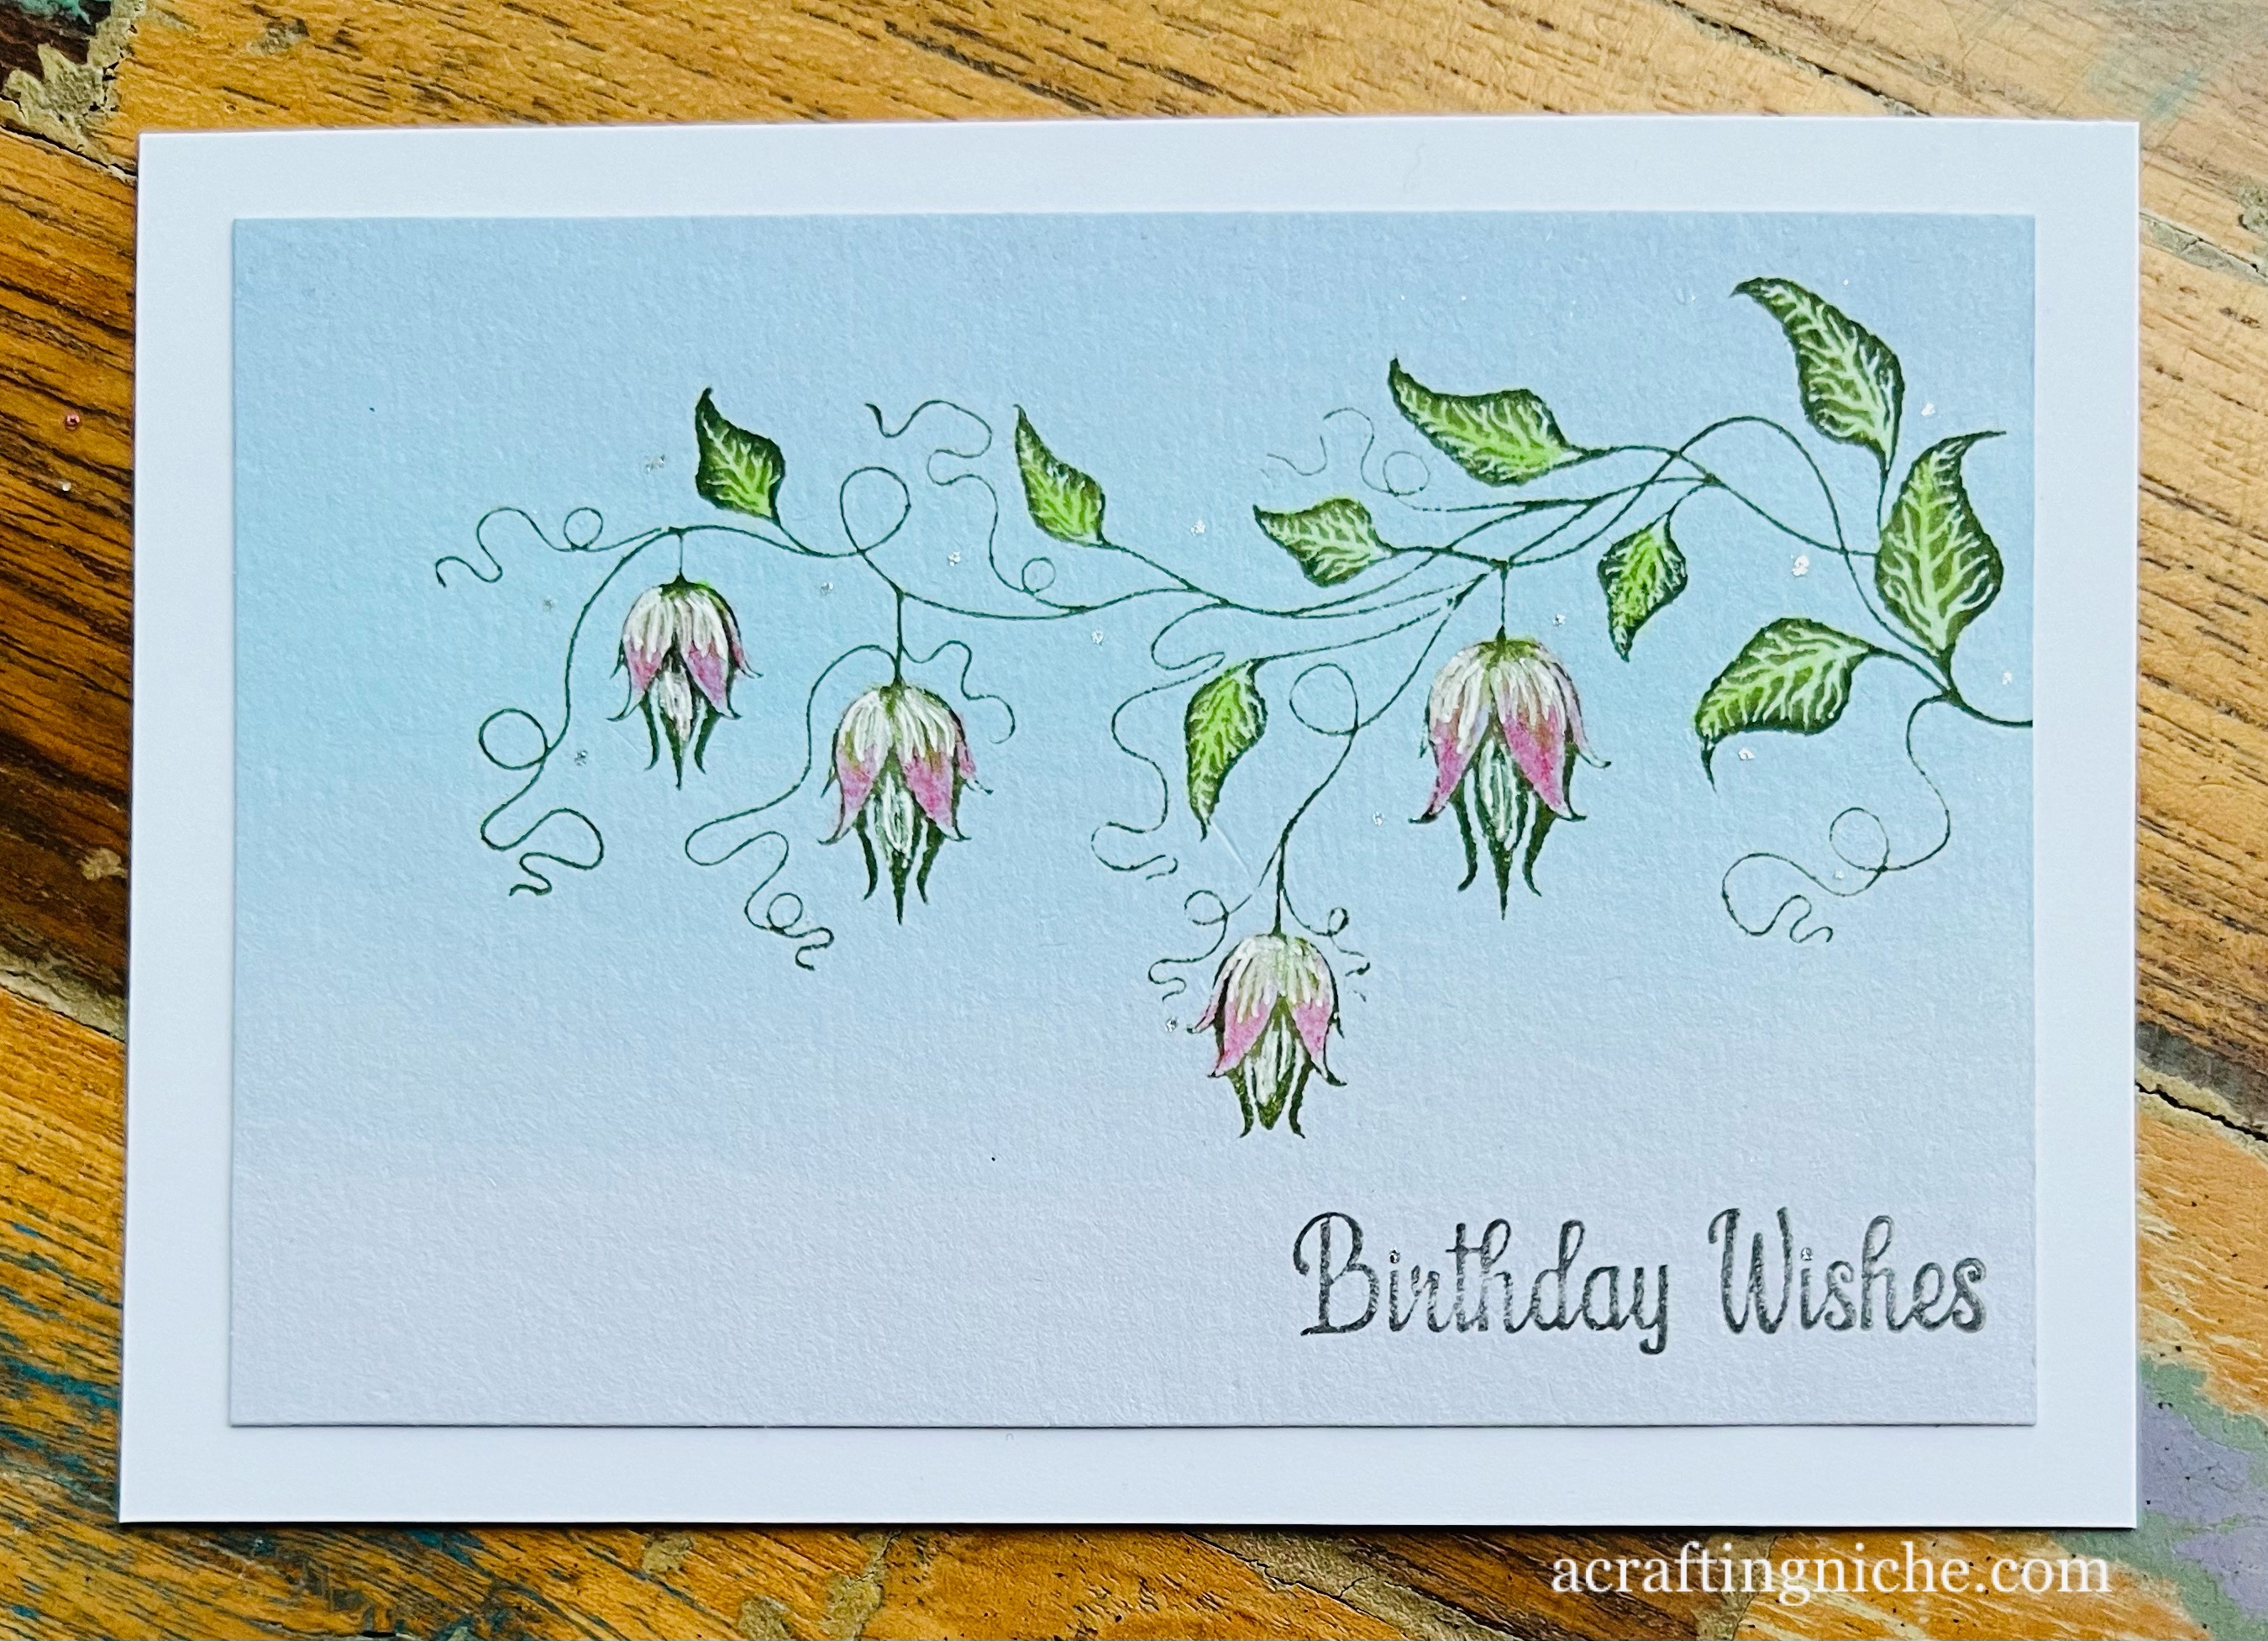
Lavinia Stamps "Bell Flower Vine" Birthday Card


I made a quick birthday card this morning, using water colour card as the base.  I spritzed it both sides so that it would lay flat, then used a wash (on the top two thirds) of three shades of Lavinia Stamps Elements Inks, using Blue Lagoon, Blue Atoll and Della Blue.

I ueds a heat gun to dry the surface then stamped the Lavinia Stamps "Bell Flower Vine" in Versafine Clair "Shady Lane" green ink.  I then stamped the birthday sentiment, which is part of the "Heartfelt Verse" stamp set in Versafine Clair "Morning Mist" grey ink

Finally, I coloured the vine using Derwent Inktense water colour pencils applied with a brush, adding a few dots of metallic silver glitter Signo Pen around the vine.

Sunday, 22 January 2023

Lavinia Stamps "Reindeer" Snow Scene Card


With the recent cold snap, I decided to make a snowy forest scene using Lavinia Stamps.

Because I wanted to start this piece with a wash of colour, I spritzed the back and the front of a piece of water colour paper.  (Spritzing the back of the paper means that it doesn't curl as much). I opted to use the smoother side of the card.

With a very wet paint brush, I brushed three shades of Elements Inks over the top two thirds of the card.  I used Blue Lagoon, Mulberry and Merlot.  Before I intensified the colour, I placed a small moon mask into position to keep that area slightly lighter.

I gave the card a very quick blast of the heat gun to take the excess moisture away, but leaving the surface still damp.  I positioned the torn edge of a piece of copy paper, then stamped the two sizes of Lavinia "Red Pines". First I stamped in "Iced Spruce" Distress Oxide Ink, then in Versafine Clair "Morning Mist" grey ink. Removing the piece of copy paper, I then stamped more of the grey trees and then used Versafine Clair "Fantasia" for the mid trees and "Medieval Blue" for the trees in the foreground.

Using "Tumbled Glass" Distress Oxide Ink with a finger dabber, I dabbed along the edge between the sky/tree trunks and the snow.  I then used a torn edge of copy paper to add some landscape to the snow area, also using "Iced Spruce" Distress Oxide Ink.

I stamped the Lavinai "Stag" and "Reindeer" in Versafine Clair "Pinecone" and "Morning Mist" so that the colour wasn't a solid black.

I then added some foliage poking through the snow, using Versafine Clair "Morning Mist" grey ink to stamp, using the "Foliage Set" and the top of one ot the "Skeleton Tree Scene set".

I removed the moon mask and using Van Goch Pastel Pencils I added extra contrast to the sky and colour to the moon.  I did the same to the snowy area.

I used a white acrylic paint to add snow detail to the trees, the stag and the reindeer. I then used the same paint and a fan shaped paint brush to create splatters to replicate snow.

Finally, I edged the card in Versafine Clair "Medieval Blue" ink before mounting it on dark blue card and then on to a white card blank.

Thursday, 22 December 2022

Lavinia Stamps "Laurel Stencil" gift tag


I followed Lavinia Stamps, Emma Jo's "Jolly Holly" tag tutorial, making this tag.

I loosely followed the tutorial, choosing some different Element Inks for the background colour, the same Lavinia "Laurel Leaf stencil", but the same colours of Posca Pens.

I used a stamp from the Lavinia "Heartfelt Verse" stamp set with Wow! Silver embossing powder and heat set.  I then die cut the sentiment and stuck it on to the tag.  

I really like the look of this tag and can see me replicating it for male and female birthday gift tags.

Tuesday, 20 December 2022

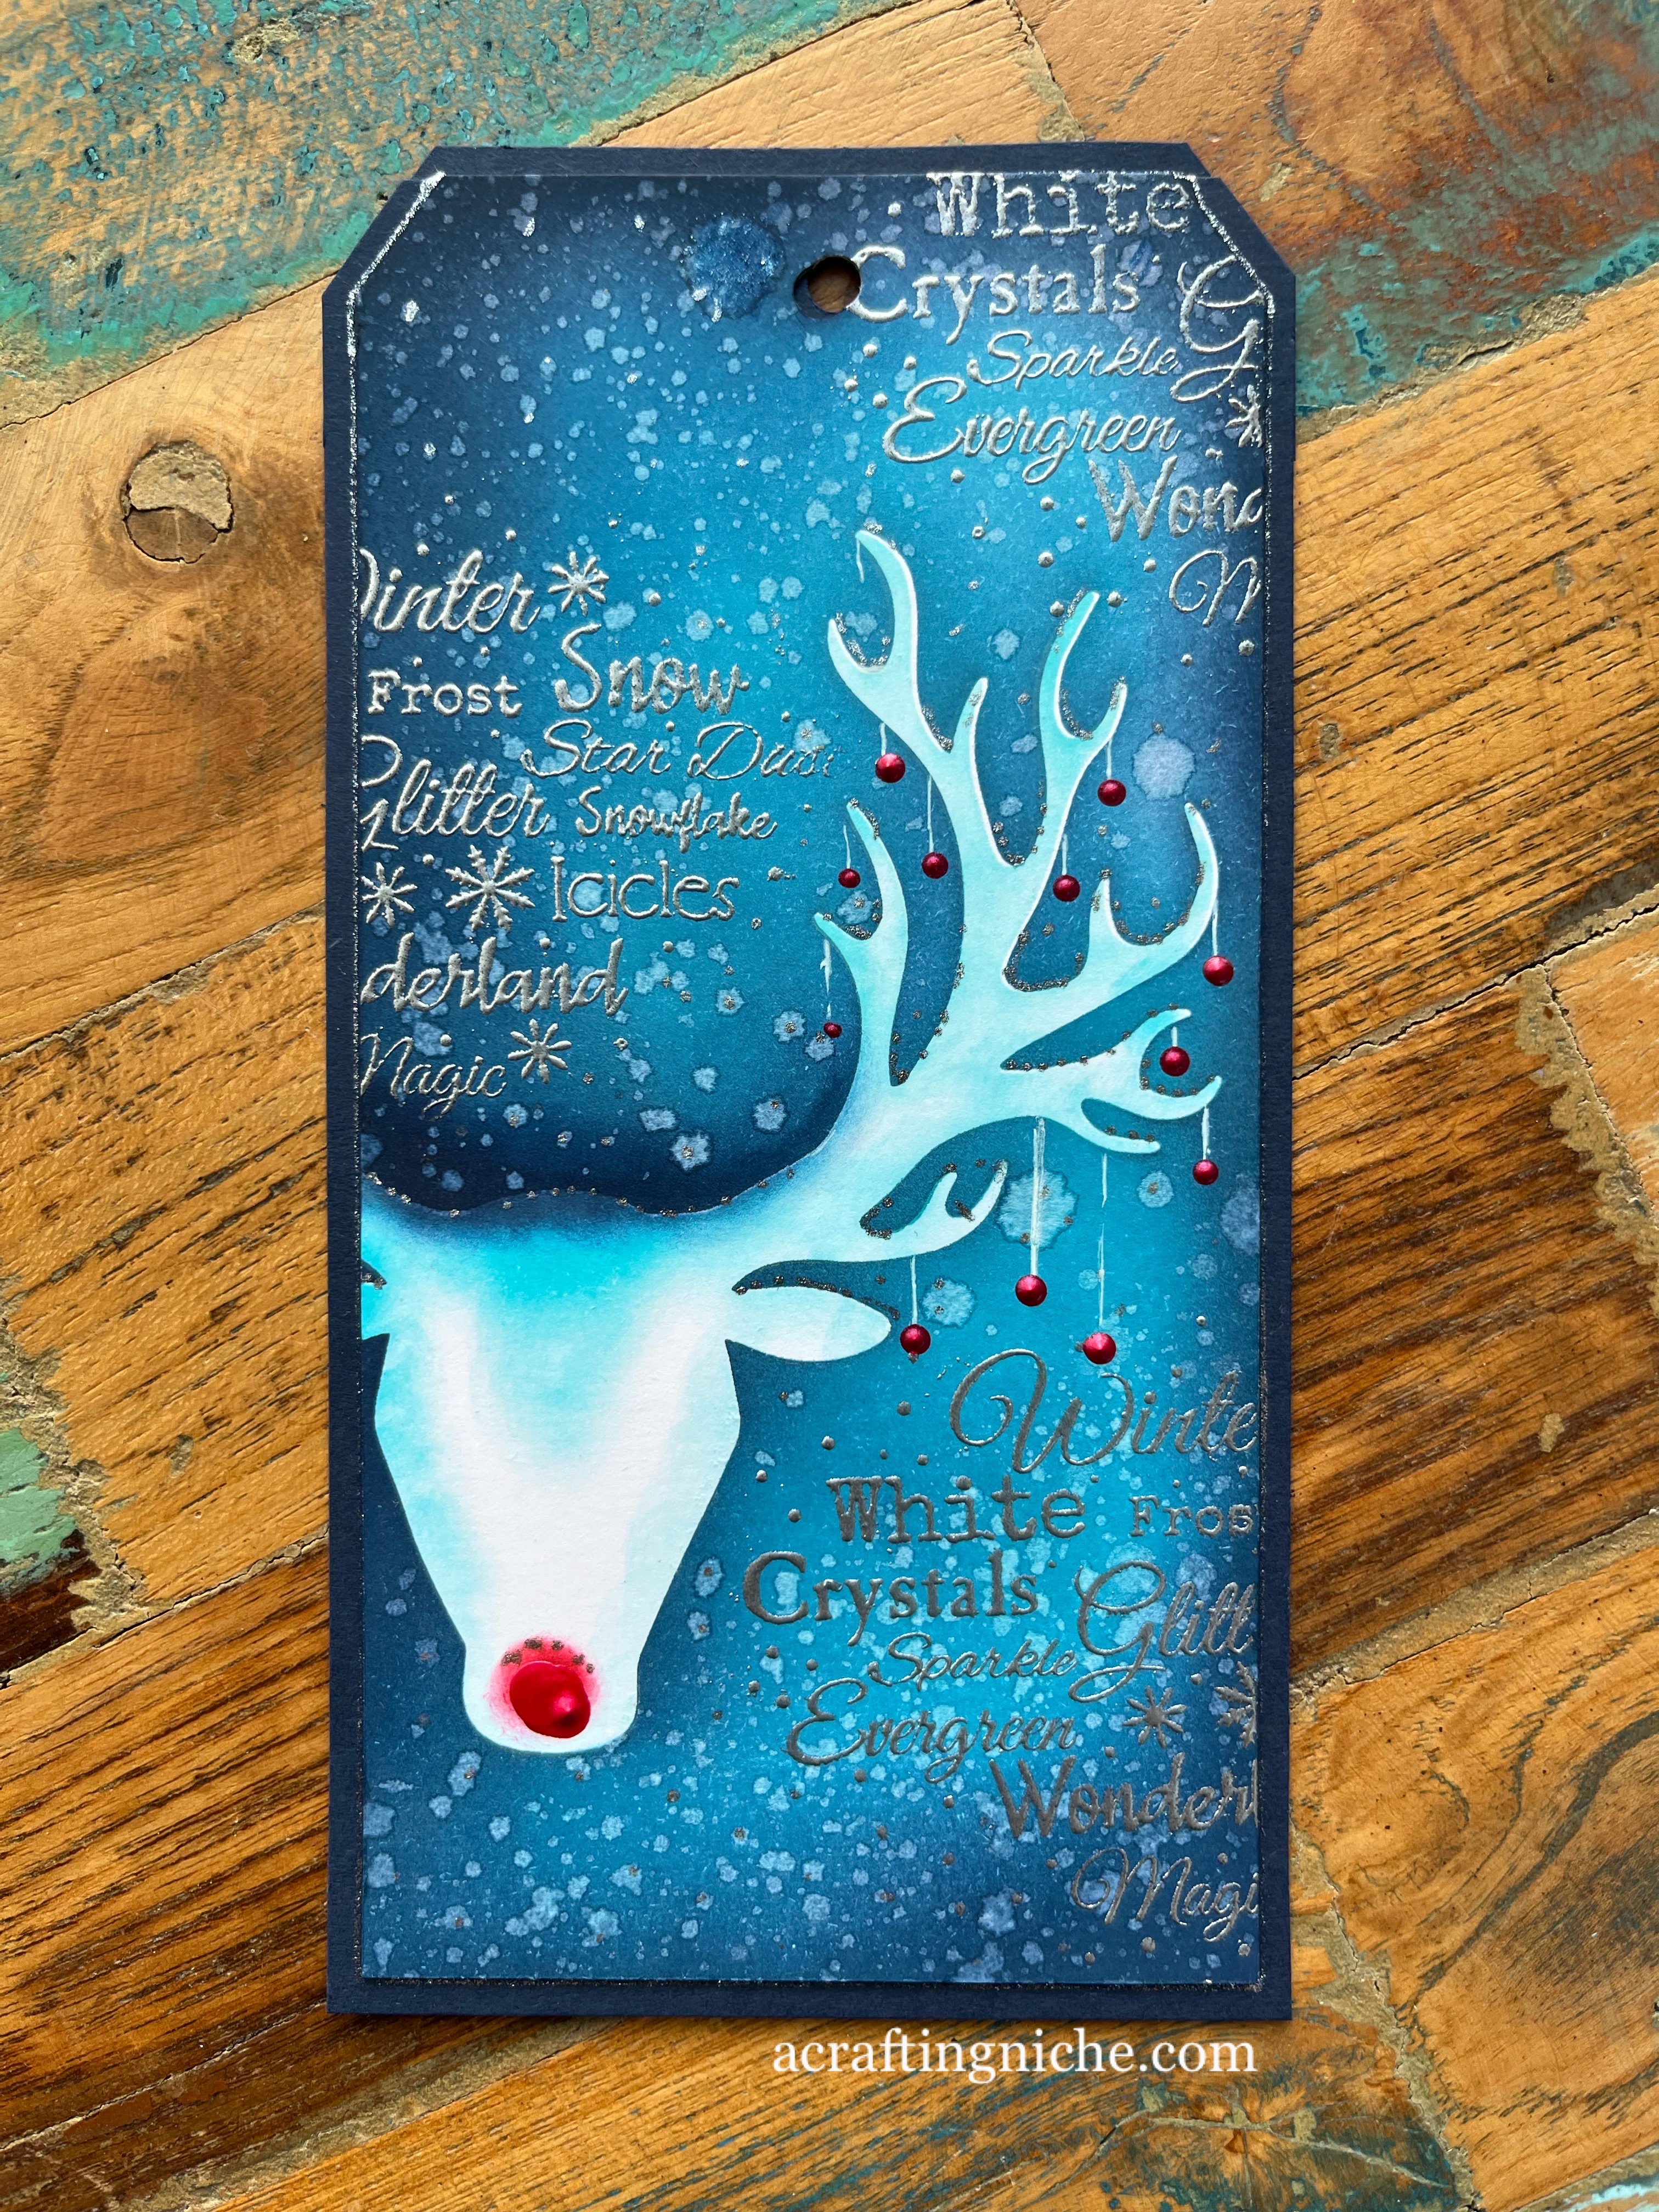
Lavinia Stamps "Stag Tag"


I saw the Lavinia Stamps Emma Jo "Stag Tag" tutorial, it's number 8 in a series of 12, and decided to give it a go. 

I used three Elements Inks:  Blue Atoll, Red Emperor and Dark Denim for the background colour with the Lavinia Stamps "Stag" sticker, which is in the Sticker Stencil pack 4 set.

I used a Wow! Clear embossing ink pad and the Wow Super fine "Metallic Silver" embossing powder and heat set using the Lavinia Stamps "Winter Magic" stamp.

I added splatters to the background using a fan brush and water.  I also added dots of silver glitter pen around the stag, in the background and also edged the tag in silver too.

Finally, I used a white gel pen and "Ruby Red" Liquid Pearls to create hanging baubles from the antlers.

Thursday, 15 December 2022

Lavinia Stamps - my take on Emma Jo's Tag 3


Last night I didn't feel well.  Nothing I could put my finger on, just feeling a bit meh and cold.  I was in bed before 9:30 but of course, by midnight I was wide awake and saw every hour till 5am so decided to get up and craft.  I'm definitely not feeling right.  Hopefully, it will improve as the day goes on.

To pass the time, I watched a Lavinia Stamps tag tutorial by Emma Jo,  so thought I would give it a go. It's a bright and vibrant tag.  I didn't throw as many products as mine as Emma Jo did as I was working with a smaller tag.

I didn't use the same inks as Emma Jo as I didn't have them.  Instead I used Dylusions "Pure Sunshine" and "Postbox Red" spray inks, then gave it a blast of the heat gun to dry the surface.

I then used "Henna Elements Inks" through the Lavinia Stamps "Dynamic" stencil, keeping the design to the right hand side, again I gave it a blast of the heat gun to ensure it was dry for the next step.

I ran an anti-statitic bag over the surface of the tag.  Using Wow! Clear Emossing Pad and the Lavinia "Heartfelt Verse" "Just For You" sentiment stamp, I stamped and then coated the stamping with Wow! Rich Gold Embossing Powder and heat set.

I repeated the process with the "Winter Berries Stamp", I stamped across the bottom of the tag and up the sides, then heat set.

Where the berries were on a dark stencilled area, I first coloured the berries in white Posca Pen, waited for them to dry and then coloured with the shade I wanted, using a glittery yellow, green, and red Posca Pen to colour the berries.  

I inked the edges of the tag using Versafine Clair "Shady Lane" green ink. I then mounted the tag on to a piece of green cardstock.

Finally, using a gold metallic pen I edged the tag and added some gold dots around the stamped berries.

Friday, 9 December 2022

Funky Fossil Designs "Foresty" Christmas Card


This morning, I played with some Funky Fossil Designs stamps that I had purchased recently. 

I started by blending four shades of Elements inks on a piece of white card.  Starting with the lightest to the darkest:  Sundance, Russet Orange, Confetti and Mulberry.

I then used the new Funky Fossil "Forestry" stamp with Versafine Clair "Twilight" dark blue ink to stamp the tree image.

Using Versafine Clair "Nocturne" ink and the Funky Fossil "Woodland Silhouette Mini's" set, I stamped the stag. I added to the outline of the stag using a white gel pen and a white pastel pencil.

At this stage, I decided to cut the image down from a rectangel to a square.  I then mounted it onto black card and then on to a white card blank.  Finally, stamping the "Winter Wonderland" sentiment, which is part of the Funky Fossil "Christmas Small Print" stamp set.


Sunday, 27 November 2022

Lavinia Stamps "Nadolig Llawen" Birds and Berries card


I've been playing with my Lavinia Stamps and stencils this afternoon, making this Welsh Christmas card.

I started by masking off the edges of the card.  I then coloured the central area using "Lime Punch" Element Ink.  I lay the Lavinia Stamps "Elegance Stencil" over the top and applied more Lime Punch ink.  I then added some "Pine" and then finally some "Bermuda" Elegance ink so that that the middle of the card was lighter than the edges.


I then started stamping.  First I stamped the Lavinia "Fern Branch" in first and second generation stamping, using Versafine Clair "Rain Forest" dark green ink.

I then stamped the Lavinia "Wild Berry" using Versafine Clair "Acorn" brown ink.

I then returned to the Versafine Clair "Rain Forest" and stamped the "Holly" in the top corner.

Next, I stamped the two birds, from the Lavinia "Birds Collection" in Versafine Clair "Acorn" brown ink.  Using the same ink, I stamped the "Nadolig Llawen" sentiment, which is part of the Lavinia Stamps "Welsh Words" stamp set.

I coloured the berries and the chests of the birds using a red Posca Pen.  I added some white detail to the berries and then used a white Posca Pen, tapped over the surface to create the impression of snow flakes, finally removing the masking tape from the edges of the card.


Friday, 25 November 2022

Lavinia Stamps "Replenish with Wild Poppies" Card


Back to a CAS card today, with this one using a Lavinia Stamps stencil, element inks and stamps. 

Using low tack masking tape, I held the Lavinia circle mask in place over the card.  Over the top, I then used more masking tape to hold the Lavinia Stamp "Replenish" stencil in place.

Through the "Replenish" stencil, I first used "Lime Punch" and then "Blue Atoll" ink, which are both Lavinia Elements inks.

Removing the stencil, I then stamped the Lavinia "Wild Poppies" in Versafine Clair "Nocturne" black ink.  I used the same ink to stamp the "Just For You" sentiment, which is part of the Lavinia Stamps "Heartfelt Verse" stamp set.

Tuesday, 22 November 2022

Lavinia Stamps "Winter Scene" using Elements Inks and a "Whimsical Hare"


This afternoon, I played with my Lavinia Stamps and inks creating this card.
 

I used four shades of Lavinia Elements Inks (Sundance, Russet Orange, Emperor Red and Merlot) to create the dramatic sky colour.  For the snow area, I used Van Goch Pastel Pencils in  pink, orange and black colours.

I stamped the "Birch Tree", the "Small Trees", the "Small Pixie Houses" and one of the "Whimsical Hares" in Versafine Clair "Nocturne" black ink.  

I added touches of yellow Posca Pen to the windows of the houses and a white gel pen to add snow to the branches of the trees and also to create the stars.

The "Just for you" sentiment is part of a Simon Says Stamp set called "Tiny Words - Christmas".


Sunday, 20 November 2022

Lavinia Stamps "Autumn Fall" Tag


A late night play for me, playing with the Lavinia Stamps "Leaf Sticker Stencil" from set 1 along with a selection of Lavinia Stamps.

 On a plain white tag, I covered the surface with "Sundance" Element Ink.

From the Sticker Stencil pack 1 set, I separated the inner and outer leaf and used the square area with a leaf shaped aperture, laying it in multiple places on the tag and colouring in the area with a deeper shade of Sundance Element Ink.  I then added areas of "Russet Orange" and "Olive" Elements Inks to create an autumnal leaf appearance.  I spritzed some water onto my fingers and clapped my hands over the tag to get large splotches of water.  I then removed the surplus water with a piece of kitchen roll and then used the heat gun to fully dry the tag.

Using second generation stamping and Versafine Clair "Shady Lane" green ink, I stamped sections of the "Winter Spice" verse in different areas.  I then stamped the Lavinia "Maple Leaf" in first and second generation stamping using Versafine Clair "Chianti" dark red ink.

I multi stamped the Lavinia "Small Branch" in second generation stamping using Versafine Clair "Acorn" brown ink.

I used Versafine Clair "Nocturne" black ink to stamp the fairy, called "Autumn Fall Large".  I used the same ink to stamp the sycamore seeds and also the sentiment called "Don't forget to fly..."

Finally, I used a gold shimmer gel pen to add highlights to the fairy and to the maple leaves.  Giving the edges of the tag a slight dusting of "Chiante" Versafine Clair ink.

Monday, 31 October 2022

Lavinia Stamps "Lupin and the birds" Card


I'm still on a roll playing with the new Lavinia Stamps release.  Today is the turn of Lupin the hare. 


I started by using a gel plate background I made a few days ago using two shades of Elements Inks (Emporor Red and Graphite) with the Lavinia Stamps "Berry" stencil.

I started by stamping Lupin the hare, using Versafine Clair "Nocturne" black ink.

I then masked off the moon and used "Confetti" Elements Ink around it.  Around that I then used "Violet Chalk" Elements Inks.  After removing the mask, I coloured the moon in using layers of white Pan Pastel, building up the colour till it was more solid.  I then used a black Van Goch Pastel Pencil to shade in the lower left hand side of the moon.

Using Versafine Clair "Nocturne" again, I multi stamped the "Tree Branch" and "Gip" on each side of the card, I then stamped two birds from the new "Birds" stamp set.

Moving to the bottom half of the card, I used two Lavinia "Hill Masks" with Versafine Inks to create the landscape.  I then stamped the "Tree Group" in Versafine Clair "Morning Mist" grey ink, with the hills masked off, so that the trees appear behind the hills.

I then moved on to stamping the foliage in the foreground using:  Leaf Spray, Flora Set, Lamps, Woodland and Small Branch in a mix of "Nocturne" and "Morning Mist" Versafine Clair ink.

Using second generation stamping and Versafine Clair "Morning Mist" grey ink, I stamped the "Winter Spice" sentiment down the left hand side of the card.

I used a stencil brush and "Wilted Violet" Distress Oxide Ink to darken the edges of the card, then edged it in Nocturne black ink.  I added extra detail using a selection of Posca Pens, Gel Pens, Pastel Pencils and a normal pencil.


Lavinia Stamps "Hanging Pods" on a gel plate background tag


Another make using the new Lavinia Stamps, this time a tag.

I've used a plain white tag, stamping the new Lavinia Stamps "Hanging Pods" the Lavinia "Happy Birthday"sentiment, part of the "Heartfelt Verse" stamp set, and the grounding in Versafine Clair "Nocturne" black ink".

I then coloured the pods, using two shades of Elements Inks, (Sundance and Paprika) applied with a brush.  I popped a slight smear of Distress Glaze over the painted area (be sure not to apply too much as it may stay on your gel plate, also try to keep it within the painted/coloured area as it may slide about if there is too much glaze).

On a rectangle gel plate, I brayered one (long) half with "Sundance" Elements ink, the other with "Paprika" Elements ink,  I then used a fan shaped paint brush to splatter some water droplets across the surface of the gel plate, I then took the impression.

I chose to use the Paprika Elements Ink through the Lavinia "Ambiance stencil", applied with a stencil brush to provide a patterned background.

Finally, I decided to add the "Small Branch" stamped in Versafine Clair "Nocturne" ink adding dots of Posca Pen to replicate berries.  I then splattered white Posca Pen across the surface to lift it a litte.

Sunday, 30 October 2022

Lavinia Stamps "Nia, Birds & Bells" card


This afternoon I've made another card.  This one didn't flow as I was making it.  At one stage it was very close to going in the bin, so I walked away from it.  Leaving it for over six hours.  

I started with a gel plate background made by brayering two Elements inks (Bleu Atoll and Greensleeves) on to the surface of the gel plate, adding splatters of water with a fan paint brush to achieve bleached areas, then taking a press.

Once dry, I started stamping.  I've used too many shades of Versafine Clair to mention and to be honest I don't recall the order I stamped in, other than the branch, Nia, the birds and bells, then I think the text, the music notes.  Here's a list of the Lavinia Stamps I used:

  • Nia the fairy (new release stamp)
  • Tree Branch
  • Bells (new release stamps)
  • Lamps/toadstools (new release stamps)
  • Winter Spice Verse (new release stamps)
  • Birds (new release stamps)
  • Musical Notes
  • Small Branch
  • Flower Collection (new release stamps)
Other than Versafine Clair inks for stamping, I used Blue Print Sketch Distress Oxide Ink around the edges.  I used Derwent Inktense water colour pencils for colouring along with Posca Pens.  I also used some glitter, some metallic and some gel pens, along with a normal pencil.

Saturday, 29 October 2022

Lavinia Stamps "Everlee" Card


Here's another card I have made using some of the new stamps released this week by Lavinia Stamps.

I've used ta gel plate and Element ink background, stamping he new "Everlee" figure, sat on the "Small Swing Bed", looking up on the new "Hanging Pods". In the bottom right hand corner, I have used the new "Cedar" stamp.  Around the swing bed and fairy, I have stamped the "Star Cluster".

All stamping is in various shades of Versafine Clair Inks.  I've used Posca Pens, glitter pens, gel pens and stickles, edging the card with Distress Oxide "Wild Violet" ink.

Friday, 15 July 2022

Lavinia Stamps "Seeing is Believing" on a Brusho gel plate background


Back from the caravan and I couldn't get at my craft desk quick enough!

I've used a Brusho Gel Plate background from my stash, but I had made a note of the colours I had used to create it.  I used "Mulberry" Element Ink and three shades of Brusho paints:  Lemon, White and Purple.

Over the top of that, I used the Lavinia Stamps "Posy" stencil with and orange and dark pink/purple Archival Ink.

I used the following Lavinia Stamps:  Seeing is Believing, Sacred Spells, and Dandelions stamped in Versafine Clairn "Nocturne" black ink.

I used a white pastel pencil to add highlights to the background area and a white Signo pen to highlight the fairy and the dandelions.


Thursday, 7 July 2022

Lavinia Stamps "Stag and Tree of hope" Birthday Card


I've made a birthday card today using Lavinia Stamps, inspired by one of the Lavinia Stamps Design Team members "Annie Gardner Frazer.

I've used the Lavinia Stamps "Flurry" stencil with "Lime Punch" Elements inks for the round background pattern.

I've used Versafine Clair Inks to stamp the "Stag" and the "Tree of hope", colouring the tree with Distress Oxide Inks.

The sentiment, stamped in Versafine Clair "Nocturne" black ink is by Simon Says Stamp, from their "Tiny words - Birthday".  I have also used touches of Posca Pens.