52 Week Mini Art Card/Tag Challenge

Showing posts with label Lavinia Stamps See a fairy. Show all posts

Tuesday, 14 February 2023

Lavinia Stamps "Indra the Moth" on an archival ink background


Inspired by a demo by Eileen Godwin, I created this card.  For the base colour, I used three shades of Elements Inks:  Sundance, Confetti and Della Blue.

Here's a short video clip which shows the glittery surface of Indra.


I used Wow! "Mistletoe Magic" embossing powder and their clear ink pad to stamp the moth image and then heat set.

I used Archival Inks through several Lavinia Stamps stencils:  Dynamic, Elegance and Posy.  Using White Pan Pastel through "White Orbs" stencil.

Using "Purple Delight" Versafine Clair ink, I stamped the "See a fairy make a wish" verse.

I stamped the "Inspire" word, part of the Lavinia "Inspire Me" stamp set in Versafine Clair "Nocturne" black ink.

I inked the edges of the card twice.  The first time using "Twilight" dark blue ink creating a broader coloured edge, then on the very edge, I used "Nocturne" to make the whole thing stand out a bit more.

I used a white Signo gel pen on the moth to highlight some of the design on the moth. 

I then used white and black enamel accents for extra detail, finally mounting the card on to a white card blank.


Thursday, 2 February 2023

A sparkly Lavinia Stamps "Darcy" card


I have made a super sparkly card and the photograph just doesn't do it justice, so I've made a little video clip to share its full beauty.


I started this card by heat embossing the Lavinia Stamps "Star Cluster" using Wow! clear embossing powder.

Using a clending brush and "Blueprint Sketch" Distress Oxide Ink, I gently blended the colour from the edges towards the middle, going very lightly over the heat embossed stars so that the colour was hardly visible.  I then gave the stars a light rub with a soft cloth to remove any ink that may have settled on the surface.

Using a fan shaped paint brush and a little bit of water, I added splatters to the area around the star cluster, then blotted with a piece of kitchen roll.  This gives a lovely delicate detail to the background, without it being too obvious.  I then gave it a quick blast with the heat gun to ensure the surface was dry.

I stamped the Lavinia Stamps "Darcy" figure in Versafine Clair "Twilight" dark blue ink.

I then used the Lavinia "See a fairy, make a wish" verse with Versafine Clair "Twilight" ink, stamped in second generation to add text to the area around Darcy and the Star Cluster.

I used a piece of torn copy paper and Versafine Clair "Twilight" ink with a finger dabber to ground Darcy and to create the impression of the landscape behind her.

I used a gold shimmer gel pen to outline Darcy.  I then used a silver glitter gel pen and a white Signo pento add a few dots of white and silver to the star cluster and to the wing area of Darcy.

I edged the card using "Chipped Sapphire" Distress Oxide Ink and then mounted on to a dark blue card then on to a white card blank.

Using a Quickie glue pen, I added a few dots of glue then added a very light sprinkle of Lavinia Holographic silver glitter.  Finally adding a few holographic silver stars I've had in my stash forever.

Wednesday, 30 March 2022

Lavinia Stamps "Seeing is believing" Fairy Card


Here's a card I made using the new Lavinia Stamps "Woodland Fern" Stamp Set and the "Seeing is believing" fairy.  Extra "Dandelions and I have also used the "See a fairy make a wish" verse stamp.

Stamping in black using Versafine Clair "Nocturne".  The other is "Peacock Feather" Distress Ink.

Wednesday, 2 February 2022

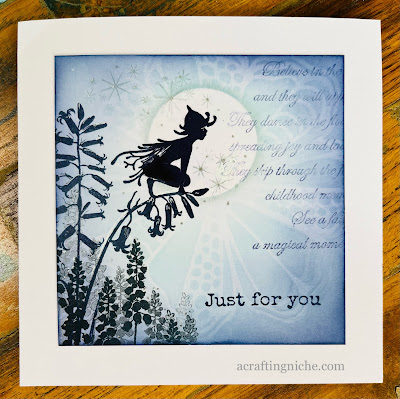
Lavinia Stamps "Bella" and the bluebell card


Today I've had another play with the lovely new Lavinia Stamp called "Bella", she is such a lovely image and just the right size in my opinion too. 

I stamped "Bella" and the new "Blue Bell" stamp in Versafine Clair "Medieval Blue" ink.  I then stamped the "Bluebells" at the base of the card in first and second generation Versafine Clair "Nocturne" black ink.

I masked the moon area off and then used "Tumbled Glass" Distress Oxide ink around the edges of the card, making the central area lighter.  I then placed the Lavinia "Flower Mask/Stencil" over the top and added more "Tumbled Glass" ink.  Around the edges of the card I added "Chipped Sapphire" Distress Oxide ink to focus the attention to the cetral area of the card.

I used Versafine Clair "Medieval Blue" to stamp the sentiment from the "Heartfelt Verse" set. I used the same ink for the "See a fairy verse" which I stamped in second generation ink.

Finally, I added some stars using one of the "Mini star sets" around the fairy.

Thursday, 29 October 2020

Lavinia Stamps "Celeste" Fairy Card


You may have noticed, I have not shared many cards or makes this past month.  I had totally lost my crafting mojo and couldn't bring myself to even consider crafting.  I find it odd that I should feel like this as crafting is what I do!  Thank goodness I had an urge to dust off my Lavinia Stamps and create this card.

The background was inspired by a technique created by the super talented Eileen Godwin using (Squeezed Lemonade and Abandoned Coral) Distress Oxide Inks.  I then used "Picked Raspberry" Distress Oxide ink through the Lavinia "Laurel" Stencil.

I moved on to the stamping, first stamping the script, which is a Lavinia Stamp called "See a fairy, make a wish", stamped in Versafine Clair "Morning Mist" grey ink.  I then used Versafine Clair "Nocturne" black ink to stamp "Celeste" the fairy and the "Mystic Swirls" to each side of the fairy.