52 Week Mini Art Card/Tag Challenge

Showing posts with label Lavinia Wallace Family. Show all posts

Thursday, 17 March 2022

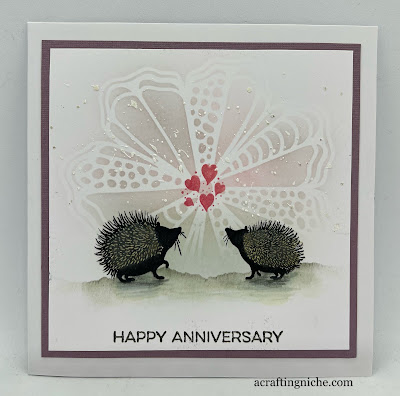
Lavinia Stamps "The Wallace Family Hedghogs" Anniversary Card


I've made an anniversary card this morning featuring two of the hedgehogs from the Lavinia Stamps "Wallace Family" stamp set. 

In the background, I have used the Lavinia Stamps "Flower Mask" with three shades of Distress Oxide Inks:  Saltwater Taffy, Iced Spruce and Pumice Stone.

I stamped the hedgehogs using Versafine Clair "Nocturne" black ink, then coloured them with "Gathered Twigs" Distress Oxide Ink.  I created a landscape using a torn edge of paper with Versafine Clair "Morning Mist" grey ink and a little of the "Iced Spruce" Distress Oxide Ink,

I stamped the Lavinia Stamps "Mini Hearts" using "Festive Berries" Distress oxide ink.

I then stamped the anniversary sentiment, which is part of a "My Favourite Things" stamp set called "Essential Sentiments".

Finally, I added some splatters of white Gesso.

Sunday, 1 March 2020

Lavinia Stamps March 2020 Creative Challenge "A Forest Gathering"


On the first of every month, Lavinia Stamps announce a new theme for their "Creative Challenge" which runs from the 1st to the 25th of each month.  The theme for March 2020 is "A Forest Gathering".


You can enter the challenge up to five times a month.  If your name is randomly drawn after the 25th you will win £40 of vouchers to spend on lovely Lavinia goodies.


This is a sample I made for the challenge.  I started by creating the background sky and ground base using three shades of Distress Oxide Inks:  Antique Linen, Tumbled Glass and Twisted Citron.  I masked a circle off for the moon and darkened the edges by using Versafine Clain "Morning Mist" lightly around the edge.  I added a little touch of yellow to the middle of the moon too.

I then started to stamp the images.  The first ones were the "Celestial Tree" and the "Skeleton Tree Scene" stamped in Versafine Clair "Morning Mist" grey shade of ink.


I then stamped the large tree trunk on the left hand side using the "Tree Root" stamp stamped in Versafine Clair "Acorn", a mid brown coloured ink.  I needed to extend the tree trunk so had to mask areas several times to get the look I wanted to achieve.

Using the same brown ink, I stamped the "Tree Branch" a couple of times. I then used a selection of Distress Oxide Ink colours to paint the tree (Gathered Twigs, Peeled Paint, Walnut Stain and Ground Espresso).

I decided to add a little stream running from behind the tree to the right hand corner.  I used three shades of Distress Oxide Inks to create this:  Tumbled Glass, Salty Ocean and Stormy Sky.  

I added darker green for grass on the river bank using "Mowed Lawn" Distress Oxide with a paint brush to create tufts of grass. I also added touches of "Stormy Sky" to the top and side of the sky area to pull the eye into the image.

Next I moved on to stamping the animals, starting with one of the crows from "The Crow Set" using Versafine Clair "Nocturne" black ink.

Using Versafine Clair "Pine Cone" a darker brown coloured ink, I stamped the animals in the foreground "Whimsical Hares", "Pipin" and the hedgehog part of "The Wallace Family".

I then used Versafine Clair "Shady Lane" to stamp the "Meadow Grass" at the bottom of the image.  I stamped the "Mini Slender Mushrooms" in Versafine Clair "Pinecone" ink.

Finally, I added touches of white to highlight areas using a white Posca Pen.  I used a green fine line pen to add long tufts of grass too.


Thursday, 6 February 2020

Lavinia Stamps February 2020 Hochanda TV show sample - set 2


Lavinia Stamps will be appearing on Hochanda TV on Friday 7th February at mid-day and 3pm, with a selection of stamps and accessories demonstrated by Amanda Branston.

For the background of this card, I have used Colorbox "Artichoke" green ink brayered onto a gelli plate.  I have then sprinkled diluted 'Orange" coloured Brusho from a fan brush which has created the speckled look.

To enhance the colour of the sky, I added some "Broken China" and "Chipped Sapphire" Distress Oxide Inks.

Once the background was dry, I used the torn edge of a piece of copy, dragging ink (Versafine Clair "Morning Mist" grey ink) over the edge to create the landscape in the background.  I used a circle to mask the moon area and edged it with the same ink.

I stamped the "Celestial Tree" in the background using a grey ink (Versafine Clair "Morning Mist").  Making the trees lighter gives the impression of depth to the image.

Using Versafine Clair "Pinecone" dark brown ink, I stamped the hare, which is part of the "Whimsical Hares" stamp set.  Using the same ink, I stamped  the baby hedgehog, which is part of "The Wallace Family" stamp set.

Using Versafine Clair "Nocturne" black ink, I stamped the "Wild Poppies".  Using a white Posca Pen, I edged the hare and hedgehog in white.  I added a little bit of shimmer to the edges of the poppies using a Sakura Gelly Roll pen.

Friday, 5 April 2019

Design Team make for "My Time To Craft Challenge Blog" #394 - Easter/Hedgehogs


It's time for another prompt on the "My Time To Craft Challenge Blog".  The theme for challenge #394 is Easter/Hedghogs.  This is the Design Team tag I made for this prompt.

Rather than a card, I thought I would make a tag instead.  I like making tags as I find them more informal than a card. 

I started with a background of Distress Oxides in greens, mauves and pale pinks.  

All the pink stamping is done in Versafine Clair "Charming Pink" ink.  I don't recall where the stamps came from as i've had them for some years, but the quality of them is not good so it makes me think they may have come with a magazine.  (Please note:  the sentiment is from a Penny Black set called "Garden Friends").

The hedgehogs are made by Lavinia Stamps and are called "The Wallace Family" which I have stamped in Versafine Clair "Fallen Leaves" ink.

Finally, I inked the edges of the tag in Versafine Clair "Charming Pink" ink and added spots of Liquid Pearls in a shade called "Blackberry".


Monday, 18 March 2019

The Leaping Hare (watched by Rory and Darcy) Card #laviniastamps


I have continued my play with some of the newly released Lavinia Stamps today making this card.

I created the background using Distress Oxides in the following shades:  Antique Linen, Tumbled Glass, Salty Ocean and Twisted Citron.

I have stamped in several shades of Versafine Clair ink on this card:  Twilight, Blue Belle, Acorn, Fallen Leaves and Summertime.  I have also used the standard Versafine "Stormy Grey".

I started by stamping the script called "Sacred Spells".  I then stamped the "Celestrial Tree" and the "Single Skeleton tree". I then stamped the "Birds".  Next I stamped the full size character stamps of "Rory" and "Darcy".

Now that the main areas were completed I just had to in-fill, so I stamped one of the "Whimsical Hares".  The hedghogs called "The Wallace Family" and the "Mini Slender Mushrooms".  The last stamping was "Mini Toadstool" and the "Mini Flowers".

Finally, to finish the card, I used a white Signo Pen to add highlights and a silver glitter Signo Pen to add some sparkle to the Celestrial Trees.


Friday, 1 February 2019

Design Team Make for "Love To Craft Challenge Blog" #31 using Lavinia Stamps


In the rabbit burrow

This little project has been in my mind for the past couple of days.  I was thinking about how I could replicate looking into a rabbit burrow.

I started off by stamping the Lavinia Stamps "Midnight Meandering" rabbits and the "Creeping Vine" in Versafine "Black Onyx" ink.  I coloured the ground the rabbits stand on with a Promarker pen and added touches of white to the tails and eyes of the rabbits using a white Signo Pen.

I then selected four nesting round dies and cut circles in three pieces of cardstock and finally the largest circle in a piece of Shenandoah "Natural Wonders" paper.  On this piece of patterned paper, I stamped a hedgehog from the Lavinia Stamps "Walace Family".  I then inked the edges and the lower section of the page with black ink.

Starting with the smallest aperture, I layered the cardstock with foam pads between each layer to add dimension. I did this in the hope it would provide depth.  Finishing with the patterned paper on the top.

I die cut some foliage in black card (I have had the dies for some time and didn't retain the packaging, so I have no idea where they came from).  I stuck the die cuts to either side of the aperture and then added a little shadow with a pen below the die cuts and the hedgehog.

I finally added a few Nuvo Sequins  in "Prickly Pear and "Olive Green" colours to add a little sparkle to the lighter top of the picture.  I then mounted the picture into a box frame.