52 Week Mini Art Card/Tag Challenge

Showing posts with label Panpastels. Show all posts

Monday, 7 November 2022

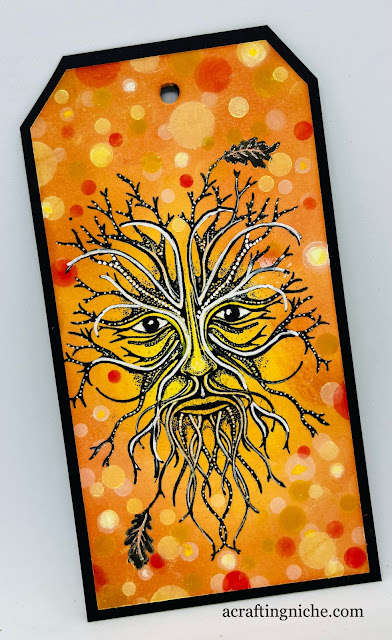
Lavinia Stamps "Green Man" Tag


This evening I have been playing with the Lavinia Stamps "Green Man" stamp to create this tag. 

To create the base colour, I used five shades of Archival Inks:  Buttercup, Sunflower, Tea Rose, Orange Blossom and Monarch Orange. Using the lightest in the middle, gradually blending to the darker shade around the edge of the tag.

Using Versafine Clair "Nocturne" black ink, I stamped the Lavinia Stamps "Small Green Man".

Around the edge of the stamped image, I used various shades of Pan Pastels through the "White Orbs" stencil to create a bokeh look.

I then added detail to the stamped image, using white and gold Signo pens and a gold shimmer gel pen.
Thursday, 20 October 2022

Funky Fossil Designs "Scribble Owl" Card


Today, I have played with one of the Funky Fossil Designs scribble stamps designed my Mo's Art Uk, to create this card. 

I used a background from my stash that I had made several months ago, using Pan Pastels through the Funky Fossil "Forest Foliage" stencil on a gel plate.

I stamped the Funky Fossil "Scribble Owl" using Versafine Clair "Nocturne" black ink, immediatedly covering the stamped area in Wow! Clear Gloss Embossing Powder and then heat set.

On a black piece of card, I used the Funky Fossil "Forest Foliage Stencil" with Wow! Clear embossing ink and the Wow! Clear Gloss Embossing Powder and heat set.

Returning to the owl image, I coloured some of the body using Derwent Inktense water colour pencils.  I also added touches of white to the eyes using a white gel pen.  I squared off the stamped image, mounting it on to the black heat embossed background, then squared the area off again, before mounting it on to a white card blank.

Sunday, 19 July 2020

Lavinia Stamps "Winter Berries" on a "Pods" Pan Pastel Gelli Plate background


A couple of weeks ago, I had a play session with the gelli plate and some of the new Lavinia Stamp stencils, so I decided to make an Autumnal themed card using one of the backgrounds I had prepared


For the background I had used the Lavinia Stamps "Pods" stencil with Panpastel colours and acrylic paint to lift the image.

I stamped the Lavinia Stamps "Oak Leaf Branch" stamp using Versafine Clair "Shady Lane" green ink.

I then stamped the "Winter Berries" and the "Red Leaves" sentiment (both by Lavinia Stamps) in Versafine Clair "Acorn" brown ink.  

At this stage, I decided I didn't like the size of the image, it seemed to be dominated by the green leaves, so I cropped the card till I was happier with the way it looked.

I used a Distress Oxide ink called "Fired Brick" around the edges of the card to provide more Autumn warmth.  I then coloured the berries using a red Posca Pen.  Finally, I added Ranger Glossy Accents to the berries and left over night to set.

Tuesday, 14 April 2020

Funky Fossil - Adventure on a Panpastel gel plate background


Earlier in the month, I watched an on-line demo of a project using Pan Pastels through stencils on a gellie plate, by a fab lady called Eileen Godwin.  


I decided to have a go and made some great backgrounds, using acrylic paint to lift the image.  For this project I have used the middle, more vibrant print.

I used several Funky Fossil stencils to create the background and teamed it with the Funky Fossil "Adventure" stamp set with Versafine Clair "Nocturne" ink to make the finished card.

Sunday, 3 November 2019

Visible Image - Behind Every Mask (Gelli Plate & Pan Pastels Play)


Some time ago, you may remember I had a session of playing with Pan Pastels and the gelli plate, which created some amazing results.  
(The original post is here if you want to read it).

This morning, while I was sorting through bits and bobs floating around in a box, I came across a section of one of the pulls from the gelli plate and decided to use it to create this card.

I stamped the Visible Image "Behind Every Mask" bird and sentiment using Versafine "Nocturne" black ink.  Because the Pan Pastel background is quite porous, I then restamped the bird image onto white card, as the ink was being absorbed and made the black look a little milky.

I used a white Posca Pen to splatter white dots and splashes over the image

I cut around the bird image, colouring the edges in black marker pen so that it didn't stand out too much and then adhered over the top of the original stamped image. 

I added a touch of pale blue to the eyes, using a paint brush with "Tumbled Glass" Distress Oxide ink.

Wednesday, 4 October 2017

Fairy Fern Tag


For this tag, I blended pink, mauve a green Panpastels to create the background.  I used Lavinia and other stamps in a Versafine ink, dotting the fairy dust stars with a white signo pen.

Monday, 2 October 2017

Week 40 - 52 Week Mini Art Card/Tag Challenge 2017

So here we are in October already!  The prompt for Week 40 is "One Stamp".


I started this tag with a blended background of Panpastels in purples, blues and green.  The stamp I decided to use is a Clarity Stamp "Dandelion" which I stamped in a purple StazOn ink.  I added small white dots to the background using a Signo pen and inked the edges of the tag.

Sunday, 17 September 2017

Week 38 - 52 Week Mini Art Card / Tag Challenge 2017

It's as if getting of the plane earlier in the week I have walked into Autumn, it is so cold here compared to Italy!  I suspect this has influenced the colour used on the tag for this week. 

The prompt for Week 38 is "Die Cuts".  So really it is anything goes as long as there are some die cuts on your tag/art card.


I started with a Panpastel background of light browns, yellows and greens blended.  I then used a Crafters Companion script stamp on a piece of medium brown coloured cardstock using a Versafine ink.  Using a die, I then cut the intricate pattern, adhering it to the Panpastel tag.  I then inked the edges of the tag in shades of red and black.

I then took a piece of red cardstock and blended various shades of yellows and greens to the surface, setting it with hairspray.  Using Stampin' Up "Vintage Leaves" set I stamped the leaf design and die cut the shape using Stampin' Up "Leaflets Framelits".  I stuck one flat on the tag, the other I elevated with foam pads to give a little dimention.  Finally I added a little more ink around the edge and added a wooden heart button to finish the tag.


Saturday, 16 September 2017

Fairy Dust Tag

I have missed crafting while I was away on holiday.  In fact I am sure that it is the longest time I have not crafted, I usually take a little something with me just in case.  This afternoon, I found I had a spare hour, so decided to play with stamps and ink.

I used a Panpastel blended background, I used a juicy Versafine ink pad on Lavinia and other stamps.  I used a Signo pen for the white areas and dabs of stickles for the fairy dust.


Tuesday, 29 August 2017

A Random Stamped Tag

This morning, I have played with an assortment of old and new stamps.  There are far too many to mention.  I also raided my box of pre-cut dies for the word "love", hearts and butterfly.  It is all on a Panpastel background.


Thursday, 17 August 2017

Flower Tag

Today, I decided to have a play with a few dies that I purchased as a used bundle.  I have no idea who made them.


I decided on a Panpastel background and die cut four layers of petals for a flower in an orange shade.  Using Promarkers, I added different shades of lines and dots, finally using a metallic gold pen for extra dots.  The layers are secured with a brad which I also added dots too.  I then cut some pieces of foliage which I arranged behind the flower.

Here are the dies that I used to create this tag:


Sunday, 16 July 2017

Week 29 - 52 Week Mini Art Card/Tag Challenge 2017 (Stampin' Up Climbing Orchid)

I seem to be in my very own little temperature zone at the moment, which inspired my prompt.  The prompt for Week 29 is "Tropical".  

This prompt can be interpreted in many ways, but I decided to opt for the floral route.  First I used a Panpastel background shaded in two colours.  I then used a large bamboo stamp (sorry, I don't know who made it, I've had it for years), in a teal colour over the top of the Panpastel background.

Using the Stampin' Up "Climbing Orchid" stamp set I stamped a couple of flowers and centres, using the Stampin' Up "Orchid Builder" die set to cut the images.  I then free-hand cut the stem in brown card and stuck it down, positioning the orchid blooms and stuck into position.  Finally for the central area of the blooms I used my Promarker pens in two shades to add little dots.


Saturday, 8 July 2017

Sunflower Cards and Tags (Papercraft Essentials Issue 148 magazine)

While in the supermarket, I always glance at the magazine display to see if there is anything that I fancy getting.  Issue 148 of the Papercraft Essentials magazine appealed due to the sunflowers.  The free gift contained a set of really versatile stamps and an embossing folder with a nice repeat pattern on it.


I quickly got faffing with card, stamps and inks and created these two cards and a tag.  my For the first card, I used my watercolour pencils to colour the stamped sunflower image.  Mounted it in black and a sunny yellow.  I used the free embossing folder for the background.  It was a little too small, so I was able to align the design and emboss the other half of the background.


For the second card (below),I used a sheet of patterned paper for the background.  Cut a piece of sacking and frayed the edges.  Then stuck the stamped image on.


I used a Panpastel background for this tag.  Stamped the verse and then stamped the flowers around the verse.


Sunday, 25 June 2017

Week 26 - 52 Week Mini Art Card/Tag Challenge 2017

So here we are at Week 26 - half way through this challenge.  I have no idea where the year has gone!

The prompt for Week 26 is "Feline".

For my tag, I used a background of blended Panpastels.  I stamped the cat image and then restamped the remains of the ink onto a post it note, cut around the image and then stuck it over the original cat image to form a mask.

Using a plastic mask produced by Tim Holtz/Stampers Anonymous, I then used Distress Inks to provide the shaded dots and hexagons.  I then removed both masks and inked the edges of the tag in black.  I die cut the letters in black card for the word "meow".


Friday, 26 May 2017

Ruby Lips Tag (using Stampers Anonymous Mini Bouquet)

I feel like I got all the toys out of the box to create this tag.

It started with a Panpastel background.  For the flowers I used Stampers Anonymous "Mini Bouquet" stamp.  The honeycomb outline is also a Stampers Anonymous stamp from a different set.  I don't recall who made the face stamp, it's a red rubber one I've had for years!.  The text stamp is a verse by Oak House Studio.  The flower petals and lips were coloured using a Promarker.  The edges of the tag were inked in black to give a more grunge look.


Sunday, 21 May 2017

Week 21 - 52 Week Mini Art Card/Tag Challenge 2017

Week 21 of the 52 Week Mini Art Card/Tag Challenge and the prompt is "Anything Goes".

I fancied playing with my Stampers Anonymous "Mini Bouquet" stamps.  So I stamped onto plain card and coloured with my watercolour pencils, cutting around the images. I rummaged through my allsorts box and found some foliage die cuts which I could use.

Using a tag with a prepared Panpastel background, I then arranged the components, glueing down and using foam pads for dimension.  I then added some self adhesive gems to add scrolls.


In hindsight, I think I should have used five rather than six flowers so that it looks less cluttered, but everything is adhered now, so it will stay as it is.

Sunday, 14 May 2017

Week 20 - 52 Week Mini Art Card/Tag Challenge 2017

The promt for Week 20 of the 52 Week Mini Art Card/Tag Challenge is "Growing".

I don't know about yours, but my garden is in over drive with growing so it seems only natural to reflect that in my tag this week.

My tag comprises of things I had around my desk, so I didn't need to cut or prepare, just put the components together. I used a prepared Panpastel background in sunny shades of yellow and green.  I added a part of a Spellbinder trellis, then various pieces of foliage from my scrap box. The flowers were already layered with a brad from a previous project that never got finished, so I'm quite pleased that I've been using up the odds and ends.


Sunday, 7 May 2017

Week 19 - 52 Week Mini Art Card/Tag Challenge 2017

Well it's Week 19 of the challenge already and the prompt for this week is "My Favourite Waste Of Time".

Now this is really apt as this weekend my Hubby introduced me to an anagram app called "Word Cookies" and I am addicted already, so it was only natural for my tag to be on this theme.

I started with a Panpastel background of pinks and orange.  I then die cut the letters for "Word Cookie App" using Xcut dies, then sticking them into position on the tag. I then stamped hexigon images around the edge and added an image of a typewriter and part of a clock to the left of the tag and five stars to rate the app on the right hand side.  Finally I added the letters for "Anagram" and inked the edges a little to provide a slightly grunge feel to the tag and also to help the colours to pop.


Monday, 1 May 2017

Week 18 - 52 Week Art Card/Tag Challenge 2017

So here we are on Week 18 of the 52 Week Art Card/Tag Challenge 2017.  The prompt for Week 18 is "Nature".

I used a Panpastel background in shades of blue and yellow/green.  I used a sentiment and bird on a branch stamps from the retired "Moon Lake" set.  I stamped the netting and script and then added the black circular dots to the top and bottom of the tag.  I inked the edges in black to make the colours on the tag pop a little more.


Friday, 28 April 2017

Floral Sunshine Wishes Card

Using a background of blended Panpastels, I created this card with a flower die cut from the Stampin' Up "Sunshine Wishes" set and the sentiment from their "Good Greetings" stamp set.

The image was trimmed to size using a die from the Memorybox "Stitched Rectangle Layers" set which was mounted onto black cardstock.