52 Week Mini Art Card/Tag Challenge

Showing posts with label Visible Image Stamps. Show all posts

Sunday, 7 September 2025

52 Week Mini Art Card / Tag Challenge 2025 - Week 36


The Crafting Niche 52 Week Mini Art Card/Tag Challenge 2025:

This is a weekly challenge. I provide you with a prompt/theme each Sunday morning through out the year.  The challenge is very relaxed.  You can do as much or as little as you like.  You can create cards, tags, Artist Trading Cards (ATC's) or index cards, the choice is yours. You just go with what ever is in your head at the time.  You can stamp, get inky, use patterned papers, texture, embellish it is all down to you.

There is a dedicated private Facebook Group, with a lovely bunch of people who are already sharing their makes from previous challenges.  You can find the group by clicking this link.  I'd love you to join in.

The prompt for Week 36 "Book Print"

I have about five old books that I often tear pages out of to use in my crafting.  One is just normal text, two are hymn books with words and the music notes, one an old dictionary and the other is an accountancy book (lots of text and balance sheets).  These provide me with a good choice.

I used Lavinia "Elements Inks" to colour my book page.  The colours I used are: Lemon Drop, Russet Orange, Green Parrot, Blue Atoll and Pine inks.  I then stuck the page on to a plain tag, trimming to size. 

Once the ink was dry, I added some splatters of white Posca Pen across the surface of the tag.

On a white piece of card, using Versafine Clair "Nocturne" black ink, I stamped the two heads, which are part of a Visible Image stamp set called "Love is Love".  I then fussy cut the heads and stuck on to the tag, again trimming to size.

After mounting the tag on to a piece of black card, I added a word sticker from my stash that says ""listen to your heart, it will show you the way".

Saturday, 8 June 2024

Visible Image "Calm Over Chaos" Card


This morning I've made a quick card using three shades of Distress Oxide Inks to create the coloured background.  The colours I have used are Twisted Citron, Mermaid Lagoon and Picked Raspberry.  

Once the background was fully dry, I used Versafine Clair "Nocturne" black ink to stamp the figure and blossom.  Both are from the new Visible Image stamp set called "Calm Over Chaos".  

I stamped the lower part of the figure again on a piece of white card, then fussy vut it and stuck it on over the coloured area of clothing.

Finally, I used a white and orange Posca Pen to colour the blossom.

Thursday, 9 May 2024

Tiffany Johnson Creative #100daysartplay Challenge - Day 82


Today, is Day 82 of the Tiffany Johnson Creative #100daysartplay challenge.  This week is all about using inks.

For this card, I have used lots of Ranger Archival Inks with stamps and stencils from Visible Image. 

I used the Visible Image "Strobes" stencil with two shades of Ranger Archival Inks, using "Sunflower" and "Tiger Lily" shades of inks.

I then used the Visible Image "Supernova" stencil with "Monarch Orange" Archival Ink.  I then used the same ink through the Visible Image "Leafy" stencil.

Next, I used the Visible Image "Halftone" stencil with "Sunflower" Archival Ink.

Next, I used "Cornflower Blue" Archival Ink through the Visible Image "Ripples" stencil.

I then used the Visible Image "Bloom & Grow" stamp set, to stamp the finger print and the baby, using the new Versafine Clair ink called "Very Peri".  I used the same ink for the Visible Image "Scripted Streets" stamps and the "Creative Chaos" stamp set for the dots/circles.

I went around the edges of the card using "Monarch Orange" Archival Ink blending towards the middle.  I then edged that in Versafine Clair "Twilight" dark blue ink.

I used the "Twilight" ink again to stamp the "Bloom and grow" sentiment across the page.

I added a few white and blue lines to the "strobes" area using Derwent Inktense pencils.

I went around the stamped baby image using a black fine liner pen as I wanted it to stand out a little more.

Finally, I used white and orange Posca Pens across the card to add extra depth of colour.


Tuesday, 28 November 2023

Visible Image "Peace, Love & Hope" Christmas Gift Tag


Today, there isn't a Karen Telfer tag, every eight days there is a days break to allow people to catch up - today is that day.  Instead, I've made my own Christmas gift tag.

I've used the Visible Image "Strobe" stencil with a gold and beige colour that was left over on my blending brushes from an ealier project, so I decided to make the most of what was there, using darker ink in the middle, getting lighter towards the edges.

I used Versafine Clair "Chianti" dark red ink, with the Visible Image stamp set called "Peace, Love & Hope", for all the stamping, using first and second generation stamping for the trees and edging the tag in the same colour too.

I found some matching card and mounted the tag on to it, then used a gold gel pen to add a little subtle shimmer to areas of the tag.

Tuesday, 7 November 2023

Visible Image "Let It Snow" Christmas Card


Today, I've been playing with my Visible Image stamps, which have not been used for some time, so it was good to get them out.

I started by masking off the edges of a plain white 6x6 card using low tack masking tape.

I used two shades of Distress Oxide Inks to create the coloured background, using "Broken China" in the middle and "Blueprint Sketch" around the edges.

I then lay the Visible Image "Frosty" stencil over the top.  Using a blending brush, I used "Blueprint Sketch" Distress Oxide Ink again to geet the patterned background.

I dusted the surface with an anti-static chalk bag.  Using a Wow! embossing ink pad, I stamped the large snowflake, which is part of the Visible Image "Let it snow" stamp set.  I then coated the stamped image with Wow! Bright White embossing powder and heat set.

I removed the masking tape from the edge and then stamped the sentiment, which is also part of the same "let it snow" stamp set.  Finally, I added a few dots of white gel pen to the background to replicate further snow.

Thursday, 17 August 2023

Visible Image "Daisy Grunge" Smile Card


While my Visible Image stamps and stencils were out, I decided to have a further play, making this card.

To start with, I used a white card, laying the Visible Image "Daisy Daisy" stencil over the top and applying two shades of Ranger Archival Inks (Cornflower Blue and Garden Patina) through the stencil with a blending brush.

Using Versafine Clair "Blue Belle" ink, I stamped the large daisy from the Visible Image "Daisy Grunge" stamp set.  Using the same ink, I stamped the solid daisy from the Visible Image "Imperfection Is Beauty" stamp set.

Between the flowers, I stamped the word "Smile" in Versafine Clair "Nocturne" black ink, which is also part of the Visible Image "Daisy Grunge" stamp set.

I used three shades of Van Goch Pastel Pencils to colour the petals of the large daisy, using an orange and a yellow colour to colour the middle of the flowers, adding touches of yellow and orange Posca Pen dots to the same area.  I used a white gel pen to add highlights to some petals and to add some white dots across the card.

Visible Image "Atomic Flower" Birthday Card


I made this quick birthday card this morning, using two shades of Ranger "Archival Inks" (Chrome Yellow and Tea Rose), through the Visible Image Stamps "Atomic Flower" stencil. 

I then used Versafine Clair "Nocturne" black ink to stamp the Visible Image "Happy Birthday" sentiment and verse.  Finally, adding some dots using a metallic gold pen.

Sunday, 6 August 2023

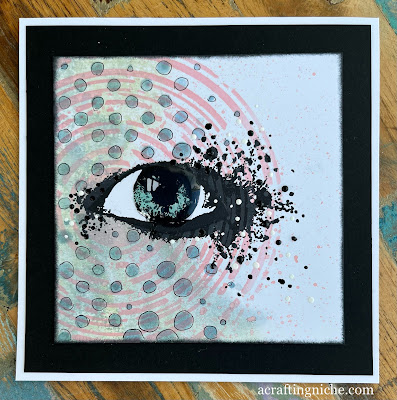
Visible Image "Where Dreams Tag You" Card


After the clean lines of the previous cards, this one is a bit more busy.

I started by using two shades of Distress Ink, using "Old Paper" and "Weathered Wood", slightly spritzed on my craft mat and then dragging the card through the ink on the left hand side only.

Once dry, I used the Visible Image "Supernova Stencil" with "Saltwater Taffy" Distress Ink, to create the circular shape.

I then used Versafine Clair "Nocturne" black ink to stamp the eye, which is part of the Visible Image "Where Dreams Take You" stamp set.

Next, I added the dots, using the Visible Image "Two Tone Stencil" with "Sky Blue" Archival Ink.  I then went around each circle with a black fine line pen to accentuate them more.

Returning to the eye area, I added colour to the eye itself by using "Salvaged Patina" Distress Oxide Ink, then coating it with Ranger "Glossy Accents".  

Finally, I added black and white dots around the eye area using Ranger "Enamel Accents", then set to one side till the Glossy Accents had set, which actually took about three hours!

Saturday, 5 August 2023

Visible Image Stamps "Daisy Grunge" Smile Card


The heavens have opened and it is bucketing it down this morning, so I decided to make a bright card.

For the very base of this card, I spritzed two shades of Distress Inks (Old Paper and Weathered Wood) on my glass mat and then dragged the piece of white card through the inks.  I ran my heat gun over the surface to dry it before moving on to the next stage.

I secured the Visible Image "Distressed Brick Stencil" with low tack tape over the inky background card.  I then applied three shades of Ranger "Archival Inks", through the stencil with a blending brush, using "Prickly Pear", "Fern Green" and "Monarch Orange" colours.

Lifting the stencil, I then positioned the Visible Image "Honeycomb Hex" stencil and applied some "Monarch Orange" and "Shadow Grey" Ranger Archival Inks, just to give a hint of a pattern.

I then moved on to the stamping, using Versafine Clair "Shady Lane" green in, I stamped the "Smile" sentiment and the stems for the flowers, using the Visible Image "Daisy Grunge" stamp set.  I then stamped the flower heads using Versafine Clair "Summertime" orange ink.

To colour the flower heads, I used the following Derwent Inktense pencils :Tangerine, Scarlet Pink, Persian Red and Lemon shades applied straight to the card wit the pencil.  Finally, I added some touches of white gel pen and dots of white Ranger "Enamel Accents".

Thursday, 27 July 2023

Visible Image Stamps "Born to perform" gift tag


Here's a tag I made last night, but got engrossed in the final of "The Great British Sewing Bee" on TV so forgot to upload it.  Did you watch the programme? I felt Asmaa was consistant with all her makes and that final dress was amazing.  I still have no idea how she made it.  A worthy winner as far as I am concerned!

Anyway, back to the tag.  I started by using three shades of Ranger "Archival Inks" to create the background colour, starting with the lightest "Pink Peony" blending in to "Vibrant Fuchsia" and then "Cactus Flower" at the base of the tag.

I lay the Visible Image "Breakout" stencil across the top corner of the tag and applied more of the "Cactus Flower" ink through the stencil.

I then moved the stencil to the lower right hand side and repeated the process.

Moving on to the stamping, I used Versafine Clair "Nocturne" black ink with the Visible Image "Born to perform" stamp set.  Stamping the figure first, then the word "Dance" at the base of the tag and then "Born to" at the top left.

I then used Versafine Clair "Morning Mist" grey ink to stamp two sizes of stars, which are also part of the Visible Image "Born to perform" stamp set.  I added a bit of sparkle to the middle of the stars using "A Wink of Stella" pen.

Finally, using a black pastel pencil, I grounded the dancer.  I added a few touches of white gel pen to areas of the dancer to make her pop a little too.

Tuesday, 25 July 2023

Visible Image Stamps "Life Is Beautiful" card


Having had a few days away, I'm back in my "happy place" crafting again.  The sun is shining and all is good in the world!

This card features a Visible Image stamp set and several of their stencils and a whole host of different inks! 


I started with a white piece of card and "Milled Lavender" Distress Ink.  I put some ink on my glass mat, then lightly spritzed it and then swooshed the white card through the ink.  I then used my heat gun to dry the surface before repeating the process with four more Distress Inks:  Victorian Veleve, Tea Dye, Weathered Wood and Old Paper.

Next I used "Peat Moss" Ranger Archival Ink through the Visible Image "Seeing Stars" stencil, uising the chequerboard section of the stencil.

I then used "Garden Patina" Ranger Archival Ink through the Visible Image "Strobes" stencil on the left hand side of the card.

After that, I used "Shadow Grey" Ranger Archival Ink through the Visible Image "Strobes" stencil on the top right hand side of the card.

I then used "Cornflower Blue" Ranger Archival Ink through the Visible Image "Breakout" stencil" at the base of the card.

Moving on to the stamping, I used Versafine Clair "Twilight" dark blue ink to stamp the bird and words, all part of the Visible Image "Life Is Beautiful" stamp set.

Placing a mask over the bird, I stamped the circles, also part of the Visible Image "Life Is Beautiful" stamp set using Versafine Clair "Morning Mist" grey ink.

I used Van Goch pastel pencils to add depth of colour in areas.

Placing the mask back over the bird and strips of paper over the words, I used Dr PH Martin's "Bleed Proof White Paint" with a fan shaped brush to create splatters across the surface.

Removing the masks, I edged the card in Versafine Clair "Twilight" ink using a finger dabber.

I then used white and black Ranger "Enamel Accents" for extra dots.

Finally, mounting the piece on to navy blue card and then on to a white card blank.

Tuesday, 18 July 2023

Visible Image "Creative Chaos" Birthday Card


I have been away at the caravan for over a week.  I didn't take any crafting things with me and boy have I missed it.  So of course, as soon as the first load of washing was in the machine, I sat down at my craft desk! 

I needed to make a birthday card, so decided to do that first to get it out of the way, then I feel I can create without any pressure.

I stamped the flower from the Visible Image "Creative Chaos" stamp set using Versafine Clair "Charming Pink" ink.  I then stamped the flower head on a Post-it note, fussy cut around the edge and stuck the post-it over the flower head on the card.

I then used Ranger "Prickly Pear" Archival Ink through a section of the Visible Image "Seeing Stars" stencil, fading out around the edges.

I removed the stencil and the mask and then stamped the "Happy Birthday" sentiment, part of the Visilbe Image "Go To Words" stamp set, using Versafine Clair "Charming Pink" ink.

To colour the flower head, I used a Derwent Inktense pencil called "Pink Flamingo 0405" applied with a paint brush, diluting the colour initially and then building the colour up in areas.  I then added some white gel pen to lighten a few areas.

Monday, 10 July 2023

Visible Image "Shining Star" tag on a Brusho stencilled background


The heavens opened today, so it was an ideal time to play with a new Christmas stamp and stencil.

In my stash of backgrounds I've created previously, I came across a blue Brusho background which I felt could work with what I had in mind.  I cut the background down in to a tag shape and then used "Vivid Chartreuse" Archival Ink with a blending brush in two or three places.  I decided the tag needed some more depth of colour so opted to used "Majestic Violet" Archival Ink on the tag too.

I used the Visible Image "Ye Olde Christmas" text stencil with Versafine Clair "Fantasia" purple ink.  I then used the same ink to edge the tag before using a heat gun to dry the surface.

I rubbed an anti-static bag (with french chalk in it) over the surface of the tag.  I then stamped the large star, the sentiment and the smaller star from the Visible Image "Shining Star" stamp set with Wow! Clear Embossing Ink Pad.  Once I was certain that the image had stamped cleanly, I coated the stamped areas with Wow! White Puff Twinkle Embossing Powder and heat set.

I went around some of the stamped areas with a gold shimmer gel pen.  I added a few dots of white gel pen around the main star too.

Finally, I squeezed some "Crystal" Stickles on to my craft mat and using my finger tip, added sparkle to areas of the tag.


Friday, 7 July 2023

Visible Image Stamps "Shining Star" new job card


I've made a "new job" card using the Visible Image "Shining Star" and "Anyone For Bubbles" stamp sets.

I've used a Wow!  Clear Embossing Pad with Wow! Rich Gold Super Fine Embossing Powder and then heat set.

I've used a metallic gold pen to draw lines and dots around the edge of the card.  For the champagne, I have used the "Lemon" Derwent Intense pencil and a white gel pen.

To colour the star, I have used "Sunflower" Ranger Archival Ink with a blending brush to give a light dusting of colour.

Thursday, 6 July 2023

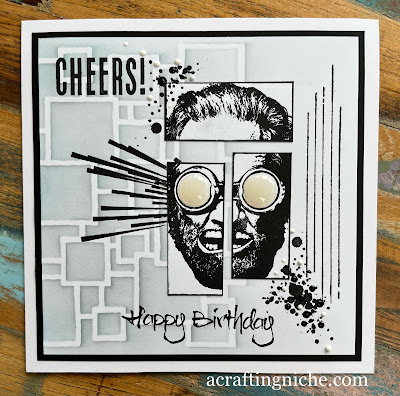
Visible Image "Art Rebel" Birthday Card


It's that time of year when I needed to make a birthday card for my Hubby.  I've been putting it off for a couple of weeks, but time is running out so I bit the bullet and made this card for him.

I used a piece of white 6x6" card for the base and lay the Visible Image "Square Route" stencil over to the left hand side of the card. I used two shades of Archival Inks through the stencil, first using "Shadow Grey" and then "Garden Patina" fading the colours out towards the right hand side of the card.

On a separate piece of white card, I used Versafine Clair "Nocturne" black ink to stamp the three face sections from the Visible Image "Art Rebel" stamp set. I then cut the three pieces down along the stamping line and inked the bare edge with a finger dabber and "Nocturne. Then glued the three sections into position slightly to the right of the central point of the card.

Once the glue was dry, I mounted the card onto a piece of black paper and then on to a 7x7" white card blank.

Now it was time to add the extra details.  I added the horizontal lines from the left of the face  and the large dot/splatters at the bottom right of the face from the Visible Image "Set the tone" stamp set with Versafine Clair "Nocturne" black ink.

I used the same ink with the vertical lines on the Visible Image "Shape It Up" stamp set.

I then moved on to the sentiments.  I used the "Cheers" from the Visible Image "Bring on the beers" stamp set and the "Happy Birthday" sentiment from their "Happy Birthday" stamp set.

Finally, I added some black and white dots using Ranger "Enamel Accents" and used Ranger "Glossy Accents" for the lenses of the goggles.

Tuesday, 4 July 2023

Visible Image "Leave Your Fears Behind" Card


Another card using the Visible Image "Flower Ink Stencil".  I actually made this one first, but for some reason it didn't gel with me, so I put it to one side, made the sunny card then returned to this one to finish it off with more detail. 

I started off by laying the Visible Image "Flower Ink Stencil" over a piece of white card, keeping it in place with low tack tape.  I then used Versafine Clair "Cheerful" yellow ink and then "Summertime" orange ink.

Over the top of the flower stencil, I lay the Visible Image "Strobes" stencil over the top, securing with another tab of tape.  I then used a blending brush with Versafine Clair "Charming Pink" ink to create the multi coloured petals. I then lifted the tape and stencils.

Using Versafine Clair "Nocturne" black ink, I stamped the bird and the sentiment, both are part of the Visible Image "Leave Your Fears Behind" stamp set.

I then set too embellishing the card.  I used white, gold and black gel pens.  I used a bright pink Posca Pen.  I used white Ranger Enamel Accents and Liquid Peals in a shade called "Outrageous" which is a vibrant orange colour.


Visible Image "Flower Ink" stencil card


wanted to make a cheerful and bright card with a positive vibe.  This wasn't for any particular reason, I just fancied making something to reflect the sunshine of today. 

Using a 6x6" white piece of card, I lay the Visible Image "Flower Ink Stencil" over the top and secured using a piece of low tack tape.

Using a blending brush I added colour through the stencil using Versafine Clair "Cheerful" yellow ink and "Summertime" orange coloured ink.

I removed the stencil and added a little detail for the petals using a pastel pencil.

In the middle of the flower, I used a stamp from the Visible Image "Random Art of Kindness" set with Versafine Clair "Summertime" orange ink.  I then used a pink Posca Pen to add extra detail to the central area.

Using Versafine Clair "Twilight" dark blue ink, I stamped the sentiment, which is called "Laugh Louder" by Visible Image Stamps.

I added extra pink dots around the edge of the stencilled flower using a brigh pink Posca Pen.  I then added white dots using a white gel pen and then larger white dots using Ranger Enamel Accents.

Visible Image Stamps "Where dreams take you" card


Another early morning crafting session from me, today I've been using Visible Image stamps. 

I had a rummage through my backgrounds file and found a Brusho background where I had a dark blue/purple with runs of colour towards the bottom.  I thought this would be ideal for what I had in mind.

I stamped the Visible Image "Fibonacci" (grid with curl) using Versafine Clair "Twilight" dark blue ink.

Using Versafine Clair "Nocturne" black ink, I stamped the Visible Image eye, which is part of their "Where dreams take you" stamp set.  I then stamped the word "Vision" which is from the same stamp set.

I used the same ink to stamp the detail on the left hand side of the card, which are from two Visible Image stamp sets, ""Random art of kindness" and "Rays of light".

I used Van Goch Pastel Pencils to add colour to the eye area.  Added extra black and white dots using Ranger "Enamel Accents" and used a white gel pen to add a little white to the eye, to give the impression of light hitting it.

Tuesday, 18 April 2023

Tuesday challenge card "Black and White"


Today, Tuesday 18th April, Eileen Godwin has set a challenge of "Black and White".  This is the card that I have made for this prompt using a selection of Visible Image products.

I stamped the main image, called "Behind Every Mask" in the middle of the card using Versafine Clair "Nocturne" black ink.  With the remaining ink on the stamp, I stamped the image on a post-it note then fussy cut the shape to create a mask.

With the mask in place, I used Versafine Clair "Morning Mist" grey ink through the Visible Image "Strobes" stencil, fading it out towards the edges.

Using Versfine Clair "Nocturne" black ink I stamped one of the Visible Image "De-stressed" stamps multiple times around the edge of the card.  I then did the same using Versafine Clair "Morning Mist" grey ink.

I then used the Visible Image "Free Your Imagination" stamp set for the feather and the sentiment, stamping both in "Nocturne" black ink.

Finally, I mounted the card on to a piece of black paper then on to a card blank.  Around the edge of the black paper, I drew a line in a white gel pen.  The last thing I did was to add dots of white Ranger "Enamel Accents" below the flight of the bird.

Monday, 27 March 2023

Visible Image "Nuts About Squirrels" Birthday Card


I apologise for my absence, I've been away on holiday for a fortnight, so today I am back to my crafting, catching up on Birthday cards that are needed for the next couple of weeks.

Our Grand Son will be five in a week or so.  As he gets very excited to see the red squirrels visit our garden, it seemed only right to pop one on his birthday card.

I've used two Visibiel Image stamp sets for this card.  "Nuts about squirrels" and "Totally Toadstools".  I also used the Visible Image "Supernova" stencil.


I used a selection of Versafine Clair ink pads to stamp the images.


I used a selection of Distress Oxide Inks to create the coloured background.


To colour the stamped images, I used Derwent Inktense Water Colour Pencils, I added further details using Van Goch Pastel Pencils and a white gel pen.

Finally, for the sentiment, I used a Lawn Fawn stamp from their "Simply Sentiments" stamp set, stamped in Versafine Clair "Morning Mist" grey ink.