52 Week Mini Art Card/Tag Challenge

Monday 31 October 2022

Lavinia Stamps "Everlee on a shelf" card


Many of my recent cards have had quite busy designs.  I decided I wanted something a little quieter.  This card would be almost a whisper if it ended up how I had it in my head. However, my heavy handedness when adding colour through the stencil changed it some what!

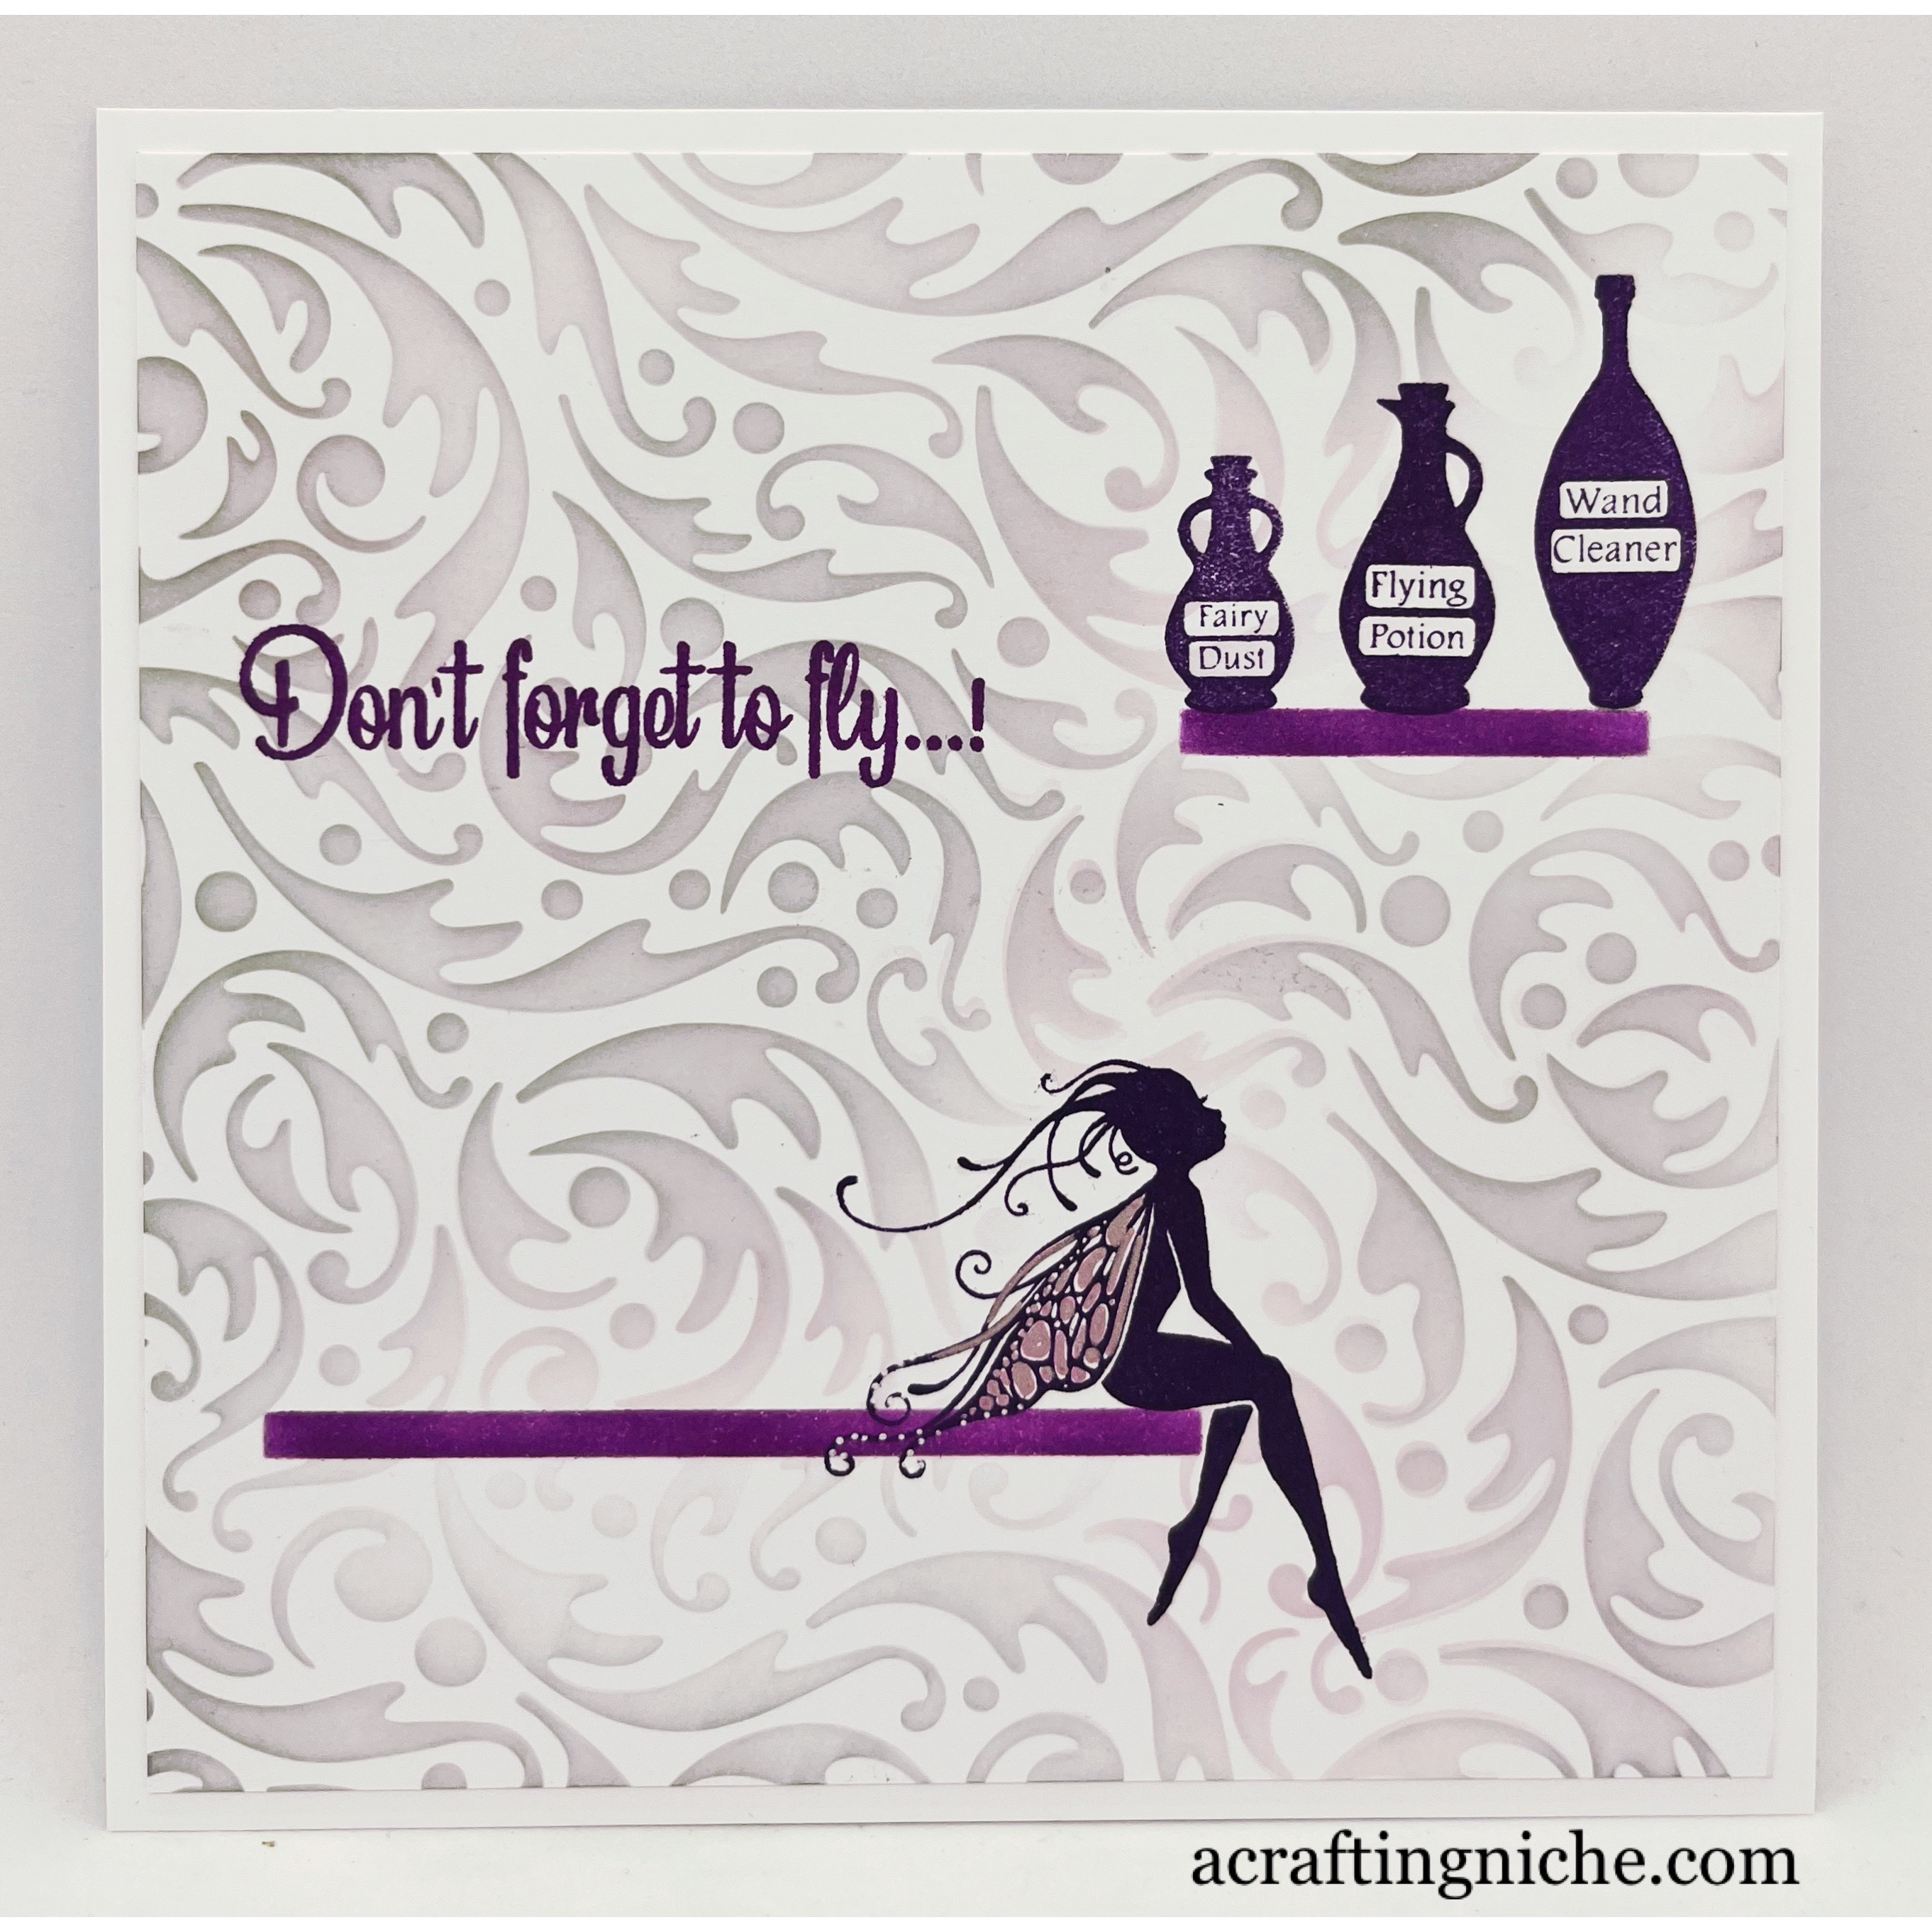
I used a stencil I had in my stash with Versafine Clair "Purple Delight" to create the two lines for the shelves.

I positioned the new Lavinia Stamps fairy called "Everlee" sitting on the end of the shelf and stamped her in Versafine Clair "Monarch" purple ink.  I used the same ink to stamp the bottles on the higher shelf.  These stamps are part of a new set called "Potions".

I used two shades of Archival Inks:  Shadow Grey and Pink Peony through the Lavinia Stamps "Dynamic" stencil.  This is where I became over zealous and it ended up a lot darker than I had imagined it would be!

Finally, I stamped the "Don't forget to fly...!" sentiment in Versafine Clair "Purple Delight "ink.  

Lavinia Stamps "Lupin and the birds" Card


I'm still on a roll playing with the new Lavinia Stamps release.  Today is the turn of Lupin the hare. 


I started by using a gel plate background I made a few days ago using two shades of Elements Inks (Emporor Red and Graphite) with the Lavinia Stamps "Berry" stencil.

I started by stamping Lupin the hare, using Versafine Clair "Nocturne" black ink.

I then masked off the moon and used "Confetti" Elements Ink around it.  Around that I then used "Violet Chalk" Elements Inks.  After removing the mask, I coloured the moon in using layers of white Pan Pastel, building up the colour till it was more solid.  I then used a black Van Goch Pastel Pencil to shade in the lower left hand side of the moon.

Using Versafine Clair "Nocturne" again, I multi stamped the "Tree Branch" and "Gip" on each side of the card, I then stamped two birds from the new "Birds" stamp set.

Moving to the bottom half of the card, I used two Lavinia "Hill Masks" with Versafine Inks to create the landscape.  I then stamped the "Tree Group" in Versafine Clair "Morning Mist" grey ink, with the hills masked off, so that the trees appear behind the hills.

I then moved on to stamping the foliage in the foreground using:  Leaf Spray, Flora Set, Lamps, Woodland and Small Branch in a mix of "Nocturne" and "Morning Mist" Versafine Clair ink.

Using second generation stamping and Versafine Clair "Morning Mist" grey ink, I stamped the "Winter Spice" sentiment down the left hand side of the card.

I used a stencil brush and "Wilted Violet" Distress Oxide Ink to darken the edges of the card, then edged it in Nocturne black ink.  I added extra detail using a selection of Posca Pens, Gel Pens, Pastel Pencils and a normal pencil.


Lavinia Stamps "Hanging Pods" on a gel plate background tag


Another make using the new Lavinia Stamps, this time a tag.

I've used a plain white tag, stamping the new Lavinia Stamps "Hanging Pods" the Lavinia "Happy Birthday"sentiment, part of the "Heartfelt Verse" stamp set, and the grounding in Versafine Clair "Nocturne" black ink".

I then coloured the pods, using two shades of Elements Inks, (Sundance and Paprika) applied with a brush.  I popped a slight smear of Distress Glaze over the painted area (be sure not to apply too much as it may stay on your gel plate, also try to keep it within the painted/coloured area as it may slide about if there is too much glaze).

On a rectangle gel plate, I brayered one (long) half with "Sundance" Elements ink, the other with "Paprika" Elements ink,  I then used a fan shaped paint brush to splatter some water droplets across the surface of the gel plate, I then took the impression.

I chose to use the Paprika Elements Ink through the Lavinia "Ambiance stencil", applied with a stencil brush to provide a patterned background.

Finally, I decided to add the "Small Branch" stamped in Versafine Clair "Nocturne" ink adding dots of Posca Pen to replicate berries.  I then splattered white Posca Pen across the surface to lift it a litte.

Funky Fossil "Merry" Gift Tag


In my craft room, I have a drawer of odds and ends which I feel may come in handy in the future.  I guess I may be a bit of a hoarder?  Anyway, the drawer was struggling to close, so I decided to delve deeper and found some bits to make this Christmas gift tag. 

I picked up a piece of red cardstock that at some stage, I had run through the Big Shot in a Sizzix/StampingUp! Cable Knit embossing folder.  So I decided that this would be my base for a couple of tags.

I also found a section of what was originally a piece of double sided sticky paper/card, on one side it looked like I had been experimenting with two different shades of Cosmic Shimmer Gilding Flakes, it's in copper and gold shades.  I decided to run this sheet through the Big Shot, using a "Merry" die from Funky Fossil Designs, it's part of their "Festive Words Die Set". I also ran some white card through using the same die.  I then stuck the two layers together to make a more solid sentiment then mounted it on top of the embossed and layered tag.

It was nice to make a really quick project, especially as it was from bits I had put by for "I might need it in the future use".

Sunday 30 October 2022

Lavinia Stamps "Nia, Birds & Bells" card


This afternoon I've made another card.  This one didn't flow as I was making it.  At one stage it was very close to going in the bin, so I walked away from it.  Leaving it for over six hours.  

I started with a gel plate background made by brayering two Elements inks (Bleu Atoll and Greensleeves) on to the surface of the gel plate, adding splatters of water with a fan paint brush to achieve bleached areas, then taking a press.

Once dry, I started stamping.  I've used too many shades of Versafine Clair to mention and to be honest I don't recall the order I stamped in, other than the branch, Nia, the birds and bells, then I think the text, the music notes.  Here's a list of the Lavinia Stamps I used:

  • Nia the fairy (new release stamp)
  • Tree Branch
  • Bells (new release stamps)
  • Lamps/toadstools (new release stamps)
  • Winter Spice Verse (new release stamps)
  • Birds (new release stamps)
  • Musical Notes
  • Small Branch
  • Flower Collection (new release stamps)
Other than Versafine Clair inks for stamping, I used Blue Print Sketch Distress Oxide Ink around the edges.  I used Derwent Inktense water colour pencils for colouring along with Posca Pens.  I also used some glitter, some metallic and some gel pens, along with a normal pencil.

Lavinia Stamps "Cedar" just for you card


I really, really like the new Lavinia stamp called "Cedar".  it works well in so many different situations but I like the look of it as a stand alone stamp too.  I think it has a sight Oriental feel about it.  Anyway, I decided I wanted it to be the star of the show, so made this card. 

In my stash of prepared backgrounds, I found one where I had mopped up Distress Inks on to a piece of card, so decided this would be perfect for the base.

I multi stamped the "Cedar" branch over the surface, using Versafine Clair "Monarch" purple ink.  I then edged the card with the same ink. I then mounted the card on to a white card base.

Using the same ink, I stamped the Lavinia "Just for you" sentiment, part of the "Heartfelt Verse" sentiment stamp set, then die cut it. I added foam pads to the back of the sentiment then mounted it in the middle of the card.

I have added a little silver sparkle to some of the tips of the Cedar spines using a glitter pen, unfortunately it doesn't show much in this photo.

Lavinia Stamps "Paper Hug" Card


This morning I've made this card for a friend that will be needing a hug this week.   

I stamped the new Lavinia Stamps "Oak Leaves" in Versafine Clair "Summertime" orange ink.  I then stamped the acorns, which are part of the same set in Versafine Clair "Acorn" brown ink.  I used the same ink for the Funky Fossil sentiment, which is part of their "Small Print #2" stamp set.

To colour the leaves and the acorns, I used Derwent Inktense water colour pencils, starting with orange and rust tones then adding greens. I edged and grounded the leaves and acorns using a pencil.

I used "Antique Linen" Distress Oxide Ink, applied with a brush in the background.  I used a fine tip pen in brown to cover the orange stems, adding areas of gold shimmer gel pen to the leaves and acorns.  


Saturday 29 October 2022

Lavinia Stamps "Winter Spice" Card


I have continued to play with my new Lavinia Stamps, making this Autumn coloured wreath using  the new Winter Spice, Oak Leaves and Flower Collection to create this wreath with the sentiment in the middle. 

I started by stamping the "Winter Spice" sentiment in the centre of the card using Versafine Clair "Golden Meadow" ink. I then lightly drew a circle around the sentiment in pencil to give myself an idea of the placement of stamps

Starting with the branch from the "Flower Collection", I stamped it around the circle, using Versafine Clair "Acorn" brown ink, stamped in second generation stamping. I left a gap in between each and stamped the seedhead from the same set using Versafine Clair " Shady Lane" green ink.

Using Versafine Clair "Tulip Red" ink, I stamped the berries using a Lavinia Pound stamp.  Then using Versafine Clair "Summertime" orange ink, I stamped the "Oak Leaves".

I coloured the wreath elements using Derwent Inktense water colour pencils, along with glitter, metallic and gel pens.  

Lavinia Stamps "Everlee" Card


Here's another card I have made using some of the new stamps released this week by Lavinia Stamps.

I've used ta gel plate and Element ink background, stamping he new "Everlee" figure, sat on the "Small Swing Bed", looking up on the new "Hanging Pods". In the bottom right hand corner, I have used the new "Cedar" stamp.  Around the swing bed and fairy, I have stamped the "Star Cluster".

All stamping is in various shades of Versafine Clair Inks.  I've used Posca Pens, glitter pens, gel pens and stickles, edging the card with Distress Oxide "Wild Violet" ink.

Lavinia Stamps "Logan Silhouette" Card


Today, I was stalking the Postman, waiting for my order of the new release of stamps by Lavinia Stamps.  I wasn't disappointed, they arrived and they are fabulous.   


I made some backgrounds using the Lavinia Stamps "Dark Denim" Elements Ink and their "Ambiance" stencil on the gel plate and then got stamping.

I decided to cut one of the gel plate images in half and stamped the new "Logan Silhouette" hare in Versafine Clair "Nocturne" black ink.  I used the same ink to stamp the new "Cedar" branches and the "Small Branch".

I used a white Pan Pastel and Van Goch Pastel Pencils to colour the moon, edging it in Versafine Clair "Twilight" dark blue ink. I added dots of red Posca Pen to look like berries on the branches.

Friday 28 October 2022

Penny Black "Brilliance" - stamping on mirror card


While I was rummaging through my cardstock, I came across a piece of gold mirror card that I had used for Christmas decorations some years back.  It got me thinking I would try stamping on it and see what happens.  

The stamping was relatively straight forward, taking a photo of the finished card without my reflection in the mirror sheen was more tricky!  So I took the card outside and took a little video of the card which shows the true colour and shine.


I used black StazOn ink for the stamping on the mirror card, everything else just seems to slide right off the surface. I used a red rubber stamp (as StazOn ink can damage the clear ones), opting to use the Penny Black cling stamp called "Brilliance -40-806".  The sentiment was another Penny Black stamp from the set called "Sprinkles & Smiles 30-297", it's a clear set and I have taken a chance stamping in StazOn, giving it a good wash after use.

I gave the stamping a quick waft with the heat gun to ensure the ink was dry, then coloured the berries using a red Posca Pen, once the red was dry, I added some gold highlights to the berries

Lavinia Stamps "Nadolig Llawen" Christmas wreath card


Today I have pulled out my Lavinia Stamps to create this Christmas card. 

I started the wreath by stamping the left and right "Wreath Flourish" in Versafine Clair "Rain Forest" Ink. I then multi stamped the "Small Branch" in Versafine Clair "Acorn" brown ink.

I then moved on to multi stamping the leaves and berries which are both from the pound stamp section, stamped in Versafine Clair "Shady Lane" green ink and "Red Tulip" ink.  I used a dotty circle pound stamp with Briliance "Galaxy Gold" around the edge of the wreath.

I used a gold glitter pen to fill in the leaves on the wreath flourish.  A red glitter pen on the berries and also a white gel pen for the light on the berries.

Finally, I stamped the "Nadolig Llawen" sentiment which is part of the "Welsh Words" stamp set, stamped in Versafine Clair "Shady Lane" green ink.

Funky Fossil "Doodle Blooms" Card


Yesterday, I played creating a grungy, mixed media kind of background, which resulted in making this card.

I started with a piece of sand coloured card.  I tore a book page into sections and glued it on to the coloured card and left to dry.

I then spritzed it with two shades of Distress Oxide Ink Spray:  Speckled Egg and Broken China.  I left it to dry again.

I then used the Funky Fossil Designs "Musings" clear stamp set with Versafine Clair "Warm Breeze" ink to stamp the letters.

I used Versafine Clair "Tulip Red" ink through the Funky Fossil Designs "Dots and Dashes stencil", circling the dashes with a red Posca Pen to add more definition to the edges of the dashes.

I die cut three seedheads using the Funky Fossil Designs "Doodle Blooms Die" in white card.

Finally, I used a sentiment from the Funky Fossil Designs "Small Print 2 stamp set", stamped in Versafine Clair "Warm Breeze" ink and die cut it into a banner.

Thursday 27 October 2022

Lavinia Stamps "Small Pixie Houses" New Home Card


This morning, I have been playing with products from three different manufacturers to create this new home card.

I started off using shades of blue and greeen Ranger Archival Inks through the Funky Fossil "Forest Glade" stencil. While the stencil was in place, I created the hill/landscape.

Next, I lightly couloured in the tree bark and the toadstools using Distress Oxide Inks applied with a brush, topped with Derwent Inktense pencils.

I used Lavinia Stamps "Small Pixie Houses, stamped in Versafine Clair "Morning Mist" grey ink.  Using the same ink, I stamped the sentiment "Home is where the heart is" which is part of a Papertrey Ink calls "Love Lives Here".

Finally, I added some grass and flowers to the foreground of the green area adding touches of white using a Signo Pen.

Funky Fossil "Halloween Artist Trading Card"


While in Halloween mode, I made an Artist Trading Card (ATC) using a small off-cut from a spray ink background I made many months ago.  I think I'd used Dylusions ink spray for the orange/red background colour.

I used Versafine Clair "Morning Mist" grey ink through the Funky Fossil "Batty" stencil, fading it out to the right hand side of the card.

At the base, I used Versafine Clair "Nocturne" black ink though the Funky Fossil "Gothic Graveyard stencil", using a white Signo Pen to edge the tomb stones.

Using Nocturne, I stamped the "Stay Curious" sentiment which is part of the Funky Fossil "Small Print 2" stamp set.

I then decided to mount the ATC on to black card, so it can no longer be counted as an ATC as it's not the recognised size.

Wednesday 26 October 2022

Lavinia Stamps "Willow the witch" card


After being away for a few days, I felt the need to craft, so made a quick Halloween card this evening.

I used a Brusho background from my stash, that I had made some months ago. I stamped in Versafine Clair "Nocturne" black ink, using the following Lavinia Stamps:

  • Willow the witch
  • Bats
  • Foliage Set 2
I added touches of glitter pen, white Signo Pen and darkened the edges of the card using more Versafine Clair "Nocturne" ink.

Saturday 22 October 2022

Penny Black "Poppy Time 40-323" Card


Today I've played with a Penny Black Inc. cling stamp called "Poppy Time - 40-323" to create this card. 

On white card, I stamped the poppy image using a fade out ink (Ink on 3), which provides a no line for colouring images.

I used the Ranger/Distress Water Colour pencil in "Candied Apple", applied with a brush to colour the poppy.  I them used a white Signo pen and a black fine liner pen to add extra detail.  I used the "Crushed Olive" Distress Water Colour pencil for the flower stems.

In the background, I used a light wash of "Speckled Egg" Distress Oxide Ink.  Once dry, I then used the same ink to darken the edges of the card, then lay the "Micro Dots Stencil" from Funky Fossil Designs to create the dotty background using the same ink.

Friday 21 October 2022

Memory Box "Pippi Butterfly" gilded birthday card


I recently watched a youtube video on using gilding flakes by Christine Stokes.  As I have some flakes in my stash, I decided to give it a try.  Here's the link to the video.

I had two pots of Cosmic Shimmer Gilding Flakes (Summer Meadow - gold and Silver Dream) both pots have varigated colours in them.  I used two widths of double sided sticky tape for the vertical line, then die cut into a square using a die with a decorative edge.

I used two Memory Box dies "Pippi Butterfly - 98508" and "Isabella Butterfly - 98507).  First cutting in white card and then cutting a double sided sticky sheet and applying the flakes to one of the sticky surfaces.

I used Wow! Rich Gold embossing powder, heat set, for the Waffle Flower sentiment which is part of their "Essential Sentiments" stamp set.


Thursday 20 October 2022

Funky Fossil Designs "Scribble Owl" Card


Today, I have played with one of the Funky Fossil Designs scribble stamps designed my Mo's Art Uk, to create this card. 

I used a background from my stash that I had made several months ago, using Pan Pastels through the Funky Fossil "Forest Foliage" stencil on a gel plate.

I stamped the Funky Fossil "Scribble Owl" using Versafine Clair "Nocturne" black ink, immediatedly covering the stamped area in Wow! Clear Gloss Embossing Powder and then heat set.

On a black piece of card, I used the Funky Fossil "Forest Foliage Stencil" with Wow! Clear embossing ink and the Wow! Clear Gloss Embossing Powder and heat set.

Returning to the owl image, I coloured some of the body using Derwent Inktense water colour pencils.  I also added touches of white to the eyes using a white gel pen.  I squared off the stamped image, mounting it on to the black heat embossed background, then squared the area off again, before mounting it on to a white card blank.

Funky Fossil Designs "Dotty Mandala Heart" Anniversary Card


Our friends celebrate their anniversary next week, so this morning I made this super quick card. 

I used a piece of kraft card for the base, cutting it to five and half inches square.  I then lay the Funky Fossil "Dotty Mandala Heart Stencil" over the top of the card, using some low tack masking tape to hold the stencil in place.

Through the stencil I applied Wow! Embossing ink using a finger dabber, repeatedly dabbing the ink pad and then the dotty area of the stencil, till I was happy I had full cover.  

Removing the tape and stencil, I then sprinkled Wow! Opaque Bright White Super Fine embossing powder over the dotty image area.  After shaking off the surplus powder, I then heat set the mandala.

Tuesday 18 October 2022

Newly decorated craft room


In a post yesterday, I mentioned that my craft room had been decorated, for the first time in six years since it had been built. There were settling cracks in some areas that needed to be made good before painting.  We got a local decorator in to do the job, along with doing the hall, stairs and the landing too.

I didn't want a colour, I like the white walls, although some may think it is a bit stark, but it works for me, which is all that matters.

Lavinia Stamps "Red Leaves Fall" Card


I've had a play with my Lavinia Stamps today, creating this autumnal card. 

I started by stamping the "Red Leaves" sentiment, using Versafine Clair "Morning Mist" grey ink, so that I had the placement for the branches in the top left corner.

Using the same ink, I stamped the "Gip" in second generation stamping, as I didn't want it to be prominent.

Next, I stamped the "Oak Leaf Branch" using Versafine Clair "Acorn" brown ink, again in second generation stamping. This allowed me go in with "Golden Meadow" and then "Tulip Red" Versafine Clair inks for the leaves.  I used the same process for the floating leaves, which are part of the "Foliage Set 2" stamp set.

I then used two shades of Distress Oxide Ink:  Peeled Paint and Aged Mahogany very lightly across the surface of the card, to give a little colour, to remove the starkness of the white card.  I then sprinkled water droplets from a fan shaped paint brush to add a little texture, by dabbing off the surplas water from the surface of the card to create a bleached look where the droplets had been.

I wasn't totally happy as the area still looked a little empty, so I used the same inks through the Lavinia Stamps "Splendour Stencil", only using the ink that remained on the blending brushes, which provided a very subtle background.

Monday 17 October 2022

Funky Fossil Designs "Twiggy Wreath Die" Christmas Tag


Apologies for not posting recently.  My craft room was being decorated, so everything had to be moved out.  It made me realise how much "Stuff" I have accumulated over the six years since I have had the craft room.  Fortunately, it is all done and I am now able to craft again.

As my inks still need to be sorted, I decided to create a tag using washi tape and die cuts.  All the products I used on this tag are by Funky Fossil Designs .  I added two lines of washi tape from their "Merry & Bright" set of tapes. I then added little stitch marks with a fine tipped felt pen around the edge of the tag.

Using my Sizzix Big Shot machine, I die cut two colours of brown card using the Twiggy Wreath Die set (this is actually reduced at the moment, so an ideal time to buy) and glued into position, placing the darker colour first, with the lighter one on top. I then trimmed the excess wreath from the edge of the card.

Using an off-cut of red card, I die cut the "Noel" sentiment, which is part of the "Festive Words" die set.  I added some "Merry & Bright Enamel Dots" to replicate berries.  Finally, I added touches of silver glitter to the wreath branches using a gel pen.

Sunday 9 October 2022

Netgalley Book Review: Driving Home For Christmas by Joanna Bolouri


Rarely do I slot right into the rhythm of the writing by an author I have not previously read or heard of, but this was one of those amazing occassions. I couldn't put the book down!

The characters felt so real and the story line was so visual in my head as I read, it felt like it was something I was watching on TV. This book has humour, but also a fabulous understanding of love and insecurities within relationships.

Ed and Kate, initially school friends, which turns into a relationship, have been together for fourteen years. Through, school, university and their adult work lives to date. Ed is a laid back school music teacher, while Kate is a hot shot divorce lawyer to "C" list celebs. Both have been happy with their lives together till the night they travel to their family for Christmas, when hard to take home truths are said in a blazing argument while stuck in the motorway traffic jam. They face the dilemma of turning round and going their separate ways or visiting the relatives over Christmas and pretending everything is fine.

I have absolutely no problem awarding this book my five stars. I'm going to look up other titles by the author as I have enjoyed it so much.