52 Week Mini Art Card/Tag Challenge

Thursday 30 November 2023

Day 18 of Karen Telfer's "24 Days of Tags 2023" Challenge


This is my Day 18 tag of Karen Telfer's "24 Days of Tags 2023" challenge.

For this tag, I blended two Distress Oxide colours, using "Mustard Seed" and "Festive Berries" to cover the tag base.

I used white Gesso through the Tim Holtz / Stampers Anonymous "Tiny Poinsettia Stencil THS165", applied with a finger dabber.

I then splattered white paint from a fan shaped paint brush to create the white dots.

Next, I used Ranger black "Archival Ink", applied with a finger dabber through the Tim Holtz / Stampers Anonymous "Poinsettia Duo stencil THS153".

I mounted the tag on to a piece of black card, finally adding some white dots of Ranger "Enamel Accents" to the middle of the flowers.

Lavinia Stamps "Fairy Dandelion" Card


After the epic amount of stamping of my previous card, this one is more minimal, opting for a clean and simple look.

I masked off three sides of the card, to protect from inky marks.

I've used three shades of Ranger Archival (Majestic Violet, Cactus Flower and Vibrant Fuchsia) through the Lavinia Stamps "Red Brick Stencil" to create the panel of colour.

Using Versafine Clair "Nocturne" black ink, I stamped the Lavinia Stamps "Fairy Dandelion" and the sentiment, which is part of the Lavinia Stamps "Heartfelt Verse" stamp set.

...and that's it!  Definitely a simple card.

Wednesday 29 November 2023

Sweet Poppy Stencils Botanicals Christmas Card


I got a bit carried away with the stamping on this card, but I think it was worth the effort for the result.  All stamps are by Sweet Poppy Stencils.

I started with a piece of cream coloured cut, cut to 6x6".  In the middle of the card, I stamped the Sweet Poppy Stencils sentiment, part of thier "Festive Phrases" stamp set in Wow! clear embossing ink and then coated with Wow! Rich Gold embossing powder and heat set.

I then used the Swet Poppy Eucalyptus stamp with "Bundled Sage" Distress Oxide Ink,  I then coloured the leaves with a diluted solution of the same ink, using a heat gun to dry the surface.

Next, I multiple stamped the Sweet Poppy "Fir Tree Sprigs" in two corners of the card, this time using "Evergreen Bough" Distress Oxide Ink to stamp and colour the needles.

I then stamped the Sweet Poppy "Holly Sprigs" using a mix of "Pine Needle" Distress Oxide Ink and Versafine Clair "Rain Forest" dark green ink.  I then coloured the holly leaves with "Beech Green" Derwent Inktense pencil applied with a paint brush.

I used a red Posca Pen to colour the holly berries.  Then used a metalic gold pen to edge the card, the holly and the berries.  I added white highlights to the berries using a Unibal Signo Pen. Finally, I added a bit of sparkle by using a gold shimmer gel pen around the Eucalyptus leaves.

Stampin' Up "Merry Patterns" Christmas Tag


Another Christmas gift tag from me.  This time, I have used the Stampin' Up stamp set called "Merry Patterns" with Versafine Clair "Chianti" dark red ink, to stamp the sentiment and the reindeer.

I wasn't very sure where I was going with this tag, but I knew I needed to fill in the background some how, so I opted to use a metalic gold gel pen to draw wavy lines vertically on the tag, edging the tag in gold too.

I then used the Lavinia Stamps "White Orbs stencil" to draw around some of the circles again with the metalic gold gel pen, then filled the circles in with colour.  Finally, mounting the tag on to  a co-ordinating colour card.

Day 17 of Karen Tefer's "24 Days of Tags 2023" Challenge.


This is my Day 17 tag of Karen Telfer's "24 Days of Tags 2023" challenge.

I've used similar, but different stamps than those used by Karen, but overall if you don't look to closely it looks the same!

I swooshed a white tag through "Peacock Feathers" Distress ink, drying with a heat gun and then swooshing again to get a build up of colour. 

Once dry, I used Versafine Clair "Morning Mist" to stamp the music notes which is part of the Tim Holtz / Stampers Anonymous "Butterfly Menage" stamp set.

Using the same stamp set, I stamped the butterfly/moths down the middle of the tag, using Versafine Clair "Nocturne" black ink.  I used the same ink to stamp the "25th December" but I don't recall who made that stamp!

Next, I used "Blueprint Sketch" Distress Oxide Ink to go around the edges of the tag.

Finally, adding a drift of white dots, using a Signo Pen, before mounting on to dark blue card.

Tuesday 28 November 2023

Visible Image "Peace, Love & Hope" Christmas Gift Tag


Today, there isn't a Karen Telfer tag, every eight days there is a days break to allow people to catch up - today is that day.  Instead, I've made my own Christmas gift tag.

I've used the Visible Image "Strobe" stencil with a gold and beige colour that was left over on my blending brushes from an ealier project, so I decided to make the most of what was there, using darker ink in the middle, getting lighter towards the edges.

I used Versafine Clair "Chianti" dark red ink, with the Visible Image stamp set called "Peace, Love & Hope", for all the stamping, using first and second generation stamping for the trees and edging the tag in the same colour too.

I found some matching card and mounted the tag on to it, then used a gold gel pen to add a little subtle shimmer to areas of the tag.

Penny Black "Sparkles 40-625" Heart Christmas Card


Another Christmas card, this time using a selection of products from different manufacturers.

For the hanging heart,  I have used one of the Penny Black baubles from their "Sparkles 40-625" slapstick/cling stamp set, stamped and coloured in "Festive Berries" Distress Oxide Ink.  I gave it some brush strokes of "A Wink of Stella" to give it a lovely gold shimmer to the surface.

I used "Shadow Grey" Ranger Archival Ink through the Sweet Poppy Stencils "Holly Backplate". 

I mounted the card on to a piece of red card and then on to a white card blank, finally adding the  sentiment of "All I want for Christmas is you", which is part of a Simon Says Stamp set called "Tiny Words - Christmas", stamped in Versfine Clair "Morning Mist" grey ink.

Monday 27 November 2023

Lavinia Stamps "Lupin the silhouette Hare" Tag


I recently saw a post on Instagram where somebody used Q-tips to create a bokeh look and also used the Q-tips for stamping.  Sorry, I don't recall who inspired me, but thank you, I had to give it a go and this tag is the result of my effort.

I had a small piece of water colour card left over from a previous project, so decided to use that for the base.  I used a wash of water and "Faded Jeans" Distress Oxide Ink, applied with a wide paint brush in rough strokes horizontally.  I then ran the heat gun over the surface to dry it.

Using a wet Q-tip, I painted dots of water across the surface, rubbing the Q-tip in the middle of the dots to achieve a lighter look.  I then used a fan shaped paint brush to create smaller splatters of water, dabbing them off with a piece of kitchen roll.  These two techniques created the mottled background you see.

I used a fine tipped black pen to draw branches dangling down from the top right hand side of the tag.

I then dipped a Q-tip into "Festive Berries" Distress Oxide Ink and dobbed the Q-tip to create round berry shapes.  I extended the branches on to the berries to make them look more realistic.

At this stage, I really wasn't sure if I was just going to stamp a sentiment or create an actual image, I decided on the latter.

I used the Lavinia Stamps "Lupin the Silhouette Hare" stamp, stamped in two shades of Versafine Clair inks (Acorn and Pine Cone).

I used the Lavinia Stamps "Hill Mask" to create the landscape using Versafine Clair "Morning Mist" grey ink.

I added colour to the hare using Van Goch pastel pencils.  I then added highlights to the hare and the berries using a white gel pen.

Finally, I mounted the tag on to a piece of dark red card to match the shade of the berries.


Day 16 of Karen Telfer's "24 Days of Tags 2023" challenge


It's Day 16 of Karen Telfer's "24 Days of Tags 2023" challenge.  Today the tag has a theme of "Splashes of Colour".  For my tag I've used a stamp set and stencil from Funky Fossil Designs.

I started by stamping the paint brush and tube of paint, both are part of the Funky Fossil Designs stamp set called "Artsy" which I think may now be retired.  I used Versafine Clair "Morning Mist".


I coated the stamped image in "Pebeo" Drawing Gum / Masking Fluid and set aside for a few minutes to dry.

Once dry, I lay the Funky Fossil Designs "Splatters" over the tag and made various coloured splatters over the tag using Distress Oxide Inks.  The colours that I used are:

  • Salvaged Patina
  • Cracked Pistachio
  • Mermaid Lagoon 
  • Wilted Violet
I then went around the edge of the tag with "Blueprint Sketch" Distress Oxide Ink.

Once dry, I used the Frisk "Maskaway" eraser to rub off the masking fluid from the paint brush and tube image.

I used Derwent Inktense pencils to colour the paint brush and paint tube, also using a metalic silver gel pen in places too.

Next, using Versafine Clair "Nocturne" black ink, I stamped the sentiment on the paint tube.  The sentiment is also part of the Funky Fossil "Artsy" stamp set.  Finally, I mounted the tag on a piece of dark blue card.

Penny Black Stamps "Winter Wander 40-356" Card


Well it is grim outside.  I woke to hear the rain lashing down, so I've made a bright and cheerful card.

For the vibrant background colouring, I have blended a selection of Lavinia Element inks.  These are the inks that I used, in the order I used them in from the bottom of the card:  

  • Sundance
  • Sahara
  • Russet Orange
  • Confetti
  • Emperor Red
  • Merlot
  • Mulberry
  • Dark Denim
  • Graphite
I wafted the heat gun over the surface to ensure it was dry before the I used Versafine Clair 'Nocturne" black ink to stamp the Penny Black "Winter Wander 40-356" stamp, using my stamping platform, which allowed me to re-ink the stamp to get full black coverage of ink.

Finally, I mounted the image on to a piece of black card and then on to a bright yellow card blank.

Sunday 26 November 2023

Day 15 of Karen Telfer's "24 Days of Tags 2023" challenge


It's Day 15 of Karen Telfer's '24 Days of Tags 2023" challenge.  Today it's about heat embossing on black card.

For my tag, I have used a Christmas tree stamp from the Pink Ink Designs "Beary Christmas" stamp set.  The sentiment is from the Simon Says Stamp set called "Tiny words -  Christmas".  For  both stamps I used a Wow! clear ink pad to stamp the images and then coated with Wow! Rich Gold super fine embossing powder and heat set.

I coloured the baubles on the Christmas tree using red and orange glitter gel pens.

I used a metalic gold gel pen to add a wavy edge to the black tag and added gold snowflakes using the gel pen too.  I then mounted the tag on to a piece of red card.

Clarity Stamps "Star Flower Spray" Card


Another stamp and stencil card, this time using Clarity Stamp products. 

I have deliberately left this card sentiment free, as it's to go in my "just in case' cards stash.  You know how it is, sometimes you need a card and then you find you don't have anything suitable. I thought this could be used for birthday, anniversary or sympathy.  If needs be I can add a sentiment at a later date.

Back to the card itself, I masked off the edges of the card, to ensure I didn't get ink where it shouldn't be... from experience, I have learnt it is better to be safe than sorry!

I used two shades of Ranger Archival Ink through the Clarity "Peacock Pattern" stencil.  Starting with "Sky Blue" Archival Ink towards the base and right hand side, then "Shadow Grey" Archival Ink towards the top and the left hand side, fading out to nothing towards the top left.

Using Versafine Clair "Medieval Blue" ink, I stamped the Clarity "Star Flower Spray" stamp.  As there was more background colour at the base of the card, I decided to use the "leaf in-fill stamp" from the same set, to kind of ground the bunch of flowers.

Finally, I added three dots of white Ranger Enamel Accents.

Saturday 25 November 2023

Day 14 of Karen Telfer's "24 Days of Tags 2023" challenge


I'm an early bird getting my tag done and out of the way today.  This is my Day 14 tag of Karen Telfer's "24 Days of Tage 2023" challenge, with a theme of "vintage".

For the background, I used a page from an old second hand Welsh hymn book.

I used Versafine Clair "Acorn" brown ink to stamp the Stampscapes "Pines & Rocks 195G" image.  I used a pale blue Derwent Inktense pencil to add touches of colour, then I inked areas using "Coffee" Ranger Archival Ink.

I edged the tag with Versafine Clair "Pinecone" dark brown ink and then used a "Destress Tool" to roughen up the edges, before I glued the tag on to a piece of blue card.

Sweet Poppy Stencils "Small Bell" Christmas Card


More play with Sweet Poppy Stencils making this Christmas card.

I've used Versafine Clair "Chianti" dark red ink through the Sweet Poppy "Small Bell" stencil. 

I then masked off the edges of the card, using low tack tape.

Next I used "Shadow Grey" Ranger Archival ink through the Sweet Poppy "Holly Back Plate" stencil, lightly adding ink around the edge of the masking tape, to give a subtle line of colour.  I then removed the masking tape.

Finally, I used Versafine Clair "Chianti" dark red ink again to stamp the sentiment, which is part of Simon Says Stamp "Tiny Words - Christmas" stamp set.  Then added some touches of gold gel pen to areas of the holly to give a lovely shimmer.

Friday 24 November 2023

Day 13 of Karen Telfer's "24 Days of Tags 2023" challenge


This is my Day 13 tag make of Karen Telfer's "24 Days of Tags 2023" challenge.  It was a really quick make using strips of washi tape that had been lingering in my stash for years.

To add a little more interest, I used a Wow! Embossing Pad and Wow!  Bright White Embossing Powder to stamp and heat set the Simon Says Stamp sentiment, which is part of their "Tiny Words - Christmas" stamp set.


Thursday 23 November 2023

Sweet Poppy Stencils "Fir Trees" Christmas Card


Another Christmas card, this time using Sweet Poppy Stencils goodies.

For this card, I started by stamping the Sweet Poppy stencils large and small "Fir Trees" in Versafine Clair "Shady Lane" green ink using first and second generation stamping.

I used some remaining ink on a finger dabber with the Lavinia Stamps "Hill Mask" to create the landscape and ground the trees.

I then used "Shadow Grey" Ranger Archival Ink through the Sweet Popp7 "Holly Back Plate Stencil" fading the ink out towards the top and the left of the card.

I used Versafine Clair "Shady Lane" green ink to stamp the sentiment, which is also by Sweet Poppy and is part of their "Festive Phrases" stamp set.

I mounted the image on to red card ,then on to a white card blank.

Finally, I added dots of Liquid Pearls to the trees, to look like Chrismtas baubles.  The colours I used are: Ruby Red, Brilliant, Blackberry and Gold Pearl.

Day 12 of Karen Telfer's "24 Days of Tags 2023" challenge


This is my Day 12 tag of Karen Telfer's "24 Days of Tags 2023" challenge - the half way point.  As you may have notices, I am loving making these tags.

Water colour card was used for the base of this tag.  I used three shades of Distress Oxide Inks (Wilted Violet, Blueprint Sketch and Uncharted Mariner) on the Sweet Poppy "Large and Small Spruce" Stamp, then spritzed the stamp then stamped it on to the card.  I repeated the process three times for each tree, drying it with a heat gun each time.

Once dry, I went around the edge with "Shaded Lilac" Distress Oxide Ink, edging the tag in "Wilted Violet" Distress Oxide Ink.  I created the landscape/grounded the trees using the same ink.

I used "Prize Ribbon" Distress Oxide ink to add splatters to the surface of the tag.

Next I stamped the Simon Says Stamp sentiment, part of their "Tiny Words - Christmas" stamp set, using Versafine Clair "Nocturne" black ink.


Finally I coloured some card with "Wilted Violet" Distress Oxide Ink and used a punch to make a hole reinforcer and stuck it into position before mounting the tag on co-ordinating card.


Wednesday 22 November 2023

Day 11 of Karen Telfer's "24 Days of Tags 2023" Challenge


This is my take on Day 11 of "Karen Telfer's 24 Days of Tags 2023" challenge, making an alternative Christmas tag, for those in warmer climates across the world.

For my tag, I have used "Chrome Yellow" Ranger Archival Ink through the Visible Image Stamps "Strobes" stencil, fading the colour out towards teh right hand side of the tag.

Using Versafine Clair inks, I stamped the bunch of daisies, which is part of the Visible Image "Daisy Grunge Stamp Set".  I've used the following colours of Distress Oxide Inks, applied with a paint brush to colour the flowers:  Spiced Marmalade, Carved Pumpkin, Gathered Twig and Mowed Lawn.

I used Versafine Clair "Nocturne" black ink to stamp the sentiment and the star, both are part of the Visible Image stamp set called "Peace, Love and Hope".  Finally, I mounted the tag on to a piece of black card.

Wow! "Winter Wishes" Christmas Gift Tag


More stencil play from me, making this Christmas gift tag.

For the background design, I used 'Mowed Lawn" and "Rustic Wilderness" through the Tim Holtz / Stampers Anonymous "Gingham Layering Stencil.

Over the top of that I used "Lumberjack Plaid" Distress Oxide Ink through the Tim Holtz / Stampers Anonymous "Tiny Poinsettia" stencil.

The next layer was using "Blueprint Sketch" Distress Oxide Ink through the Tim Holtz / Stampers Anonymous "Sparkle Layering Stencil".

I used a fan shaped paint brush to splatter white paint, using Dr PH Martin's white bleed proof paint.

Once totally dry, I ran an anti-static chalk bag over the surface.  I used the Wow! clear embossing pad to stamp the Wow! "Winter Wishes & Snowflake Kisses" sentiment.  I then coated it with Wow! Bright White Embossing Powder and heat set.

I inked the edges of the tag using Versafine Clair "Rain Forest" dark green ink and then mounted the tag on to a piece of white card.

Tuesday 21 November 2023

Day 10 of Karen Telfer's "24 Days of Tags 2023" Challenge


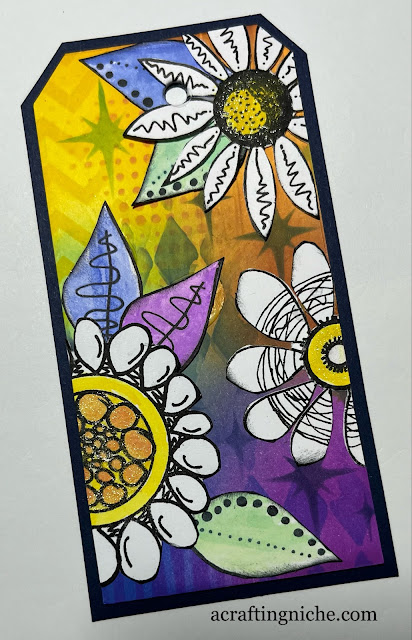
Here's the tag I made for Day 10 of Karen Telfer's "24 Days of Tags 2023" challenge.  It had a theme of "Bold & Bright" and I think I hit the brief!

Starting with a white tag, I used several colours of Distress Oxide Ink to cover the surface of the tag.  The shades I used were:  Mustard Seed, Spiced Marmalade, Cracked Pistachio, Blueprint Sketch and Wilted Violet.

I then used the same colours through a selection of Tim Holtz / Stampers Anonymous stencils.  The stencils I used are:  Chevron Shifter Layering Stencil, String Layering Stencil, THMM104 stencil, Dot Fade Layering Stencil and the Sparkle Layering Stencil.

Using Versafine Clair "Nocturne" black ink, I stamped flowers and leaves from Hobby Art Ltd "Abstract Flowers CS175D" stamp set on to white card.  

I coloured the middle of the flowers with two shades of Distress Oxide Inks:  Mustard Seed and Spiced Marmalade, giving the colour a coat of "A Wink of Stella" to add a lovely golden shimmer.  I then fussy cut the flowers and leaves and glued them into position on the tag.

Monday 20 November 2023

Monochrome Foil Tape "Stag" Christmas Card


I seem to be on a roll with my crafting today, here's a monochrome Christmas card using "Karen Warneka's / Oarsum Crafts" Tape a tag technique.

I used a Sizzix die from their thinlits set called "Woodland Deer".  I glued the die cut on to a piece of 4x4" mount board then covered it with sticky backed foil. 

I smoothed out the surface then used a paper stump to determine the edges of the stag. I then used a small ball ended metal tool to go round the outline of the stag and make the vertical lines in the background.

I used a wide tipped black Sharpie pen to cover the entire square.  Once covered, I buffed the surface with a piece of kitchen roll, till the silver stag was exposed but leaving a very textural background.

Next, I mounted the piece on to a square of black card and then used sticky tape to adhere it to a white card blank.

I used Versafine Clair "Nocturne" black ink to stamp the Simon Says Stamp Christmas greeting, which is part of their "Tiny Words - Christmas" stamp set.


Clarity Stamps "Star Flower Spray" Card


Now I'm up to date on the tags, it was time for me to make a Birthday card needed shortly, so I made this card using a selection of goodies from Clarity Stamps.  It was nice to work on a square format rather than tag shape!

I started by using the Clarity "Christmas Stars" stencil with "Chrome Yellow" Ranger Archival Ink, keeping to the right hand bottom side of the card.

Next I used the Clartiy "Stripes" stencil with "Shadow Grey" Ranger Archival Ink, again keeping to the right hand side of the card, fading to the left and to the top.

I moved on to the third stencil, using the Clarity "Three Blooms Stencil" with "Orange Blossom" Ranger Archival Ink.

I then stamped the Clarity "Barbara's A6 Star Flower Spray" using Versafine Clair "Nocturne" black ink.  I added colour to the stamped areas using Posca and gel pens.

Finally, I stamped the greeting using the Clarity "Birthday Occasions Sentiment" stamp set with Versafine Clair "Morning Mist" grey ink.  I then mounted the image on to grey card and then on to a 7x7" card blank.

Day 9 of "Karen Telfer's 24 Days of Tags 2023" challenge


This is my take on the Day 9 tag of Karen Telfer's "24 Days of Tags 2023" challenge.

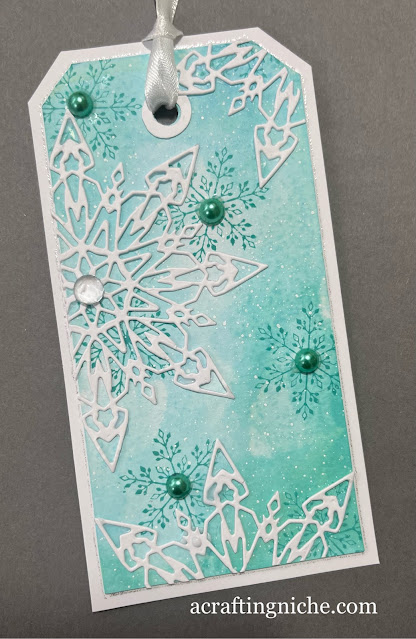
For the background colour, I have used two shades of Distress Oxide inks on a spritzed piece of card.  I used "Salvaged Patina" and "Peacock Feathers".

Once dry, I used the "Peacock Feathers" Distress Oxide Ink to stamp the Lavinia "Snowflakes (small) across the surface of the background.  I then gave the surface a very fine splattering of white paint, to break up the surface colour a little.

Using a 300 gsm white card and the Sizzix / Tim Holtz "Flurry #1 - 663105" die, I cut two large snowflakes.  I then cut them up into sections and glued into position so that the background design was still visible.

I mounted the tag on to a white piece of backtorund card, then cut a ring re-inforcer in white using a We R Memory Keepers punch and stuck into position.

I went around the edge of the coloured area with a silver gel pen to add a little subtle sparkle and then added clear and pearl gem stones to compliment the colours I had already used on the tag.

Day 8 of Karen Telfer's "24 Days of Tags 2023" Challenge


Yey, I'm up to date with my tags.  This is my Day 8 tag with a theme of "patterned papers and pockets".


I dug into my stash and found some Christmas patterned papers which I was able to die cut into smaller tags.  I decorated them with die cuts and gel pens.

For the main tag, I covered the whole tag in a plaid patterned paper and patterned matched the pocket on the front, adding a strip of patterned paper horizontally and adding a line of liquid pearls.  On the front of the pocket I added more die cuts and some holly leaves, finishing with red Liquid Pearls for the berries.

Day 7 of "Karen Telfer's 24 Days of Tags 2023" challenge.


I'm still playing catch up with my tags, but I am nearly back on track.  This is my Day 7 tag of "Karen Telfer's 24 Days of Tags 2023" challenge.

Using Kraft card for the base, I splattered Dr PH Martins white bleed proof paint from a fan shaped paint brush to replicate the snow.

Once dry, I stamped the bird which is part of the Tim Holtz / Stampers Anonymous stamp set called "Crazy Birds, using Versafine Clair "Nocturne" black ink. I then stamped the bird again on a piece of white card. I coloured the stamped image on the white card using Derwent Inktense pencils, applied with a paint brush. then fussy cut the body and stuck it over the image on the tag.

I used a Woodware stamp with Versafine Clair "Rain Forest" dark green ink to stamp the holly leaves.  Again, I used Derwent Inktense pencils to colour the leaves then fussy cut them, sticking them into position below the bird.

I used more Dr Ph Martin's white paint to add snow to the edges of the holly leaves, applied with a very fine paint brush.  I then added a little dusting of Pin Flair "Ice Diamond", (it's looks a bit like ice/snow).  I then added some sticky backed red gems for the berries.

I used a Simon Says Stamp for the sentiment, it's part of their "Tiny Words - Christmas" stamp set, stamped in Versafine Clair "Nocturne" black ink.

Finally, to add a little sparkle, I added tiny areas of Lavinia "Moon Dust" silver glitter.


Sunday 19 November 2023

Day 6 of Karen Telfer's "24 Days of Tags 2023" challenge.


I'm playing catch up again after being away for a few days.  This is my Day 6 tag for the Karen Telfer's "24 Days of Tags 2023" challenge with a brief of "gel plate" background.


Rather than just make one background, I made half a dozen as they're always handy to have in my stash for later use. Above are the six backgrounds I made.

I used Paperartsy chalk paints on my gel plate and a fern and an olive branch picked from the garden for the foliage pattern.  In the background I have used the Lavinia Stamps "Cryptic" stencil, then taken a press.

I used a Sweet Poppy Stencils sentiment from their "Festive Phrases" stamp set, stamped in Wow! Bright White embossing powder and heat set.

I mounted the tag on to a white background and then went around the edge of the tag and some foliage using a silver glitter gel pen.

Thursday 16 November 2023

Tim Holtz / Stampers Anonymous Stencil Play Tag


I really enjoyed playing with my Tim Holtz / Stampers Anonymous stencils yesterday, so I decided to have another play this morning, making this Christmas gift tag.

I started with a cream coloured tag as the base,  Using a blending brush I added random colour using "Orange Blossom" Archival Ink.  I then used the same ink through the Tim Holtz / Stampers Anonymous "Flourish Layering Stencil".

In the areas where there was less pattern, I use "Coffee" Archival Ink through the Tim Holtz / Stampers Anonymous "Chevron Shifter Layering Stencil".

I then moved on to the third stencil, using "Red Geranium" Archival Ink through the Tim Holtz / Stampers Anonymous "Tiny Poinsettia Stencil" leaving some of the flourish in sight.

In the middle of the tag, I used Versafine Clair "Chianti" dark red ink to stamp the seniment, which is part of the Tim Holtz / Stampers Anonymous cling stamp set called "Cozy Christmas CMS444".

I inked the edges of the tag using "Red Geranium" Archival Ink and then stuck the tag on to a deep red piece of card and cut to size.  Around the edge of the coloured area I used a gold sparkle pen -after all, it's always good to sparkle a little at Christmas!

Finally, I added gold gel pen dots to the middle of the flowers and added some dots across the surface of the tag too, before threading the tag with gold coloured ribbon.

Wednesday 15 November 2023

Day 5 of Karen Telfer's "24 Days of Tags 2023" challenge


This is the tag that I made for Day 5 of Karen Telfer's 24 Days of Tags 2023 challenge.  I didn't have a die or stamp remotely close to the ones that Karen used, so I went for a home tag instead.

I used a Funky Fossil Die set for the word "Home" and for the "House" shape.  I cut two houses, one in pink card, which I then mounted on to a piece of darker pink card for the swing tag. I then used the white one like a stencil with "Pink Peony" Ranger Archival Ink to create the background pattern.

I stuck the "Home" die cut on to the tag and then used a Papertrey Ink stamp set called "Love Lives Here" for the wording, stamped in Versafine Clair "Charming Pink" ink.  I used the same ink to edge the tag, before mounting it on to a piece of white card.  

Finally, I used pink and white "Bakers Twine" to tie the small tag to the main tag.


Tim Holtz / Stampers Anonymous Poinsettia Christmas Card


I was up early this morning, so decided to have a play with my Tim Holtz / Stampers Anonymous stencils, making this Christmas card. It reminds me very much of Kath Kidston prints, I guess it's the colour combo.

I started with a white card and the Tim Holtz Poinsettia Duo stencil, using "Festive Berries" Distress Oxide Ink through the stencil.

Next, I used "Lost Shadow" Distress Oxide Ink through the Tim Holtz "Dot Fade Layering Stencil" only using it around the large flower.

I then moved on to adding some green using "Rustic Wilderness" Distress Oxide Ink through the Tim Holtz "Chevron Shifter Layering Stencil", I only used this around the large flower.

I used "Festive Berries" Distress Oxide Ink very lightly through the Tim Holtz "Tiny Poinsettia" stencil fading the colour out towards the edge of the card.

I edged the card, using "Mowed Lawn" Distress Oxide Ink, applied with a blending brush.

I used a Tim Holtz / Stampers Anonymous cling stamp from the "Mini Holidays CMS142" set with "Festive Berries" Distress Oxide Ink to stamp the Christmas sentiment.

Finally, I splattered white acrylic paint from a fan shaped paint brush lightly over the surface of the card so simulate snowfall, then mounted the finished image on to a white card blank.

I added yellow dots of Posca Pen to the middle of some of the flowers and then splattered white acrylic paint over the surface of the card.

Tuesday 14 November 2023

Day 4 of Karen Telfer's "24 Days of Tags 2023" challenge.


This is the tag that I have made for Day 4 of the  Karen Telfer's 24 Days of Tags 2023" challenge.

This tag is in two layers.  The lower layer has a bokeh style design using "Spun Sugar" and "Shaded Lilac" Distress Oxide Ink applied using a foam blender. I used Versafine Clair "Purple Delight" to stamp the sentiment which is part of a Personal Impressions stamp set.

For the top, I have used a Wow! embossing ink to stamp the Paperartsy/Jofy Christmas image from their JOFY107 stamp set.  The image was then coated with Wow Bright White embossing powder and then heat set.

I mounted the coloured bokeh design on to a pink background and then lay the vellum over the top, punching a hole through the layers.

Finally, embellishing with co-ordinating sequins and dots of "White Opal" Liquid Pearls.


Monday 13 November 2023

Sweet Poppy Stencils "Spruce" Christmas Tree Card


I've had a play with the new "Spruce" trees from Sweet Poppy Stencils, making this card.

I started by using one of the Lavinia Stamps "Hill Masks" to create the definition between the sky and the snow.  For they sky, I used two shades of Ranger Archival Inks:  Manganese Blue and Cobalt.  I used the same hill mask to create the snowscape using "Bluebird" Archival Ink.

I stamped the large and small Sweet Poppy "Spruce Trees" using Versafine Clair "Twilight" dark blue ink.  I used Dr P H Martin's Bleed Proof White paint to add paint the snow on the trees.  I used a pastel pencil to ground the tree in the foreground.

Finally, I stamped the sentiment, which is also by Sweet Poppy and is part of their "Festive Phrases" stamp set, stamped in Versafine Clair "Twilight" dark blue ink.

Day 3 Tag of Karen Telfer's "24 Days of Tag Challenge 2024"


This is my Day 3 tag of Karen Telfer's "24 Days of Tags 2023" challenge.  I'm happy to say I am up to date... for now!

I really enjoyd making this tag, in fact I may well make more to go on Christmas gifts in different colour way stencils by Funky Fossil Designs for the background, using "Snow Crystal" and "Snow is falling" with "Blueprint Sketch" Distress Oxide Ink.

Over the top I stamped two different snowflake stamp sets by Lavinia Stamps using Versafine Clair "Twilight" dark blue ink.  I used the same ink to stamp the Simon Says Stamp sentiment, part of their "Tiny Words - Christmas" stamp set.

Day 2 Tag of Karen Telfer's "24 Days of Tags Challenge 2023"


This is the tag that I've made for Day 2 of the Karen Telfer's "24 Days of Tags Challenge 2023".

I've used the Funky Fossil Designs stencil called 'Holly Wreath New" with "Mowed Lawn" Distress Oxide Ink.

I used a Woodware stamp called "Yew & Holly JGS458" stamped in Versafine Clair "Shady Lane" green ink on the tag but also several times on a piece of white card.  I then coloured the holly leaves with various shades of green Distress Oxide Inks (Crushed Olive, Mowed Lawn, Rustic Wilderness and Pine Needles).  I then fussy cut the holly stamped and coloured on the spare piece of card.

Using three off cuts of card, I cut three shapes of houses and stuck them in to position.  I then glued the fussy cut holly leaves in to position.  Finally, I added dots of Ranger "Ruby Red" Liquid Pearls.

Day 1 Tag of Karen Telfer's "24 Days of Tags Challenge" 2023


In previous years, I have taken part in Karen Telfer's "24 Days of Tags Challenge".  Last Saturday, the challenge started for 2023, but I was away visiting family, so I am playing catch up already.

This is the first tag I've made.  I've not really done much different on it from the original that Karen made.  The major difference is that I decided not to use any green on my tag.

I've used the Sweet Poppy Stencil "Small Winter Cottage" stamped in Versafine Clair "Acorn" brown ink.

I've used Wow! Bright White embossing powder for some of the snowflakes and heat set.

To colour around the cottage, I have used Distress Oxide Inks, using "Tea Dye" around the cottage, then "Picked Raspberry" then "Festive Berries".  I edged the tag in Versafine Clair "Acorn" brown ink.

I used the Lavinia Stamps "Sacred Script" stamp with Versafine Clair "Charming Pink" ink, stamped in second generation stamping.

I used the same ink for stamping some of the Lavinia Stamps "Snowflakes" too, also using "Acorn" ink in second generation stamping.

Wednesday 8 November 2023

Sweet Poppy Stencils "Poppies Leaf Aperture" Card


I've continued my play session, making this card using a couple of Sweet Poppy Stencils.

I started with "Sky Blue" Ranger Archival Ink, through the Sweet Poppy "Leaf Stencil".  Using a blending brush, I added more colour to the edges, leaving the central area almost bare of ink.

Next, I used the Sweet Poppy "Poppy SP!-135" stencil with two shades of Ranger Archival Ink:  "Peat Moss" for the leaves and the stems and "Poppy" for the poppies.

I added a few touches of black Posca Pen to the central area of the poppies.  I also used a 2B pencil to add shading to the base of the poppies, adding touches of white gel pen where the light would catch the edges of the poppies.

Finally, using Versafine Clair "Nocturne" black ink, I stamped the "Sending Hugs" sentiment which is part of the Sweet Poppy "Octopus" stamp set.

Sweet Poppy Stencils / Stampscapes Oak Branch Card


This morning I have had a play with my little used "Stampscape" stamps, paired with a couple of Sweet Poppy products to make this card.

I started with the Stampscapes "Oak Branch" red rubber stamp, stamping it in Versafine Clair "Shady Lane" green ink.

I then used "Sky Blue" Ranger Archival Ink, through the Sweet Poppy Stencil called "Floral Trellis Backplate".

I stamped the sentiment, which is part of the Sweet Poppy "Hugs & Kisses" stamp set, in Versafine Clair "Shady Lane" and "Acorn" ink.  I then Inked the edges of the card in "Shady Lane" too.

I added colour to the tree using Derwent Inktense pencils, colouring the trunk and also adding a lighter shade of green to areas of the tree canopy.

Finally, I mounted the card on to a piece of green card and then on to a white card blank.

Tuesday 7 November 2023

Visible Image "Let It Snow" Christmas Card


Today, I've been playing with my Visible Image stamps, which have not been used for some time, so it was good to get them out.

I started by masking off the edges of a plain white 6x6 card using low tack masking tape.

I used two shades of Distress Oxide Inks to create the coloured background, using "Broken China" in the middle and "Blueprint Sketch" around the edges.

I then lay the Visible Image "Frosty" stencil over the top.  Using a blending brush, I used "Blueprint Sketch" Distress Oxide Ink again to geet the patterned background.

I dusted the surface with an anti-static chalk bag.  Using a Wow! embossing ink pad, I stamped the large snowflake, which is part of the Visible Image "Let it snow" stamp set.  I then coated the stamped image with Wow! Bright White embossing powder and heat set.

I removed the masking tape from the edge and then stamped the sentiment, which is also part of the same "let it snow" stamp set.  Finally, I added a few dots of white gel pen to the background to replicate further snow.

Monday 6 November 2023

Lavinia Stamps "Starr" and the foxes Birthday Card


Willow, our Grand-daughter will be ten next week, so I needed to make a birthday card for her.  I was up early as Hubby was driving our friends to Manchester airport, so it meant was I was able to craft without interuption.


I started by stamping the main features on to a white piece of card.  I stamped the Lavinia Stamps "Moon" in Versafine Clair "Morning Mist" grey ink.

I stamped the Lavinia fairy called "Starr", the "Tree Branch" the "Wands & Spells" set of books and the "Mini Chinese Lanterns" in Versafine Clair "Twilight" dark blue ink.

I then stamped the two Lavinia foxes called "Ash" and "Rufus" in Versafine Clair "Acorn" brown ink.


I used Pebeo Drawing Gum / Masking Fluid with a paint brush to cover the moon, the fairy hat and wings, the books and the Chinese Lanterns.  I used just a thin layer and set aside for a few minutes to dry.

Using a blending brush and the torn edge of a piece of copy paper, I coloured in the sky, using "Blueprint Sketch" Distress Oxide Ink.  Around the edges of the sky I used a darker shade "Chipped Sapphire" distress Oxide Ink.  I blended over the top of the areas where I had used the masking fluid.

I used the Lavinia Stamps "Hill Mask" to create the snowy landscape using two shades of Distress Oxide Inks:  Tumbled Glass and Lost Shadow.  I then used Van Goch Pastel Pencils to add extra depth of colour and grounding to the foxes and the books.

I used the Fisk "Maskaway" eraser to remove the masking fluid.

I used a paint brush to colour in the moon using "Lost Shadow" Distress Oxide Inks.

I used the Lavinia "Small Branch" stamp with first and second generation stamping using Versafine Clair "Acorn" brown ink. I added red dots of Posa Pen to the end of some of the branches to replicate berries.

I stamped the Lavinia "Pixie Houses" using Versafine Clair "Morning Mist" grey ink, adding dots of yellow Posca Pens to the windows.

Using Versafine Clair "Morning Mist" grey ink I stamped little branches popping out of the snow using the Lavinia Stamps "Foliage Set".

To colour the foxes, I used a white gel pen and orange Derwent Inktense pencils to add dimension and detail to the animals.

I coloured the books with various shades of Derwent Inktense Pencils, applied with a paint brush.

I used several shades of gel pens, glitter pens, Posca Pens and "A Wink of Stella" to colour the fairy "Starr".

Finally, I added two outlines to the branches.  First with a blue glitter gel pen and then with a white Posca Pen. I then mounted the card on to a piece of dark blue card and then added it to an 8x8 inch card blank.

Sweet Poppy Stencils "Snowberries" Card


Here's a simple Christmas card made using a couple of Sweet Poppy stamps and a stencil.

I stamped the Sweet Poppy Stencils "Snowberries" stamp, part of their "Botanicals" collection in Versafine Clair "Shady Lane" green ink.  I then coloured the image using Derwent Inktense pencils, using the colours:  Spring Green, Apple Green, Light Olive, Lanium Green and Storm Dust.  I added extra shading using a 2B pencil too.

I then used "Shadow Grey" Ranger Archival ink through the Sweet Poppy "Plaid Back Plate" stencil. Shading the colour out towards the left and the top of the card.

Finally, I added a stamped greeting, using one of the "Festive Phrases" sentiment, stamped in Versafine Clair "Nocturne" black ink. I then added Ranger "Glossy Accents" to the berries and set aside to dry.


Sunday 5 November 2023

Lavinia Stamps "Floral Wreath" Birthday Card


I made this Birthday card this morning, using an off-cut of a Brusho paint background I'd had hanging around for a while, so I have no idea what colours I have used to create the coloured background.

Using Versafine Clair "Medieval Blue" ink, I stamped the Lavinia "Floral Wreath" and the "Waffle Flower" sentiment.  I then inked the edges of the card, before mounting the card on to a piece of blue card and then a white card blank.

To colour the wreath buds, I used a Derwent Inktense pencil, called "Mineral Blue" applying the colour with a paint brush.  Once dry, I used "A Wink of Stella" to provide a lovely subtle gold shimmer over the wreath.

Thursday 2 November 2023

Lavinia Stamps "Luna Lights" Panel Card


Here's another card, where I have masked off an area to ink and stamp within.

For this card, I used four shades of Distress Inks:  Spun Sugar, Tea Dye, Pumice Stone and Hickory Smoke, all blended with a brush between two lines of masking tape.

I stamped the Lavinia Stamps "Luna Lights" in Versafine Clair "Morning Mist" grey ink.  I then went over areas with a gold gel pen and then a gold shimmer gel pen.  Sadly it doesn't show up too much in the photograph.

Finally, I used a greeting from the "Heartfelt Verst" stamp set, also stamped in Versafine Clair "Morning Mist" grey ink.

Lavinia Stamps "Red Pines" panel card


A quick Christmas card from me today.  I masked off an area on a piece of white card.  Within the masked area I blended three shades of Ranger Archival Inks:  Shadow Grey, Paradise Teal and Watering Can.

I then stamped the Lavinia Stamps large and small "Red Pine Trees" in Versafine Clair "Nocturne" and "Morning Mist" inks. I then splattered white paint from a fan shaped paint brush to replicate snow. Then removed the masking tape from the card.

I stamped the sentiment, which is part of the new Lavinia Stamps "Christmas Greetings" stamp set, stamped in Versafine Clair "Morning Mist" grey ink.

Wednesday 1 November 2023

Lavinia Stamps "Wild Pine" Forest Scene Card


I'm back to playing with my Lavinia Stamps, mixing a couple of the new with several of the existing stamp collection.

I started with a 7x7 card and used a selection of Element Inks to create the background.  By the time I was happy with the inked background, I decided it was too large for what I wanted, so cut it down to  five and a half inch square.

I started by multi stamping the trees on the left hand side of the card, using the "Tree Den" and the "Tree Stem" with Versafine Clair "Pine Cone" dark brown ink.

I then stamped the "Wild Pine" tree in Versafine Clair "Nocturne" black ink.

Using Versafine Clair "Shady Lane" green ink, I stamped the new "Leaf Bouquet" on the bottom right hand side of the card.

Next I stamped the Lavinia "Wild Hares" in Versafine Clair "Nocturne" black ink.

I used the Lavinia "Hill Mask" with Versafine Clair "Shady Lane" green ink to create the landscape.

Next, I stamped the "Small Pixie Houses" using Versafine Clair "Morning MIst" grey ink.

I stamped the Lavinia "Small Branch" in Versafine Clair "Pine Cone" to replicate branches from the tree trunks.

Next I stamped the Lavinia "Vine" in Versafine Clair "Nocturne" black ink using first and second generation stamping.

Finally, I coloured in areas using Derwent Inktense pencils, gel pens and Posca pens.

Clarity Stamps "Fly Away" card


This was a little "just because" card I made, because I was in the mood to play with stamps and stencils this morning.

I used the Clarity Stamps "A5 Birds Decorative Panel" stencil, using the "stripes" section with "Sky Blue" Ranger Archival Ink and the scrolls using "Garden Patina" Archival Ink.

Over the top, I used Versafine Clair "Medieval Blue" ink to stamp the images, which are all part of the Clarity Stamps "A6 Fly Away" stamp set.