52 Week Mini Art Card/Tag Challenge

Showing posts with label Distress Inks. Show all posts

Sunday, 12 May 2024

52 Week Mini Art Card / Tag Challenge 2024 - Week 20


This is a weekly challenge. I provide you with a prompt/theme each Sunday morning through out the year.  The challenge is very relaxed.  You can do as much or as little as you like.  You can create cards, tags, Artist Trading Cards (ATC's) or index cards, the choice is yours. You just go with what ever is in your head at the time.  You can stamp, get inky, use patterned papers, texture, embellish it is all down to you.

There is a dedicated private Facebook Group, with a lovely bunch of people who are already sharing their makes from previous challenges.  You can find the group by clicking this link.  I'd love you to join in.

***

It is Week 20 of "The Crafting Niche 52 Week Mini Art Card / Tag Challenge 2024".  The prompt for Week 20 is "Follow the sketch".  Here is the sketch in question.


For my tag, I've used a selection of Stampin' Up stamps to make this lighthouse tag.

I started with a white tag, using the Stamping Up "Hardwood" stamp which is a lovely woodgrain look, stamped in "Speckled Egg" Distress Ink. I then used "Iced Spruce" Distress ink dragged down the surface of the tag.  I used the same ink to ink the edges of the tag too.

Next, I used Versafine Clair "Morning Mist", grey ink with the Stampin' Up script stamp from their "HighTide" stamp set, stamping several times in second and third generation stamping on the top right hand corner, so that the text eventyually faded out.

Using the Stampin' Up "High tide" stamp set, I stamped the rocks at the base of the tag, using two shades of Versafine Clair Inks (Shady Lane - a green ink and Acorn - a brown ink).  I stamped the sea using Versafine Clair "Warm Breeze" then went over the surface with a pale blue pastel pencil, giving it a rub with my finger in various places to help it blend in more. I then stamped the lighthouse, using Versafine Clair "Twilight" dark blue ink.

At the top of the tag on the right hand side, I stamped the long striiped penant,which is part of the Stampin' Up stamp set called "Perfect Penants". I then mounted the card on to a piece of dark blue card and trimmed to the tag shape.

Using a sentiment from the Stampin Up "High Tide" stamp set and Versafine Clair "Twilight" dark blue ink, I stamped the sentiment and then die cut it using the Sizzix / Stampin Up "Banners Framelits Die set".  I added foam pads to the back of the die cut and stuck it into position.


Sunday, 14 January 2024

52 Week Mini Art Card / Tag Challenge 2024 - Week 3


The challenge for 2024 is weekly.  I will provide you with a prompt/theme each Sunday morning through out the year.  The challenge is very relaxed.  You can do as much or as little as you like.  You can create cards, tags, Artist Trading Cards (ATC's) or index cards, the choice is yours. You just go with what ever is in your head at the time.  You can stamp, get inky, use patterned papers, texture, embellish it is all down to you.

There is a dedicated private Facebook Group, with a lovely bunch of people who are already sharing their makes from previous challenges.  You can find the group by clicking this link.  I'd love you to join in.

The Crafting Niche 52 Week Mini Art Card/Tag Challenge 2024:

The prompt for Week 3 is "Blocks of Colour"

*****

I've opted for what should be a relatively straight forward tag to make, so if anybody is a little behind, it should be a quick make, also it allows for a little scrap busting, using up some of those small pieces of paper and card that we don't like to throw away.  Here's how I made my tag.

Starting with a plain white tag base, I lay the Clairty stencil called "Framework Circle Stencil" over the top of the tag.  Using a blending brush, I applied "Lost shadow" Distress Ink through the stencil and removed the stencil.

I then raided my drawer of paper and card scraps, opting for plain colours that I felt worked well together, cutting them into strips and rectangles then sticking them in to position.

I then used a sentiment from a Lawn Fawn stamp set called "Simply Sentiments", stamping the word "Hello" in Versafine "Monarch" purple ink.  I used the same coloured ink to  edge the tag, then mounted the tag on to a piece of dark blue coloured card.


Thursday, 2 November 2023

Lavinia Stamps "Luna Lights" Panel Card


Here's another card, where I have masked off an area to ink and stamp within.

For this card, I used four shades of Distress Inks:  Spun Sugar, Tea Dye, Pumice Stone and Hickory Smoke, all blended with a brush between two lines of masking tape.

I stamped the Lavinia Stamps "Luna Lights" in Versafine Clair "Morning Mist" grey ink.  I then went over areas with a gold gel pen and then a gold shimmer gel pen.  Sadly it doesn't show up too much in the photograph.

Finally, I used a greeting from the "Heartfelt Verst" stamp set, also stamped in Versafine Clair "Morning Mist" grey ink.

Saturday, 28 October 2023

Lavinia Stamps "Winter Whispers" Eve Card


Another card using some of the new Lavinia Stamps.

I made a circlur gel plate background using Distress Inks, I used Squeezed Lemonade, Picked Raspberry, Blueprint Sketch and another, but I don't recall the colour.

Once the background was dry, I stamped the Lavinia Stamps new "Eve" fairy in Versafine Clair "Monarch" purple ink.

I then used a couple of the new Lavinia "Small Pine Trees" stamp set, stamping them in first and second generation stamping using Versafine Clair "Morning Mist" grey ink.

Masking off the bottom area, I added some white ink, I used Hero Arts "Hero Hues in Unicorn" applied with a finger dabber to give the impression of a light snowfall on the ground.

I coloured the fairy using gel pens and Derwent Inktense Pencils.  I added white to the trees using a gel pen too.  

I lightly masked the fairy and then splattered white paint to replicate snowfall.

Finally, in the bottom left hand corner, I stamped "Just for you" which is part of the Lavinia "Heartfelt Verse" sentiment stamp set.

Friday, 27 October 2023

Lavinia Stamps "Winter Whispers" Eve Card


Today, I was fortunate to be passing reasonably closely to the Lavinia Stamps shop, so asked Hubby to make a detour via Ruthin, so that I could purchase the new "Winter Whispers" stamp release.


I've not been to the shop since it's opening day, four years ago, which I attended as part of the Lavinia Stamps Design Team, so it was nice to get back there and see all their lovely goodies.  I was greeted by the super helpful Jack on the counter and then had a jangle with Sarah Anderson and Jo Rice, who were both on the Design Team at the same time as myself.


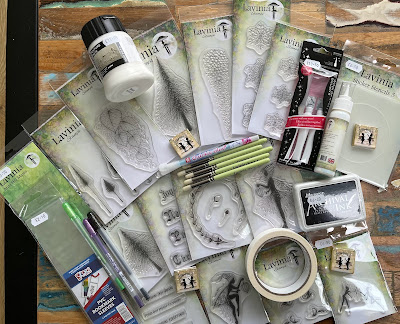
I knew I was purchasing the new "Winter Whispers" stamp bundle, but there were some other bits and bobs that I needed too.  You can see my goodies in the photo above - it was quite a haul!

Obviously, as soon as I got home, I catalogued and repackaged the stamps how I like them and then got busy making a card!

I started by using Distress Oxide Inks:  Mustard Seed, Dried Marigold, Shabby Shutters and Faded Jeans. 

I used two Lavinia Stamps stencils:  Filigree and Flower Mask".

I used two of the brand new Lavinia Stamps, using the new fairy called "Eve" stamped in Verafine Clair "Nocturne" black ink and the new "Forest Leaf" stamped in Versafine Clair "Shady Lane green ink.

I used Wow! Embossing pad and Rich Gold Embossing Powder with the Lavinia "Mystic Swirls" stamp and the "Star Cluster" stamp.


I coloured the card using Derwent Inktense pencils, Posca Pens and gel pens, also adding more sparkle and shimmer using "A Wink of Stella" too.

Tuesday, 17 October 2023

Visible Image "Creative Chaos" Card - Inspired by Eileen Godwin On-line Workshop


I couldnt sleep so decided to get up and craft.  I watched another of Eileen Godwin's on-line workshops and decided to try it myself.  This is my take on Project 4 of Workshop 15. 

As before, I won't go into the process of making this card as it is from one of Eileen's paid workshops.  However, I will detail the products that I have used for this card (I didn't have everything that Eileen used, so have improvised).

Visible Image "Atomic Flower" Stencil

Visible Image "Set the tone" stamp set

Visible Image "Grunge Flourish" stamp

Visible Image "Creative Chaos" stamp set

Visible Image "Distressed Christmas" stamp set

Lavinia Stamps "Filigree" stencil

Lavinia Stamps "Wreath Flourish - left" stamp

Wow! Embossing Powders and inks

Versafine Clair Inks

Distress Inks

Derwent Inktense Pencils

Gel Pens

Tuesday, 3 October 2023

Tim Holtz Idea-ology "Paper Dolls Christmas 2023" Tag


Yesterday, I placed an order with Country View Crafts, I was amazed when it arrived this morning.  You can't get better service than that!  Here's a photo of my goodies.  I got a couple of stencils and a pack of Idea-ology Paper Dolls.  Because the order was a little over £20 I also got free postage!


I obviously couldn't wait to have a play so made this tag.  Starting with a manilla coloured tag, I swooshed it through "Tea Dye" Distress Ink spritzed with water.

I used the Tim Holtz / Stampers Anonymous "Chevron Layering Stencil - THS127" with two shades of Ranger Archival Ink, using "Peat Moss" and "Vermillion" shades.

I then lay the Tim Holtz / Stampers Anonymous "Rosette" stencil - THS092" over the top and used "Red Geranium" Ranger Archival Ink through the stencil.

Over some of the plainer areas, I used a stamp with a crazing design, from the Tim Holtz / Stampers Anonymous cling stamp set called "Mini Holidays - CMS142", which I stamped in Versafine Clair "Acorn" Brown ink.

I inked the edges of the tag using "Acorn" and "Chianti" Versafine Clair inks.  I then used some metallic gold paint to splatter gold speckles across the surface of the tag.

I picked out a couple of designs from the Tim Holtz Idea-ology "Layers & Paper Dolls, Christmas 2023" set and coloured the figure using Derwent Inktense pencils, adding colour to the cheeks, lips hair and buttons.  I then stuck the figure in to position and layered the flower on top.

Finally, I chose a phrase from the Tim Holtz Idea-ology "Clipping Stickers" saying "Diary of Events" and stuck that down.  Then mounted the tag on to some green card.


Saturday, 2 September 2023

Clarity Stamps "Art Nouveau Snowdrops" stencilled card


Yesterday, I received my order from Clarity Stamps, so of course I had to have a play making this card.

In my stash, I found a background I had made some months back using a selection of Distress Inks, mainly in pinks, blues and purples.  I decided today was the day I would use it!

I lay the Clarity Stamps "A5 Art Nouveau Snowdrops Stencil" over the background and used  four shades of Distress Oxide Inks through the stencil, using Spun Sugar, Peacock Feathers and Wilted Violet.

I then inked the edges of the card using Versafine Clair "Monarch" purple ink.  While the ink was out, I stamped the "Just to say" sentiment , which is part of the Clarity "A4 Bijou Art Nouveau Stamp Collection" on to a piece of white card, cut it to size and inked the edges of that too, before sticking it into position.

Finally, I used some pastel pencils, mainly in a pink and a yellow to add extra colour to the snowdrops and the area around them.


Sunday, 6 August 2023

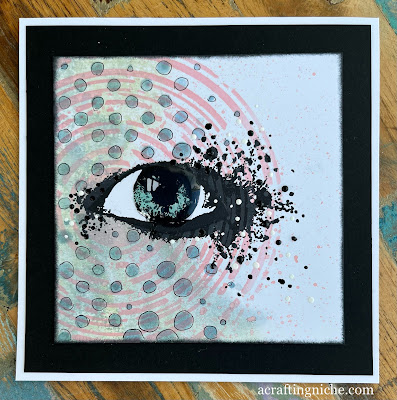
Visible Image "Where Dreams Tag You" Card


After the clean lines of the previous cards, this one is a bit more busy.

I started by using two shades of Distress Ink, using "Old Paper" and "Weathered Wood", slightly spritzed on my craft mat and then dragging the card through the ink on the left hand side only.

Once dry, I used the Visible Image "Supernova Stencil" with "Saltwater Taffy" Distress Ink, to create the circular shape.

I then used Versafine Clair "Nocturne" black ink to stamp the eye, which is part of the Visible Image "Where Dreams Take You" stamp set.

Next, I added the dots, using the Visible Image "Two Tone Stencil" with "Sky Blue" Archival Ink.  I then went around each circle with a black fine line pen to accentuate them more.

Returning to the eye area, I added colour to the eye itself by using "Salvaged Patina" Distress Oxide Ink, then coating it with Ranger "Glossy Accents".  

Finally, I added black and white dots around the eye area using Ranger "Enamel Accents", then set to one side till the Glossy Accents had set, which actually took about three hours!

Tuesday, 25 July 2023

Visible Image Stamps "Life Is Beautiful" card


Having had a few days away, I'm back in my "happy place" crafting again.  The sun is shining and all is good in the world!

This card features a Visible Image stamp set and several of their stencils and a whole host of different inks! 


I started with a white piece of card and "Milled Lavender" Distress Ink.  I put some ink on my glass mat, then lightly spritzed it and then swooshed the white card through the ink.  I then used my heat gun to dry the surface before repeating the process with four more Distress Inks:  Victorian Veleve, Tea Dye, Weathered Wood and Old Paper.

Next I used "Peat Moss" Ranger Archival Ink through the Visible Image "Seeing Stars" stencil, uising the chequerboard section of the stencil.

I then used "Garden Patina" Ranger Archival Ink through the Visible Image "Strobes" stencil on the left hand side of the card.

After that, I used "Shadow Grey" Ranger Archival Ink through the Visible Image "Strobes" stencil on the top right hand side of the card.

I then used "Cornflower Blue" Ranger Archival Ink through the Visible Image "Breakout" stencil" at the base of the card.

Moving on to the stamping, I used Versafine Clair "Twilight" dark blue ink to stamp the bird and words, all part of the Visible Image "Life Is Beautiful" stamp set.

Placing a mask over the bird, I stamped the circles, also part of the Visible Image "Life Is Beautiful" stamp set using Versafine Clair "Morning Mist" grey ink.

I used Van Goch pastel pencils to add depth of colour in areas.

Placing the mask back over the bird and strips of paper over the words, I used Dr PH Martin's "Bleed Proof White Paint" with a fan shaped brush to create splatters across the surface.

Removing the masks, I edged the card in Versafine Clair "Twilight" ink using a finger dabber.

I then used white and black Ranger "Enamel Accents" for extra dots.

Finally, mounting the piece on to navy blue card and then on to a white card blank.

Saturday, 1 July 2023

Visible Image "Wings of Change" Card


I was awake early this morning, so decided to have a play with my Visible Image Stamps.  I don't use them often enough!

I started by masking of the edges of a piece of white card.  In the un-masked area I used two shades of Distress Ink:  Wild Honey and Abandoned Coral.  I used a heat gun to dry the area then added splatters of more "Abandoned Coral" ink. I then removed the masking tape.

I used dots from the Visible Image "De-strerssed" stamp set with "Abandoned Coral" Distress Ink diagonally across the coloured background.

Using Versafine Clair "Nocturne" black ink, I stamped the "Grunge Flourish" and then stamped the wording, which is part of the "Wings of Change" stamp set.  I also added some extra rings using the Visible Image "Shape It Up" stamp set.

On a piece of white card, I stamped three butterflies, also part of the "Wings of Change" stamp set, using two shades of Versafine Clair inks (Summertime and Charming Pink) over the top of each other to create the shade I wanted.  I then fussy cut the butterflies and stuck them on to the card.

Finally, I added black and white Ranger "Enamel Accents" to add a little dimension.


Wednesday, 29 June 2022

Lavinia Stamps "Feather" and gilding flake card


I've been playing with a Lavinia Stamp this morning, stamping the "Feather" in Versafine Clair "Twilight" dark blue ink over a Distress ink and stencilled background (using the Lavinia "Posy stencil".

I have added gilding flakes to area of the card to provide additional dimension.

I have used a Simon Says Stamp from thier "Tiny Words - Birthday" for the sentiment.

Tuesday, 28 June 2022

Funky Fossil "Abstractions" Thank you Card


I've been playing with a Funky Fossil Designs stamp set called "Abstractions" to create this card.  I've stamped in two shades of Versafine Clair inks:  Charming Pink and Nocturne on a background where I have mopped up Distress Oxide Inks from my glass mat. I've used black and white Posca pens for highlights.

I've used a Funky Fossil Designs "thank you" die, cutting white card for the central sentiment.

Monday, 27 June 2022

Lavinia Stamps "Seeing is believing" cards


About a month ago, a lady commented on one of my Lavinia Stamps makes.  In her comment, she mentioned that she was new to stamping and had purchased a couple of Lavinia Stamps, a Versafine Clair ink pad and some Distress Inks, but hadn't been brave enough to try them out.

I sent the lady a private message and discussed the issue, suggesting that she tells me which stamps she has and which colours of Distress Inks.  I then made very brief videos, just a minute long for each technique, to make the cards shown above using one of the stamps (Seeing is Believing) that she had.

I have to say I felt rewarded when in a few days time, she shared with me her first make.  I hope I have inspired her to try out more techniques.  At the end of the day, it's only time, paper and ink lost if it all goes wrong.

Tuesday, 17 May 2022

Sweet Poppy Stencils "Phoenix" SP1-136 Card


For the background of this card I have used a background made from mopping up Distress Inks from previous projects.  A real mish-mash of colours that I felt would likely only work with something black on it.

I decided to use the Sweet Poppy Stencil "Phoenix" (SP1-136) stencil with Versafine Clair 'Nocturne" black ink through the stencil, applied with a blending brush.  

I used the same ink to stamp the Lavinia Stamps "Dream" sentiment, which is part of the "Inspire Me" stamp set.  Finally adding a few splatters of black and white Posca Pen paint.

Friday, 22 April 2022

Sweet Poppy "Oriental Cherry Blossom SP1-330" on Brusho Card


I fell in love with a Sweet Poppy Stencil called "Oriental Cherry Blossom" so had to order it!.  I came back from a few days away in the caravan and my order had been delivered, so as soon as the unpacking was done and the washing machine was on, I wasted no time in having a play. 

I used a small Brusho paint background I had in my stash.  Round the edges of the paint splatters I used another Sweet Poppy stencil called "Plaid Back Plate SP6-122" with two shades of Distress Inks:  Squeezed Lemonade and Ripe Persimmon" this filled in the white areas.

I then lay the Sweet Poppu "Oriental Cherry Blossom" stencil down over the background and using a metal spreader with the Sweet Poppu "Glossy Red Stencil Paste" filled in the areas of the stencil. I then set it aside for an hour or two.

Once dry, I noticed that some of the paste had oozed under the stencil.  I used a white gel pen to fill in the excess red areas.  I used a white and a black Posca Pen to add splatters.

Finally, I used a Lawn Fawn "Hello" sentiment from their "Simply Sentiments" stamp set, stamped in Verafine Clair "Nocturne" black ink.


Wednesday, 30 March 2022

Lavinia Stamps "Seeing is believing" Fairy Card


Here's a card I made using the new Lavinia Stamps "Woodland Fern" Stamp Set and the "Seeing is believing" fairy.  Extra "Dandelions and I have also used the "See a fairy make a wish" verse stamp.

Stamping in black using Versafine Clair "Nocturne".  The other is "Peacock Feather" Distress Ink.

Saturday, 26 March 2022

Funky Fossil Designs "Prehistoric" Grunge Card


The past few weeks I've been in Lavinia and Penny Black mode.  This afternoon, I felt an urge to play with my Funky Fossil Designs goodies, creating this card. 

In my stash of previously made backgrounds, I found a page from an accountancy book which I had used to mop up Distress Oxide Inks from my glass mat, so I decided to use this for the base. All stamping is in various shades of Versafine Clair Inks.

For the central image, I used the Funky Fossil "Prehistoric" stamp set.  

Around the edge of the central image I used a Funky Fossil stencil called "Abstract Pattern" with a brown Distress Ink.

I then used two of the Funky Fossil A7 stamps in the corners "Grungy" and "Inky Grid".

Finally, using a white Derwent Inktense pencil, I lightened the central stamped image.  I used white and red Posca Pens to add splatters across the surface too.

Lavinia Stamps "Hare Set"


I loathe to throw out small pieces of card, so this morning, I set myself a challenge of using a piece of white card measuring 8.5cm. The central image measures 5.5cm.

I used the following Lavinia Stamps:

  • Wild Hare Set
  • Foliage Set
  • Small Branch
  • Heartfelt Verse

I stamped in Versafine Clair Inks on a background using Distress Inks.


Wednesday, 23 March 2022

Penny Black "Farm Fresh 40-834" Sentiment Card


I really enjoyed creating the earlier card, so while the stamps and inks were still on my work desk, I decided to create another card with the same set, but this time with a central sentiment. 

This time, I have just used the flowers from the largest of the three stamps within the Penny Black "Farm Fresh 40-834" cling stamp set.  Stamping them in "Spun Sugar" Distress Ink.

In the middle I stamped the sentiment, which is part of the Penny Black "Not Older, Better 30-896" clear stamp set.  I stamped in Versafine Clair "Purple Delight" Ink and then stamped some more flowers around the edge of the card in the same ink.

I used "Picked Raspberry" Distress Oxide Ink and a paint brush to add a touch of extra colour to the darker flowers.  Using a yellow Posca Pen for the central area of each flower head.