52 Week Mini Art Card/Tag Challenge

Showing posts with label Visible Image Where Dreams Take You. Show all posts

Sunday, 6 August 2023

Visible Image "Where Dreams Tag You" Card


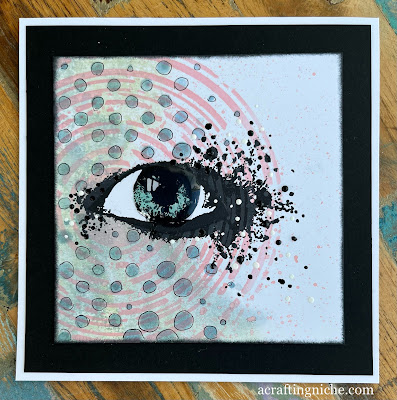
After the clean lines of the previous cards, this one is a bit more busy.

I started by using two shades of Distress Ink, using "Old Paper" and "Weathered Wood", slightly spritzed on my craft mat and then dragging the card through the ink on the left hand side only.

Once dry, I used the Visible Image "Supernova Stencil" with "Saltwater Taffy" Distress Ink, to create the circular shape.

I then used Versafine Clair "Nocturne" black ink to stamp the eye, which is part of the Visible Image "Where Dreams Take You" stamp set.

Next, I added the dots, using the Visible Image "Two Tone Stencil" with "Sky Blue" Archival Ink.  I then went around each circle with a black fine line pen to accentuate them more.

Returning to the eye area, I added colour to the eye itself by using "Salvaged Patina" Distress Oxide Ink, then coating it with Ranger "Glossy Accents".  

Finally, I added black and white dots around the eye area using Ranger "Enamel Accents", then set to one side till the Glossy Accents had set, which actually took about three hours!
Tuesday, 4 July 2023

Visible Image Stamps "Where dreams take you" card


Another early morning crafting session from me, today I've been using Visible Image stamps. 

I had a rummage through my backgrounds file and found a Brusho background where I had a dark blue/purple with runs of colour towards the bottom.  I thought this would be ideal for what I had in mind.

I stamped the Visible Image "Fibonacci" (grid with curl) using Versafine Clair "Twilight" dark blue ink.

Using Versafine Clair "Nocturne" black ink, I stamped the Visible Image eye, which is part of their "Where dreams take you" stamp set.  I then stamped the word "Vision" which is from the same stamp set.

I used the same ink to stamp the detail on the left hand side of the card, which are from two Visible Image stamp sets, ""Random art of kindness" and "Rays of light".

I used Van Goch Pastel Pencils to add colour to the eye area.  Added extra black and white dots using Ranger "Enamel Accents" and used a white gel pen to add a little white to the eye, to give the impression of light hitting it.

Friday, 21 February 2020

Design Team sample for 'My Time To Craft Challenge Blog" #416 - Rubber stamp (not digital)


It is time for another challenge theme on the "My Time To Craft Challenge Blog".  Challenge #416 has a theme of "Rubber - not digi stamps".  If you have a minute to spare, please do pop over to the blog and take a look at the fab makes by my Design Team colleagues.

For this sample, I have used a selection of stamps from Visible Image.  I really enjoy working with these stamps as they allow your mind to go in odd directions, which in turn ends up on a card like this one.

I started with a gelli plate background I had created a while back, so I don't recall the colours I have used, but it was originally a mustard/gold colour with water splashes over it.


The first stamping I did was the book, part of a Visible Image set called "Free your imagination", (which is one of their February 2020 releases), stamped in Versafine Clair "Fallen Leaves" dark brown ink.  

I stamped the book again on a post it note, cut around the book and used it as a mask over the original stamped image.
Using Versafine Clair "Chianti", a dark red ink, I stamped the spiral, from the Visible Image "Ahead of our time" stamp set" (the mask over the book protects the area from getting the spiral image muddled up with the book image.  I then removed the mask.

I stamped the crow on the left, also part of the Visible Image "Free your imagination" set in Versafine Clair "Nocturne" black ink.  I stamped the crows in flight on the right hand side, which are part of the Visible Image "Ahead of our time" stamp set, in the same ink.

I then stamped the large sentiment on the bottom right in
Versafine "Vintage Sepia" brown ink.  The sentiment is from another Visible Image set called "Where dreams take you".  Using the same ink, I stamped the word "Hope" at the top left of the card, using a stamp from the Visible Image set called "Peace, Love and Hope".


I needed to pull the eye in to the main images, so using a finger dabber and Versafine Clair "Chianti and Nocturne" I added darker shades from the edge inwards.

I used a white Posca pen, making lots of small dots to lighten the pages of the book and a Sakura gel pen for the page edges.  I used a metallic gold pen for areas of the spiral too.

Thursday, 2 January 2020

Visible Image - Play Guitar Card


While sorting my file with previously created backgrounds, I came across a small off cut of a multi coloured Distress Ink background, so decided to use it now rather than keeping it in the file and then eventually getting rid of it.


The size was a little restrictive (2.5" x 5.5"), so I decided to use a Distress Oxide Ink called "Blueprint Sketch" through the Visible Image "Play Guitar" stencil.

I used another striped stencil by Clarity Stamps to create the striped effect using the Distress Oxide Ink "Peacock Feathers", the colour matched one of the background colours really well, so seemed to tie everything in.

Finally, using Versafine Clair "Nocturne" black ink, I stamped the "Go where your dreams take you" sentiment which is part of a Visible Image stamp set called "Where Dreams Take You".

I then mounted the coloured piece on to black, which makes the colours pop and then added it to a card blank.


Friday, 10 May 2019

Visbile Image "Face It" Tag (Funky Fossil Circle and Stripes Stencil)


I decided to play with my Prima "Watercolor Confections" paints by making a background for this tag.  The colours are quite bold as I've used the "Tropical" set.

The base colour of the tag is a cream/manilla shade, so I decided to leave a section of it plain and then painted the orange and the purple area.  

I used a Distress Ink in the shade of "Peacock Feathers" through a Funky Fossil stencil called "Circles and Stripes".

Using the Visible Image "Face It" stamp set, I stamped the eyes, and nose in Versafine Clair "Nocturne" shade of ink.  I stamped the lips in two Versafine Clair shades of ink.  "Tulip Red" and "Glamorous".

On plain white card, I stamped the lips in the same shade, cutting them out and sticking on top of the already stamped lips (so that the stencil wasn't showing through).  I stamped the eyes, and painted them with Distress Ink in the shade of "Peacock Feathers", then cut the eyes out and stuck them on to the tag.  I then coated the eyes with "Glossy Accents" to make them appear glassy.

Finally, I went around the edge of the tag using a stamp from another Visible Image set called "Where Dreams Take You".  I then mounted the tag onto black card.