52 Week Mini Art Card/Tag Challenge

Showing posts with label Archival Inks. Show all posts

Sunday, 10 December 2023

Daisy B "Dapper Gent" Birthday Card


Here's a card I made for a male friend.  I'm not happy with it for a couple of reasons, but maybe that is me being a bit picky - One of them being the sentiment isn't quite central, no idea how I managed that!  I doubt very much that he will notice.  My Hubby didn't when I showed him.

For the male image, I used a stamp by Daisy B called "Dapper Gent" stamped in Versafine Clair "Morning Mist" grey ink then coated with Wow! clear embossing powder and heat set. I then stamped the image again on a piece of paper, fussy cut it and used it as a mask for the stamped area, while I worked on the background.

With the mask in position I used "Chrome Yellow"  Archival Ink through the Visible Image "Strobes" stencil.

I then used "Shadow Grey" Archival Ink through the Visible Image "Halftone" stencil.

Next I used "Orange Blossom" Archival Ink throguh the Tim Holtz / Stampers Anonymous "Chevron Shifter Layering Stencil - THS127".

Then I used "Cobalt" dark blue Archival Ink with the Tim Holtz / Stampers Anonymous "Grime - THS130" stencil, edging the card with the same colour.

Removing the mask, I coloured in the stamped area of the male, using a paint brush to apply "Tattered Rose" Distress Oxide Ink for the skin and "Faded Jeans" Dsitress Oxide Ink for the clothing.

I used a silver glitter gel pen to go over the outline of the male and also added some dots of sparkle to the background too.  I then mounted the card on to a 7x7" card blank

I used Versafine Clair "Twilight" dark blue ink to stamp the sentiment, which is part of the Daisy B stamp set called "Men Sentiments".


Monday, 20 November 2023

Clarity Stamps "Star Flower Spray" Card


Now I'm up to date on the tags, it was time for me to make a Birthday card needed shortly, so I made this card using a selection of goodies from Clarity Stamps.  It was nice to work on a square format rather than tag shape!

I started by using the Clarity "Christmas Stars" stencil with "Chrome Yellow" Ranger Archival Ink, keeping to the right hand bottom side of the card.

Next I used the Clartiy "Stripes" stencil with "Shadow Grey" Ranger Archival Ink, again keeping to the right hand side of the card, fading to the left and to the top.

I moved on to the third stencil, using the Clarity "Three Blooms Stencil" with "Orange Blossom" Ranger Archival Ink.

I then stamped the Clarity "Barbara's A6 Star Flower Spray" using Versafine Clair "Nocturne" black ink.  I added colour to the stamped areas using Posca and gel pens.

Finally, I stamped the greeting using the Clarity "Birthday Occasions Sentiment" stamp set with Versafine Clair "Morning Mist" grey ink.  I then mounted the image on to grey card and then on to a 7x7" card blank.

Saturday, 21 October 2023

A tag inspired by an Eileen Godwin workshop


I have been itching to get back to my craft desk and get inky, so I made this tag.  It is inspired by two projects on an Eileen Godwin workshop.

As it was a paid workshop, I won't go in to detail of how I made it, but I have listed the products I used:

Distress Oxide Ink:  Mustard Seed, Faded Jeans, Rusty Hinge, Spiced Marmalade & Frayed Burlap.

Archival Inks:  Jet. Black & Red Geranium

Visible Image Stencils:  Strobes & Butterfly Ink

Hobby Art Ltd Stamp:  CS160D Janie's Oliver Owl

Woodware Stamp:  Teasels JGS329

Visible Image Stamp:  Distressed Christmas

Wow Embossing Powder:  Opaque Bright White Super Fine

Tuesday, 26 September 2023

Tim Holtz / Stampers Anonymous Layering Stencil Tag


An early morning craft session today as for some reason I couldn't stop my mind from racing away with thoughts, but it resulted in this tag, where I threw lots at it and I'm quite happy with the way it turned out.

I started with a white piece of card cut into a tag shape.  I lay the Stampers Anonymous/Tim Holtz "Bouquet Layering Stencil (THS143) over the top of the tag and then applied "Sky Blue" Ranger Archival Ink through the stencil.

I removed the stencil and replaced it with another, this time using the Stampers Anonymous/Tim Holtz "Stripes Layering Stencil" (THS004) with two shades of Ranger Archival Ink "Watering Can" and "Cobalt".

After lifting the stencil, I then drew some wonky vertical lines on the tag using a blue Posca Pen.

I then lay the "Bouquet Layering Stencil" over the top of the tag again and applied some Ranger "Matte Texture Paste", mainly on the right hand side of the tag, using a heat gun to dry it (remember to pop the stencil into a bowl of water immeditately after use, so that the product can be cleaned off easily).

I used Ranger Dylusions "Bubblegum Pink" spray ink to spritz the dry texture paste surface and again used the heat gun to dry.  I then sanded the raised areas lightly to expose the shape of the texture paste flowers.

I splattered the surface of the tag using Dr PH Martin's White bleed proof paint.

Next I die cut a flower from the Sizzix/Tim Holtz thinlits set called "Wild Flower Stems #1 (664163)" and stuck the flower on to the tag using a wet glue.  I coated the die cut flower with "A Wink of Stella" which gives it a lovely subtle gold shimmer.

Finally, I mounted the tag on to a piece of white card and added a word sticker from the Tim Holtz Idea-ology "Small Talk" word set. 

Tuesday, 5 September 2023

Sweet Poppy Stencils "Pumpkin & Pumpkin Vine" card


Well, I must be getting close to perfecting colouring pumpkins, I think this is card number four in a row!  I really like how this one has turned out though.

For this card, I have used two of the recently released stamps from Sweet Poppy Stencils.  I've used the "Pumpkin" and the "Pumpkin Vine" stamps, stamped in Versafine Clair "Acorn" brown ink and "Shady Lane" green ink. I coloured the stamped images with Derwent Inktense pencils, applied with a paint brush.

In the background, I have used "Shadow Grey" Ranger Archival Ink through the Sweet Poppy "Plaid Backplate Stencil" fading the ink out towards the top of the card.


Saturday, 2 September 2023

Sweet Poppy Stencils "Honeysuckle Flourish" card


Sweet Poppy Stencils have released some fabulous new stamps and stencils in the past few days.  It would have been rude of me not to show interest in them and buy a couple - wouldn't it?

My stencil order arrived today, so I wasted no time in making a card using one of the new stencils.

Starting with a piece of white card, I lay the new Sweet Poppy "Honeysuckle Flourish" stencil over the top and secured with low tack tape. Through the stencil, I used Antique Linen, Saltwater Taffy and Picked Raspberry Distress Oxide Inks for the flowers and "Iced Spruce" Distress Oxide for the stems and foliage.

Removing the stencil, I replaced it with the Sweet Poppy "Floral Trellis Stencil", applying "Shadow Grey" Archival Ink through the stencil with a blending brush.

Once the stencil was lifted, I added touches of Van Goch Pastel Pencils to the flowers to add a little depth of colour, then went over the flowers with "A Wink of Stella" which provides a lovely subtle gold shimmer.

Using Versafine Clair "Morning Mist" grey ink, I stamped the two sentiments, both are part of the Sweet Poppy "Hugs & Kisses" stamp set. Finally, mounting the card on to dark grey card and then on to a card blank (the finished card is slightly smaller than A5, so quite large).

Thursday, 31 August 2023

Clarity Stamps "Leafy Swirl" Stencilled Birthday Card


For some reason I couldn't sleep, so was up 4am and decided to craft. I've used four Clarity stencils and two of their stamp sets for this card.

I started by masking of the vertical and horizontal edges of the right hand side of the card using a low tack masking tape.  I used "Sunflower" Archival ink through three of the rectangles in the Clarity "Abstract Squares" stencil.

I then used "Tea Rose" Archival Ink through the striped section of the Clarity "Birds Decorative Panel" stencil in two different directions over the yellow rectangles.

Next I used "Shadow Grey" Archival Ink through the Clarity "Zig Zag" stencil fading the colour out towards the left hand side of the card.

I used two shades of Ranger Archival Inks (Cornflower first and then Vivid Chartreuse) through the Clarity "Abstract Droplets" stencil, again fading the colour out towards the left hand side of the card.

I stamped the Clarity "Leafy Swirl" and the "Entwined Sentiment" using Versafine Clair "Twilight" dark blue ink.

Finally, adding a few finishing touches, by using a gold shimmer gel pen to go around the edges of the droplets and adding some white "Enamel Accents" to break up the colour a little.


Thursday, 6 July 2023

Clarity Stamps "Seedheads & Foliage" Thank You Card


As soon as I saw the Clarity Stamps 4x4" Seedheads & Foliage stencil set on the Clarity web site, I knew I had to get it ordered.  My order arrived this afternoon, so I obviously had to have a play session!

I decided to use the leaf stencil, positioned in the middle of a small piece of white card, measuring approximately three and a half inches square.

I used three shades of green Archival Inks through the stencil, starting with the lightest shade which was "Prickly Pear".  Then on to "Leaf Green" and finally "Fern Green" around the outer edge of the leaf.

I removed the leaf stencil and then positioned the square aperture stencil that also came in the "Seedheads & Foliage" stencil set and drew around the inner edge of the square with a fine tip black pen to create a frame.  I then added three dots to each edge of the inner square.

I mounted the white card on to a piece of Kraft card, then on to a white card blank.

Using Versafine Clair "Shady Lane" a mid green coloured ink, I stamped the sentiment which is also by Clarity and is part of their "A6 Thank You Occasions Sentiment Stamp Set".  Finally, I added three dots of Ranger "Glossy Accents" to the leaf to replicate rain drops.

Friday, 30 June 2023

Clarity Stamps "Deco Stencil" Birthday Card


A quick male birthday card from me today, using Clarity Stamp products. 

I masked off a piece of white card and then lay the Clarity Stamps "Deco" stencil over the top.  I masked off most of the stencil, so that only one line of the design was showing in the middle of the card.  I then used Versafine Clair "Medieval Blue" ink through the stencil.

I removed the deco stencil and then lay the Clarity "Stripes" stencil over the top.  I used a blending brush with "Shadow Grey" Archival Ink through the stencil.  Then removed the masking tape.

Using Versafine Clair "Medieval Blue" ink, I stamped the greeting, using Clairty "Happy Birthday Occasion Sentiment" stamp set.

Finally, at the tip of each of the deco areas I added a dot of white gel pen.  Then I added larger white dots using Ranger "Enamel Accents".

Thursday, 29 June 2023

Lavinia Stamps "Large Heart" Anniversary Card


Here's an anniversary card I've made using goodie by Lavinia Stamps. 

I started with a piece of white card measuring four and a half inches square, laying the Lavinia "Replenish" stencil over the top and applying "Pink Peony" and "Violet" Ranger Archival Ink through the stencil.  Around the edge of the card I used a blending brush with "Dusty Concorde" Distress Oxide Ink.

In the middle of the card, I stamped the Lavinia "Large Heart" in Versafine Clair "Morning Mist" grey ink.  I then stamped the heart again on a piece of white card, then coated the stamped image in Wow! Clear Embossing Powder and heat set.

I coloured the heart on the white piece of card using "Fuchsia" Derwent Inktense pencil, applied with a paint brush.  Once dry, I cut out the heart close to the stamped edge.  I then inked the cut edge of the heart using Versafine Clair " Morning Mist" grey ink then put the heart to one side.

Returning to the piece of card with the stencilled background and the stamped heart in the middle, I then used the Lavinia "Texture 4" stamp with Versafine Clair "Morning Mist" grey ink to stamp the stone detail , ensuring it extended past the edge of the heart stamp. I then painted the stone texture pattern, using "Weathered Wood" Distress Oxide ink.

I added wet glue to the back of the heart and stuck it into postion over the stamped heart in the middle of the card.  I then used the "With Love" sentiment from the Lavinia "Heartfelt Verse" sentiment set, stamped in the bottom right hand corner.  Finally, I added some touches of silver glitter pen to areas of the card and some dots of Ranger White "Enamel Accents".


Wednesday, 28 June 2023

Honey Doo Crafts "Delicious Dahlia" Birthday Card


Another card ticked off my "to make list", this time using a stamp by Honey Doo Crafts.

For the main floral image, I used Versafine Clair "Purple Delight" ink to stamp the "Delicious Dahlia" stamp by Honey Doo Crafts.  Once stamped, I quickly coated the stamped area with Wow! clear embossing powder and then heat set.

I used two shades of Ranger Archival Inks:  Pink Peony and Shadow Grey through the Lavinia Stamps "Dynamic Stencil" to create the background pattern, fading the colour out towards the edges.

I coloured the dahlia blooms using an "Amethyst" Derwent Inktense pencil applied with a pencil.  I then added some splatters of the same colour, across the surface of the card.

Once dry, I used Versafine Clair "Purple Delight" ink to stamp the "Happy Birthday" sentiment and the small outline hearts using a stamp set by Lawn Fawn called "Simply Sentiments".

I then started to add the finishing touches.  I used a yellow and orange Posca Pen for the central areas of the flowers and added dots of Range White Enamel Accents to areas around the stamped flowers.

Stencilled "New Home" Card


Do you find that some months are busier than others when it comes to things to celebrate.  July is one of those months and on top of the usual birthdays and anniversaries there are a couple of new home cards needed too. 

Today, I decided to be disciplined and at least tick one of the cards off the list of pending makes. For this card, I have used products from several copanies.

I started by using two shades of Archival Inks (Pink Peony and Violet) through the Lavinia Stamps "Replenish Stencil" on the outer edges of a white card blank.

I then cut a piece of white card 4" square and used low tack masking tape to mask off the edges.I used the same shades of Archival  Inks through the same stencil in the central area of the card. Then removed the masking tape.

Next I die cut the little house shape.  The die is part of the Papertrey Ink stamp an die set called "Love Lives Here".  I cut two houses, sandwiching them together with glue.  I then coated the top one with Versafine Clair "Purple Delight" ink.  I then stuck the house into the central stencilled area of the card.

I used Versafine Clair "Purple Delight" to stamp the sentiment, which is part of the Funky Fossil Designs stamp set called "Home".

I then assembled the card, mounting the inner area on a co-ordinating piece of card before sticking it on to the stencilled card front.


Tuesday, 20 June 2023

Clarity Stamps "Queen Anne's Lace Striped" card


I couldn't resist a little ebay purchase of a pair of Clarity stencils.  They arrived today, so of course I had to have a little play.  I've used one of the new ones (to me) on this card. 

I used two shades of Archival Inks:  Sunflower and Orange Blossom, through an area of the Clarity 7x7 "Queen Anne's Lace" stencil.

Over the top of that, I lay the Clarity "Stripes" stencil, applying "Monarch Orange" Archival Ink through the stencil making the bottom darker and the top lighter.

Using Versafine Clair "Morning Mist" grey ink, I stamped the greeting which is part of the Clarity "Entwined Sentiment" stamp set.  

I stamped the sentiment again on a post it note, fussy cut it and popped it over the sentiment on the card.  I then used a fan shaped paint brush to add fine splatters of Dr PH Martin's Bleed Proof white paint.  I then removed the mask and mounted the card onto a grey mat and then a white card blank.

Monday, 19 June 2023

Honey Doo Crafts "Lilies" Get Well Soon Card


I've been sorting through some of my stamps, with a view to selling some of the ones I rarely use these days and came across one stamp set that I felt the urge to use, so made this card. 

I started with the base using three shades of Archival Inks (Chrome Yellow, Sunflower and Orange Blossom), through the "Abstract Flowers Stencil" by Funky Fossil Designs.

Using Versafine Clair "Nocturne" black ink I stamped the Lily (part of the Lilies stamp set) by Honey Doo Crafts.  While the ink was out, I also stamped the "Get Well Soon" greeting which is part of the "Stripped Back Sentiments" stamp set by Funky Fossil Designs.

I used two shades of Derwent Inktense pencils, applied with a brush to colour the liy.  I then used a gold shimmer gel pen over the surface for extra interest.

Finally, I added three dots of black Ranger "Enamel Accents" for added dimension.

Thursday, 15 June 2023

Clarity Stamps "Vases" Thank You Card


I've made another card today, using a selection of Clarity Stamp products. 

I started by masking off the vase and laying the Clarity "Leonie Pujal Circle Edge Stencil" with "Sky Blue" Archival Ink, blending the colour outwards.

I then lifted the stencil and mask and replaced with the Clarity "Vases Stencil", using "Tea Rose" and "Shadow Grey" Archival Inks through the stencil.

I then stamped the Clarity "Dandelions" in first and second generation stamping using "Versafine Clair "Morning Mist" grey ink.  I used the same ink to stamp the sentiment, which is part of the Clarity "Occasion Sentiment Thank You" stamp set.

Finally, I used a Unibal Signo Gold Metallic pan to colour the dandelions.

Tuesday, 30 May 2023

Clarity "Abstract Droplet Stencil" Congratulations Card


I recently joined the Clarity Stamps "Stencil Club".  I received my first stencil and welcome pack today, so of course I had to have a quick play.

The stencil is called "Abstract Droplets" by Clarity Stamps.  I used five colours of Archival Inks through the stencil to create the background (Cactus Flower, Violet, Leaf Green, Forget-me-not and Vivid Chartreuse).

For the greeting, I used a stamp from the Clarity "Entwined Sentiments" set, stamped in Versafine Clair "Purple Delight" ink. 

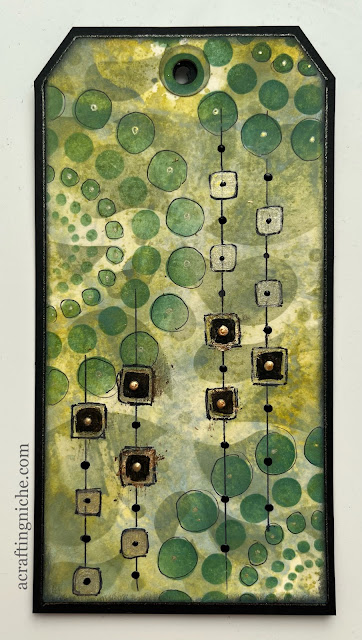
An "Abstract" tag using Clarity Stencils


I've been away again, home just in time to do one of Eileen Godwin's challenges of create something "Abstract". 

I raided my backgrounds file and found a tag I'd made a while back using "Bundled Sage" and "Peeled Paint" Distress Oxide Inks on a cream coloured tag.

I used "Peat Moss' Archival Ink through the Clarity "Abstract Droplet" stencil.

Next I used "Library Green" Archival Ink through the Clarity "Circle Dots" stencil.

Using a fine tip black pen, I drew some vertical lines, then drew some boxes on them, adding dots inbetween the boxes.  Some of the boxes I coloured with a gold shimmer gel pen, the others I filled using a black Posca Pen, edging some with a metallic gold pen.

I inked the edges of the tag using Versafine Clair "Nocturne" black ink before mounting it on to black card.  

Finally, I added dots of black Ranger "Enamel Accents" and gold coloured Liquid Pearls.

Wednesday, 17 May 2023

Lavinia Stamps "Feather" on a Brusho and stencilled background


After making relatively clean cards in the past day, this evening I have gone all out to fill all the white space.  It's one extreme to another!

I started with a Brusho background I had made a while back.  I rubbed an anti-static bag over the surface of the card then stamped the Lavinia Stamps "Feather" and a sentiment from the "Heartfelt Verse" stamp set in Versafine Clair Medieval Blue.  I immediately coated stamped images in Wow! Clear Embossing Powder and heat set using a heat gun.

I used "Bright Tangelo" Archival Ink through areas of the Lavinia "Elegance" Stencil. I then used "Cobalt" Archival Ink through the Lavinia Stamps "Waffle" stencil, trying not to overlap the stamped images, so each were allowed to breathe and highlight the design of each stencil.

Finally, I inked the edges of the card using Versafine Clair "Medieval Blue" ink, then mounted it on to a dark blue card before placing on a card blank.

Tuesday, 16 May 2023

Lavinia Stamps "Fern Heads - Diolch" card


Today, Tuesday 16th May, Eileen Godwin set a challenge to make a "Thank you" card.  I've opted for the word "Diolch" which is the Welsh word for "Thanks". 

I started by using shades of Archival Inks through the Lavinia Stamps "Words 1 Stencil" to create the floral background I used Leaf Green, Pink Peony, Violet and Cornflower Blue inks.  I used the latter to blend the edges of the card.

Using Versafine Clair "Nocturne" black ink, I stamped the Lavinia "Fearn Heads" and the words "Diolch" which is part of the Lavinia "Welsh Words" stamp set.

Using Versafine Clair "Morning Mist" grey ink, I stamped the Lavinia "Texture 1" at the base of the card.  Finally adding some white dots of Ranger "Enamel Accents".

Friday, 12 May 2023

Lavinia Stamps "Tree of Dreams"


As I had the Lavinia Stamps "Tree of Dreams" stamp out, I decided to make another card using it. 

Using Versafine Clair "Nocturne" black ink, I stamped the Lavinia Stamps "Tree of Dreams" in the middle of the white card.  I then stamped "Pipin" and one of the hares from the "Wild Hare" stamp set.

Using a black fine line pen, I extended the roots of the tree and drew a landscake.

I then used Archival Inks through the Lavinia "Elegance" stencil fading the pattern out towards the edges

I coloured the tree and the landscape using Derwent Inktense pencils.

I then used two shades of Versafine Clair Inks:  Purple Delight and Monarch with a blending brush to blend the edges of the cards fading towards the middle of the card.  I then edged the card in Versafine Clair "Nocturne" black ink.

I used Versafine Clair 'Purple Delight" ink to stamp the "Sacred Spells" verse around the edge of the tree.

Using Versafine Clair "Nocturne" and "Morning Mist" I stamped the "Fairy Hives" hanging from the tree, adding dots of yellow Posca Pen to the windows.

I used an orange glitter and white gel pen to colour the climbers and to highlight the roots.  I then used the orange glitter pen to add dots around the tree, to give the impression of leaves.

Using Gold Stickles, applied with my finger tip, I added sparkle to the tree canopy.  In real life it looks really pretty, sadly the sparkle isn't picked up in this photograph.