52 Week Mini Art Card/Tag Challenge

Showing posts with label Dylusion Spray Ink. Show all posts

Wednesday, 15 May 2024

Tiffany Johnson Creative #100daysartplay Challenge - Day 88


Today is Day 88 of the Tiffany Johnson Creative #100daysartplay challenge.  This week I'm using "inks".

For the base of this tag, I used four shades of Dylusion Spray Inks, using Lemon Soft, Fresh Linen, Bubblegum Pink and London Blue colours.

I then used two "Oakhouse Studio" stamps, I've had these for years and I believe the company is now closed, but the stamps continue to be pulled out of my stash every so often. I used Versafine Clair "Monarch" purple ink to stamp the flowers.

I used a white pastel pencil to colour the petails and a white gel pen to go around the edges and also to draw white lines between the flowers.

Finally, I added tiny dots of orange and yellow Posca Pens to the middle of the flowers.

Sunday, 28 April 2024

52 Week Mini Art Card / Tag Challenge - Week 18


This is a weekly challenge. I provide you with a prompt/theme each Sunday morning through out the year.  The challenge is very relaxed.  You can do as much or as little as you like.  You can create cards, tags, Artist Trading Cards (ATC's) or index cards, the choice is yours. You just go with what ever is in your head at the time.  You can stamp, get inky, use patterned papers, texture, embellish it is all down to you.

There is a dedicated private Facebook Group, with a lovely bunch of people who are already sharing their makes from previous challenges.  You can find the group by clicking this link.  I'd love you to join in.

The Crafting Niche 52 Week Mini Art Card/Tag Challenge 2024:

The prompt for Week 18 is "Weather"

*****

This is the tag that I have made for the Week 18.

I've used three colours of Dylusion spray inks for the background colour, using Lemon Zest, Fresh Lime and Bubble Gum.

I've used Distress Glaze over "Crushed Grape" Dylusion ink through the Tim Holtz "Rays - THS003" stencil.

On the computer, I printed "Here Comes The Sun" in red, cutting it down and sticking into position on to the rays.

I then used four shades of Posca pens, using red, orange, yellow and white colours to draw on dots of colour on the lighter rays.

I then added gold dots using a metalic gold gel pen.  

I inked the edges of the tag using "Tulip Red" Versafine Clair Ink.

I mounted the tag on to a piece of black card and then drew around the tag using a metalic gold pen.

Friday, 8 March 2024

Tiffany Johnson Creative #100daysartplay Challenge - Day 20


Today is Day 20 of the Tiffany Johnson Creative #100daysartplay Challenge.  This week is all about using the palette knife.

I've used a background created using Dylusion Spray Inks, using "Lemon Zest" and "Bubblegum Pink" colours.

Once dry, I used That's Crafty "Sand Texture Paste" through the Tim Holtz / Stampers Anonymous "Tiny Poinisettia - THS163" stencil applied with a palette knife.  This really is a gritty texture paste, quite similar to cement in texture!

Once the texture past was dry, I inked the edges using "Charming Pink" Versafine Clair ink and then mounted the card on to a piece of navy blue coloured card.

I added some dots of orange and pink Posca Pens to the area between the flowers, then added dots of "Ruby Red" Liquid Pearls to the middle of the flowers.

Finally, I mounted a Tim Holtz, Idea-ology "Big Chat" word sticker on to a piece of navy blue card and stuck it in position using foam pads so the sentiment is more elevated.

Wednesday, 6 March 2024

Tiffany Johnson Creative #100daysartplay Challenge - Day 18


It's Day 18 of Tiffany Johnson Creative #100daysartplay Challenge.  This week is all about using a palette knife.

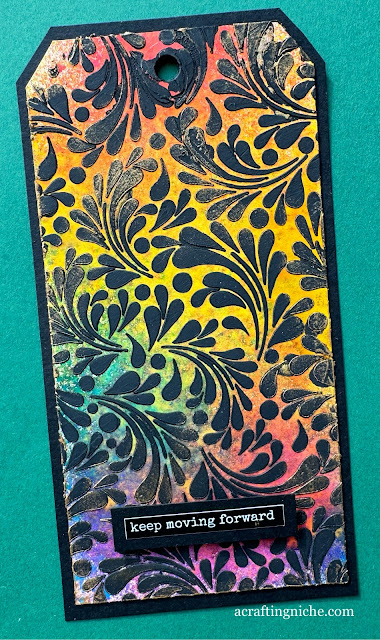
For this tag, I have used four colours of Dylusion Spray Inks, using Lemon Zest, Fresh Lime, Bubblegum Pink and London Blue.

I then used That's Crafty "Black Texture Paste" through the Lavinia Stamps "Feather Leaf Stencil".

Once the texture paste was dried, I rubbed Cosmic Shimmer "Old Gold" Gilding Wax over some areas of the black texture paste, it shows quite dull in the photograph, but actually shows up quite well in real life.

I mounted the tag on to a piece of black card, then on an off cut of black card added one of the Lavinia Stamps "Sentiment Sticker 6" cutting a border around the word sticker, before adding it to the tag with black foam pads to elevate the sentiment.

Sunday, 3 March 2024

Tiffany Johnson Creative #100daysartplay Challenge - Day 15


It's Day 15 of the Tiffany Johnson Creative #100daysartplaychallenge and the start of the Week 3 theme of using a palette knife.

I used to palette knife to apply Distress Texture Paste through the Funky Fossil Designs "Butterfly Wreath" opting to position the wreath off the edge of the tag.

Once the texture paste was dry, I used Dylusions "Crushed Grape" ink spray to spritz the surface of the tag, this highlighted the raised textured areas.

I mounted the tag on to a piece of white card and with the off cut of card, die but the two layers of the white butterfly, using the Memory Box "Pippi Butterfly die 98508" and the "Isabella Butterfly die 98507".  I then die cut a further two Isabella butterflies using an off cut of patterned paper.  I used wet glue to stick them in position.

Tuesday, 27 February 2024

Tiffany Johnson Creative #100daysartplay Challenge - Day 10


It's Day 10 of the Tiffany Johnson Creative #100daysartplay challenge.  This week it's all about stencils. 

I have a confession to make, I forgot to take a photo of the spray ink background before I started work with the stencils.  On the background, I used two Dylusion ink sprays:  "Bubblegum Pink" and "Squeezed Orange".

I then used Versafine Clair "Monarch" purple ink through the Funky Fossil "Circle Burst" stencil.

Next, I used black Ranger Archival Ink through the Funky Fossil "Beauty in profile" stencil.  

I cut the card down to size then inked the edges in Versafine Clair "Nocturne" black ink, before mounting on to black paper and then on to a piece of grey card.  Finally, I added some bright pink Liquid Pearls, called "Dazzle" to the middle of some of the circle bursts.

Monday, 26 February 2024

Tiffany Johnson Creative #100artdaysartplay Challenge - Day 9


It's Day 9 of the Tiffany Johnson Creative #100daysartplay challenge.  This week is all about stencils.


For this card, I have used "Lemon Zest" Dylusion spray ink for the base colour.  I then lay the Funky Fossil Designs "Broken Radius" stencil over the top and spritzed the surface with "Sqeezed Orange" Dylusion Spray Ink, then set aside to dry.

I used the Funky Fossil "Fern" die set to cut a fern shape in dark blue card, using wet glue to stick the die cut on to the card. I then mounted the card on to the same coloured dark blue card and then onto white card.

Finally, I stamped the Simon Says Stamp sentiment, from their "Tiny Words - Birthday" stamp set, stamped in Versafine Clair "Twilight" dark blue ink.  Then I added some white dots of Range Enamel Accents.


Tuesday, 20 February 2024

Tiffany Johnson Creative #100daysartplay Challenge - Day 3


It's Day 3 of the Tiffany Johnson Creative #100daysartplay Challenge 2024,with a theme of spray paints.

This is my take.  I've used a white piece of card and graduated three colours of Dylusion spray paint to cover the surface.  The colours that I have used are:  Lemon Zest, Cut Grass and London Blue.  Once dry, I cut the card down to a tag shape.


To decorate the tag, I have used a selection of Lavinia Stamps, starting with the "Tree Branch" and one of the owls from the "Echo & Drew" stamp set.  I then stamped the "Vine Branch" and one of the hares from the "Whimsical Hares" stamp set, all in Versafine Clair "Nocturne" black ink.

Using Versafine Clair "Morning Mist" grey ink with a Lavinia "Hill Mask" I created the landscape behind the hare.  I used the same ink to stamp the Lavinia "Small Branch".

In the foreground, I have used Posca Pens to give the impression of flowers in the grass and a white gel pen for highlights on the owl and the hare.  Finally, adding a Lavinia "Sentiment Sticker".

Monday, 19 February 2024

Tiffany Johnson Creative #100daysartplay Challenge - Day 2 (b)


On my previous Day 2 post, I mentioned I was taking part in the Tiffany Johnson Creative #100daysartplay Challenge.  I enjoyed the "wax resist" technique so much, I had another go, making this card.


Again, I started by using the Brusho "Wax Resist" crayons, this time to draw broken horizontal lines across the face of a piece of white card.

I then sprayed two shades of Dylusion Spray Inks:  Bubblegum Pink and Crushed Grape.

Once dry, I trimmed the card to size.

I used the Waffle Flower "Oversized Hello Die - 271309" to cut the "Hello" word in white card.  I cut two layers of the word and stuck them together, then glued them on to the card.  This allows the die cut to sit proud of the card base.

I inked the edges of the card using Versafine Clair "Monarch" purple ink and then mounted it on to a white card blank.

Tiffany Johnson Creative #100daysartplay challenge - Day 2


It is Day 2 of Tiffany Johnson Creative #100daysartplay challenge.  Once again it is using sprays, this time I have used the "wax relief" technique.


I used a Brusho "Wax Resist" crayon to draw the scrolls and dots freehand.

At the top I used Dylusions "Squeezed Orange" spray ink.  On the lower section, I used Dylusions "Ground Coffee" Spray ink.

Once dry, I trimmed the card down and started to decorate, loosely based in the style of one of my favourite artists "Klimt".  I used a gold gel pen, a black Sharpie and a black fine liner.

I mounted the card on to a piece of black paper and then on to a white card blank.

Finally, I used Versafine Clair "Nocturne" black ink to stamp the Simon Says Stamp sentiment, which is part of their "Tiny Words - Birthday" stamp set.

Wednesday, 10 January 2024

Hobby Art Ltd "Abstract Flowers CS175D" Tag


I've had a tag play session today, it's a just because I wanted to play tag.

Starting with a plain tag, I pulled a page from an old Welsh hymn book and stuck it over the tag, cutting the page down to the size of the tag.

I then used three shades of Dylusion ink sprays:  Lemon Zest, Fresh Lime and London Blue.  Dabbing the surface with a piece of kitchen towel then drying the surface using a heat gun.

I then splattered the surface of the tag with Orange and White coloured Posca Pens. I then inked the edges of the tag using Versafine Clair "Twilight" dark blue ink.

On a piece of white card, I stamped three flowers, leaves and a circular design, using Versafine Clair "Twilight" dark blue ink.  I then fussy cut all the pieces.

I used two shades of Derwent Inktense pencils (applied with a paint brush) to colour the pieces using the "Mango" colour for the middle of the flowers.  "Iris Blue" for the leaves and the edges of the round designs and then a purple Posca Pen for the dots within the round discs.

I glued everything into position using a wet glue, then mounted the tag on to a piece of orange card, creating a vibrant, cheerful looking tag.

Tuesday, 26 September 2023

Tim Holtz / Stampers Anonymous Layering Stencil Tag


An early morning craft session today as for some reason I couldn't stop my mind from racing away with thoughts, but it resulted in this tag, where I threw lots at it and I'm quite happy with the way it turned out.

I started with a white piece of card cut into a tag shape.  I lay the Stampers Anonymous/Tim Holtz "Bouquet Layering Stencil (THS143) over the top of the tag and then applied "Sky Blue" Ranger Archival Ink through the stencil.

I removed the stencil and replaced it with another, this time using the Stampers Anonymous/Tim Holtz "Stripes Layering Stencil" (THS004) with two shades of Ranger Archival Ink "Watering Can" and "Cobalt".

After lifting the stencil, I then drew some wonky vertical lines on the tag using a blue Posca Pen.

I then lay the "Bouquet Layering Stencil" over the top of the tag again and applied some Ranger "Matte Texture Paste", mainly on the right hand side of the tag, using a heat gun to dry it (remember to pop the stencil into a bowl of water immeditately after use, so that the product can be cleaned off easily).

I used Ranger Dylusions "Bubblegum Pink" spray ink to spritz the dry texture paste surface and again used the heat gun to dry.  I then sanded the raised areas lightly to expose the shape of the texture paste flowers.

I splattered the surface of the tag using Dr PH Martin's White bleed proof paint.

Next I die cut a flower from the Sizzix/Tim Holtz thinlits set called "Wild Flower Stems #1 (664163)" and stuck the flower on to the tag using a wet glue.  I coated the die cut flower with "A Wink of Stella" which gives it a lovely subtle gold shimmer.

Finally, I mounted the tag on to a piece of white card and added a word sticker from the Tim Holtz Idea-ology "Small Talk" word set. 

Friday, 1 September 2023

52 Week Mini Art Card/Tag Challenge - Taster Tag for September 2023


This is the second monthly "Taster Tag" of 2023.  From January 2024 the challenge will become weekly.  The challenge is very relaxed and is aimed to get you to craft for no specific reason other than a minless bit of crafting, so there are no restrictions on the products mediums or in fact id doesn't even need to be a tag, it could be a card, ATC a frame, really anything you want.  All you need to do is fit it to the monthly prompt/theme.  There is a Facebook Group for this challenge which you can find by clicking on this link.

The prompt/theme for September 2023 is "In the meadow/fields"

***

This is my tag for September 2023 "In the meadow" prompt/theme.


To make this tag, I used a base of Dylusion spray inks, I made four backgrounds while I was getting inky, so I have some for future use.  The shades of inks I used are Lemon Zest, Fresh Lime and Bubblegum Pink.

I used three shades of Versafine Clair Inks to stamp with, using Twilight, Nocturne and Summertime, stamping in first and second generation stamping.

The stamp set that I used to stamp with was by Hobby Art Ltd and is part of the "Janie Collection" called "Lino Cut Hares - CS208D".

I added touches of a white gel pen for highlights and metallic gold pen for little dots in the background.

Thursday, 19 January 2023

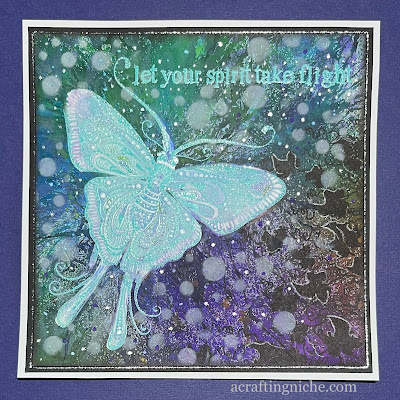
Lavinia Stamps "Indra" on a spray ink background


Today, I have been using my Lavinia Stamps again to create this card.

 I used Wow! Clear embossing ink and the Lavinia Stamps "Indra" the moth stamp on white card, coating the stamped image with "Wow! Angel Eyes Embossing Powder and heat set.

Over the stamped image I brushed on Pabeo Drawing Gum.  This provides a protective coating to what ever is being covered, which once dry can be rubbed off at a later date.


I then put the piece of card in my spray box and spritzed three shades of Dylusion Spray inks on to the surface.  The colours I used were London Blue, Crushed Grape and Fresh Lime.  Any ink left on the surface, I puffed away using a Tim Holtz hand puffer thing sending the ink to the edges of the card.  I set the card to one side for a couple of hours to dry while I took the dog for a walk.

Once dry, I was able to rub off the drawing gum using my finger.  This revealed the original white card base and the turquoise embossed image.

Using the same Wow! ink pad and embossing powder, I added the heat embossed Lavinia Stamps sentiment, which is called "let your spirit take flight".

In the bottom right hand corner and up part way of the right hand side, I stamped the "Vine Flourish" using Versafine Clair "Nocturne" black ink.  I used the same ink to edge the card too.

Next, I used the Lavinia Stamps "White Orbs stencil" with white Pan Pastels to create the idea of movement.  I dotted a white Posca Pen and a silver glitter Signo Pen for added detail to Indra and to the background.  Then mounting the card on to a piece of black card and then a white card blank.

Thursday, 15 December 2022

Lavinia Stamps - my take on Emma Jo's Tag 3


Last night I didn't feel well.  Nothing I could put my finger on, just feeling a bit meh and cold.  I was in bed before 9:30 but of course, by midnight I was wide awake and saw every hour till 5am so decided to get up and craft.  I'm definitely not feeling right.  Hopefully, it will improve as the day goes on.

To pass the time, I watched a Lavinia Stamps tag tutorial by Emma Jo,  so thought I would give it a go. It's a bright and vibrant tag.  I didn't throw as many products as mine as Emma Jo did as I was working with a smaller tag.

I didn't use the same inks as Emma Jo as I didn't have them.  Instead I used Dylusions "Pure Sunshine" and "Postbox Red" spray inks, then gave it a blast of the heat gun to dry the surface.

I then used "Henna Elements Inks" through the Lavinia Stamps "Dynamic" stencil, keeping the design to the right hand side, again I gave it a blast of the heat gun to ensure it was dry for the next step.

I ran an anti-statitic bag over the surface of the tag.  Using Wow! Clear Emossing Pad and the Lavinia "Heartfelt Verse" "Just For You" sentiment stamp, I stamped and then coated the stamping with Wow! Rich Gold Embossing Powder and heat set.

I repeated the process with the "Winter Berries Stamp", I stamped across the bottom of the tag and up the sides, then heat set.

Where the berries were on a dark stencilled area, I first coloured the berries in white Posca Pen, waited for them to dry and then coloured with the shade I wanted, using a glittery yellow, green, and red Posca Pen to colour the berries.  

I inked the edges of the tag using Versafine Clair "Shady Lane" green ink. I then mounted the tag on to a piece of green cardstock.

Finally, using a gold metallic pen I edged the tag and added some gold dots around the stamped berries.

Thursday, 27 October 2022

Funky Fossil "Halloween Artist Trading Card"


While in Halloween mode, I made an Artist Trading Card (ATC) using a small off-cut from a spray ink background I made many months ago.  I think I'd used Dylusions ink spray for the orange/red background colour.

I used Versafine Clair "Morning Mist" grey ink through the Funky Fossil "Batty" stencil, fading it out to the right hand side of the card.

At the base, I used Versafine Clair "Nocturne" black ink though the Funky Fossil "Gothic Graveyard stencil", using a white Signo Pen to edge the tomb stones.

Using Nocturne, I stamped the "Stay Curious" sentiment which is part of the Funky Fossil "Small Print 2" stamp set.

I then decided to mount the ATC on to black card, so it can no longer be counted as an ATC as it's not the recognised size.

Thursday, 3 June 2021

Funky Fossil Designs new "A7 Stamp Sets" preview 6


This is my final preview sample, using the new Funky Fossil Designs A7 stamps.  The six new stamps will be available on the Funky Fossil web site from tomorrow, Friday 4th June 2021.


This was a very quick slimline card to make.  I used Dylusion spray inks to create the background colour.  

Once dry, I stamped the new A7 Chevrons, using Versafine Clair "Glamorous" pink ink.  Using the same ink, I stamped the "Live your life in full colour" sentiment, which is part of the Funky Fossil "Small Print" stamp set, finally sticking three bright flower shaped buttons to the edge of the card.

Tuesday, 2 February 2021

Funky Fossil "Zen Mandala Die" Card


Here's another make using the fabulous Funky Fossil "Zen Mandala Die Set". 


I used a background I had created a while back using Dylusion Spray inks.  I remember I wanted to create the illusion of heat, so opted for yellows, orange and red shades using Lemon Zest, Squezed Orange and Post Box Red.

I took a piece of black card, scored and folded in half then opened the card flat on the base of my Big Shot die cutting platform.  I then positioned the dies where I wanted them to be and ran it through the machine. Retaining all the major cut pieces.

I cut the brightly inked piece of card to a fraction smaller than half of the black card and adhered into position.  I then glued the central pieces into position through the front of the card (onto the coloured background).  

Finally, using the Funky Fossil "Small Print" stamp set, I stamped the "Miss You" sentiment in Versafine Clair "Nocturne" black ink.


Friday, 22 January 2021

Funky Fossil "Guitar Hero" Birthday Card


Another productive early morening start for me, making this card, ideal for a male teenager or somebody into rock.  I've used the new Funky Fossil "Guitar Hero" stamp set that was released last week.


For the background of this card, I used a background I had prepared a few weeks back, using Dylusions "Lemon Zest" and "Fresh Lime" spray paints.

I lay the Funky Fossil "Scattered Straw" mask over the top of the card and taped the edges with low tack masking tape.  I then lay a circle stencil over the top of that so that the circle was in the middle of the card and again taped the edges.  I then used a blending tool with "Peacock Feathers" Distress Oxide Ink to fill the circle area with colour.  Removing the tape and stencils left a lovely crisp patterned circle.

I lined the guitar stamps across the middle of the patterned circle and then stamped them and the "Party Like A Rockstar" sentiment in Versafine Clair "Nocturne" ink.  

I then stamped the guitar images again on a plain piece of white card, in the same ink and while it was wet, coated it in Wow! Clear embossing powder and heat set.

Finally, I coloured the guitars with Posca Pens, cut out the images, edged them with a black Sharpie pen and adhered the shapes on to the card.

Sunday, 29 September 2019

Week 40 - 52 Week Mini Art Card / Tag Challenge 2019


The prompt for Week 40 is "Favourite Colours".

Some of my favourite colours are greens and blues, add a little purple then it is spot on for me, hence the colours I have used on my tag.

For my tag, I used Dylusion Spray inks in London Blue and Fresh Lime.

I used a Distress Oxide Ink in the shade of Wilted Violet through a Funky Fossil stencil called "Circle Blast".

Across the surface of the tag I have adhered Cosmic Shimmer gilding flakes in shades of gold, silver and copper.

I've added dimension with dots of Liquid Pearls in the shades of White Opal and Blackberry.

Finally, I added a ClarityStamps word sticker to the base of the tag saying "Surround Yourself With Colour".

~~~

Click Here for more details about this challenge and the previous prompts.

Click Here for the challenge Facebook Group.