52 Week Mini Art Card/Tag Challenge

Showing posts with label Tim Holtz Idea-ology Word Sticker. Show all posts

Sunday, 19 May 2024

52 Week Mini Art Card / Tag Challenge 2024 - Week 21


This is a weekly challenge. I provide you with a prompt/theme each Sunday morning through out the year.  The challenge is very relaxed.  You can do as much or as little as you like.  You can create cards, tags, Artist Trading Cards (ATC's) or index cards, the choice is yours. You just go with what ever is in your head at the time.  You can stamp, get inky, use patterned papers, texture, embellish it is all down to you.

There is a dedicated private Facebook Group, with a lovely bunch of people who are already sharing their makes from previous challenges.  You can find the group by clicking this link.  I'd love you to join in.

Week 21 prompt for The Crafting Niche "52 Week Mini Art Card / Tag Challenge 2024" is "TEXTURE".

***

This is the tag that I made for Week 21 with a prompt of "Texture".

I coated a plain tag with three shades of metalic sticky backed foil tape.  I used a mat copper, a shiny copper tape and a shiny silver tape.  You can buy these tapes from hardware stores, I believe plumbers and heating engineers use it.  I was fortunate that my Hubby had some from a previous job, so I nabbed the rest of it.  He won't see it again!

Anyway, once you have covered your tag, smooth the surface.  An old credit card or similar works well.  I then put the whole tag in an embossing folder.  I don't recall, who made it but it had lovely wavy lines on it.  I then ran it through the Big Shot.  I realised I had put the tag in the wrong way round, with the wavy lines being concaved, rather than sitting high/embossed, so I worked with what I had - a happy accident.

I then covered the whole tag with a black sharpie.  Once the tag was covered, I rubbed the surface of the tag with a piece of kitchen roll, to reveal the original colours of the tape, but with the wavy lines being black.  Then with scissors, I cut along one of the wavy lines, so I then had two pieces, one for future use (see below).  


Setting the two pieces to one side, I moved on to work on the dark side of the tag.  I covered a plain tag with black card, then put it through a Crafters Companion/Gemini Embossing Folder and popped it through the Big Shot.

This embossing folder has quite a deep design, so I decided to apply some Cosmic Shimmer "Platinum Gilding Wax" over the top, applied with my finger, which highlighted the design.  I then glued the left hand side of the metalic tape tag on to the tag.

Because the tag was quite thick, I went around the edges with a black Sharpie Pen.  I then mounted the tag on to a piece of black card, trimming to tag shape.

Finally, I raided my crafting embellishments.  I found a Tim Holtz / Idea-ology word sticker, with the word "Feel" which I thought was appropriate.  I popped it on to the tag, then outlined the word with a white gel pen.

I then added some small circular embellishments, following the wavy line.

Friday, 3 May 2024

Tiffany Johnson Creative #100daysartplay Challenge - Day 76


Today, is Day 76 of the Tiffany Johnson Creative £100daysartplay challenge.  The prompt for the week is use crayons.

For my tag, I shaded three colours of wax crayon at angle across the tag, using blue, green and purple colours.

I drew branches with leaves on them using a turquoise coloured Posca Pen, in the gaps, I used a white Posca Pen to draw scrolls. Finally adding a Tim Holtz Idea-ology "Chit Chat" word sticker, saying "Cherish".

Friday, 19 April 2024

Tiffany Johnson Creative #100daysartplay Challenge - Day 62


Today is Day 62 of the Tiffany Johnson Creative #100daysartplay challenge.  This week is all about "Collage".

I used a postcard from a product I'd purchased a few years ago for the lighthouse and boat image, which I stuck on to a piece of white card. I edged the light house using a charcoal pencil and a white gel pen.

I used "Tumbled Glass" Distress Oxide ink to colour the white card, then inked the edges of the card using two shades of Verafine Clair Inks, using "Blue Belle" and "Bali Blue" shades.

Next, I stamped Versafine Clair "Morning Mist" grey ink to stamp some text in the background.  I actually used a Lavinia stamp called "See a fairy"as it has a nice vintage script.

Along the base of the card, I glued on a decorative ribbon strip with a loopy design and with peal beads attached.

Above the decorative ribbon, I added a strip of Washi Tap, with shell designs.  I then stuck on some tiny sea shells and coloured beads.

Finally, I added some Nuvo "Diamond" sequins to add some lovely shimmer and a Tim Holtz Idea-ology word sticker, saying "The most beautiful thing".


Thursday, 18 April 2024

Tiffany Johnson Creative #100daysartplay Challenge - Day 61


Today is Day 61 of the Tiffany Johnson Creative #100daysartplay challenge.  This week is all about collage.  

I've raided my odds and ends drawers to make this collage.  I've used an off cut of a 12x12 scrapbook paper.  A piece of vellum with a die cut circle in it, tissue paper with a butterfly design, a turquoise coloured Posca Pen some small buttons and some sticky backed pearls.  Finally, adding a Tim Holtz Idea-ology word sticker saying "the loveliest things".

Wednesday, 17 April 2024

Tiffany Johnson Creative #100daysartplay Challenge - Day 60


Today is Day 60 of the Tiffany Johnson Creative #100daysartplay challenge.  This week is about "Collage".

For my collage, I have used off-cuts of old scrap booking patterned paper that I have had in my stash for more than fifteen years!  I cut them into strips and layered them across a 6"x 5" card.  By memory the brands used are Crate Paper and My Minds Eye.  Then with the remaining papers I punched circles and glued them over the striped background.

I mounted the colourful background on to a piece of white card and then stuck a Tim Holtz "Paper Doll" of a wedding couple.   Finally, I added a Tim Holtz "Idea-ology word sticker staying "never meant to last".

Saturday, 6 April 2024

Lavinia Stamps Oak Leaves black and white card


A friend asked me about a technique, so I set too making this card, so I could share the process.

I've used a good quality solid black coloured card, approx 280 gsm.  I stamped the Lavinia Stamps "Oak Leaves" in Versafine Clair "Nocturne" black" ink.

I then used a white Uniball Signo Pen to go over the edges of the stamping.  It goes on quite dull as the card seemed to absorb the colour.

I then used a white and black pastel pencil to colour the leaves, blending the colours with a paper stubb.  I then went over some of the edges of the leaves with the white Signo pen again, these remained brighter than the original ones.

Finally, I used a Tim Holtz Idea-ology word sticker from their "Small Talk" booklet, going round th edges with the white Signo pen.

Tuesday, 5 March 2024

Tiffany Johnson Creative #100daysartplay Challenge - Day 17


It's Day 17 of Tiffany Johnson Creative #100daysartplay challenge.  This week the theme is to use a palette knife.

I found a backgroud in my stash that had paint splodges across it, so decided that this would be the base of my tag, sticking the patterned paper to a tag to give it a bit more substance.

Next, I used the Ranger "Opaque Crackle Texture Paste", applied with a palette knife through the Tim Holtz / Stampers Anonymous "Bubble Layering Stencil - THS138', just keeping it to the right hand side of the tag.  I then used my heat gun to accelerate the crackle process.

I used two shades of Distress Oxide Ink to colour the crackle area, using "Victorian Velvet" and "Iced Spruce".  I then Versafine Clair "Nocturne" black ink to ink the edges of the tag, before mounting it on to a piece of black card and cutting to size.

Finally I added two words to the tag "Say" and "Something", both are from the Tim Holtz Idea-ology "Big Chat" word sticker booklet.  I stuck them on to black card, cut to size and then used black foam pads to elevate the words.

Saturday, 28 October 2023

My Mind's Eye "Heirloom Papers" Anniversary Card


This is an anniversary card I have made for our Son and his wife.  

I've raided my patterned papers to create this card.  The majority of the papers used are part of a My Mind's Eye collection called "Heirloom" which are maybe 15 years old?

For the hearts, I used a die, which again I have had for years, but I think it was part of a Tonic Studios die set.

The die cut foliage is using a die from the Sizzix / Tim Holtz die set called "Wild Flower Stems #1

I used a Tim Holtz "Idea-ology" word sticker for the setiment.

Sunday, 1 October 2023

Country View Crafts "October - Autumn Magic" challenge entry card


Country View Crafts are now holding their challenges on a dedicated Facebook group rather than their blog.  October is the first challenge on the group and has a theme of "Autumn Magic".  This is my challenge entry.

I started by using a gel plate background. using a 4" round gel plate with Lavinia "Sundance" and "Olive" Element inks. I splattered water droplets across the surface of the gel print which bleached the area where the droplets were and dabbed dry with a piece of kitchen roll and then used my heat gun to completely dry the surface.

I ran an anti-static bag over the surface of the card before stamping the leaf over the gel print.  The leaf is part of a Tim Holtz / Stampers Anonymous cling stamp set called "Pressed Foliage - CMS376".  I stamped in Versafine Clair "Acorn" brown ink, then coated the stamping with Wow! Embossing "Metallic Rich Gold" embossing powder and heat set with the heat gun.

I used assorted gel pens and two Derwent Inktense pencils to add colour to the leaf area.  I also added gold dots to the gel plate area too.

In the background, I used two Tim Holtz/ Stampers Anonymous stencils.  I used Versafine Clair "Shady Lane" green ink through the "Stripes Layering Stencil - THS004" and "Rusty Hinge" Distress Ink through the "Dot Layering stencil - THS006".

I inked the edge of the card using Versafine Clair "Shady Lane" green ink and then added some gold gel pen too.

I mounted the card on to a piece of brown card, then on to a white card blank.  Finally, I added a Tim Holtz Idea-ology "Small Talk" sentiment sticker.


Tuesday, 26 September 2023

Tim Holtz / Stampers Anonymous Layering Stencil Tag


An early morning craft session today as for some reason I couldn't stop my mind from racing away with thoughts, but it resulted in this tag, where I threw lots at it and I'm quite happy with the way it turned out.

I started with a white piece of card cut into a tag shape.  I lay the Stampers Anonymous/Tim Holtz "Bouquet Layering Stencil (THS143) over the top of the tag and then applied "Sky Blue" Ranger Archival Ink through the stencil.

I removed the stencil and replaced it with another, this time using the Stampers Anonymous/Tim Holtz "Stripes Layering Stencil" (THS004) with two shades of Ranger Archival Ink "Watering Can" and "Cobalt".

After lifting the stencil, I then drew some wonky vertical lines on the tag using a blue Posca Pen.

I then lay the "Bouquet Layering Stencil" over the top of the tag again and applied some Ranger "Matte Texture Paste", mainly on the right hand side of the tag, using a heat gun to dry it (remember to pop the stencil into a bowl of water immeditately after use, so that the product can be cleaned off easily).

I used Ranger Dylusions "Bubblegum Pink" spray ink to spritz the dry texture paste surface and again used the heat gun to dry.  I then sanded the raised areas lightly to expose the shape of the texture paste flowers.

I splattered the surface of the tag using Dr PH Martin's White bleed proof paint.

Next I die cut a flower from the Sizzix/Tim Holtz thinlits set called "Wild Flower Stems #1 (664163)" and stuck the flower on to the tag using a wet glue.  I coated the die cut flower with "A Wink of Stella" which gives it a lovely subtle gold shimmer.

Finally, I mounted the tag on to a piece of white card and added a word sticker from the Tim Holtz Idea-ology "Small Talk" word set. 

Thursday, 23 February 2023

Clarity Crafts "Leafy Strip" Stencil Card


I made another card this evening, using a Clarity Stamps stencil called "Leafy Strip".

I masked off the edges of a card, then used Elements Inks from the bottom right hand corner gradually fading out around the middle of the card.  The shades of ink I used were Bermuda and Greensleeves.

Through the Clarity "Leafy Strip Stencil" I used Elements Pine and Mermaid.

I used a gold metallic pen to add extra detail then a Star Dust Gelly Roll Pen around the foliage.  Finally, attaching a Tim Holtz word sticker for the sentiment.

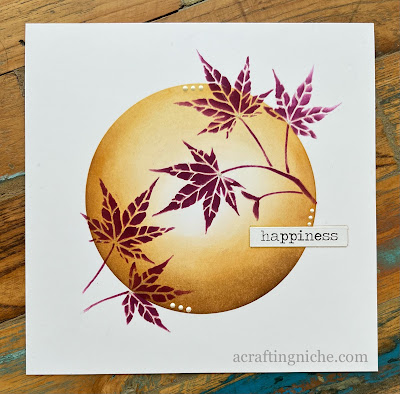
Sweet Poppy Stencil "Maple Leaf" Card


I was about to start sewing some shorts, when I had an urge to make a card.  This card emerged really quickly without any thinking.  It rarely happens like this for me! 

I used a 6" square piece of white card and lay the Sweet Poppy Stencil "Aperture Circle" over the top, securing in position with a piece of low tack tape.

I used a selection of Elements Inks to blend within the circle, starting with Sundance, followed by Sahara, Russet Orange and then Truffle.  I only used the Truffle, which is the darkest of the inks used at the bottom edge of the circle.  I deliberately left the middle of the circle almost bare of ink.

I removed the stencil, then positioned the Sweet Poppy Stencil called "Maple Leaf" over the circle, using a different Element Ink "Mulberry" through the stencil.  I repositioned the stencil and repeated the process.

Using a "Star Dust" Gelly Roll Pen, I coloured in the veins of the leaves, sadly this subtle shimmer doesn't show on the photograph.

I didn't fancy stamping a sentiment, so rummaged through my stash and found a Tim Holtz Idea-ology word sticker book, so stuck the "Happiness" sticker on to the card and edged it in the same Gelly Roll Pen. Finally, I used Ranger Enamel Accents in white in three areas of the card.

Friday, 15 January 2021

Gel Plate and Pan Pastel Die Cut Card


I was supposed to be sorting through my craft supplies in an attempt to destash, instead I ended up making this card.

I used a small gel plate off cut, created using Pan Pastels.  I then used a Designs by Ryn "Fish Scales" stamped in Versafine Clair "Warm Breeze" ink in the central area.  I splattered bronze and then white Posca Pens across the surface.

I used the Tim Holtz/Sizzix "Wild Flower Stems" die for the flowers and a Tim Holtz "Ideaology" word sticker saying "Remember".  Finally, I inked the edges in Versafine Clair "Nocturne" black ink.

Tuesday, 17 March 2020

Funky Fossil MDF Artist Trading Coin for St.Patrick's Day


Today, the 17th March is St.David's Day.  To give a little nod to the special day I made this MDF Artist Trading Coin.

I used one of the Funky Fossil MDF Artist Trading Coin blanks for the base.

I used three shades of Paperartsy Chalk Acrylic paint.  I covered the whole surface with the white "Snowflake" shade.  Once dry, I then put a strip of low tack masking tape down the centre of the coin and used "Jade" colour on the left and "Tangerine Twist" on the right.

Once dry, I removed the masking tape and used a new Funky Fossil "Feeling Lucky" stencil with "Lucky Clover" Distress Oxide ink.

Finally, I used a Tim Holtz Idea-ology word sticker saying "Lucky" to finish the coin.