52 Week Mini Art Card/Tag Challenge

Showing posts with label heat embossing. Show all posts

Wednesday, 17 May 2023

Sweet Poppy Stencils "Wildflower Butterfly Stencil SP2-129" Heat Embossed Card


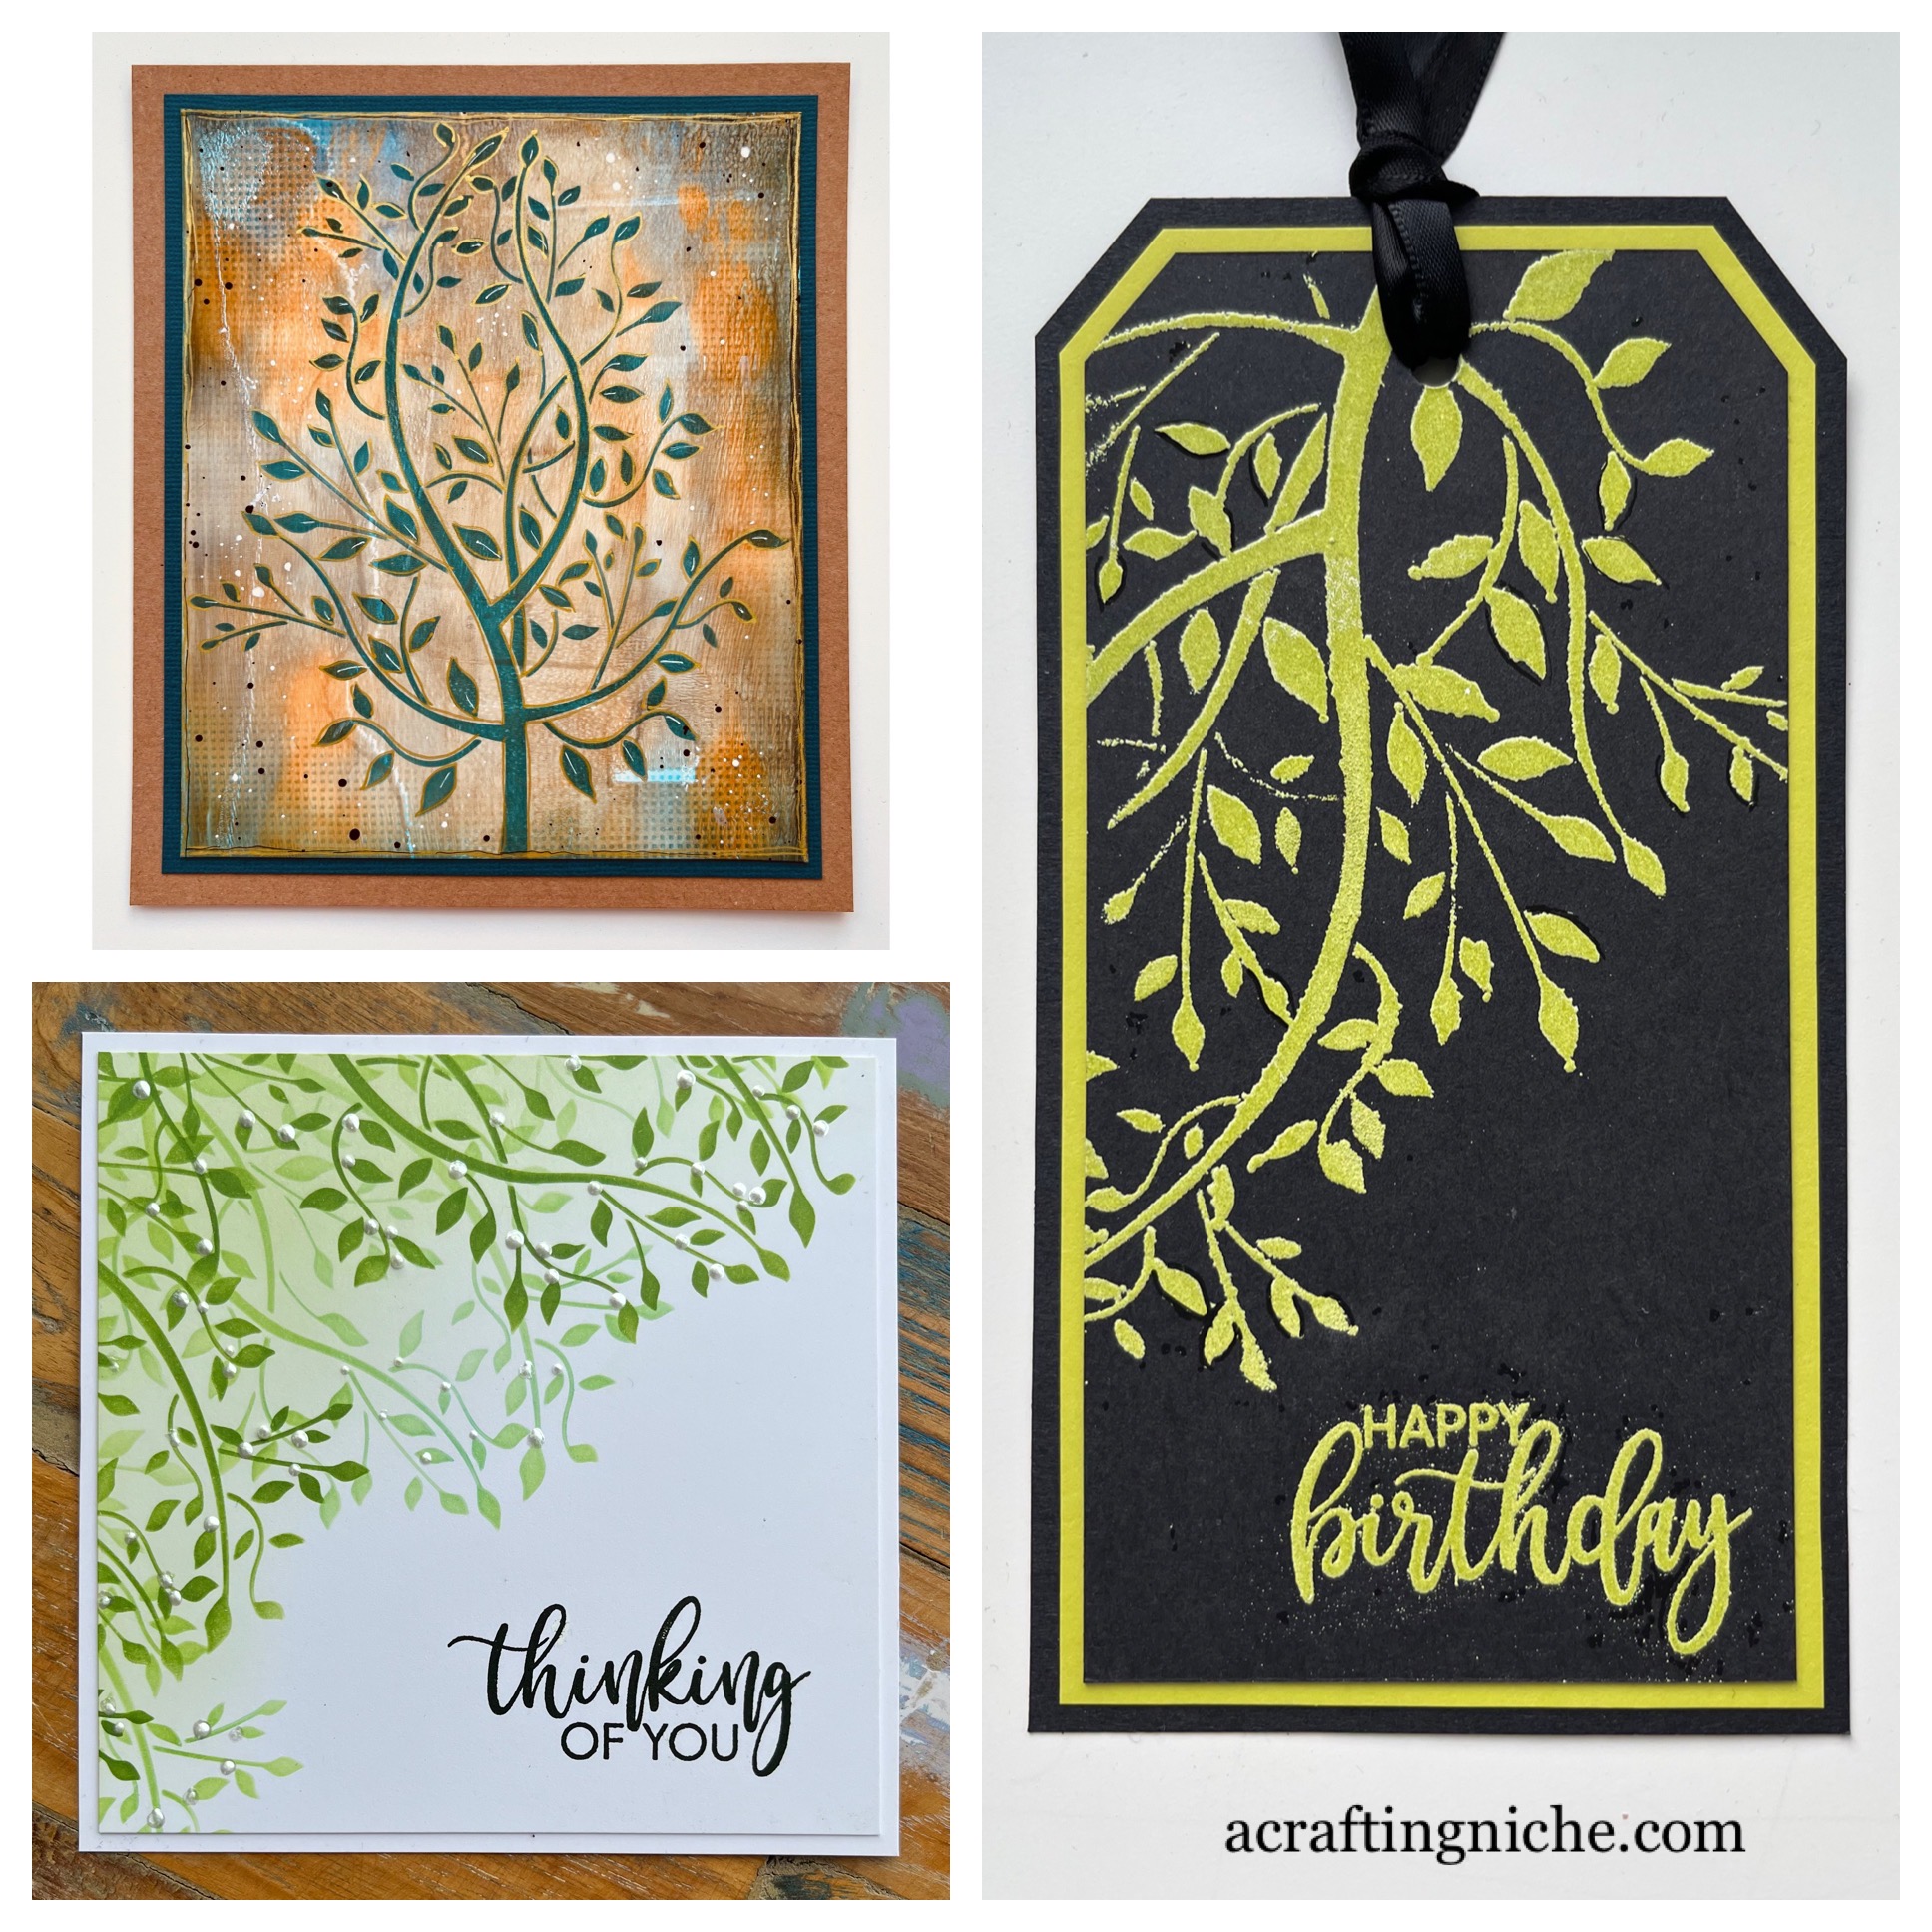
I've been playing with my heat gun today to make this card using a Sweet Poppy stencil.

I ran an anti-static bag over navy blue card then lay the Sweet Poppy Stencil called "Wildflower Butterfly SP2-129" which I believe may now be retired from the present collection.

Through the stencil, I applied Wow! Clear Embossing Ink using a finger dabber till all areas were covered.

I then covered the inked area with Wow! Rich Gold embossing powder and heat set.

I was going to add a head embossed sentiment, but decided that this card would be handy to have for any occasion, so decided to leave it blank.


Saturday, 14 May 2022

Sweet Poppy "Blissful" Stencil three ways


Today I have made three items using the same Sweet Poppy "Blissful" stencil. They are all quite different so I decided to show them all together.

The top left has a folk art feel where I've used a gel plate background.

The bottom left has a fresh clean and simple look to it, with stamping in Archival Inks.

For the tag on the right I have heat embossed both the stencil image and the sentiment.

Sunday, 5 July 2020

Stampers Anonymous "Destination" Tag


Yesterday, I couldn't settle to making the projects that I should have been making!  I even did the ironing!  That gives you an indication of my state of mind!

Instead, I played with a selection of Stampers Anonymous goodies to make this tag, using Spray Inks, stamping, stencils, heat embossing and word stickers.

Monday, 24 February 2020

Visible Image "I've Got A Text" Teen Birthday Card


Today I've made a card for a teenager.  Never an easy task, but certainly easier now I have this new stamp set from Visible Image called "I've Got A Text"!

I stamped the phone in Versafine "Nocturne" black ink and heat embossed the whole thing.  I then re-stamped the phone on an off cut of card and filled in the screen area then heat embossed and adhered over the front of the phone, mounting it on black and silver glitter card.

Wednesday, 19 February 2020

Funky Fossil Heat Embossed "Abstract Flowers" stencil image


I seem to be in embossing mode.  Today I created a card using a section of a Funky Fossil Designs Stencil and heat embossed the image.  A simple technique but a strong image all the same.

I started with a plain piece of white card.  I used a blending tool and an assortment of Distress Oxide Ink shades (Antique Linen, Wild Honey, Worn Lipstick and Ripe Persimmon) to create the mottled coloured background.  I made quite a large background and have only used half for this card, so I have a background prepared for a future project now.


I lay the Funky Fossil Designs "Abstract Flowers" stencil over the prepared background and masked off an 2 1/2" square area using low tack masking tape.

Using a finger dabber and the Wow! Embossing Pad, I applied the clear ink through the stencil.  I removed the stencil and shook Cosmic Shimmer, thick embossing crystals in the shade of "Blue Raspberry" over the wet patterned area.  

I used my heat gun, directed to the underside of the design as I wanted a smooth-ish finish (sometimes if you heat from the top it can have an orange peel texture).  The end result was a rather glossy tile, which I decided would be the main feature of the card.

Thursday, 13 February 2020

Funky Fossil - 15% off Discount Cose - Beautiful Inside and Out Valentine's Card


It's the eve of Valentine's Day.  To celebrate, Funky Fossil Designs are offering 15% off their range for the weekend.


Quote "HEART15" at checkout before midnight on Monday 17th February to claim your savings.

For this card, I used the Funky Fossil "Beautiful Inside and Out" clear stamp set.

I used a Wow! clear slow drying ink pad to stamp the main image on the card.  I then used a Wow! super fine "Metallic Silver" embossing powder and heat set using the underside of the card not the top.

I painted the flower wreath using Prima "Tropical" water colour confections paints.

I stamped the sentiment (which is from the same set as the main image) using Versafine Clair "Morning Mist" grey ink.

Tuesday, 4 February 2020

Lavinia Stamps February 2020 Hochanda TV show sample - Set 3


Lavinia Stamps will be appearing on Hochanda TV on Friday 7th January 2020 at mid-day and 3pm.  Amanda Branston will be representing Lavinia with stamps, accessories and demonstrations.

I've made a very simple card for this sample.  I created the background using two shades of Dylusion Ink Sprays (Crushed Grape and Vibrant Turquoise).

I rubbed the dry background with an anti-static bag and then stamped the large "Fairy Chain" using Wow! Embossing clear pad.  I then coated the clear image in Wow! Super Fine Metallic Silver Embossing Powder.  I then heated the image from underneath the image.  I find I get a better result heating in this way than from the top.

I cut the image down to size then stamped the "Creeping Vine" multiple times using Versafine Clair "Nocturne" black ink.

I mounted the image on to black card and then on to a white card.  I then added some "Holographic Moon Dust" to the wings of the fairies and to areas of the ivy too.

Sunday, 22 December 2019

Week 52 of the 52 Week Mini Art Card / Tag Challenge 2019


If you are still with me up to now, you'll be releieved to know this is the final prompt of 2019.  It has been another fabulous year and you need to pat yourself on the back for all the fabulous tags you have made over tha past weeks.

The final prompt is "Celebrate the end"

For my tag, I used black card stock and a Funky Fossil "Circle Burst" stencil.  I used several different mediums through the stencil, including acrylic paint Sakura Gelly Roll Pens and Signo glitter pens.  I added gem stones, sequins and glitter too.

For the sentiment I used a Stampers Anonymous stamp heat embossed using Wow! clear embossing powder with their "Super Fine Metallic Silver embossing powder".

~~~

Check out the challenge Facebook Group here.


Monday, 2 September 2019

Funky Fossil Designs "Whale of a Time" and "Wavy Grid" Stencil Card


As I mentioned in my earlier post, I was up early, deciding to get crafting making a couple of cards.  This is the second card of the session using Funky Fossil Design products.

I used Tumbled Glass shade of Distress Oxide Ink through the Funky Fossil Designs "Wavy Grid" stencil.

On a separate piece of white card, I stamped the whale image (part of the Funky Fossil Designs "Whale of a Time" stamp set), stamped in a Wow! Clear Embossing pad.  I then used Wow! Embossing Powder in a Super Fine "Metallic Silver" shade then heat embossed till the powder had melted.

Once the image had cooled, I painted the whale using two shades of Distress Oxide Inks (Twisted Citron and Mermaid Lagoon).  I then cut around the edge of the whale and adhered to the bottom right of the card.

Using a Versafine Clair "Morning Mist" ink pad I stamped the sentiment which is also part of the "Whale of a Time" Stamp set.

(The small bubbles from top left to bottom right are a free stamp from an old magazine).

Funky Fossil Designs - "Whale of a Time" Stamps on "Wavy Grid" Stencil


I was up early this morning ready to have a play with ink and stamps, making these two cards using the Funky Fossil Designs "Whale of a Time" stamp set and "Wavy Grid" stencil.

I made this card, using Cracked Pistachio and Salty Ocean Distress Oxide Inks through the Funky Fossil Designs "Wavy Grid" stencil.

On an off-cut of pink card, I stamped the unicorn whale, which is part of the "Whale Of A Time" stamp set, stamped in Versafine Clair "Monarch" ink which is a shade of purple.  The hearts and the sentiment are from the same set and stamped in the same ink too.

I cut around the pink and purple whale and adhered it to the middle of the card.  Using a gold shimmer Sakura Jelly Roll pen I added sparkle to the whale horn and also to some of the spots on her back.

I used a white Signo pen to the eye then added a dot of Glossy Accents over the top to give the eye a domed glassy look.  Finally, I added some sequins to the sea area for extra sparkle.

Friday, 16 August 2019

Vintage multi-stamp card (Crafty Individuals and others)


Last night I wanted to make something totally different, and work out of my comfort zone, to what I've been doing recently, so pulled out some of my older stamps and played with a gelli plate background made of Colorbox Inks and wet Brusho paint tapped onto the plate using a fan brush.

I'd seen a video of Tracey Evans using Versamark through a stencil, I added clear embossing powder and then heated (this produces the discs of lighter colour across the card) so decided to try that technique out, which worked really well.  Certainly something I wouldn't have thought about doing myself.

Over the top of the surface, I used a blending tool with the "Ripe Persimmon" Distress Oxide Ink. Then the "Crushed Olive, then around the edges the "Forest Moss" Distress Oxide Ink.

I put "Forest Moss" Distress Oxide Ink though a diamond stencil in two corners of the card.  Using a clear stamp with text, I stamped the image )unfortunately, I don't have a clue who made the stamp to credit them) using Versafine "Olympia Green" shade of ink.

I used Crafty Individual ferns from their CI-207 set.  The circle numbers and the image on the bottom left of the card are stamps by Paperartsy.  I don't recall where the circular face stamp came from as I've had it for years.  All of these images were stamped in Versafine "Olympia Green" shade of ink,

I stamped the Crafty Individuals CI-519 in Versafine Clair ink in the shade of "Chianti" on an off cut of white card.  I then coloured it with my Arteza Brush Pens and a metallic gold pen.  I then cut around the image and adhered into position.

Friday, 28 June 2019

Design Team make for "My Time To Craft Challenge Blog" #400 "Seaside"


It's time for another challenge on the "My Time To Craft Challenge Blog" which has a theme of "Seaside" for challenge #400.

If you have a moment, please do pop across to the blog to see the other fab makes by my fellow Design Team members.

I decided to do something a bit different for this make by using lots of little bits and bobs I had floating around my work desk.

I had a piece of stamped card with a woodgrain effect, which I had given a grey wash to make it look like weathered wood, so decided to use that as a base.

I knew the colours that I wanted for the sea, so used Distress Oxide Inks in the shades of:  Twisted Citron, Tumbled Glass, Stormy Sky, Broken China and Salty Ocean and roughly applied it to card, filling the white areas using a paint brush.  

Once it was dry, I ran it through a Crafters Companion embossing folder which gave a nice wave look texture.  I ran a clear embossing ink pad across the surface then covered with a white/silver embossing glitter so that the raised areas sparkle like the sun catching the raised waves, then heat set.

In my embellishment stash, I found a balsa wood sentiment saying "Sun, Shells & Sand" so decided to colour the sea weed and star fish using my Arteza brush pens and then added some Stickles glitter glue to give it a bit of sparkle.

I tore a piece of cardboard box to add a colour and texture like wet sand. 

Finally, I assembled all the components and added little pearl like beads to the sand and small shells,  I also added a handful of clear sequins to the card to give added sparkle.

Saturday, 25 May 2019

Pink Ink Designs Sea Turtle Card


As the Pink Ink Designs "Sea Turtle (PI019)" stamp set was still on my desk, I decided to make another card, but instead used some of the smaller stamps in the set.

First I dragged an anti-static bag across the surface of the card.  I used the "Turtley Awesome" sentiment first by using a "Wow! Clear Ultra Slow Drying Embossing Pad" and their "Super Fine Metallic Silver" embossing powder and heat set.

I then stamped the larger turtle across the page, using the same stamp pad but used "Regular Earthtone Blueberry" shade of embossing powder and heat set.

Next I stamped the small turtle, in the same clear ink but used an embossing powder in the shade of "Jealous Guy" it's a green/yellow sort of shade and heat set.

Using an Arteza brush pen, I coloured in the white areas on the turtles.

Finally, to create the background, I used three shades of Distress Oxide Inks (Salty Ocean, Tumbled Glass and Cracked Pistashio), applied in a wash with a paint brush.

Wednesday, 21 November 2018

Gardening Robin Tag - Hobby Art Stamps


Another reason for it being a "Happy Post" Day is that I received a small order of stamps from Hobby Art Ltd.  My order consisted of Robins and Puffins.  I wasted no time in making this tag using the "Gardening Robin FMGR09F" stamp.

I heat embossed the snowflakes.  Stamped the sentiment in Versafine then stamped the robin/spade image.  I coloured the image in with a damp paint brush and Distress Inks.  I added a little shimmer using a Sakura Jelly Roll Pen.

Friday, 16 November 2018

Design Team Make - 16th November 2018 (Let It Snow) My Time To Craft Challenge #384


It's time for the "My Time To Craft" fortnightly challenge.  This time the prompt is "Let It Snow" #384.

I started off with a piece of pale blue plain cardstock.  Using a Versamark ink pad, I stamped the image of snowflakes and then coated in Wow "Bright White" super fine embossing powder.  I then heat embossed to set the snowflakes.

I die cut the dry embossed circle using a Spellbinders die from their "Blooming Collection".

I stamped the sentiment and then die cut into the decorative shape using a Spellbinders "Victorian Tags" die set.  I added some sequins to the snowflakes to add a little subtle icey shimmer to the card.

Monday, 12 November 2018

Purple Pixie Celebrate Card (Lavinia Stamps)


I've been playing with stamps and ink this afternoon, making this card using the following Lavinia Stamps:  Fairy Dandelions, Sacred Spells, Spanish Moss Foliage, Fairy Washing Line, Make a Dandelion and Birds.

I created the background using Distress Oxides and Pixie Powder in Violet/Purple shade.  I have heat embossed the dandelion wishes too.

Sunday, 26 August 2018

IndigoBlu Colour Me Daisy Card - a happy accident


While out with friends on Friday I purchased a jar of white emobossing powder.  I went to use it today, it was only while I was using my heat gun that I realised that the powder wasn't white (as stated on the pot) the contents were in fact clear!  This card is the result of my "happy accident"

I've used an IndigoBlu "Colour Me Daisy" stamped in Versamark and then heat embossed.  I have used Liquid Pearls in a "Ballerina" shade.  The sentiment is from a Stampin' Up set called "Sheltering Tree".

Unfortunately, the card does not photograph awfully well.  I've made a little video clip that can be viewed on The Crafting Niche Facebook page, so pop over there if you want a better look.

Thursday, 23 August 2018

Moonlight Foxgloves on a Brusho Background


Having watched a Lavinia hour on Hochanda this afternoon, I decided to have a play with my Brusho paints, creating this card.

I heat embossed the Lavinia "Foxgloves" image in a fine silver embossing powder.  The  Lavinia "Fairy Orbs" were heat embossed in a shade of "Enchanted Gold" embossing powder.

I then chopped the image up into half inch strips.