I was awake early this morning, so decided to have a play with my Visible Image Stamps. I don't use them often enough!
I started by masking of the edges of a piece of white card. In the un-masked area I used two shades of Distress Ink: Wild Honey and Abandoned Coral. I used a heat gun to dry the area then added splatters of more "Abandoned Coral" ink. I then removed the masking tape.
I used dots from the Visible Image "De-strerssed" stamp set with "Abandoned Coral" Distress Ink diagonally across the coloured background.
Using Versafine Clair "Nocturne" black ink, I stamped the "Grunge Flourish" and then stamped the wording, which is part of the "Wings of Change" stamp set. I also added some extra rings using the Visible Image "Shape It Up" stamp set.
On a piece of white card, I stamped three butterflies, also part of the "Wings of Change" stamp set, using two shades of Versafine Clair inks (Summertime and Charming Pink) over the top of each other to create the shade I wanted. I then fussy cut the butterflies and stuck them on to the card.
Finally, I added black and white Ranger "Enamel Accents" to add a little dimension.
Once again, I am back from a few days away and I really missed my crafting, so while the first load of washing was in the machine, I got cracking and made this mixed media card.
I used lots of products on this and to be honest I didn't make notes, so don't recall what order I used things, so I'll list the products I used.
This is the card that I had started at the caravan, but couldn't finish till I got home today.
I started the card, by stamping the flowers from the Visible Image "Creative Chaos" stamp set in Versafine Clair "Nocturne" black ink.
I then used Derwent Inktense pencils, applied with a paint brush to colour the flowers. I used a minty green Inktense pencil with a brush to create a very informal rectangle panel of colour behind the flowers.
I used "Weathered Wood" Distress Oxide Ink through part of the Visible Image "Supernova Stencil".
I then added extra black and white dots using Ranger "Enamel Accents". Finally mounting the card onto a piece of black paper and then on to a card blank.
I took a few crafting bits with me to the caravan, but I struggled to craft there as I only took one ink pad, stamping platform, a handful of stamps,my Derwent Inktense pencils with a paint brush. So I ended up stamping, making this card and made half a card which I will finish at a later date.
While trawling through Social Media, I noticed how cruel and thoughtless some comments made by people were. As I had the Visible Image "One Kind Word" stamp set with me, I decided to make a black and white card, so that the attention is brought to the wording. I stamped using Versafine Clair "Nocturne" black ink.
I'm playing catch up with the challenges I have missed, while I was away. The Friday Eileen Godwin challenge prompt was "Butterflies", this is the card I have made.
The central image is actually the mask I used for the "glitter" challenge a few days ago. I couldn't bring myself to throw it away as it was so pretty - just as well I didn't!
The mask is a stamped image from the Visible Image stamp set called "Butterfly Effect", stamped in Versafine Clair "Nocturne" black ink. It's got lots of different Archival Inks and splatters on it.
In the background, I have used a stencil called "Butterfly Wreath" by Funky Fossil Designs, with "Shadow Grey" Archival Ink, using more ink in the central area and blending out so it is lighter on the edges.
I used foam pads to adhere the butterfly over the wreath. Then stamped the sentiment, which is part of the Simon Says Stamp set called "Tiny Words - Birthday", stamped in Versafine Clair "Monarch" purple ink.
I then mounted the card on to a piece of grey paper and then on to a card blank. Finally adding some dots of Ranger "Enamel Accents" to complete the card.
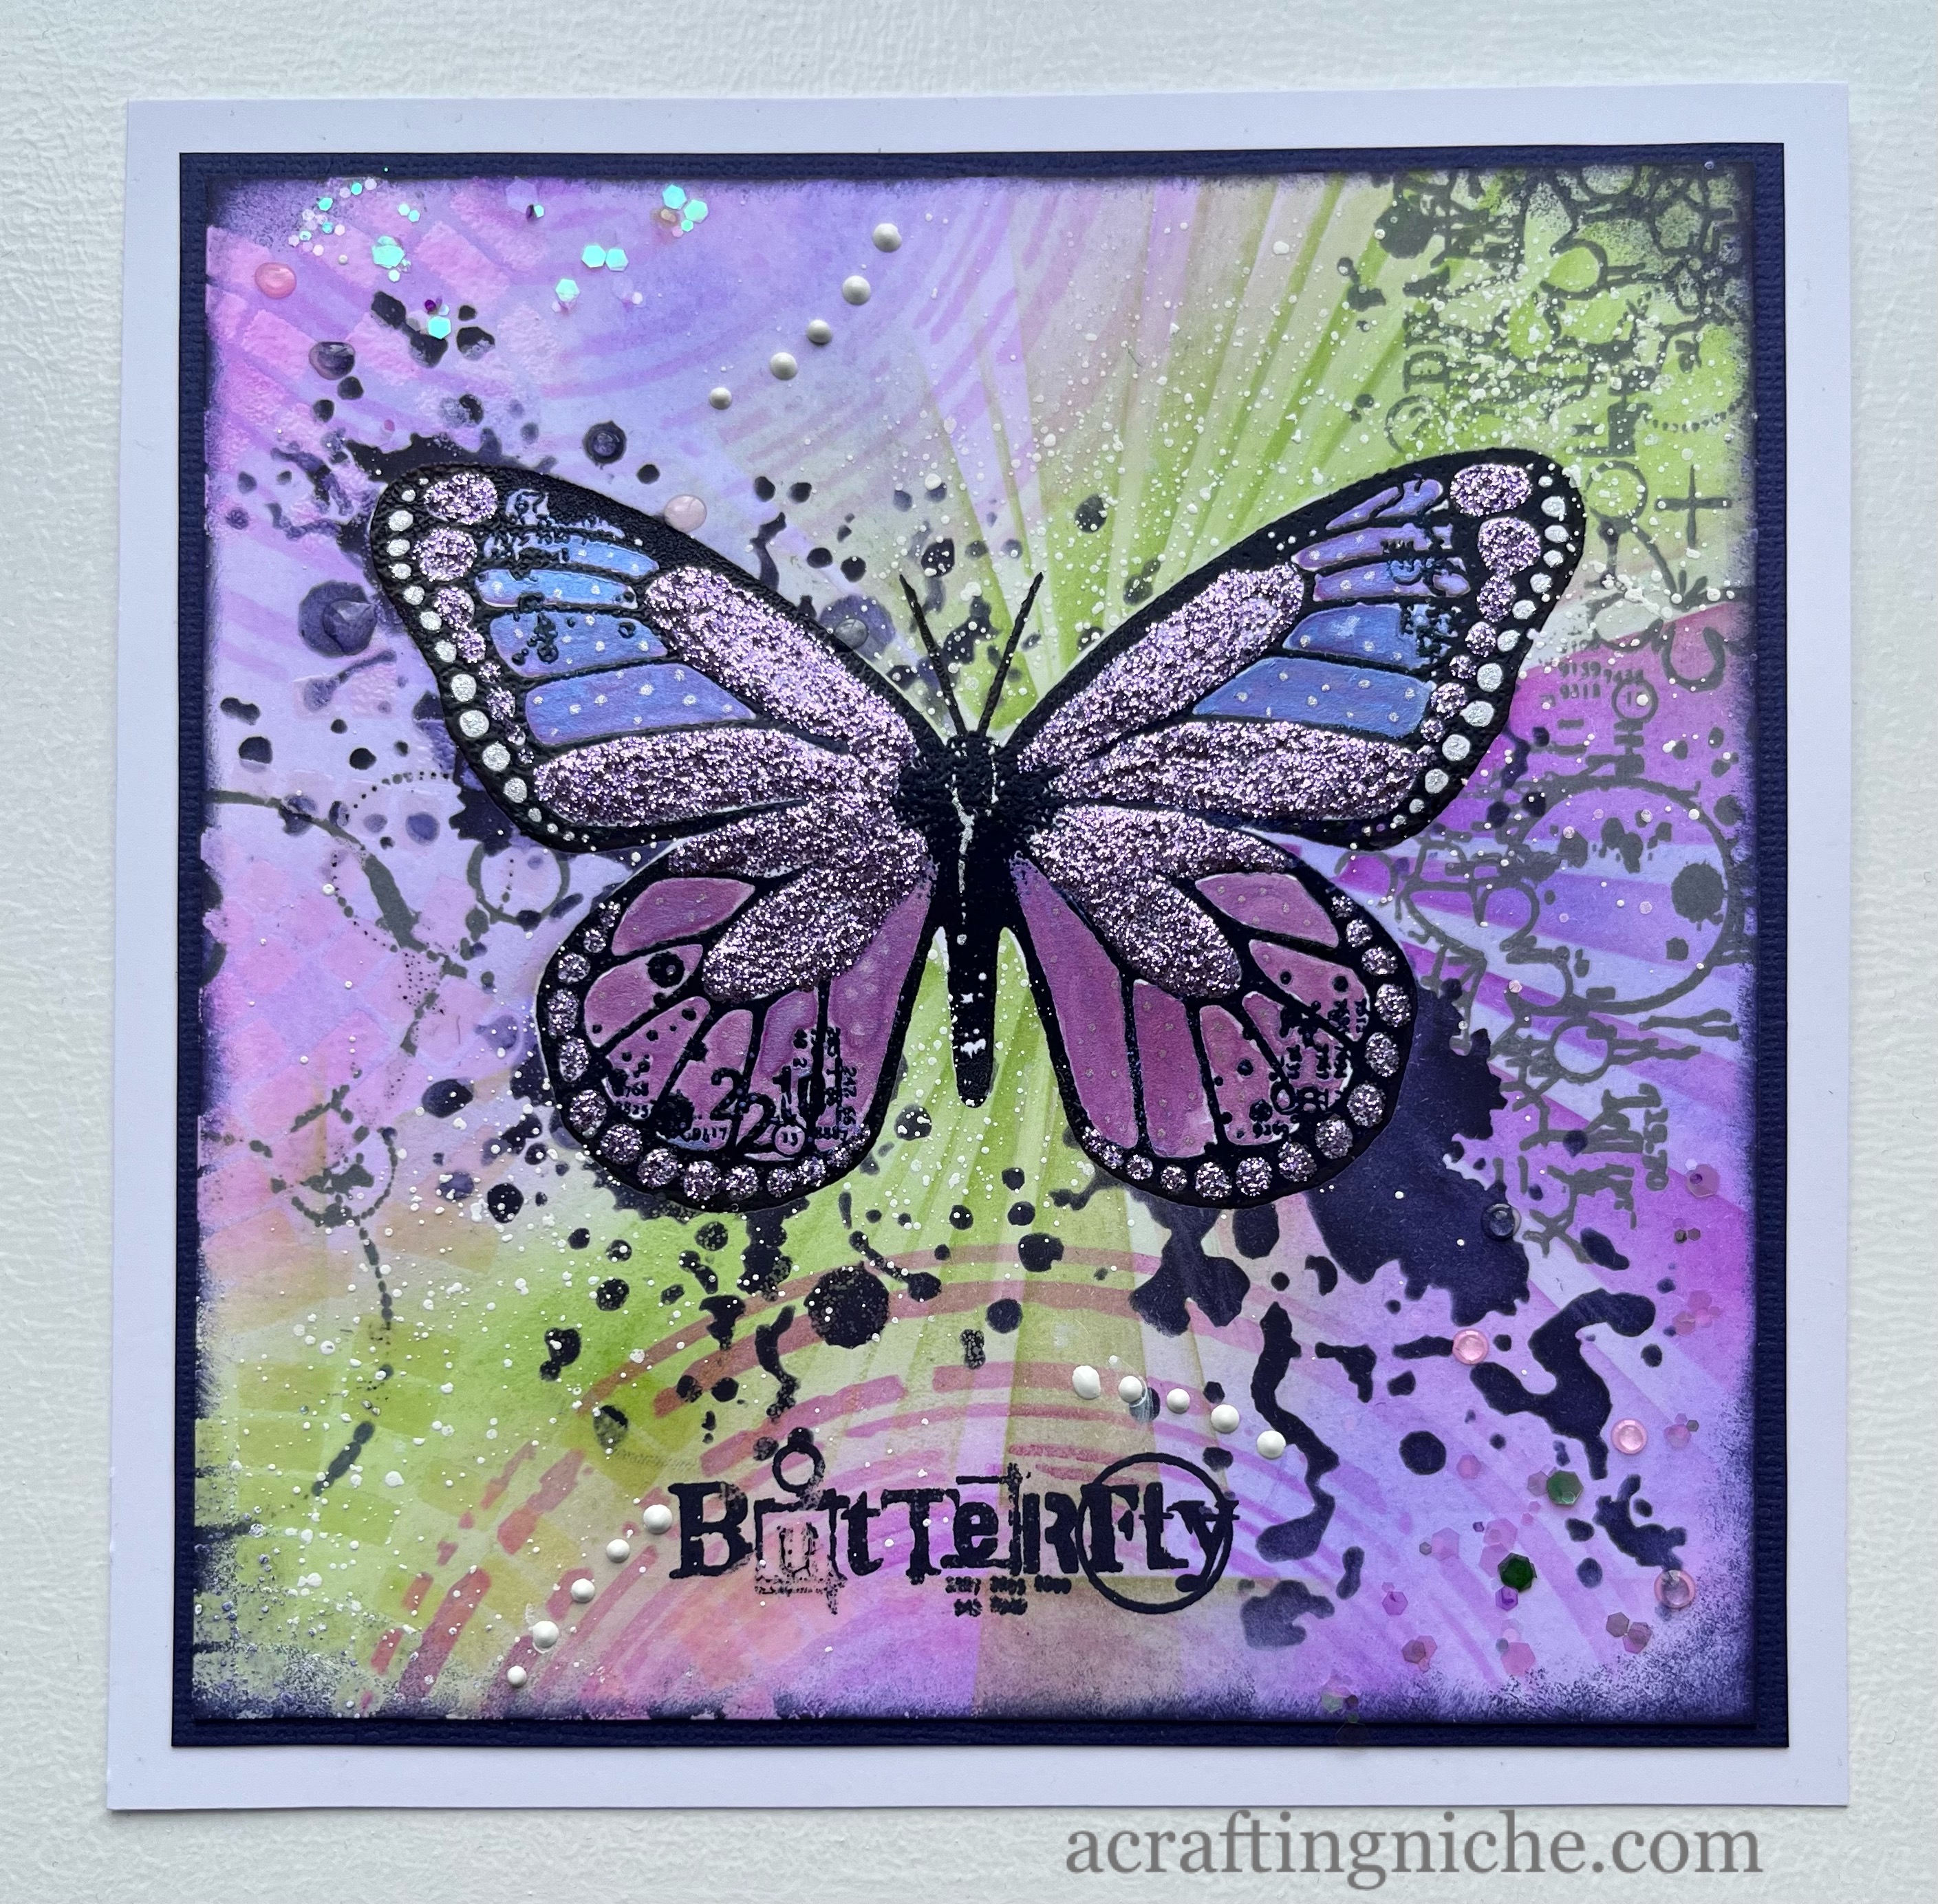
Eileen Godwin set a challenge today (12th April 2023) to use glitter. This is the card that I have made.
Starting with a plain piece of white card, I stamped the central butterfly, using the Visible Image "Butterfly Effect" stamp set, stamped in Versafine Clair "Medieval Blue" ink. I then coated it in Wow! Clear embossing powder and heat set.
I stamped the butterfly again on a piece of copy paper, then fussy cut the shape to use as a mask while I created the background. I used a small amount of repo glue to position the mask over the top of the card.
Using blending brushes, I applied two shades of Archival Inks: Vivid Chartreuse and Violet around the background.
I then used Cactus Flower and Vivid Chartreuse Archival inks through the Visible Image "Strobes" and "Supernova" stencils.
I then lay the Visible Image "Breakout" stencil in a couple of positions and applied "Wow! embossing ink" with a finger dabber through the stencil, then coated in Wow! Clear Embossing Powder and heat set.
I lay the Visible Image "Butterfly Ink" stencil over the butterfly and applied Versafine Clair "Medieval Blue" ink through the stencil to creats the dark splatters. I used the same ink to stamp the "Butterfly" sentiment which is also part of the "Butterfly Effect" stamp set.
Using Versafine Clair "Morning Mist" I stamped some rings on the left hand side of the butterfly and some random circular images on the top right, which are both part of the "Butterfly Effect" stamp set.
I used a white acrylic paint with a fan shaped paint brush to add fine white splatters, from the bottom left to the top right hand corner.
I then removed the paper mask from the butterfly, it looks so pretty with all the colours. If it didn't blend in so well with the background, I would have kept it in position!
I now turned my attention to decorating the butterfly itself. I used Creative Expressions Cosmic Shimmer Iridescent paints in a blue and purple shade. I then used "Lavender" coloured stickles for the four main sections of the wings, adding small dots of silver glitter signo pen to the dots at the ends of the wings.
In the background, I added dots of Ranger Glossy Accents and also some dots of White Enamel Accents.
Once everything was dry, I inked the edges of the card using Versafine Clair "Medieval Blue" ink, then layered it on to dark and then white card. Finally adding some very small sequins to the top left and bottom right hand corners.
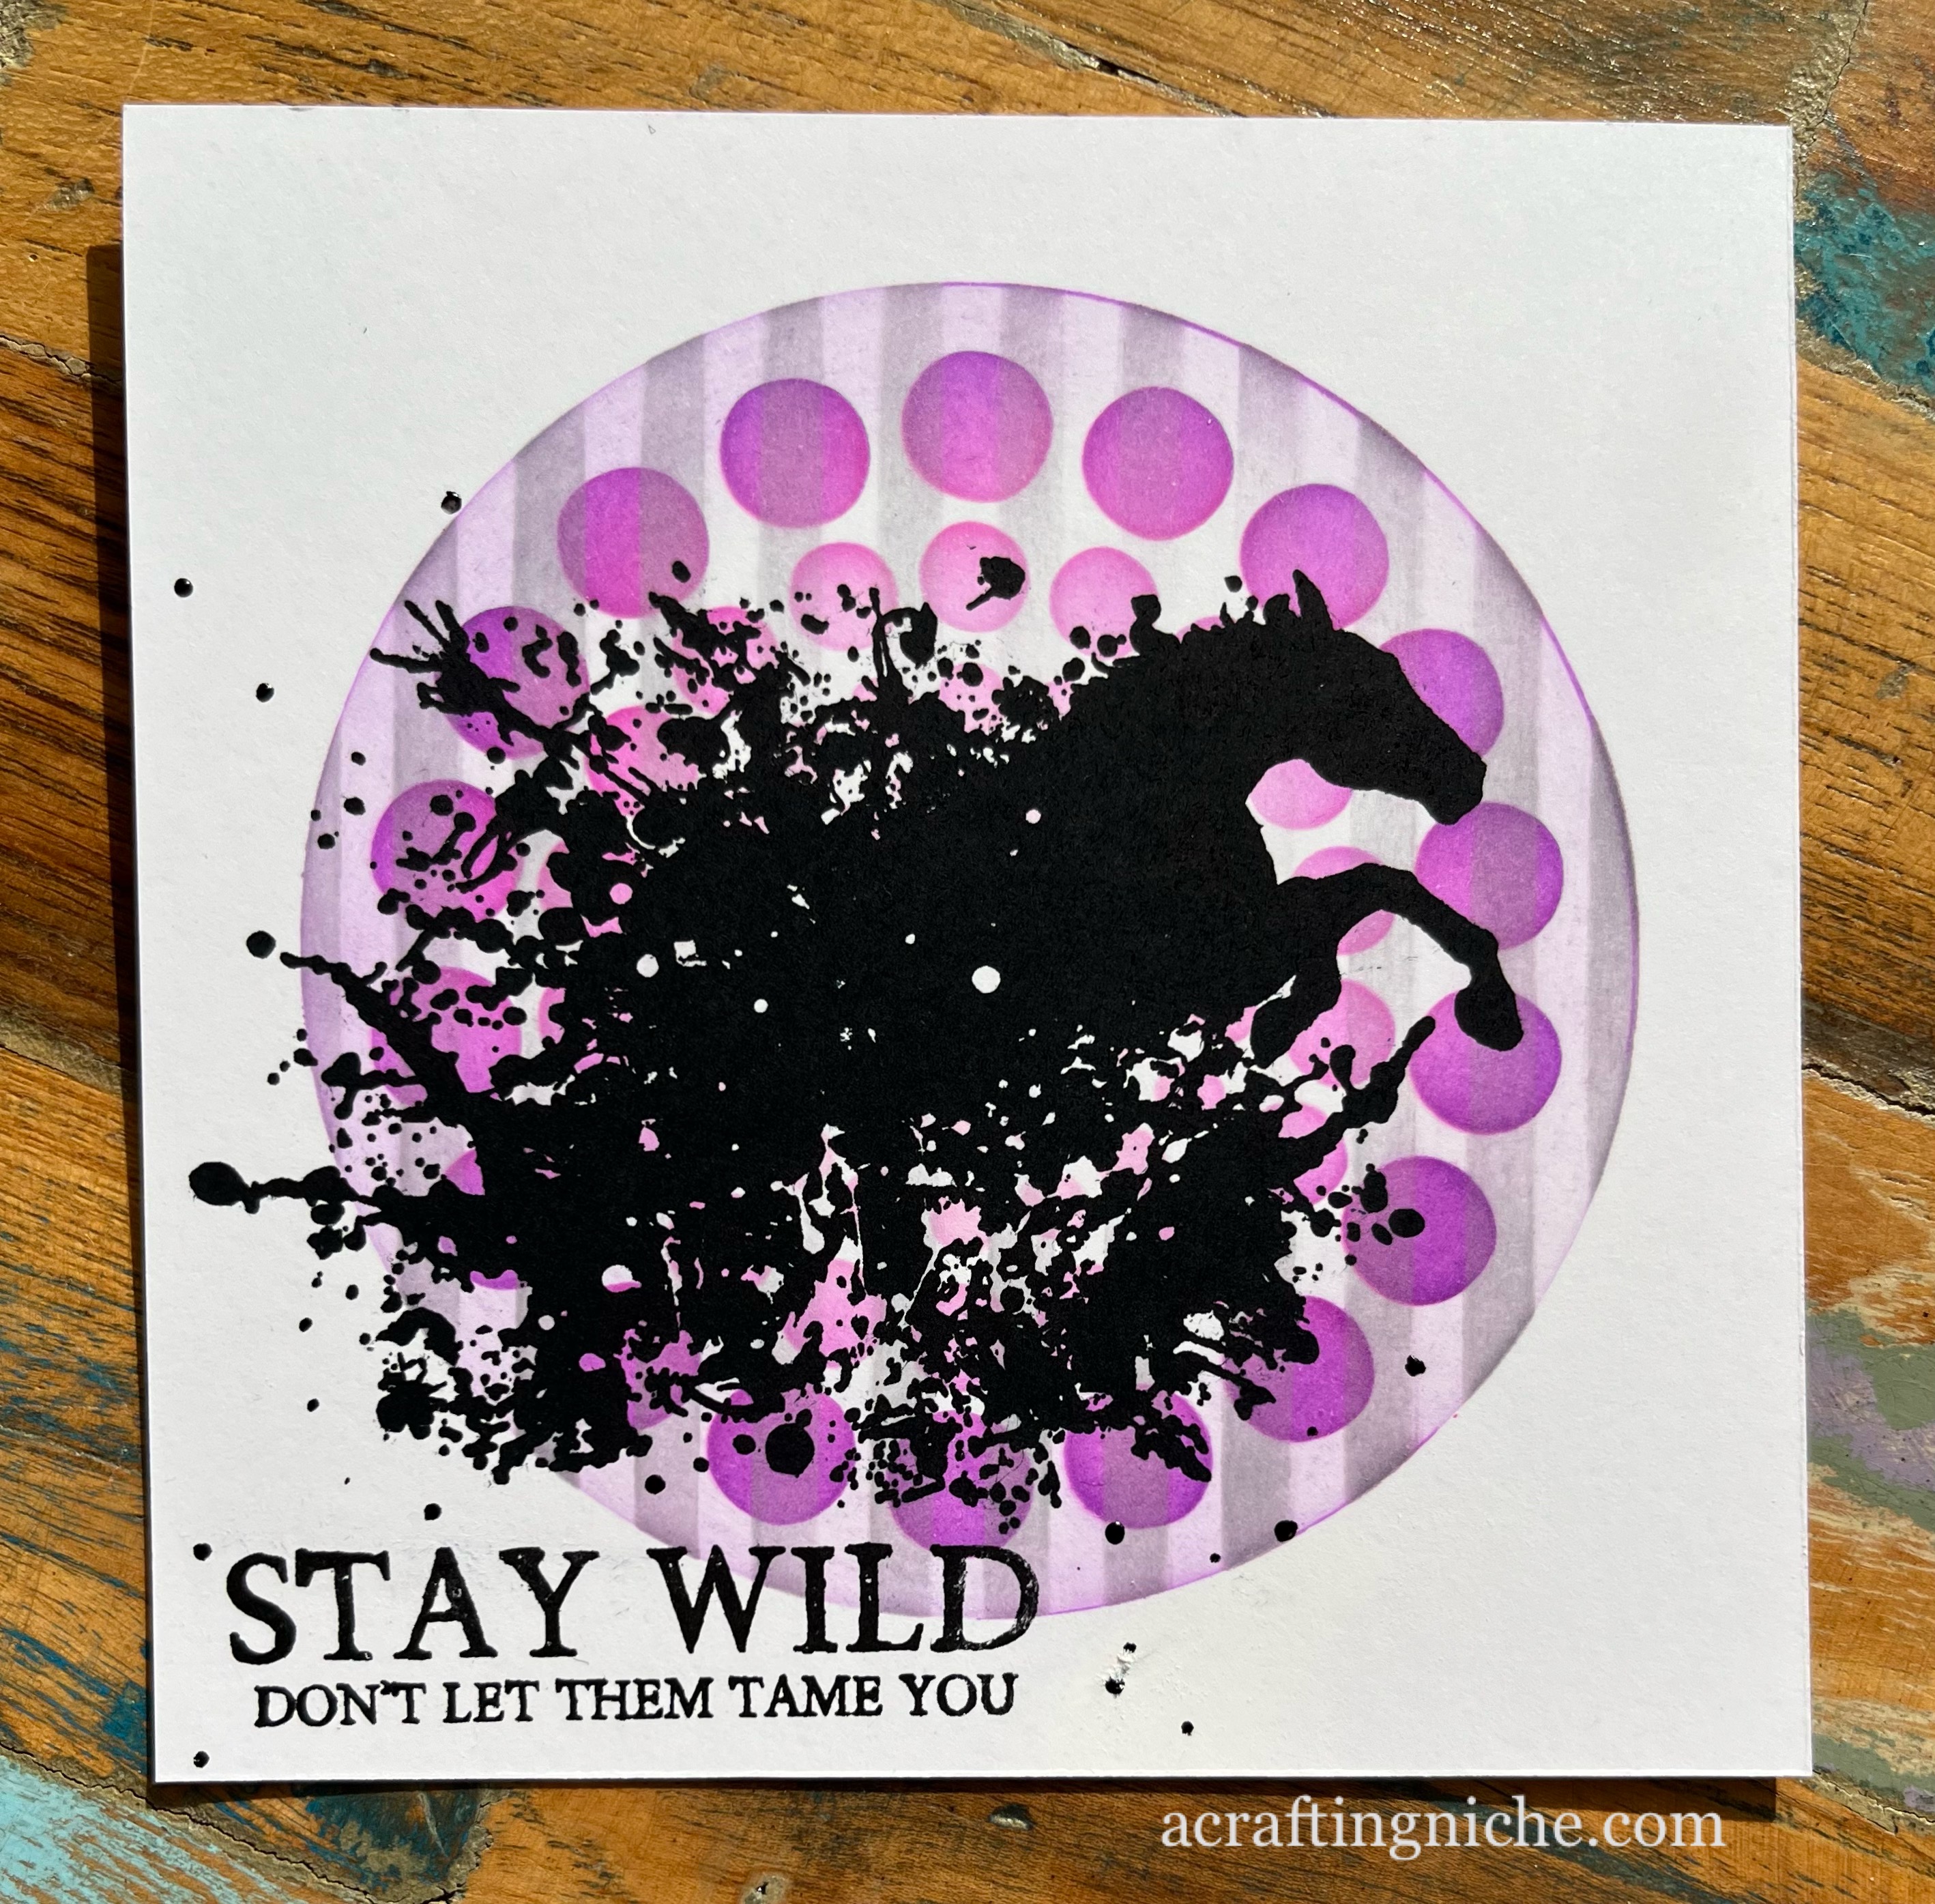
Today Wednesday, Eileen Godwin has set a challenge of "Circles". In total contrast to the last card I made, this one is very busy to look at and may make your eyes go funny, so apologies in advance!
I started by using the Funky Fossil Designs "Grid Stencil" with "Shadow Grey" Archival Ink, making it darker around the edges and lighter in the central area.
I then lay the Funky Fossil "3D Sphere" stencil over the top and applied "Cobalt" Archival Ink through the stencil, again, making it darker at the edges and lighter in the middle.
Using Versafine Clair "Nocturne" black ink with Visible Image "Ahead of our time" stamp set, I stamped the clock spiral, the falling people and the birds in flight. I then mounted the piece oon to black card.
This morning on the Eileen Godwin facebook group, she set group members a challenge saying "Make a card - start with a stencil or stencils and add a stamp or two..."
I used two Clarity Stamp stencils. Starting with the "Circle Dot Stencil" using three shades of pink Archival inks: Pink Peony, Vibrant Fuchsia and Cactus Flower. I then added a touch of Majestic Violet too.
Over the top of that, I used another Clarity Stamps stencil called "Stripes", applying "Shadow Grey" Archival Ink through the stencil but only around the edges of the circle.
After lifting the stencil, I decided I wanted a touch more colour to the edge of the circle, so used the brush I had applied the violet with to add a little more colour.
Using Versafine Clair "Nocturne" black ink, I stamped the horse and sentiment from the Visible Image "Stay Wild" stamp set.
I did manage to get a little smudge of ink on the white area around the card, so added a few spots of black "Enamel Accents" to cover it, which kind of tied in with the water splashes.
A couple of days ago, I watched an Eileen Godwin live demo on a Facebook group. As I had most of the items she used, I decided to do a "lift" of her work and this is a result. The demo was an hour long. I'm not going to go into detail how I made it, but have listed some of the items used below:
I've taken a look at birthdays coming up in January and decided I had better get making some card. I've started with the most difficult one that I find to make for: Teenage Boys!
I used stampb by Visible Image for the main area of the card, using the silhouette stamp that could be Churchill from the "Ahead of our time" stamp set. Stamping it in Versafine Clair "Nocturne" black ink and then coating it in Wow! clear embossing powder and heat setting.
I then used a brick wall stamp from the Visible Image "Teenage Kicks" stamp set and stamped the wall in Versafine Clair "Shady Lane" green ink in multiple positions.
Once dry, i gave the whole image a light wash using "Antique Linen" Distress Oxide ink and then wafted the heat gun over it to dry. Using a blending brush and "Aged Mahogany" Distress Oxide ink, I coloured over the bricks and background to give a warmer background. I edged the tag with "Tulip Red" Versafine Clair ink.
Using Versafine Clair "Nocturne" black ink, I stamped the flying birds to the right of the hat (they are also part of the "Ahead of our time" stamp set. Using the same ink and the verse from the Visible Image "Happy Birthday" stamp set, I multi stamped part of the verse down the left hand side of the card. I also edged the card in the black ink.
I then added some white and black splatters using Posca Pens.
Finally, after mounting the card, I added a Simon Says Stamp sentiment from thier "Tiny words - Birthday" stamp set, again stamped in "Nocturne" black ink
I loosely did the same as Karen. I used a cake and the sentiement stamp by Visible Image from the set called "Blow Out The Candles". Stamping the cake on the tag, colouring it it, creating a mask of the cake.
Then creating the bokeh look, I used a Funky Fossil stencil called "Bokeh Builder" and using various shades of Distress Oxide Inks and I used lots: Tumbled Glass. Scattered Straw, Shaded Lilac, Twisted Citron and Kitch Flamingo. Around the edge, I used another Distress Oxide ink: Seedless Preserve and then used Versafine Clair "Purple Delight" ink to edge the tag.
While the mask was in place, I sprinkled water droplets over the tag which created another bokeh look.
Having a birthday at this time of year is rubbish. I should know, I have my birthday sandwiched between Christmas and New Year.
For my friends who have a birthday in December, I try to ensure I have made a card in advance. There is nothing worse than receiving what is clearly an "after thought card", usually purchased from a garage or an "open all hours" type shop. Birthdays are special and need to be kept that way, regardless of age.
So here is a card I have made for a male friend ,who actually shares the same birthday as myself. I've used Visible Image products for this card.
I used an "Ink on 3" Fade out ink pad to stamp the beer glass, which is part of the Visible Image "Bring on the beers" stamp set. Colouring the image with Derwent Inktense Water Colour Pencils and a 2B pencil. I then stamped the glass of beer on to a post it note, cut around the shape and then popped it over the top of the coloured image, to use as a mask.
I used three shades of Distress Oxide Inks (Antique Linen, Weathered Wood and Scattered Straw) with a blending brush through the Visible Image "Strobes" stencil.
Finally, I stamped the "Cheers' sentiment, also part of the "Bring on the beers" stamp set in Versafine Clair "Morning Mist" grey ink.
I'm back from a night away at the caravan and couldn't get back quick enough to craft while Hubby watches the World Cup Football games.
I started this card, by using Versafine Clair "Nocturne" black ink to stamp the penguin, part of the Visible Image "Snowman Jack" stamp set. I then used a post-it note and stamped the penguin again, cutting out the shape of the penguin and then popping in position over the stamped image.
I used the Visible Image "Breaking Glass Stencil" with a selection of Archival Inks to create the background colour. I started with the darkest in the middle and worked my way out, these are the colours I used Cobalt, Watering Can, Forget-me-not, Sky Blue, Pink Peony and Shadow Grey. I coloured the edges of the card with Versafine Clair "Warm Breeze" Ink.
I removed the mask from the pengin and coloured him using Derwent Inktense wate colour pencils applied with a paint brush. I used a 2B pencil to ground the penguin.
I used Versafine Clair "Nocturne" black ink to stamp the words. The Brrr! was part of the "Snowman Jack" stamp set. The "Merry Christmas" was part of another Visible Image stamp set called "Christmas Chaos.
I then mounted the image on to a white card blank. Finally, using a Signo Silver Glitter pen, I went around all the cracked pieces of ice. I also added some sparkle to the penguin and to the edges of the card.
I started on the base, using three shades of Archival Inks (Pink Peony, Cornflower Blue and Forget-me-not) through the Visible Image "Fibres" stencil.
On a plain piece of white card, using Versafine Clair "Morning Mist" grey ink, I stamped the t-shirt, which is part of the Visible Image "Nothing to wear" stamp set. I then die cut the t-shirt using the "Nothing to wear" die.
I stamped the penguin and the Brrr! on to the front of the t-shirt using Versafine Clair "Morning Mist" grey ink, the penguin and the Brrr! is part of the Visible Image Stamp set called "Snowman Jack". I coloured the Penguin using Derwent Inktense water colour pencils. I coloured the t-shirt itself with a wash of "Tumbled Glass" Distress Oxide Ink.
Finally, using Versafine Clair "Morning Mist" again, I stamped the "Merry Christmas" sentiment, which is part of the Visible Image "Christmas Chaos" stamp set.
I thought this would be a good card to give a male teen I know!
This morning I've had a play with a new to me stamp set by Visible Image, they actually have a huge Black Friday sale on at the moment, so it's a good time to stock up on stamps and stencils you've thought about purchasing in the past.
I've used the "Blow out the candles" stamp set. I coloured the cup cake using Derwent Inktense water colour pencils, applied with a brush. In the background, I used the Viible Image "Fibres" stencil with three shades of Ranger Archival inks: Pink Peony, Cornflower Blue and Tea Rose.
The sentiment is part of the same stamp set, which I stamped in Versafine Clair "Morning Mist" grey ink.
The son of our friends will be 18 soon, so I wanted to make a birthday card for him.
He is also training for a weight lifting competition, so I wanted to make the card themed to this, but it has proven easier said than done.
There is a definite lack of stamps which fit this theme. In the end, a crafting friend pointed me in the direction of a listing on Etsy for a discontinued stamp set by Avery Elle. The only problem is that it was in America. I bit the bullet and purchased it, at an extortionate postage cost and it arrived this week.
(this is the original draft card)
Now I have the stamp and know the size of it, I need to create the card and I am not in the mood for it at all. Here are two attempts. The one without the blue border was my draft, I then made what was to be the card to give, but I don't like it. It is too busy. So I need to make another one. I'll leave it for today and see if I have other ideas for it tomorrow.
I've used the Avery Elle stamp for the main figure, with the Visible Image stencil called "Time Tunnel" in the background.
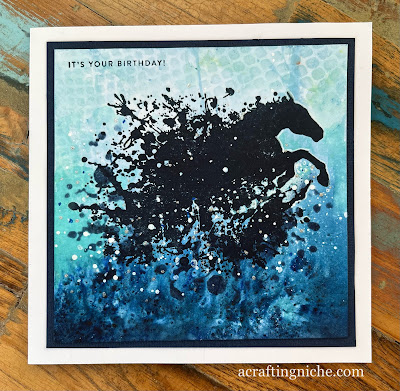
Today I made this birthday card using one of the Brusho paint backgrounds that I made earlier in the week. When I made the background I thought it leant itself to the ocean, so pairing it with the horse from the Visible Image "Stay Wild" stamp set, seemed to be the natural thing to do.
I stamped the horse using Versafine Clair "Twilight" dark blue ink. I added some colour around the horse using "Tumbled Glass" and "Peacock Feathers"Distress Oxide Ink though the Visible Image "Ripped Fishnet" stencil. I added splashes with a white Posca Pen and silver dots using a gel roll pen.
I use a Simon Says Stamp sentiment, part of their "Tiny Words - Birthday" stamped in Versafine Clair "Twilight" Dark Blue Ink.
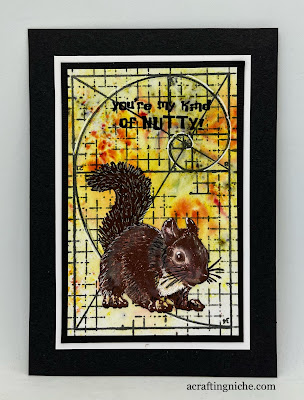
For anybody that follows my Instagram, you will know that I have red squirrels visit my garden each day and that I'm a little addicted to them! So when Visible Image brought out the "Nuts About Squirrels" stamp set, it was a no brainer purchase. For some reason, I've not got round to using it till today.
For the background area, I have used Brusho paint granules sprinkled on to damp paper, which allows the paint to spread, with makes different colours to pop. Once dry, I then stamped teh Visible Image "Fibonacci" scroll and grid using Versafine Clair "Nocturne" black ink.
I also stamped the "You're my kind of nutty" sentiment, part of the Visible Image "Nuts About Squirrels" stamp set in the same ink.
I then stamped the squirrel on to the card, using Versafine Clair "Acorn" and "Fallen Leaves" brown inks, I stamped the same image on to a piece of white card too using the same shades.
I coloured the squirrel on the white card, using Distress Oxide Inks and Sakura Gelly Roll pens. I then cut the image out and adhered on to the card.
For the Day 19 tag, Karen asked us to use something we had not used before.
Earlier in the year, I had purchased the "Christmas Eve" Visible Image stamp set in their sale, so this seemed to be the ideal time to break open the packet.
I stamped the images in Versafine Clair "Nocturne" black ink, using first and second generation stamping.
I created the background using several shades of Distress Oxide Inks: Tumbled Glass, Stormy Sky, Chipped Sapphire, Blueprint Sketch and Villainous Potion.
I used a white gelly roll pen to add highlights to the Christmas trees and then used Paperartsy "Snowflake" white acrylic chalk paint to create the falling snow.
Finally, I stamped the sentiment, which was from a Woodware stamp set in "Nocturne" black ink.