52 Week Mini Art Card/Tag Challenge

Showing posts with label Nuvo Sequins. Show all posts

Sunday, 2 March 2025

52 Week Mini Art Card / Tag Challenge 2025 - Week 9


The Crafting Niche 52 Week Mini Art Card/Tag Challenge 2025:

This is a weekly challenge. I provide you with a prompt/theme each Sunday morning through out the year.  The challenge is very relaxed.  You can do as much or as little as you like.  You can create cards, tags, Artist Trading Cards (ATC's) or index cards, the choice is yours. You just go with what ever is in your head at the time.  You can stamp, get inky, use patterned papers, texture, embellish it is all down to you.

There is a dedicated private Facebook Group, with a lovely bunch of people who are already sharing their makes from previous challenges.  You can find the group by clicking this link.  I'd love you to join in.

The prompt for Week 9 is "Sparkle"

•••

For my Week 9 "Sparkle" tag, I started with a plain white tag and stamped the comic book shape (part of the Funky Fossil "Comic Book" stamp set). on to the tag using Versafine Clair "Nocturne" black ink.  I then stamped the same shape on a piece of white card and fussy cut the shape.

Returning to the tag with the stamped image, I stuck lots of sequins around the stamped image, right up to the edge of the tag.  I then mounted the tag on to a piece of black card and cut to shape.


I used double sided sticky foam pads on the reverse of the comic book shape and stuck it on to the prepared tag.

On a piece of yellow card, I stamped the word Wow!, (also part of the Funky Fossil Designs Comic Book stamp set) using Versafine Clair "Nocturne" black ink,  I then used the co-ordinating Funky Fossil "Comic Book Words" die set to cut the word.  I stuck the word on to the tag using a wet glue.


Wednesday, 5 June 2024

Visible Image Hope Card


Today, I have been playing with Visible Image products to make this card.

I started with a piece of white card measuring 4" x 5.5".  I used the Visible Image stencil set called "Art spheres #2" with three shades of blue Ranger Archival Inks, using Sky Blue, Paradise Teal and Cobalt colours.  I went round the lower edge with a 2b pencil to darken it a little and added some dots of white Posca Pen to areas above the wave to replicate water spray.

I used Versafine Clair "Blue Belle" ink to stamp the wording which is part of the Visible Image stamp set called "Equality, Hope & Love".  Finally, adding a few Nuvo "Aqua Aurora" sequins across the surface of the card.

Monday, 18 March 2024

Tiffany Johnson Creative #100daysartplay Challenge - Day 30


Today is Day 30 of Tiffany Johnson Creative #100daysartplay challenge.  This week is all about "texture", so I looked around my stash and came across some skeleton leaves that have been lurking in my cupboard for close on twenty years, so I decided to make use of some for this challenge today.

I sprayed the surface of a cream coloured tag with spray adhesive and positioned the skeleton leaves.  Because edges kept lifting, I went over the top of the whole tag including the leaves with "Matte Distress Collage Medium" to ensure everything stayed in position.

I inked the edges of the tag with two shades of Versafine Clair ink, first using "Pine Cone" a brown ink and then on the very edges using "Nocturne" black ink.  I then mounted the tag on to a piece of black card.

I used a black Posca Pen to splatter paint across the surface of the tag, finally sticking some Nuvo "Rose Gold Sequins" over the top using Ranger "Glossy Accents" as adhesive.

Saturday, 9 March 2024

Tiffany Johnson Creative #100daysartplay Challenge - Day 21


This is Day 21 of the Tiffany Johnson Creative #100daysartplay challenge.  The theme for the week is "use a palette knife" and I really have found this week a challenge, having to think a bit differently about my makes and definitely taking me out of my comfort zone!

I rescued a piece of cardboard from the recycling box tore a bit off and then started peeling off some of the paper layer, to expose the ridges between the corrugation.


I used two shadess of Paper Artsy Chalk Paints for the background colour, using "Lake Wanake" and "Snowflake".

Once the paint was dry, using a palette knife I spread some Ranger "Matte Distress Texture Paste" using the edge of the palette knife to create the lines similar to the cardboard.


Over the top of the paste, I added a selection of silver and greeen/blue glitter, white beads, sequins "Crystal" Stickles and "Periwinkle" Liquid Pearls.

Wednesday, 14 December 2022

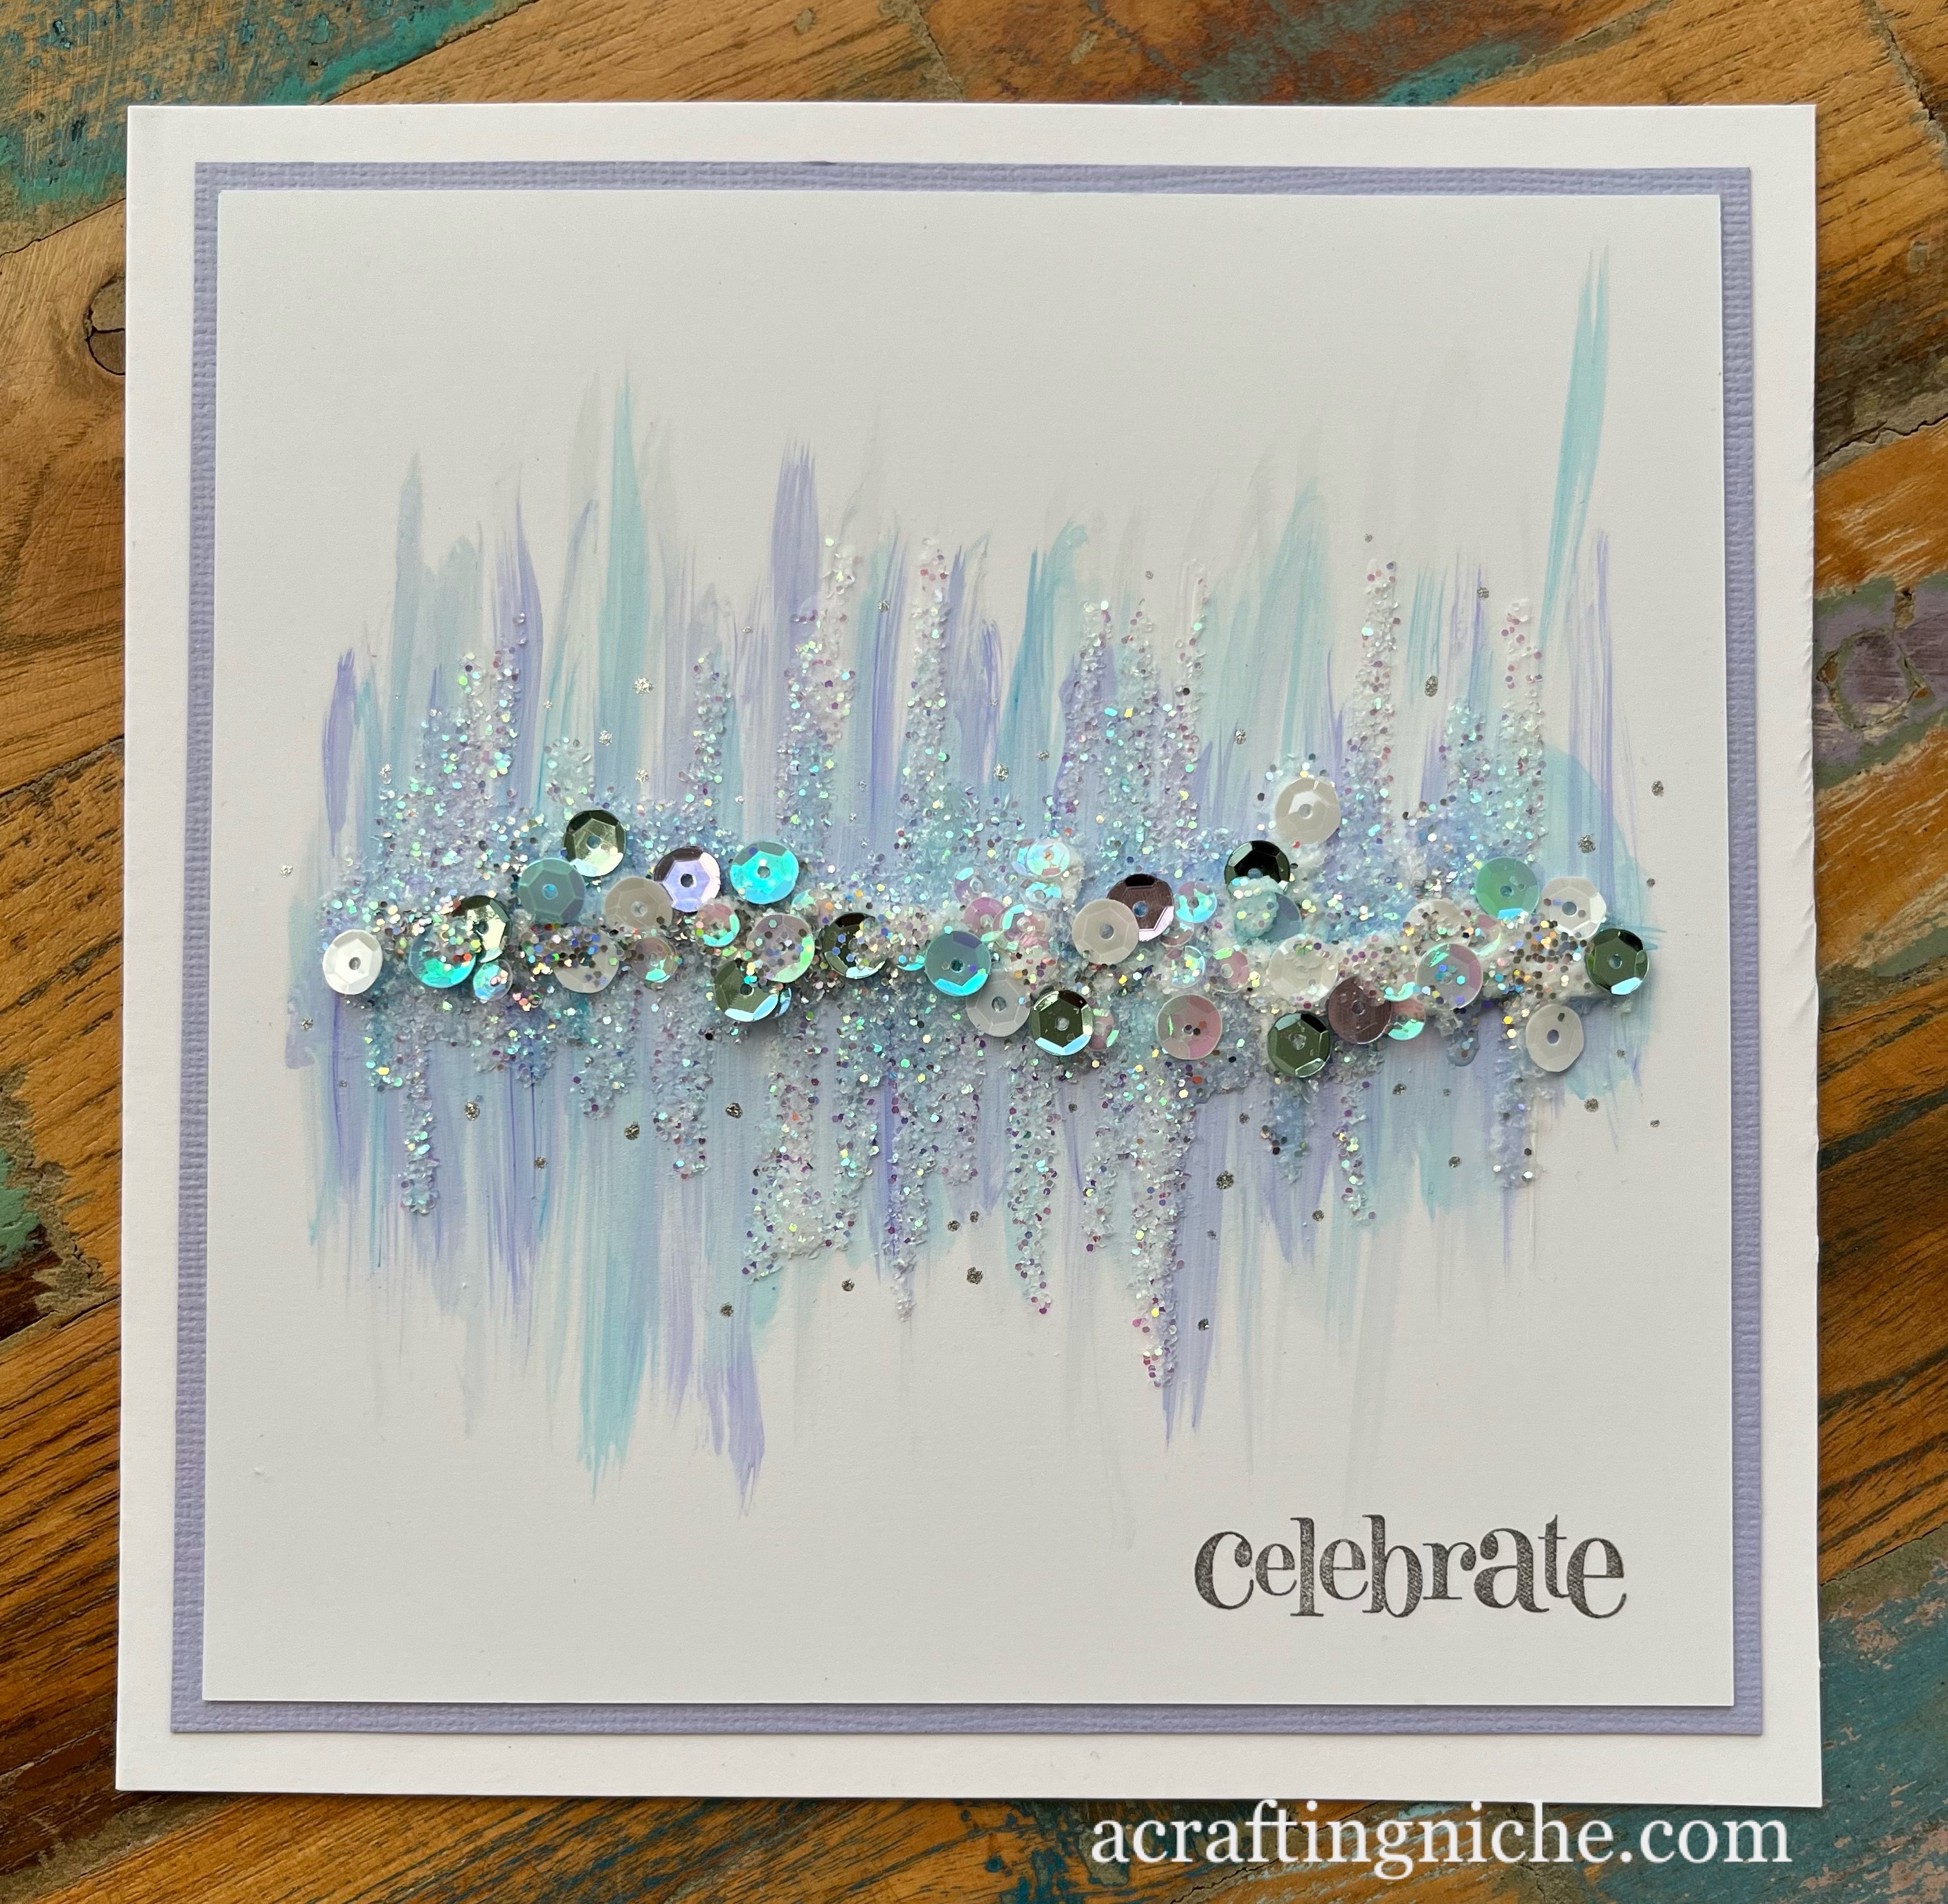
Sparkle "Celebrate" Penny Black Inc. "Sweet Wishes 30-104" Card


In the past few weeks, I have seen two tutorials by two different people but creating a very similar sparkly card.  They were by Marion Emberson and Amy Wilson.  I didn't have the same products that either of these used, so improvised making my own version.


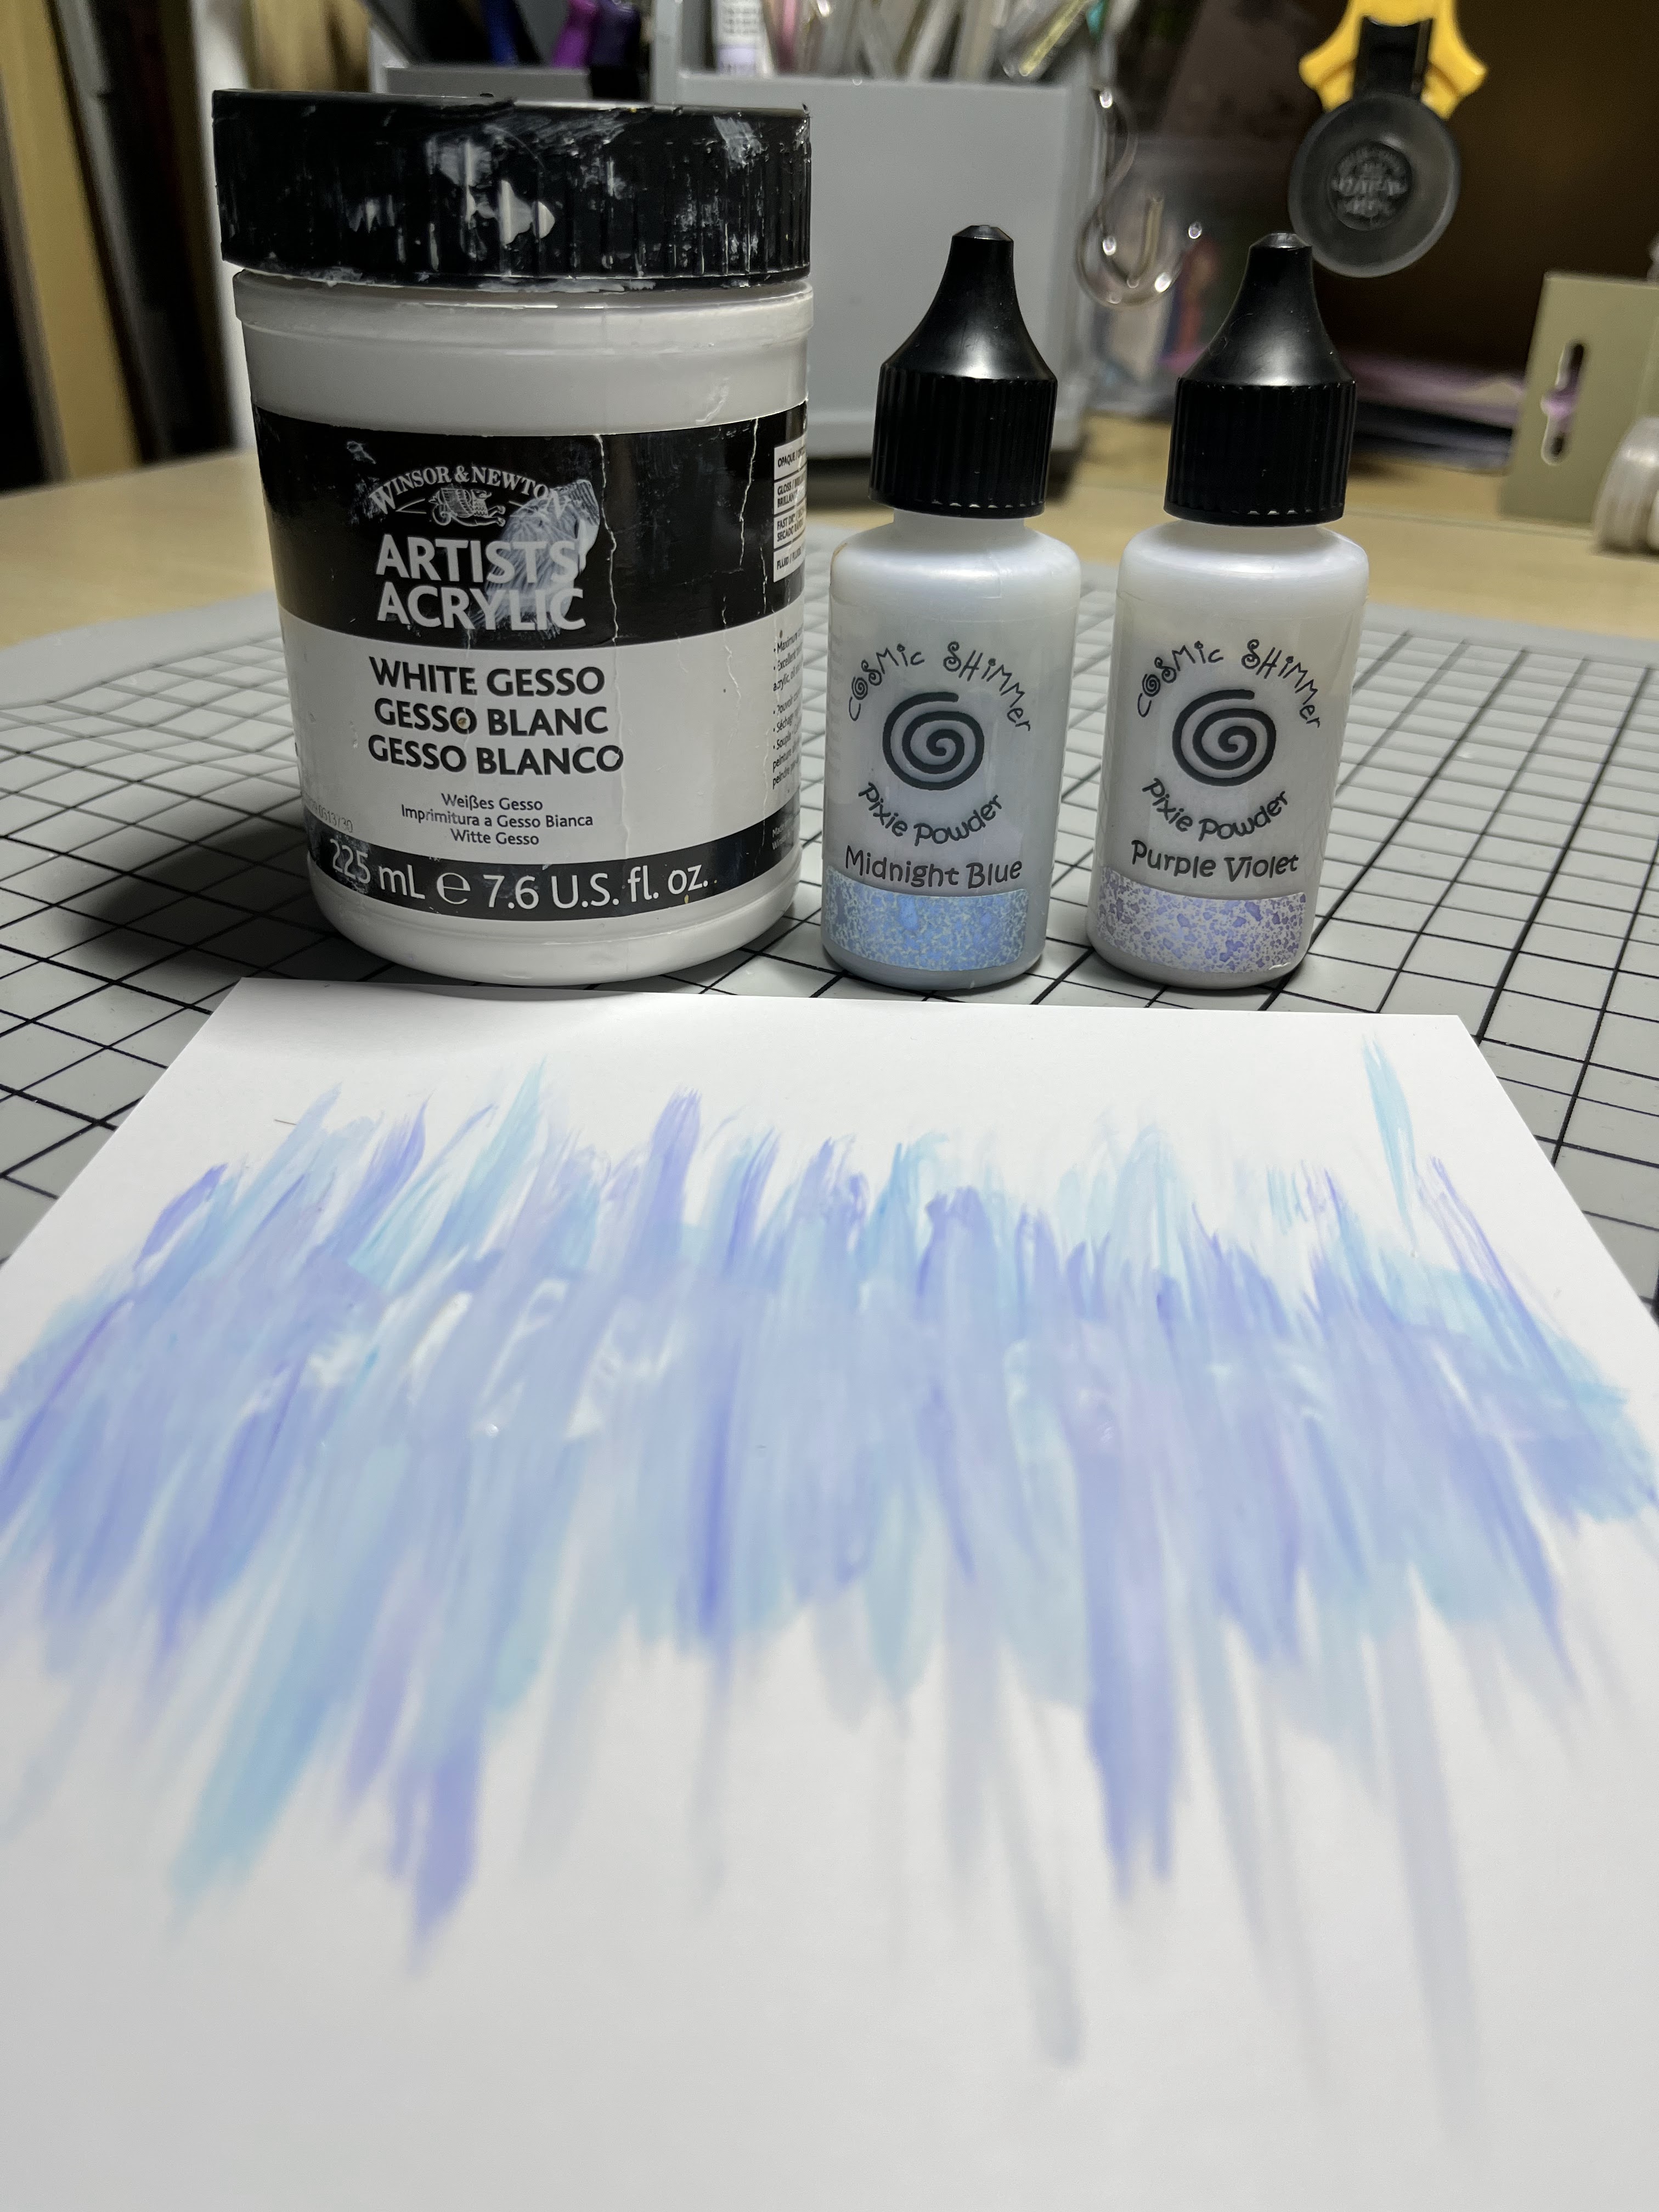
I placed two dollops of white Gesso on my glass mat.  On one dollop, I added "Midnight Blue" Cosmic Shimmer Pixie Powder.  On the other, I added "Purple Violet" Cosmic Shimmer Pixie Powder. I mixed each pile till the Pixie Powder merged with the Gesso to turn it the appropriate colour.


Using a paint brush, loosely held, I stroked the brush up and down in the blue mix across the white card from left to right.  I then did the same with the now lilac coloured mix.  I decided it needed something else, so also added some strokes of Gesso to blend the brush strokes. I used my heat gun on a gentle heat to dry the surface.

This is the ideal time for you stamp a sentiment and mount your card, as it will take ages for the glue to dry later.. lesson learnt from experience! I used the word "Celebrate" from the Penny Black Inc "Sweet Wishes 30-104" clear stamp set, stamped in Versafine Clair "Morning Mist" grey ink.  I like the idea that this card could be used for birthday, Christmas or New Year purposes.


I applied Cosmic Shimmer Acrylic Glue, very informally across the card, in the same up and down motions as the gesso mix, but keeping it closer to the the central area.  
Finally, I added a selection of glitter, Iced Diamonds and sequins to the glue area and then set aside to dry.

Friday, 28 June 2019

Design Team make for "My Time To Craft Challenge Blog" #400 "Seaside"


It's time for another challenge on the "My Time To Craft Challenge Blog" which has a theme of "Seaside" for challenge #400.

If you have a moment, please do pop across to the blog to see the other fab makes by my fellow Design Team members.

I decided to do something a bit different for this make by using lots of little bits and bobs I had floating around my work desk.

I had a piece of stamped card with a woodgrain effect, which I had given a grey wash to make it look like weathered wood, so decided to use that as a base.

I knew the colours that I wanted for the sea, so used Distress Oxide Inks in the shades of:  Twisted Citron, Tumbled Glass, Stormy Sky, Broken China and Salty Ocean and roughly applied it to card, filling the white areas using a paint brush.  

Once it was dry, I ran it through a Crafters Companion embossing folder which gave a nice wave look texture.  I ran a clear embossing ink pad across the surface then covered with a white/silver embossing glitter so that the raised areas sparkle like the sun catching the raised waves, then heat set.

In my embellishment stash, I found a balsa wood sentiment saying "Sun, Shells & Sand" so decided to colour the sea weed and star fish using my Arteza brush pens and then added some Stickles glitter glue to give it a bit of sparkle.

I tore a piece of cardboard box to add a colour and texture like wet sand. 

Finally, I assembled all the components and added little pearl like beads to the sand and small shells,  I also added a handful of clear sequins to the card to give added sparkle.

Tuesday, 18 June 2019

Lavinia Stamps "Tree Goddess Luna" Dream Card


I love this "Tree Goddess Luna" stamp by Lavinia Stamps, so decided to use her again, even though it's only a couple of days since I last stamped her.  This card is actually very sparkly, but unfortunately the camera just doesn't pick it up.


I used one of the backgrounds I made the other day, when I was experimenting using a stencil to print with.  The image above is the background before I started stamping.  I produced the pattern by using a Funky Fossil Stencil called "Petal Burst".  For this background I experimented with Distress Inks, which I found didn't work as well as the Oxides did for the same process.

Back to the image.  I started by stamping the Lavinia Stamps "Sacred Spells" script stamp in Versafine "Stormy Gray" ink.

Using the "Dream" stamp from the Lavinia Stamps "Inspire Me" set of word stamps, I stamped the word in Versafine Clair "Purple Delight" ink.  Using the same ink, I stamped the "Tree Goddess Luna" image.

I needed to draw the eye in to the image, so went around the edge with a blending tool and a Distress Oxide Ink called "Broken China".

Finally, I added some sparkle by using a silver glitter Signo Pen and a Sakura Gelly Roll pen to add some shimmer to the wings of Luna.  I added a sprinkling of Nuvo "Diamond" sequins to the background too.

Friday, 3 May 2019

Design Team Make for "My Time To Craft Challenge Blog" #396 "Clean and Simple"


It's time for another challenge on the "My Time To Craft Challenge Blog".  Challenge #396 has a theme of "Clean and Simple".  This is the Design Team sample I have made.

I masked a circle area and filled it using Tim Holtz Distress Inks with a blending tool.

I stamped the Lavinia Stamps "Dandelions" and the Spellbinders sentiment from their clear stamps set STP-005 using Versafine Clair "Twilight" shade of ink.  Finally, I added some clear sequins.

Thursday, 21 March 2019

Drake The Crow Card #laviniastamps


I've had a play with one of the new crow stamps released by Lavinia Stamps. This crow is called "Drake" and he is the large stand alone crow (rather than the small one from the set of three).

I used a background I had pre-prepared a couple of weeks ago.  I used Distress Inks on the Gelli Plate.  I used the following inks:  Wilted Violet, Blueprint Sketch, Mermaid Lagoon and Peacock Feather.  The large background with the strong colour was the first pull, the inner background that Drake stands on was the second pull.

To create the background on the inner background, I used the Lavinia "Feather" stamp, stamped in Versafine Clair "Monarch".  I stamped the crow called "Drake" in Versafine Clair "Nocturne".

I added some Liquid Pearls in a "Blackberry" shade and some silver glitter and white high lights using Signo Pens.

Friday, 1 March 2019

Lavinia Stamps March Monthly Challenge - Sample #2


Every month Lavinia Stamps hold a monthly challenge.  The challenge for March 2019 is "Pink, Purple and Blue".  As part of the Design Team, we are asked to produce three samples for each challenge theme.  This is my second sample for this month.

Initially, I was going to make a graduated brayered background, but after applying the Distress Oxides "Spun Sugar" ink, I decided to keep it to one colour.

I used Distress Ink in the shade of "Wilted Violet" through a  Sweet Poppy stencil then built the bouquet up using the following Lavinia Stamps:  Wild Vines, Vine, Dragon Pods, Zen Plant and Zen Thistle.  I stamped these in  Versafine Clair "Blue Belle", "Monarch" and "Purple Delight".

I added touches of extra colour using Signo Glitter Sparkle Pens in Violet and Blue.  I also used a white Signo Pen too.  I added a few Nuvo Sequins to lift the plain areas.

Finally, I mounted the card onto a dark blue cardstock then punched a couple of holes and threaded the ribbon through and tied the bow.  I then mounted the card onto a white card blank.


Lavinia Stamps March Monthly Challenge - Sample #1


Every month, Lavinia Stamps have a monthly challenge.  The challenge for March 2019 is to use the colours "Pink, Purple and Blue".  As part of the Design Team, we are asked to produce three samples on the challenge theme. This is the first of my three.

I decided I wanted to create a more light and airy card, instead of a solid coloured background, so had a messy splatter session using Distress Inks in the shades of "Worn Lipstick, Picked Raspberry, Wilted Violet and Salty Ocean", which I splattered using a fan paint brush.

When the coloured splatters were dry, I stamped the Lavinia Stamps "Flower Fairy" and "Fairy Wishes" sentiment in Versafine Clair "Monarch" shade of ink (I actually masked of the "and angel kisses" as I didn't want that part of the sentiment on the card).  Finally, I added a few Nuvo Sequins to the surface of the card.


Wednesday, 20 February 2019

A recovery project (when crafting goes wrong) #Laviniastamps


I have been a paper crafter for many years and sometimes things go wrong.  Usually due to my carelessness.  This is one of those projects that went wrong and was then recovered.

It started a couple of days ago, when I was making a batch of alcohol ink backgrounds on Yupo paper.  Having made a very special background (using Mermaid and Citrus shades), I foolishly stamped the seahorse in the wrong ink.  I don't mean the wrong shade, I mean the wrong type of ink.  I used a Versafine Clair ink instead of a StazOn.  

The difference between the two is that StazOn is quick drying and works well on non-porous surface (Yupo is like a plastic coated paper).  Where as the Versafine Clain needs something to grip to.  The result of this error was that in 24 hours time, the ink was still very wet.  I decided to wipe it off and see if I could salvage the beautiful background - and it worked!


The wet wipe did remove some of the alcohol ink background, but at least I was able to use it.

I started by stamping the Lavinia Stamps "Seahorse" in a StazOn ink in a "Teal Blue" shade.  I then stamped the "Skeleton Tree" in StazOn "Midnight Blue" shade of ink to replicate seaweed.  I used the Lavinia "Seaweed" stamped in StazOn "Forest Green" shade of ink.

Finally, I added highlights of silver glitter using a Signo Pen and added sequins and sticky gems to replicate air bubbles in the water.

Sunday, 10 February 2019

52 Week Mini Art Card / Tag Challenge 2019


The prompt for Week 7 is "Love"

For my tag, I started by raiding my box of patterned paper off-cuts.  I added a piece of paper tape measure then coated the patterned paper and measure with a thin wash of Gesso, just enough that the pattern on the paper could be seen.  I then inked the edges in black and red ink.

I used a paper coaster/doily and painted a thin wash of Distress Oxide "Old Paper" across the surface and positioned it on the tag.  Using co-ordinating papers, I layered them above the doily, cutting paper hearts with a punch.  I die cut the word "Love" using a Stampin' Up die from the "Expressions Thinlits" set.  

To finish I added a piece of ribbon to the base, a flower and die cut foliage to the top right and Nuvo sequins across the tag.

~~~

You can find out more about the challenge, including a list of prompts to date, by clicking here.

There is also a Facebook Group that you are more than welcome to join.  Within the group, you can upload your creations to the weekly prompt albums, see what others are making and chat too.  We would love you to join us, the more the merrier.  Sam x


Friday, 1 February 2019

Design Team Make for "Love To Craft Challenge Blog" #31 using Lavinia Stamps


In the rabbit burrow

This little project has been in my mind for the past couple of days.  I was thinking about how I could replicate looking into a rabbit burrow.

I started off by stamping the Lavinia Stamps "Midnight Meandering" rabbits and the "Creeping Vine" in Versafine "Black Onyx" ink.  I coloured the ground the rabbits stand on with a Promarker pen and added touches of white to the tails and eyes of the rabbits using a white Signo Pen.

I then selected four nesting round dies and cut circles in three pieces of cardstock and finally the largest circle in a piece of Shenandoah "Natural Wonders" paper.  On this piece of patterned paper, I stamped a hedgehog from the Lavinia Stamps "Walace Family".  I then inked the edges and the lower section of the page with black ink.

Starting with the smallest aperture, I layered the cardstock with foam pads between each layer to add dimension. I did this in the hope it would provide depth.  Finishing with the patterned paper on the top.

I die cut some foliage in black card (I have had the dies for some time and didn't retain the packaging, so I have no idea where they came from).  I stuck the die cuts to either side of the aperture and then added a little shadow with a pen below the die cuts and the hedgehog.

I finally added a few Nuvo Sequins  in "Prickly Pear and "Olive Green" colours to add a little sparkle to the lighter top of the picture.  I then mounted the picture into a box frame.


Monday, 28 January 2019

Lavinia Stamps "Shaylee" Card


This weekend we have had our son and his family staying with us.  we planned a fairy hunt in the garden for Willow, our Grand daughter who is five, and she loved it, so I've made this card to remind Willow of her stay with us.

I started the card, by creating a background using various shades of Distress Oxides. 

All the stamps I have used are by Lavinia Stamps.  I stamped the main fairy "Shaylee" in Versafine "Black Onyx" ink.  I then created the landscape Shaylee stands on by using Distress Oxides and a mask.

I then stamped the "Foxglove" and the "Fern Heads" in Colorbox and Memento inks.

I stamped the "mini snail", "Fairy Bugs" and the "ball/bubble" the fairy is holding in Versafine Ink. I added touches of white and silver glitter to the card by using Signo Pens.  Finally, I added "Glossy Accents" to give the bubble a more crystal ball look and a handful of clear Nuvo sequins to add quiet interest to the background.

Sunday, 13 January 2019

Week 3 - 52 Week Mini Art Card / Tag Challenge 2019


Hi, thanks for popping in.  It's time for another challenge prompt. 
The Week 3 prompt is "Collage"

If like me, you save your scraps of paper and other bits and bobs, for a "just in case moment", then this prompt is for you. Drag out those bits and put them to use.

For my collage, I decided on a beach scene, but yours can be on anything you like.  I raided my oddments box and came up with this.

I started by painting the sky with water colours and worked my way down the tag from there.

I've torn inked paper into scraps,  found an embossed bit of card that could be used for sea and added a bit of extra sparkle with Nuvo sequins.  On the rocks in the foreground, I have used some FlowerSoft which was given to me by a friend but I had never got to use.  

The only stamping on the tag, are the birds which are a Lavinia Stamp. 

~~~

You can join this challenge at any time, do as much or as little as you like, it's very, very relaxed.  If you would like more info or would like to see the previous prompts, you can check them out here.

There is also a Facebook Group for this challenge, I'd love it if you popped over and joined the fun, by sharing your challenge images and talking to the others taking part about all things crafty.  Sam x

Thursday, 10 January 2019

Bear Birthday Card (Papercraft Essentials Magazine - issue 159)


I made this card for a relative who will be celebrating his birthday shortly.

The lovely bear and sentiment was a stamp that came free with Papercraft Essentials magazine in issue 159.  I stamped him in Versafine "Vintage Sepia" ink for the bear face and "Black Onyx" for the hat and the sentiment.  I then coloured the image using a damp paint brush and Distress Inks.

The green stars in the background were stamped in Versafine Clair "Verdant", this stamp was in the same set as the star. Finally, I added two shades of Nuvo sequins to the surface of the card and a sticky black gem for each of the eyes.