52 Week Mini Art Card/Tag Challenge

Showing posts with label Wow! Heat Embossing. Show all posts

Tuesday, 26 August 2025

Karen Telfer's 12 Days of Chrismas Tags 2024 - Day 6


On the run up to each Christmas, I usually take part in Karen Telfer's Christmas Tag challenge.  Because we were living in the caravan and I didn't have my craft supplies, I wasn't able to take part in 2024.  Now my craft room is set up, I thought I had better get cracking on the tags.  For 2024, Karen was doing 12 tags rather than 24 as she had a busy work schedule.

This is my Day 6 Tag (You can watch Karen's tutorial here).

I used three shades of Distress Oxide Inks for this tag, using: Mustard Seed, Mowed Lawn and Abandoned Coral shades of inks.

I used a Wow! clear embossing stamp pad and Wow! Bright White super fine embossing powder and heat set to stamp the star and the sentiment, which are both part of the Stampin' up stamp set called "Bright and Beautiful".

I added some splatters of white paint and black Posca pen to the background too.

Saturday, 23 August 2025

Lavinia Stamps Headress Jingle Bell Forest Tag


I've had a very random play today, making this tag, which I have called "The Jingle Bell Forest".

I used four shades of Distress Oxide Inks for the background, using Salvaged Patina, Peacock Feathers, Blueprint Sketch and Villainous Potion. I sprinkled splatters of water across the surface then blotted the tag to get a mottled/bleached look/

I used the Wow! Clear Embossing Pad with the Lavinia Stamps "Headress" and "Bells" stamps, coated in Wow! Rich Gold embossing powder and heat set.

I then stamped the trees, using four shades of Versafine Clair Inks (Morning Mist, Warm Breeze, Blue Belle and Twilight) with the Lavinia Stamps "Small Fairy Fir Tree" stamp. I used Versafine Clair "Arctic" ink for the shadows.

Finally, I added some splatters of white Posca Pen and dots of "Mermaid" Liquid Pearls to the headress along with some dots of blue glitter gel pen too.

Sunday, 16 March 2025

52 Week Mini Art Card / Tag Challenge 2025 - Week 11


The Crafting Niche 52 Week Mini Art Card/Tag Challenge 2025:

This is a weekly challenge. I provide you with a prompt/theme each Sunday morning through out the year.  The challenge is very relaxed.  You can do as much or as little as you like.  You can create cards, tags, Artist Trading Cards (ATC's) or index cards, the choice is yours. You just go with what ever is in your head at the time.  You can stamp, get inky, use patterned papers, texture, embellish it is all down to you.

There is a dedicated private Facebook Group, with a lovely bunch of people who are already sharing their makes from previous challenges.  You can find the group by clicking this link.  I'd love you to join in.

The prompt for Week 11 is "Greens and Blues"

•••

For my Week 11 "Greens and Blues" tag, I started out with a navy blue base for the tag.

Some years ago, I saved a lovely photo from a magazine of a piece of green and blue fabric.  I decided to cut it into strips and stick it on to the navy tag base at regular intervals.

I then used Wow! Embossing ink and Wow! Rich Gold Embossing Powder to stamp the sentiment which is part of a Lavinia stamps set called "Heartfelt Verse".  I then heat set the powder, cut the piece to size in a banner shape and stuck it to the tag using double sided sticky tape.

Thursday, 24 October 2024

Clarity Stamps "Retirement Card"


My friend retires from her TA job in the local primary school tomorrow after many years of service, so I made her this card.

For the central area of the card, I used two stencils from the Clarity Crafts "Seedheads & Tiles" stencil set.  For the square background I used "Vivid Chartreuse" Ranger Archival Ink .  I then lay the decorative leaf stencil from the same set over the top and applied "Fern Green" Ranger Archival Ink through the stencil.

I dusted the surface of the card with an anti static bag of chalk, then stamped the words "On your retirement", part of the Clarity "Entwined Sentiment" stamp set, using Wow! Clear Embossing pad, coated the words with Wow! Rich Gold Embossing Powder and heat set.

I mounted the card on to a piece of dark green card then on to a white card blank.  I used a Signo Uniball gold coloured pen to add littel dots around the central tile and around the extremities of the inner leaf.

Sunday, 21 July 2024

Funky Fossil "Classic Trimmings" Christmas Tag


As usual, when I get back from the caravan, I have to have a play with stamps and inks.  Today I made this Christmas gift tag.

I started with a blank tag and added horizontal strips of washi tape in a plaid design.  The tape is from the Funky Fossil set called "Timeless Traditions Trio Washi Tape".  I then sanded the surface to dull it.

Next, I went around the edge of the tag and drew vertical lines (on the left hand side), using a gold gel pen. I then used the Funky Fossil "A7 Face the music" stamp set to stamp music notes, stamped in "Jet Black" Archival Ink.

On an off cut of white card, I used a Wow! Clear Embossing Pad to stamp the ornament shapes.  The ornaments are part of the Funky Fossil "Classic Trimmings" stamp set.  I then coated the stamped image in Wow! Rich Gold Embossing Powder and heat set.  I coloured the ornaments and then fussy cut them, gluing them into position on the tag.

Finally, using Versafine Clair 'Morning Mist" grey ink, I stamped the sentiment, which is part of the Funky Fossil "Christmas Small Print" stamp set, cut it down and edged it in a gold gel pen.

Sunday, 30 June 2024

52 Week Mini Art Card / Tag Challenge 2024 - Week 27


The Crafting Niche 52 Week Mini Art Card/Tag Challenge 2024:

This is a weekly challenge. I provide you with a prompt/theme each Sunday morning through out the year.  The challenge is very relaxed.  You can do as much or as little as you like.  You can create cards, tags, Artist Trading Cards (ATC's) or index cards, the choice is yours. You just go with what ever is in your head at the time.  You can stamp, get inky, use patterned papers, texture, embellish it is all down to you.

There is a dedicated private Facebook Group, with a lovely bunch of people who are already sharing their makes from previous challenges.  You can find the group by clicking this link.  I'd love you to join in.

The prompt for Week 27 is "Summer"

*****

This is the tag that I have made for the Week 27.  I decided to go with a bee, as nothing sums up summer to me, than the sound of the low hum of a bee in the distance.

I used Versafine Clair "Medieval Blue" ink, coated in Wow! Clear Embossing Powder and heat set for the Funky Fossil "Hello Gorgeous" flowers and sentiment.

I coloured the flowers by painting the flowers with different shades of Distress Oxide Inks.  I also used Posca Pens and gel pens.

The bumble bee is part of the Funky Fossil "Queen Bee" stamp set, I stamped the bee on to the tag and then on to an off-cut of white card, using Versafine Clair "Nocturne" black ink, I then coated the stamped image in Wow! Clear Embossing Powder and heat set the image.

I fussy cut the bee, inking the edges of it in black ink, then coloured the body using Posca Pens, using "A Wink of Stella" on the wings.  I used wet glue on the underside of the head of the bee, but for the rear end added some black foam pads to stick the bee into position, this gave it a more 3D look.


Monday, 24 June 2024

Heat Embossed Flower Anniversary Card


Another card ticked of my list of "to be made" cards.

I used a four and a half inch square piece of white card and ran an antistatic chalk pad over the surface.  I then stamped the flower, which is part of the Hobby Art Stamps "Abstract Flowers CS175D" stamp set, stamped in Wow! Clear Embossing Ink, which I then coated in Wow! "Rich Gold" Embossing Powder and heat set.

I then coloured the white card with two colours of Derwent Inktense Pencils, applied with a paint brush.  Using "Burnt Orange" for the flowers and "Neutral Grey" for the background.  Once dry, I then added dots of white and gold gel pen.  I used a black fine line pen to fill the central dots of the flowers, then mounted the card on to a piece of black paper and then on to a white card blank.

Finally, using Versafine Clair "Nocturne" black ink, I stamped the "Happy Anniversary" greeting, which is part of the Funky Fossil Designs "Stripped Back Sentiments" stamp set.  I then die cut the stamped sentiment in to a banner shape, using sticky foam pads to elevate the greeting off the surface of the card.

Sunday, 2 June 2024

52 Week Mini Art Card / Tag Challenge 2024 - Week 23


The Crafting Niche 52 Week Mini Art Card/Tag Challenge 2024:

This is a weekly challenge. I provide you with a prompt/theme each Sunday morning through out the year.  The challenge is very relaxed.  You can do as much or as little as you like.  You can create cards, tags, Artist Trading Cards (ATC's) or index cards, the choice is yours. You just go with what ever is in your head at the time.  You can stamp, get inky, use patterned papers, texture, embellish it is all down to you.

There is a dedicated private Facebook Group, with a lovely bunch of people who are already sharing their makes from previous challenges.  You can find the group by clicking this link.  I'd love you to join in.


The prompt for Week 23 is "Weddings"

*****

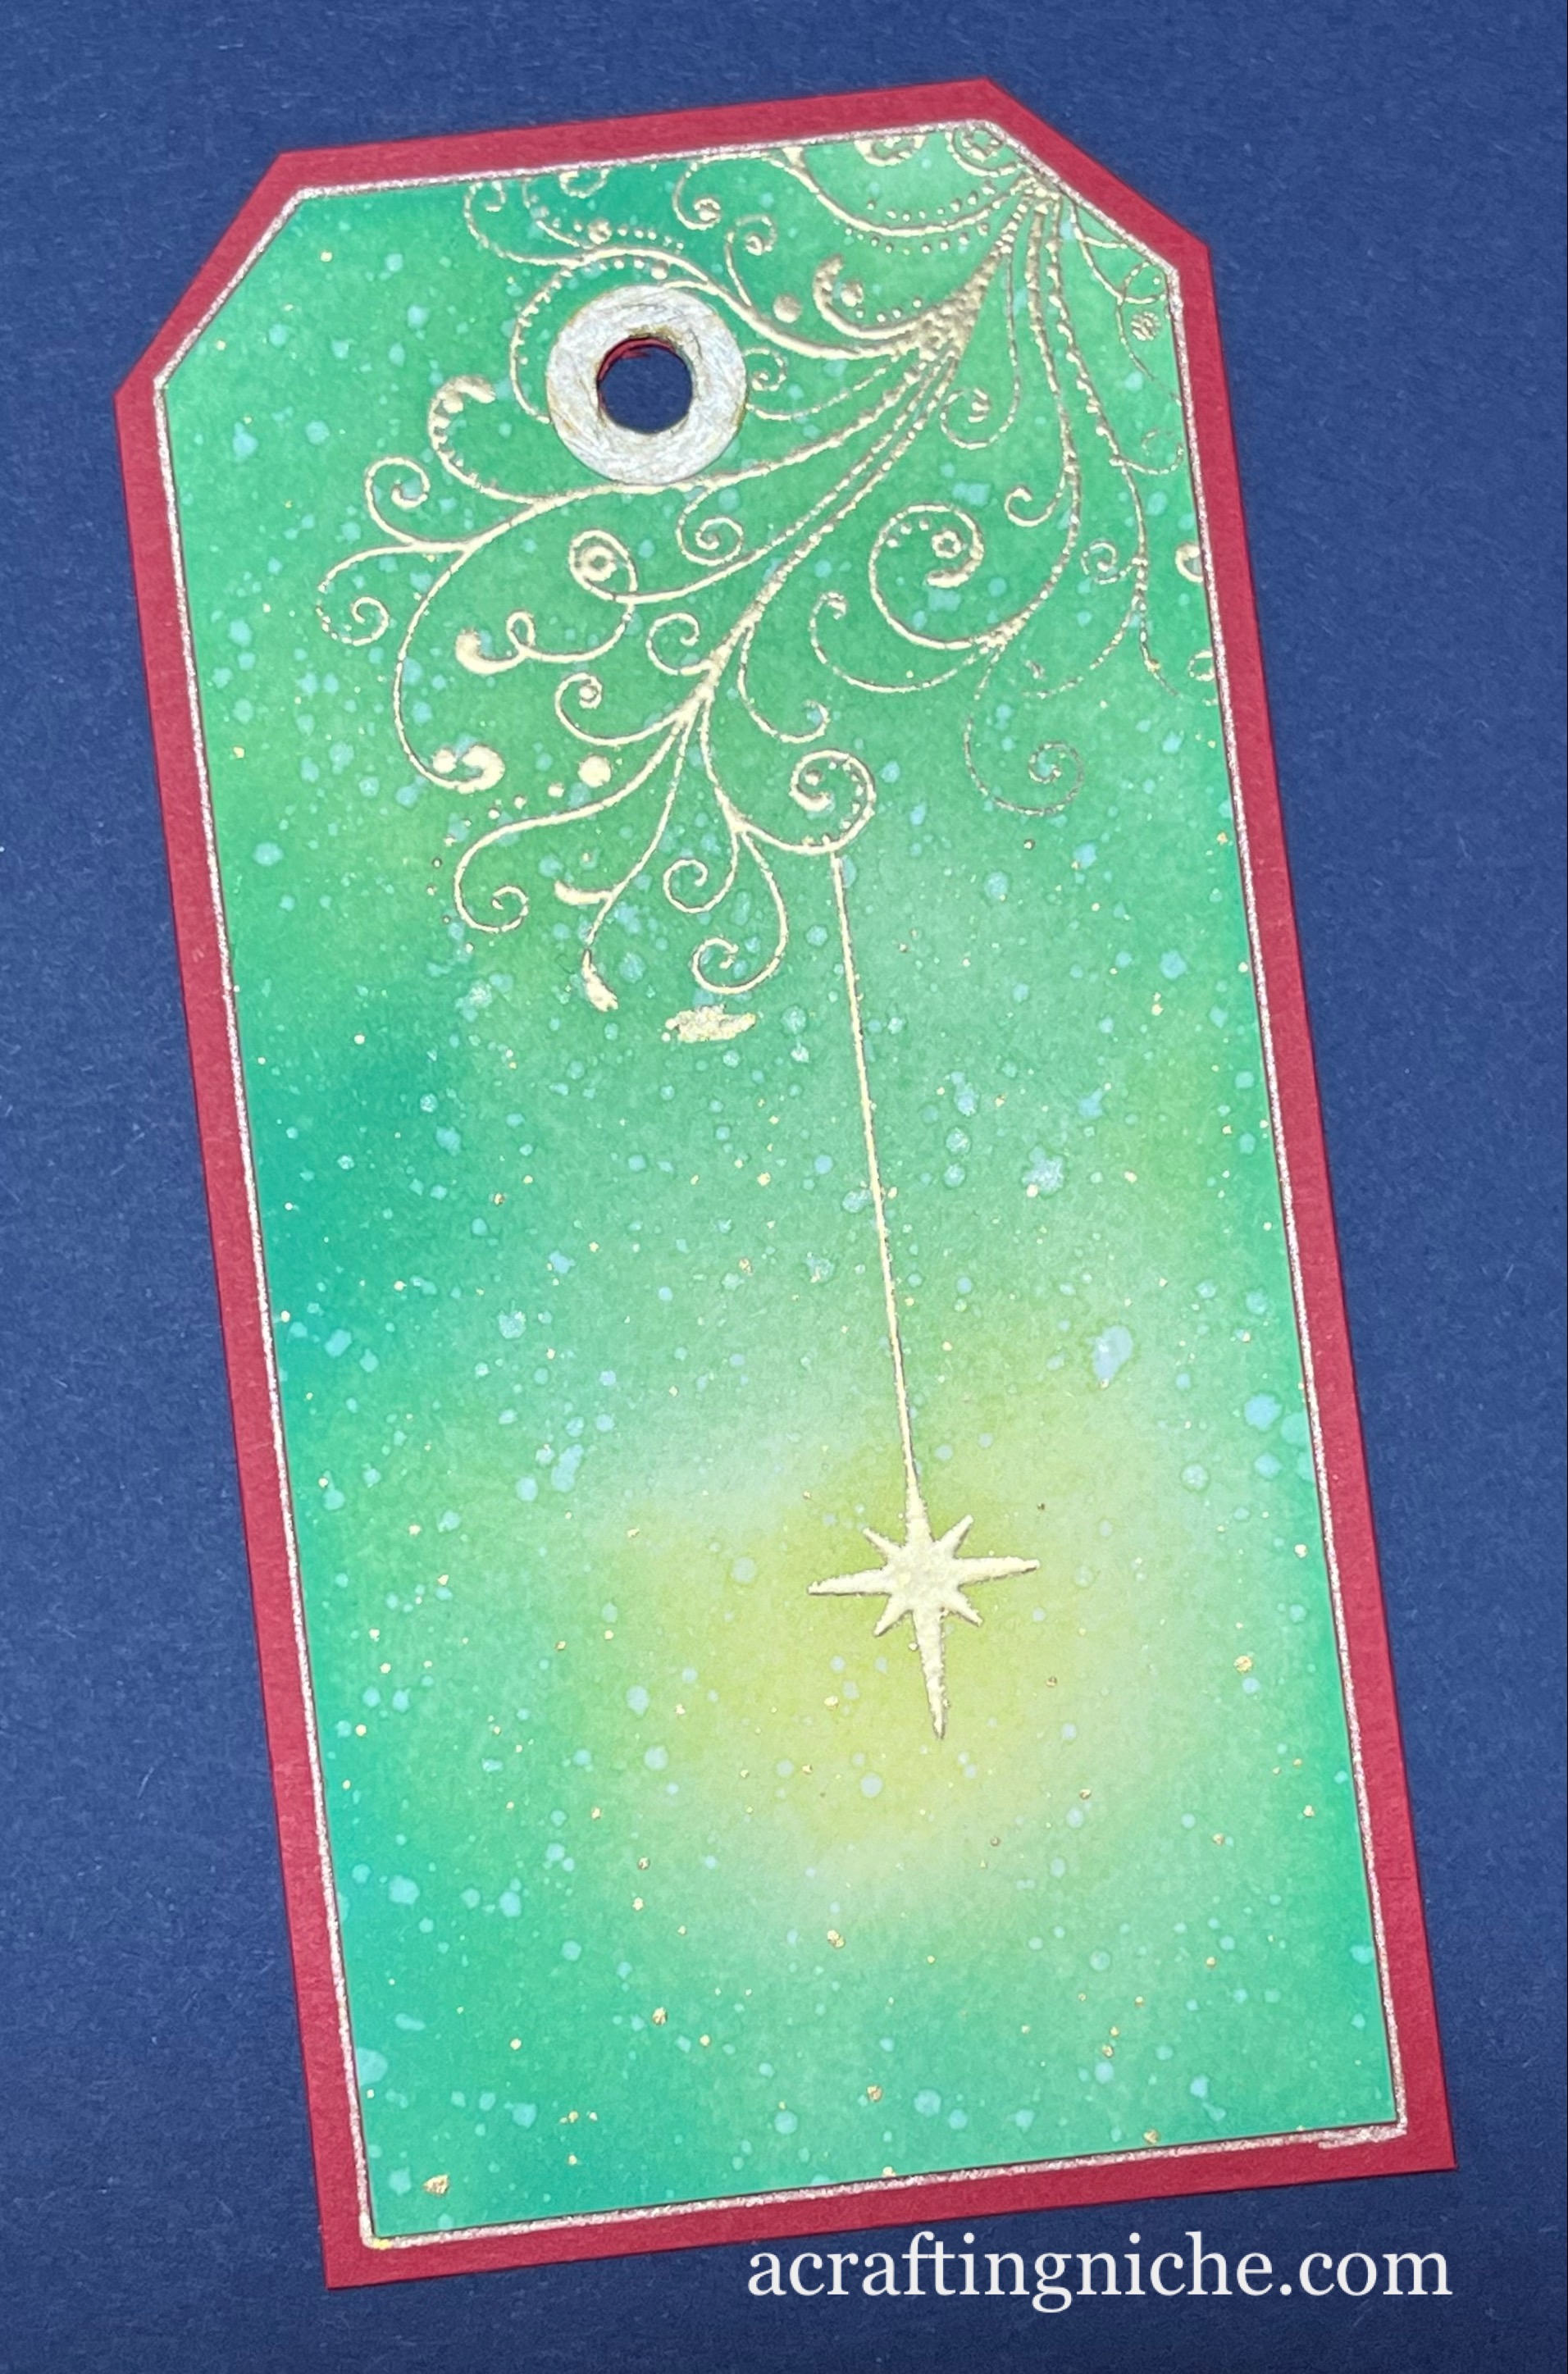
This is the tag that I have made for the Week 23, I started with a piece of white card, cut into a tag shape.

Using "Finger Dabbers" and three shades of Distress Oxide Inks:  Spun Sugar, Tumbled Glass and Shaded Lilac.  I added lots of dots across the surface of the white card.  Some over lapped, in places I left some white space.

I then cut a strip of Vellum, wider and longer than the tag by about an inch each way.  Along the bottom of the narrow edge, I used a punch to create a scalloped edge to the vellum.

Then, using a stamping platform, with Wow! Clear Embossing Ink, I stamped the image of the bride on to the vellum, using a Stampin' Up stamp set, called "Wonderful Moments".  I coated the stamped image with Wow! Opaque Bright White Embossing Powder and then heat set using a low heat setting in case the heat distorted the vellum.

I added a strip of double sided sticky tape to the top of the back of the tag and folded the top of the vellum from the front over to the back, so that the sticky tape held it into position.  I then mounted the tag on to a piece of lilac coloured card.

Next, I stamped the sentiment, using the same Wow! ink and embossing powder as I used earlier, with a Penny Black sentiment saying "Love is all around".  The sentiment is part of their set called "Only You 30-666", I then heat set the stamped sentiment.

Returning to the vellum, the decorative edge, kept lifting, so I added a touch of glue to keep it in place.  I then added a handful of sticky backed pearl gems across the surface of the tag.


Saturday, 18 May 2024

Tiffany Johnson Creative #100daysartplay Challenge - Day 91


Today is Day 91 of the Tiffany Johnson Creative #100daysartplay challenge, this is the last day with the prompt of "inks".

This was a quick make card.  I found a small piece of kraft card, only 4"x4" - it was one of those situations - do or ditch.  I decided to use it.

Going through my stamps, I came across a set from my scrapbooking days, I think it was by 7gypsies and has not seen the light of days for around fifteen or more years!  I decided to address this by using a couple of the stamps from the set.

I rubbed an anti-static bag over the surface of the kraft card, popped it in my stamping platform then using a Wow! Clear Embossing Pad, coated the stamp and stamped.  I did this a couple of times as the Kraft card tends to absorb the ink quicker than normal card.  I then covered the inked area with Wow! Opaque Bright White Embossing Powder and heat set. Finally mounting the kraft card on to a white card blank.

Wednesday, 24 April 2024

Tiffany Johnson Creative #100daysaertplay Challenge - Day 67


Well I've got two thrids of the way through the Tiffany Johnson Creative #100daysartplay Challenge.  I can see the light of the finish line at the end of the tunnel. The prompt for this week should be "Dollar Tree" finds, but here in the UK, we don't have Dollar Tree, so I'm making making anything I fancy this week.

For this card, I used a piece of gel plate/Brusho background I had in my stash.  Stamping the Creative Expression "Hexagon Script" over the surface using Versafine Clair "Charming Pink" ink.  I used the same ink to ink the edges of the card. I splattered some white paint from a Posca Pen across the surface of the card.

I used Wow! Clear Embossing Ink and Wow! Bright White Super Fine Embossing Powder to stamp the dandelion and sentiment and then heat set.  (I'm not sure who made the stamp set, it's one I've had for years with a reference of SSC1106 STM2010). I then mounted the card on to a piece of pink paper and then on to a white card blank.

Friday, 5 April 2024

Tiffany Johnson Creative #100daysartplay Challenge - Day 48


Today is Day 48 of the Tiffany Johnson Creative £100daysartplay challenge.  This week is all about stamps and stamping.

For this card, I have used Versafine Clair "Medieval Blue" ink to stamp the Wow! Blossom (stamp set 53).  Once stamped, I coated the stamped area in Wow! Clear Embossing Powser and heat set.

I mounted the embossed image on to navy blue card and then on to a white card blank

I stamped and die cut the word "Hello" using Wow! Rich gold embossing powder and ink pad and the Waffle Flower "Oversized Hello 271309" stamp and die set.  I used wet glue to stick the word in position.

Finally, using a gold gel pen, I coloured in some of the flowers and edged the white with a gold band of ink.

Tuesday, 2 April 2024

Tiffany Johnson Creative #100daysartplay Challenge - Day 45


Today is Day 45 of the Tiffany Johnson Creative #100daysartplay challenge.  This week is all about stamps and stamping.

I started with a white piece of card, cut in to a tag shape.  I used the stamps from two Visible Image stamp sets, using "See Everything" and "Creative Chaos", stamped in Versafine Clair "Nocturne" black ink and then coated in Wow! Clear Embossing Powder and then heat set.

I used a blue and a yellow Derwent Inktense Pencils to colour the iris of the eye.  I then used yellow, orange and light blue coloured Posca pens to colour in various sizes of dots. Finally, mounting the tag on to co-ordinating blue card.

Saturday, 9 March 2024

Lavinia Stamps "Botanical Blossoms" Tag


My order of the new stamp release from Lavinia Stamps arrived early afternoon, so I wasted no time in getting to play with my favourite stamp from the new release, the "Botanical Blossoms".

I cut a piece of kraft card in to a tag shape, then using Versafine Clair "Twilight" dark blue ink, stamped the new "Botanical Blossom" stamp, coating the stamped image with Wow! Clear Embossing Powder and then heat setting.

Next I used "Paradise Teal" Ranger Archival Ink through the "Lavinia Stamps "Nimbus Stencil" fading the colour out towards the edges.

I then used Versafine Clair "Morning Mist" grey ink to stamp "Words of Spring" in second generation stamping.  I then inked the edges of the tag with Versafine Clair "Twilight" ink.

Finally, I made splatters with a white Posca Pen around the edges of the stamping.  I used a white gel pen to add a little detail to the stamped image and then mounted the tag on to a piece of dark blue card.

Sunday, 11 February 2024

52 Week Mini Art Card / Tag Challenge 2024 - Week 7


The challenge for 2024 is weekly.  I will provide you with a prompt/theme each Sunday morning through out the year.  The challenge is very relaxed.  You can do as much or as little as you like.  You can create cards, tags, Artist Trading Cards (ATC's) or index cards, the choice is yours. You just go with what ever is in your head at the time.  You can stamp, get inky, use patterned papers, texture, embellish it is all down to you.

There is a dedicated private Facebook Group, with a lovely bunch of people who are already sharing their makes from previous challenges.  You can find the group by clicking this link.  I'd love you to join in.

The Crafting Niche 52 Week Mini Art Card/Tag Challenge 2024:

The prompt for Week 7 is "Pastel Colours"


***


This is my Week 7 tag, working to a prompt of "Pastel Colours"

For the tag base, I used one of the Clarity stamps "Printed Post Card Quotes", cut in to a tag shape.

Over the top of the printed alphabet, I used three shades of Ranger Archival Inks (Prickly Pear, Violet and Forget Me Not), applied with blending brushes.

I dusted the surface of the inked tag with an anti static chalk bag before laying a Tim Holtz / Stampers Anonymous stencil over the top.  I used the "THS032 Flourish" stencil.  Then using a Wow! Embossing Ink Pad, I pressed the ink over the surface and through the surface.  

Once I was sure there was enough coverage of sticky clear ink, I then coated the tag with Wow! "Sea Mist" Embossing Powder and heat set.

Next, using a fan shaped paint brush, I splattered Dr PH Martin's white bleed proof paint over the surface of the tag so there were lots of small speckles of white across the surface.

While the paint was drying, I die cut the flowers using a Sizzix / Tim Holtz die set called "Wild Flowers #2".  I used plain white card to cut the flowers then fixed them into position using a wet glue.

I mounted the tag on to a piece of white card, finally adding dots of white Ranger "Enamel Accents"  to break up the background colour.

Saturday, 20 January 2024

Funky Fossil Designs "Indian Mandala" Card


A quick card, using the Funky Fossil Designs "Indian Mandala Stencil" with a metalic copper/gold coloured paint, applied through the stencil with a finger dabber.  It flooded a little bit in one area, which lost some of the stencil pattern, so I decided that was where I was going to put the sentiment.

I used a piece of kraft card and a sentiment from the Simon Says Stamp set called "Tiny Words - Birthdays", stamped in Wow! Clear embossing ink and then coated with Wow! Earthtone Blueberry Embossing Powder and then heat set.  

I then mounted the mandala on to a piece of kraft card and then on to a white card blank. I mounted the sentiment on to a piece of the dark blue card and used black foam pads to elevate the sentiment over the problem area of the stencil.


Friday, 8 December 2023

Lavinia Stamps "Wallace" Birthday Card


I made this card for my nature loving friend.  I have already given her the birthday present, a hedgehog hibernation house for the garden, so I decided the card had to reflect that gift somehow.

For the large "Happy Birthday" sentiment, I have used a "Hobby Art Ltd" stamp set called "Greetings for Friends - CS158D", stamped in Wow! embossing ink and coated with a Wow! silver coloured embossing powder and heat set.

For the small corner image, I have used three Lavinia Stamps sets.  I stamped one of the hedgehogs from "The Wallace Family" stamp set in Versafine Clair "Morning Mist" grey ink.  

I then stamped the "Lavender" and the small lavender stamp from the Lavinia "Flower Pots" stamp set in two shades of Versafine Clair, using "Shady Lane" green ink for the stems and "Monarch" purple ink for the flower heads.

I grounded the hedgehog and flowers using "Weathered Wood" Distress Oxide Ink, applied with a paint brush. I then gave the hedgehog body some colour, using "Frayed Burlap" Distress Oxide Ink.  I painted on some grass too, using "Mowed Lawn" Distress Oxide Ink.  

Finally, I added some dots of pink and purple Posca Pen to give the impression of flowers in the grass.  Then mounted the card on to a piece of grey paper and then on to a white card blank.

Wednesday, 6 December 2023

Day 24 of Karen Telfer's "24 Days of Tags 2023" challenge - The Final Day


It is Day 24, the final day of Karen Telfer's "24 Days of Tags 2023" challenge and I am already missing it!  I have absolutely loved taking part this year.  Karen always has the ability to inspire me.  So I would like to say a big thank you to Karen for planning, sharing her ideas, taking the time to video her tag making and commenting on all the posts on Social Media.  Karen is a total star in my eyes.

The Day 24 tag is all about using your favourites.  I've used my favourite colours and techniques on this tag.  

Starting with a white piece of tag shaped card, I used three shades of Distress Oxide Inks, using Salvaged Patina, Mermaid Lagoon and Blueprint Sketch.

I splattered water droplets over the surface to achieve a bleached speckled look to the background.  I then splattered some silver metalic paint over the surface in the same way.  I used a heat gun to dry the surface.

Next I used the Funky Fossil Designs "Vintage Script" stamp, in second generation stamping using Versafine Clair "Morning Mist" grey ink.

The next layer to go on the tag was using "Chipped Sapphire" Distress Oxide Ink through the Visible Image "Ye Olde Christmas Stencil". I then gave it a blast of the heat gun to totally dry the surface.

The next step was using Wow! Embossing Ink and Wow! "Bright White Super Fine" embossing powder with the Visible Image "Peace, Love & Hope" stamp set for the word "peace" and the "snowflakes.

I inked the edge of the tag with Versafine Clair "Medieval Blue" ink.  I used glue tape to stick the tag to the dark blue card.  Finally, I added sticky backed gems to the snowflakes and the background for a bit of sparkle.

Tuesday, 5 December 2023

Day 23 of Karen Telfer's "24 Days of Tags 2023" Challenge.


Well it has been a bit of a marathon, but I am now up to date with my tags, ready for the final one tomorrow.

The main image is part of a Woodware stamp called "Poinsettia Corner - JGS360", which I have heat embossed using Wow! Rich gold embossing powder on the tag, but also on two small pieces of card.

I used the same Wow! embossing powder to stamp and heat set the sentiment, which is part of the Simon Says Stamp set called "Tiny Words - Christmas".

I coloured the stamped poinsettia images using Distress Oxide Inks, the colours I used are:  Peeled Paint and Rustic Wilderness for the leaves and Festive Berries and Candied Apple for the petals.

I fussy cut the two flowers on the small pieces of card.  I used foam pads on the underside of the petals and wet glue in the middle.  Once in postion I added some Ranger "Glossy Accents" to the very middle of the flower and dropped some tiny bronze coloured beads into it.

I mounted the card on to a piece of green card then coloured the berries using a red Posca Pen and a white gel pen for highlights.

Monday, 4 December 2023

Day 19 of Karen Telfer's "24 Days of Tags 2023" challenge.


I'm playing catch up on my tags again as I was away at the weekend attending a course.  I'll share with you what I was up to in my next post.

This is my Day 19 tag of "Karen Telfer's 24 Days of Tags 2023" challenge.

For my tag, I used two Lavinia Stamps the "Mystic Swirl" and "Christmas Charms", stamped in Wow! clear embossing ink, coated in Wow! Rich Gold Embossing Powder and then heat set.

I then created the background colour using two shades of Distress Oxide Inks:  "Twisted Citron" and "Lucky Clover".  I deliberately kept the darker ink away from the hanging star, to give the impression that the star is shining light. I rubbed over the heat embossing with a cloth to remove any ink that was over it.

Next, I used a fan shaped paint brush, dipped in water and tapping the brush over the surface of the tag, creating tiny droplets, I then blotted the water, which left a lovely bleached splattered look.

I used the same technique with metalic gold paint to add tiny gold flecks across the surface of the tag.

Finally, I mounted the tag on to a piece of red card and outlined the inner tag with a metalic gold pen.

Wednesday, 29 November 2023

Sweet Poppy Stencils Botanicals Christmas Card


I got a bit carried away with the stamping on this card, but I think it was worth the effort for the result.  All stamps are by Sweet Poppy Stencils.

I started with a piece of cream coloured cut, cut to 6x6".  In the middle of the card, I stamped the Sweet Poppy Stencils sentiment, part of thier "Festive Phrases" stamp set in Wow! clear embossing ink and then coated with Wow! Rich Gold embossing powder and heat set.

I then used the Swet Poppy Eucalyptus stamp with "Bundled Sage" Distress Oxide Ink,  I then coloured the leaves with a diluted solution of the same ink, using a heat gun to dry the surface.

Next, I multiple stamped the Sweet Poppy "Fir Tree Sprigs" in two corners of the card, this time using "Evergreen Bough" Distress Oxide Ink to stamp and colour the needles.

I then stamped the Sweet Poppy "Holly Sprigs" using a mix of "Pine Needle" Distress Oxide Ink and Versafine Clair "Rain Forest" dark green ink.  I then coloured the holly leaves with "Beech Green" Derwent Inktense pencil applied with a paint brush.

I used a red Posca Pen to colour the holly berries.  Then used a metalic gold pen to edge the card, the holly and the berries.  I added white highlights to the berries using a Unibal Signo Pen. Finally, I added a bit of sparkle by using a gold shimmer gel pen around the Eucalyptus leaves.