52 Week Mini Art Card/Tag Challenge

Showing posts with label Van Goch Pastel Pencils. Show all posts

Tuesday, 12 August 2025

Lavinia Stamps Abstract Fish (Sticker Stencil 10)


I've had a play session creating the abstract looking tag using a Lavinia Stamps vase stencil.

I used one of the Lavinia Stamps vase sticker stencils from set 10, on it's side for this tag, using Distress Oxide Inks for the colour.  I used Spiced Marmalade, Ripe Persimmon and Abandoned Coral for the three vase/fish.  Then lay the Lavinia Stamps "Nimbus" stencil over the top and used "Festive Berries" Distress Oxide ink through the stencil.

I used a black Posca Pen to colour the surrounding background area.  They used a gold cloured gel pen to draw circles over the background.  I filled some of them with the gold gel pen and some of them I added a "Wink of Stella" to add a gold glittery look.

I used a couple of Van Goch Pastel Pencils for shading on the vase/fish with touches of gold gel pen on the base/tail.  I then used a white and black Posca Pen to create the eye.

Thursday, 28 March 2024

Tiffany Johnson Creative #100daysartplay Challenge - Day 40


Today is Day 40 of the Tiffany Johnson Creative #100daysartplay Challenge.  This week is all about using charcoal and pastels.

I had an off cut of white card measuring 95mm square, so decided to use that as the base. I coloured it using Van Goch Pastel Pencils, blending the colours together, by rubbing my finger tip across the surface.  The colours I used were Blue, Mauve, Pink and Green.  

I then used "Della Blue" Elements Ink through the Funky Fossil Designs "Shoal of fish stencil".  While the ink was out, I inked the edges of the card using a finger dabber.

I mounted the card on to a piece of dark blue paper and then on to a card blank.

On an off cut of white card, using "Della Blue "Elements Ink again, I stamped the "Swim your own way" sentiment, which is part of a stamp set called "Wierd Fish" by Funky Fossil Designs. I cut the sentiment up into words and glued them in to position using wet glue. 

Finally, using a silver glitter and a white gel pen, I added extra dots around the shoal of fish.

Monday, 27 November 2023

Lavinia Stamps "Lupin the silhouette Hare" Tag


I recently saw a post on Instagram where somebody used Q-tips to create a bokeh look and also used the Q-tips for stamping.  Sorry, I don't recall who inspired me, but thank you, I had to give it a go and this tag is the result of my effort.

I had a small piece of water colour card left over from a previous project, so decided to use that for the base.  I used a wash of water and "Faded Jeans" Distress Oxide Ink, applied with a wide paint brush in rough strokes horizontally.  I then ran the heat gun over the surface to dry it.

Using a wet Q-tip, I painted dots of water across the surface, rubbing the Q-tip in the middle of the dots to achieve a lighter look.  I then used a fan shaped paint brush to create smaller splatters of water, dabbing them off with a piece of kitchen roll.  These two techniques created the mottled background you see.

I used a fine tipped black pen to draw branches dangling down from the top right hand side of the tag.

I then dipped a Q-tip into "Festive Berries" Distress Oxide Ink and dobbed the Q-tip to create round berry shapes.  I extended the branches on to the berries to make them look more realistic.

At this stage, I really wasn't sure if I was just going to stamp a sentiment or create an actual image, I decided on the latter.

I used the Lavinia Stamps "Lupin the Silhouette Hare" stamp, stamped in two shades of Versafine Clair inks (Acorn and Pine Cone).

I used the Lavinia Stamps "Hill Mask" to create the landscape using Versafine Clair "Morning Mist" grey ink.

I added colour to the hare using Van Goch pastel pencils.  I then added highlights to the hare and the berries using a white gel pen.

Finally, I mounted the tag on to a piece of dark red card to match the shade of the berries.


Tuesday, 31 October 2023

Lavinia Stamps "Wild Poppies" Sympathy Card


A quick sympathy card from me today.

Using low tack tape, I masked off a vertical striped area for me to work within, to ensure I didn't get any ink where I didn't want it.

I used "Chrome Yellow" Ranger Archival ink with a blending brush to fill the stripe.

I lay the Lavinia Stamps "Elegance" stencil over the top of the card, securing with a piece of tape.  I then used "Orange Blossom" Ranger Archival Ink through the stencil, again applied with a blending brush.

Using Versafine Clair "Nocturne" black ink, I stamped the tall Lavinia "Garden Poppies" and then the "Wild Poppies" below them.

While the black ink was out, I stamped the sentiment, which is part of a Simon Says Stamp set called "Tiny Words".  

To ground the poppies, I used a black pastel pencil.  I then added a few touches of white gel pen to the poppies too.


Saturday, 7 October 2023

Tim Holtz / Stampers Anonymous "Mini Bouquet - CMS269" stencilled tag


I've entered this tag in to the "Country View Crafts" October challenge.  It has a theme of "Autumn Magic".

I used a manila coloured tag, using the Tim Holtz / Stampers Anonymous "String Layering" stencil  with "Orange Blossom" Ranger Archival Ink.

I then used the Tim Holtz / Stampers Anonymous "Bouquet Layering" stencil with "Monarch Orange" Ranger Archival Ink.

Next, I used the Tim Holtz / Stampers Anonymous "Rosette" stencil with "Red Geranium" Ranger Archival Ink.

Finally Adding some a grunge look using the Tim Holtz / Stampers Anonymous "Grime" stencil with Versafien Clair "Fallen Leaves" a dark brown ink.

I used Versafine Clair "Acorn" brown ink to stamp the three flowers, which are part of the Tim Holtz / Stampers Anonymous stamp set called "Mini Bouquet - CMS269".  I stamped the flower heads again on an off cut of card and coloured them with Derwent Inktense pencils, Posca Pens and gel pens.  I fussy cut the flowers and stuck them on to the tag.

I added some touches of gold gel pen to areas of the tag, some green Pastel Pencil and some black Ranger "Enamel Accents" too.

Saturday, 30 September 2023

Sweet Poppy Stencils ""Winter Cottage" Christmas Card


A winter scene using stamps from Sweet Poppy Stencils.

I stamped the Sweet Poppy "Small Winter Cottage" in Versafine Clair "Morning Mist" grey ink. I used a heat gun to dry the surface, before I made a wash of Distress Oxide Inks for the sky and snowscape.  Initially, I used "Spun Sugar" soft pink, then used "Saltwater Taffy" for the sky and "Lost Shadow" for the snow in front of the cottage.  Again I used my heat gun to dry the surface.

Using Versafine Clair "Morning Mist" I stamped the sentiment, which is part of the Sweet Poppy "A6 Hugs & Kisses" stamp set.

I then used a black "Van Goch Pastel Pencil" to add extra depth of colour to the snowscape - before hand it just looked a bit wishy-washy.

I added small touches of colour to the fir trees using "Bundled Sage" Distress Oxide ink, applied with a paint brush.

I did the same for the stonework on the cottage, this time using "Tea Dye" Distress Oxide Ink.  

Finally, using a fan shaped paint brush, I added some splatters of white acrylic paint to replicate snow flakes.

Saturday, 2 September 2023

Clarity Stamps "Art Nouveau Snowdrops" stencilled card


Yesterday, I received my order from Clarity Stamps, so of course I had to have a play making this card.

In my stash, I found a background I had made some months back using a selection of Distress Inks, mainly in pinks, blues and purples.  I decided today was the day I would use it!

I lay the Clarity Stamps "A5 Art Nouveau Snowdrops Stencil" over the background and used  four shades of Distress Oxide Inks through the stencil, using Spun Sugar, Peacock Feathers and Wilted Violet.

I then inked the edges of the card using Versafine Clair "Monarch" purple ink.  While the ink was out, I stamped the "Just to say" sentiment , which is part of the Clarity "A4 Bijou Art Nouveau Stamp Collection" on to a piece of white card, cut it to size and inked the edges of that too, before sticking it into position.

Finally, I used some pastel pencils, mainly in a pink and a yellow to add extra colour to the snowdrops and the area around them.


Friday, 21 July 2023

Clarity Stamps "Birdhouse" on a stencilled rose background


This is a very different card from the last few I have been making.

I used a piece of Shenandoah patterned paper for the base and lay the Clarity Club Stencil #45 "rose" over the top.  Through the stencil, I applied three shades of Versafine Clair Inks: Charming Pink, Glamorous and Purple Delight, applied with a small blending brush.

I then used Van Goch Pastel Pencils to add more depth of colour and then inked the edges of the card uisng Versafine Clair "Fantasia" ink.

Using Versafine Clair "Monarch" purple ink I stamped the birdhouse and foliage which is part of a Clarity stamp set called "Birdhouse".

Next I stamped the greeting, using the Clarity "Birthday Occasion Sentiment" stamp set. I added touches of Posca Pens and White gel pen to areas of the stamping.

Finally, I mounted the card on to co-ordinating pink card before sticking on to a red card blank.  

Tuesday, 4 July 2023

Visible Image Stamps "Where dreams take you" card


Another early morning crafting session from me, today I've been using Visible Image stamps. 

I had a rummage through my backgrounds file and found a Brusho background where I had a dark blue/purple with runs of colour towards the bottom.  I thought this would be ideal for what I had in mind.

I stamped the Visible Image "Fibonacci" (grid with curl) using Versafine Clair "Twilight" dark blue ink.

Using Versafine Clair "Nocturne" black ink, I stamped the Visible Image eye, which is part of their "Where dreams take you" stamp set.  I then stamped the word "Vision" which is from the same stamp set.

I used the same ink to stamp the detail on the left hand side of the card, which are from two Visible Image stamp sets, ""Random art of kindness" and "Rays of light".

I used Van Goch Pastel Pencils to add colour to the eye area.  Added extra black and white dots using Ranger "Enamel Accents" and used a white gel pen to add a little white to the eye, to give the impression of light hitting it.

Wednesday, 21 June 2023

Stencil Girl "Pretty as a peacock" gel plate card


I've had a play this morning, using a background I'd made on the gel plate months ago.  I really liked the look of it and I kept putting off using it for another occasion.  I decided today would be the day I used it.  I'd created it by adding orange, blue and grey Pan Pastels to make it.

I paired my lovely background with a new to me stencil, by Stencil Girl Products, called "Pretty as a peacock stencil.

I lay the stencil over the background and secured all edges with low tack tape.  I then added blobs of That's Crafty "Black Texture Paste" along the top of the tape and then dragged the straight edge of a piece of metal across the surface, repeating the process till all areas were covered.

I set aside the stencil and the piece of metal in a tub of water so that I could clean it afterwards.  If you don't do this, you'll find them hard to clean.

I set aside to dry the image and then cut it to size.  A few areas of the background had a few white areas, so I topped up the colour in those areas by using Pastel Pencils.

Friday, 16 June 2023

Sweet Poppy Stencils "Botanicals Thistle Stem" Tag


I
t seems quite some time since I last made a tag, so I decided to have a play making this one. 

I started with a cream coloured blank tag.  On my glass mat, I dabbed the following Distress Oxide inks:  Dried Marigold, Rusty Hinge, Stormy Sky and Chipped Sapphire. I strized each one with a little water then ran the tag through the colours, after each colour, I used the heat gun to dry the tag.  I continued doing this till the surface was covered.

I inked the edges of the tag with "Chipped Sapphire" Distress Oxide Ink and then edged it with Versafine Clair "Nocturne" black ink.

Using Versafine Clair "Nocturne" I multi stamped the Sweet Poppy "Botanical Thistle Stem Stamp". I coloured the image with Van Goch Pastel Pencils and a white gel pen.


*Edited to add

I forgot to mention the spotlight area.  I used a die cut circle of plastic and Versafine Clair "Nocturne" black ink with a finger dabber to create the dark ring around the thistle and bee.
Starting in the middle and working my way outwards and rotating the tag, so that I was always working in the same direction.

I used a white gel pen around the inner edge.  I also used a white Pastel Pencil to lighten the area within the circle.

Friday, 2 June 2023

Clarity Stamps "Treescape Stencil" card


I seem to be on a roll with my crafting today, each make has been quite different, which I like.

I had an urge to do something with trees and came across a stencil by Clarity Stamps that I had purchased second hand from Ebay, called "7x7 Treescape", so decided I would put it to use for the first time.

I had a rummage through my file of prepared backgrounds and came across one that I thought would be suitable.  It was a variation of mid green shades, which I thought I would be able to manipulate.

I ended up using the following Versafine Clair Inks, used in this order for the area above the ground:  Warm Breeze, Monarch and Medieval Blue.  For the groundscape area, I used two shades of green Versafine Clair Inks:  Verdant and Shady Lane.

I used my Van Goch Pastel Pencils to create light and shade areas, adding touches of white using a white gel pen.   

Tuesday, 4 April 2023

Lavinia Stamps "Easter Bunnies" card


I made a little Easter card using an assortment of Lavinia Stamps and one of their stencils. 

I stamped the "Forestcap Toadstool" in Versafine Clair "Morning Mist" grey ink.  I then stamped the "Midnight Meandering" bunnies stamp in Verafine Clair "Acorn" brown ink.

I coloured the background using a selection of blues and green shades of Distress Oxide Inks, applied with a paint brush. Over the top, I added detail using the Lavinia "Cryptic" stencil.

I coloured the toadstool using Derwent Inktense water colour pencils, applied with a brush.  

In the background, I used the "Small Branch" stamp with Versafine Clair "Shady Lane" green ink, stamped in first and second generation stamping.

I used coloured pencils and Posca Pens to create the impression of flowers around the toadstool, using Van Goch Pastel Pencils for shadows.

In the foreground, I used the Lavinia "Foliage Set" to create the long grasses in the bottom corners of the card using Versafine Clair "Shady Lane" green ink.

I added touches of Ranger "Enamel Accents" to the toadstool and "Glossy Accents" on the flowers on the trunk of the toadstool.

Wednesday, 1 March 2023

Clarity Stamps "Wild Flower Spray Stencil" card


A softer more feminine looking card from me this time using a stencil. 

I found a background in my stash that I'd made some months ago using a selection of colours of Distress Oxide inks.  I'd splattered water from a fan paint brush to ge the bleached dots look and the background was just waiting to be used.

I decided to pair the background with a Clarity Stamps stencil called "Wild Flower Spray". I used low tack tape to secure the stencil over the background then used three shades of Versafine Clair inks (Charming Pink, Shady Lane and Warm Breeze) through the stencil.  I then moved the stencil and filled in a few empty spaces with more detail.

After lifting the stencil, I added extra detail to the flowers and foliage by using Van Goch Pastel Pencils, gel pens and a 2B pencil.

I stamped the sentiment by Simon Says Stamp (part of their "Tiny Words - Birthday" stamp set) using Versafine Clair "Charming Pink" ink.  I used the same ink to edge the card using a finger dabber.

Darkroom Door "African Trees" Birthday Card


Once again, I am back after a few days away and decided I needed to get a wiggle on and get a card made for next Monday. As you can see from the photo below, the first attempt didn't go to plan as I forgot to use acetate to stamp the reflections, so had to start again! 


It just goes to show that it doesn't matter how experienced you are, mistakes are still made.  I did try to rescue the top half of the card, by cutting it in half.  It didn't look right so it got binned.

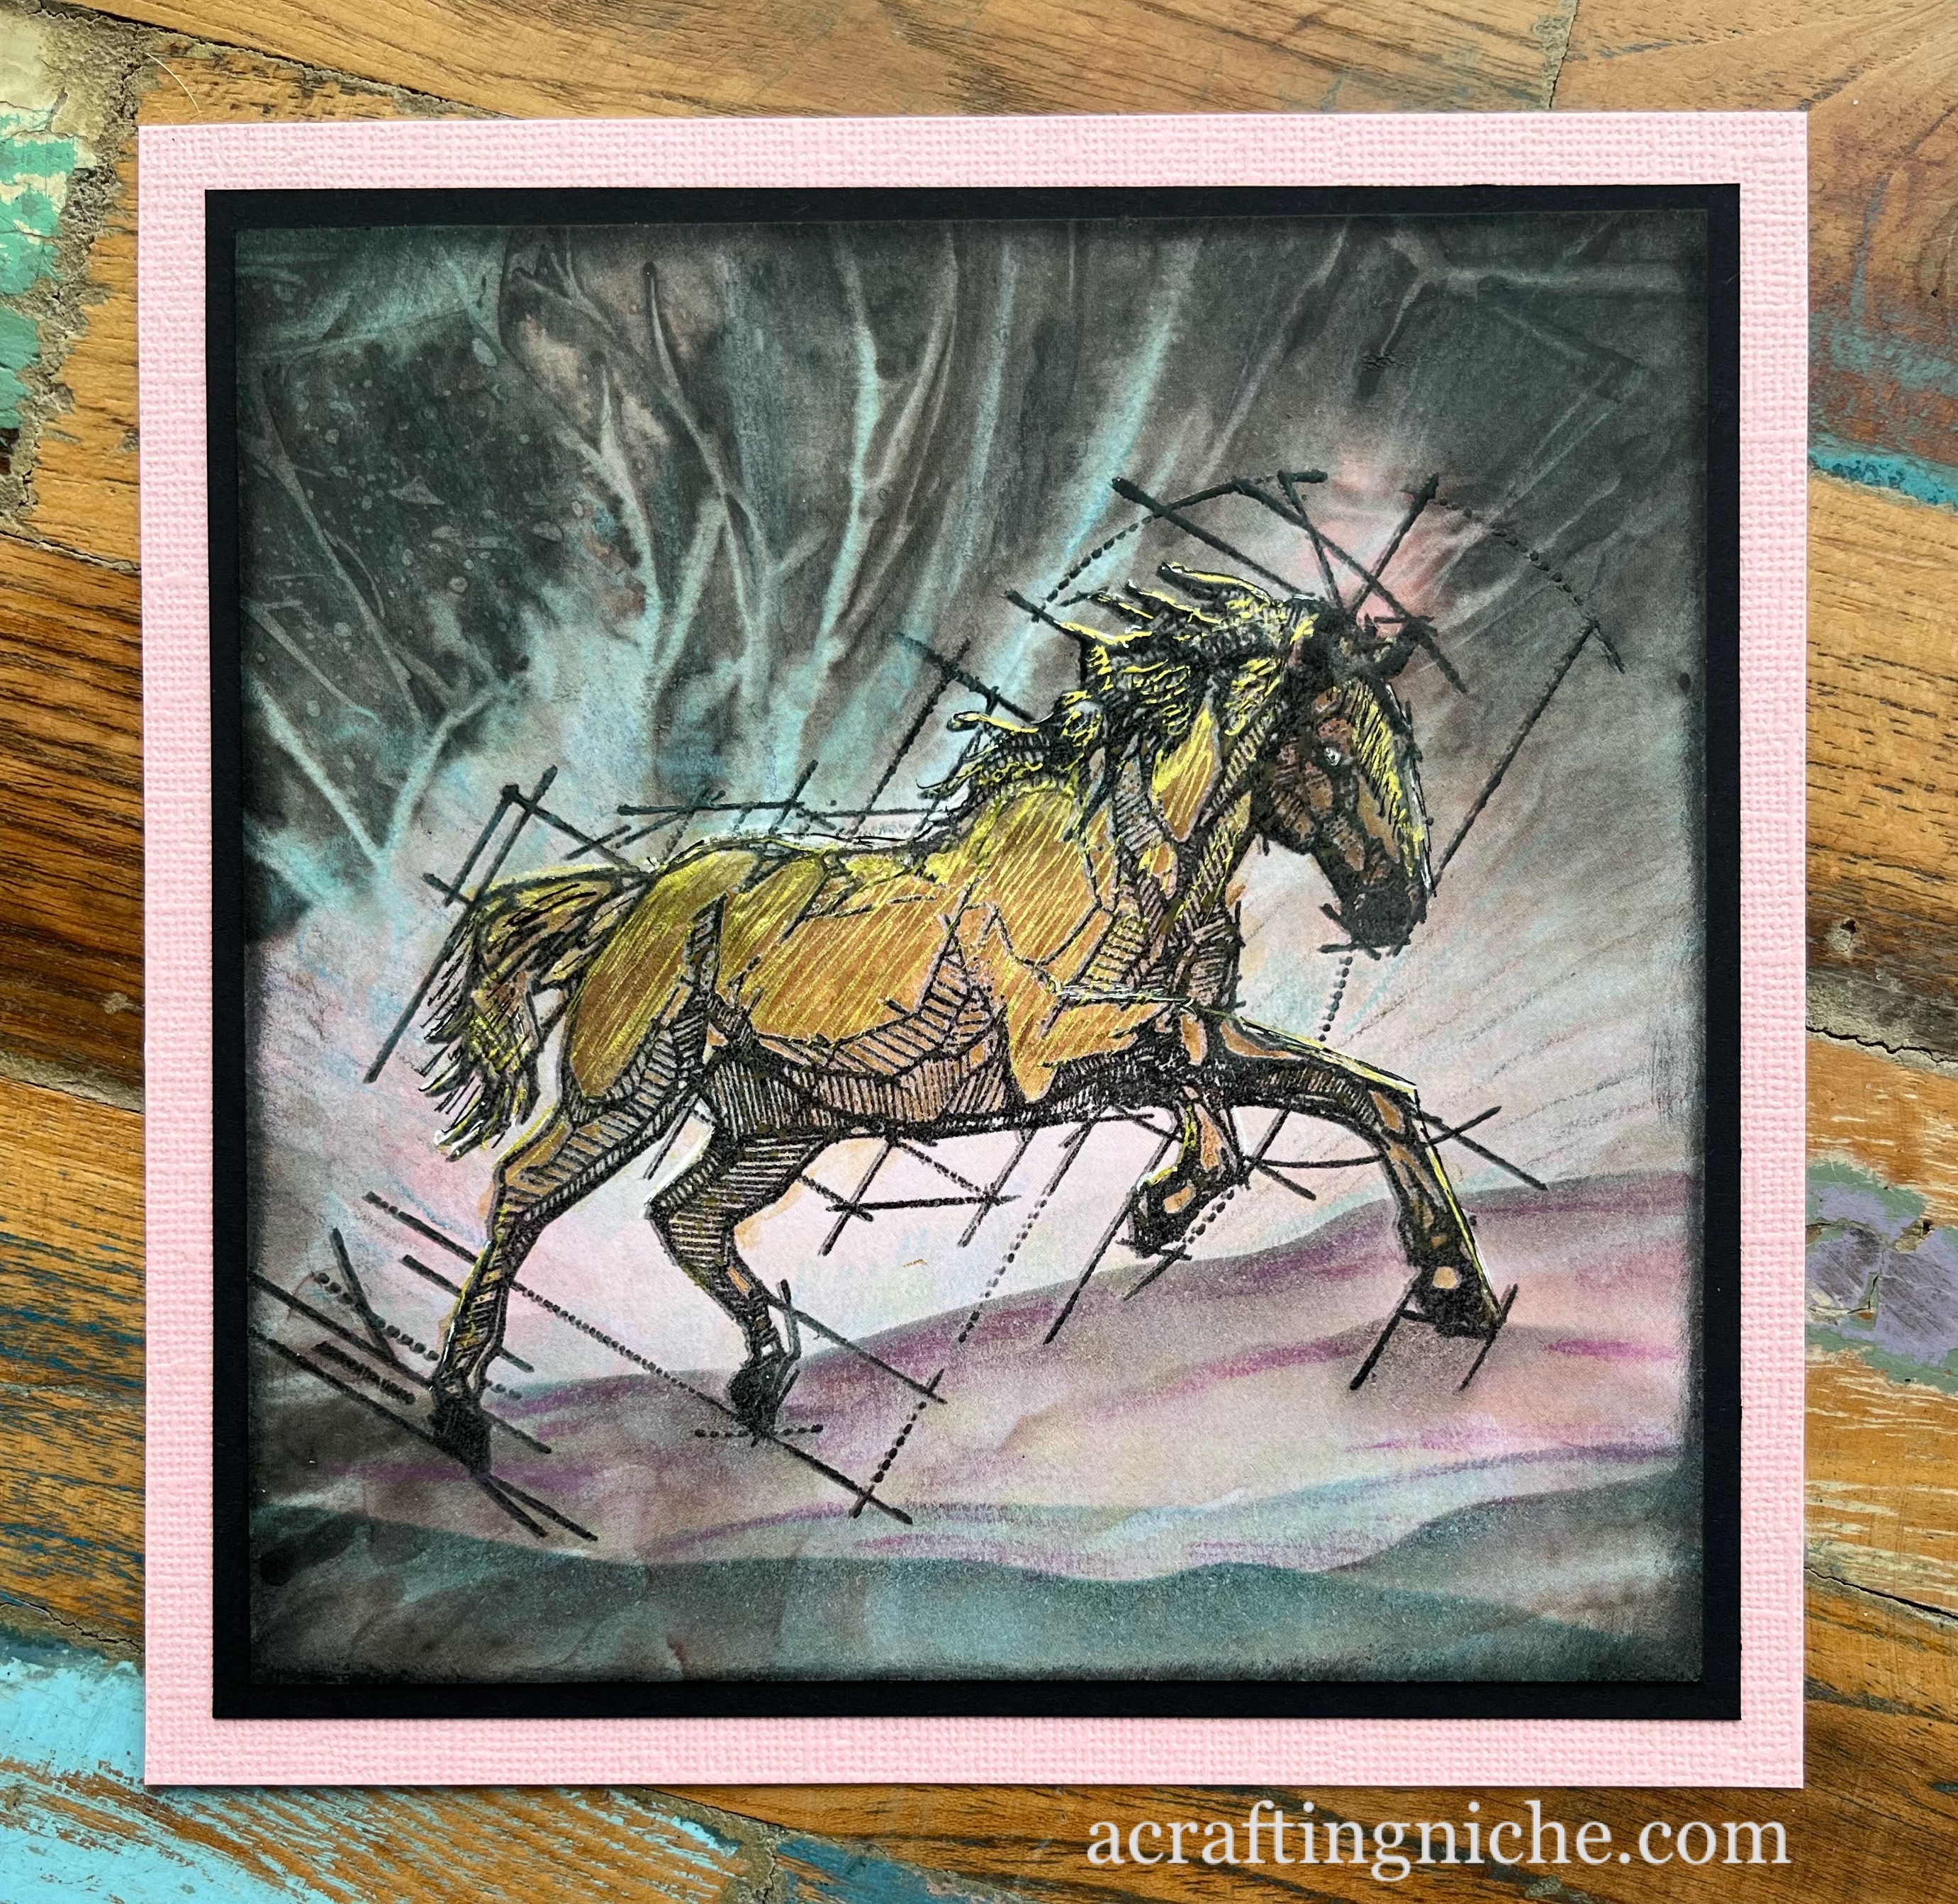
So to make this card, I used the Sweet Poppy "Aperture Circle Stencil" over a piece of square white card, held into place with a piece of low tack tape.

Within the circle I used the following Element Inks in the order typed (so lighter first, finishing in the darker shade):  Sundance, Russet Orange, Confetti, Emperor Red and Mulberry.

Keeping the stencil in position, I lay a piece of low tack tape slightly about the central line.

Using the tree and giraffe from the Backroom Door "African Trees" stamp set, I stamped the tree image in Versafine Clair "Morning Mist" grey ink on to a piece of acetate.  I then pressed the inked image on the acetate below the line of tape.  I repeated the process for the other tree and for the giraffe.

Removing the tape along the middle of the card, I then stamped the trees and the giraffe slightly higher than where the central line of tape had been, using Versafine Clair "Nocturne" ink.

Using a torn piece of copy paper and a finger dabber with Versafine Clair "Nocturne" black ink, I created the landscape, making the area at the bottom lighter (where the land would be reflected).

I added a touch of extra pink and yellow to the sky using Van Goch Pastel Pencils.

Using Versafine Clair "Morning Mist" grey ink and a sentiment from the Lawn Fawn "Simply Sentiments" stamp set, I stamped the Happy Birthday, then mounted the card on to red card and then a white card blank.

Sunday, 22 January 2023

Lavinia Stamps "Reindeer" Snow Scene Card


With the recent cold snap, I decided to make a snowy forest scene using Lavinia Stamps.

Because I wanted to start this piece with a wash of colour, I spritzed the back and the front of a piece of water colour paper.  (Spritzing the back of the paper means that it doesn't curl as much). I opted to use the smoother side of the card.

With a very wet paint brush, I brushed three shades of Elements Inks over the top two thirds of the card.  I used Blue Lagoon, Mulberry and Merlot.  Before I intensified the colour, I placed a small moon mask into position to keep that area slightly lighter.

I gave the card a very quick blast of the heat gun to take the excess moisture away, but leaving the surface still damp.  I positioned the torn edge of a piece of copy paper, then stamped the two sizes of Lavinia "Red Pines". First I stamped in "Iced Spruce" Distress Oxide Ink, then in Versafine Clair "Morning Mist" grey ink. Removing the piece of copy paper, I then stamped more of the grey trees and then used Versafine Clair "Fantasia" for the mid trees and "Medieval Blue" for the trees in the foreground.

Using "Tumbled Glass" Distress Oxide Ink with a finger dabber, I dabbed along the edge between the sky/tree trunks and the snow.  I then used a torn edge of copy paper to add some landscape to the snow area, also using "Iced Spruce" Distress Oxide Ink.

I stamped the Lavinai "Stag" and "Reindeer" in Versafine Clair "Pinecone" and "Morning Mist" so that the colour wasn't a solid black.

I then added some foliage poking through the snow, using Versafine Clair "Morning Mist" grey ink to stamp, using the "Foliage Set" and the top of one ot the "Skeleton Tree Scene set".

I removed the moon mask and using Van Goch Pastel Pencils I added extra contrast to the sky and colour to the moon.  I did the same to the snowy area.

I used a white acrylic paint to add snow detail to the trees, the stag and the reindeer. I then used the same paint and a fan shaped paint brush to create splatters to replicate snow.

Finally, I edged the card in Versafine Clair "Medieval Blue" ink before mounting it on dark blue card and then on to a white card blank.

Tuesday, 17 January 2023

Funky Fossil Designs "Free Spirit" Card


Funky Fossil Designs recently released a stamp set that I was really taken with, so of course I had to order it.  It's the "Free Spirit Stamp Set" designs by Ankit Kumar, which arrived with me yesterday. I obviously had to play with it as soon as I could, making this card.

Still "stash busting" I found a sheet of patterned paper that I had had at a craft crop/group. It was a big battered around the edges, but I was able to use the central area of it.  I stamped the horse in Versafine Clair "Nocturne" black ink and then covered it in Wow! clear embossing powder and heat set.

Using Derwent Inktense Water Colour Pencils, I coloured the horse.  I then used a gold metallic pen to add extra details.

I created the landscape using a torn piece of copy paper and Versafine Clair "Morning Mist" grey ink then added extra colour and details using Van Goch Pastel Pencils.


Saturday, 14 January 2023

Lavinia Stamps "Fairy Chain" Card


I've used another one of the backgrounds I made the other day using Amanda Branston's alcohol inks on gel plate technique to make this card.

Again, I have used a selection of Lavinia Stamps:  Fairy Chain (large), Red Pines (large and small), Forest So Green verse, Small Branch and Foliage Set.  I've also used the Lavinia Moon and Hill masks.

I've used five shades of Versafine Clair Inks:  Nocturne black, Morning Mist grey, Shady Lane green, Warm Breeze teal/turquoise and Purple Delight.

I've added extra colour to the picture using Van Goch Pastel Pencils, Posca Pens and assorted gel glitter pens.


Friday, 30 December 2022

Day 17 of Karen Telfers "24 Days of Tags 2022"


This is my Day 17 tag for Karen Telfer's "24 Days of Tags 2022" challenge.  If you would like to see Karens demo of her Day 17 tag, you can find it here.  This tag has a theme of "Reflections".

For my tag, I used the Lavinia Stamps "Fip" fairy figure, stamped in Versafine Clair "Nocturne" black ink and coloured with Van Goch Pastel pencils.  Around the edge of the tag, I have used a blending brush with "Tumbled Glass" Distress Oxide Ink.

Monday, 28 November 2022

Lavinia Stamps "Astrid and the Wild Vines" Card


Today I have played with a Lavinia Stamp which I rarely use "Astrid".  I think it is because it is such a stand alone stamp which tends to get pushed to the end of the box.  Today she saw the light of day!

I used two shades of Versafine Clair Ink to stamp the "Wild Vines" and "Astrid", they were "Warm Breeze" and "Twilight".  I used Posca Pens and Van Goch Pastel Pencils to colour "Astrid".  I also added touches of silver glitter to her hair using a Signo pen and also to some of the vines.  Unfortunately, it doesn't show very well.

I used Wow! super fine silver embossing powder and their clear ink pad to stamp the "Just for you" sentiment, which is part of the "Heartfelt Verse" stamp set.  I then heat set the sentiment, die cut it and adhered to the card.