52 Week Mini Art Card/Tag Challenge

Showing posts with label Glossy Accents. Show all posts

Wednesday, 3 May 2023

Sweet Poppy Stencils "Octopus Stamp" card


This evening, I have had a play using the new Octopus stamp from Sweet Poppy Stencils. 

I found a Brusho background I had made some months ago which I thought would be suitable for a watery background.

I stamped the Octopus image using Versafine Clair "Blue Belle" ink.  Then coloured the image using Derwent Inktense Pencils applied with a brush, building up the colour to create layers of colour.  I added touches of a white gel pen and a yellow Posca Pen, finally adding Ranger "Glossy Accents" to the eyes and the suckers.

Tuesday, 4 April 2023

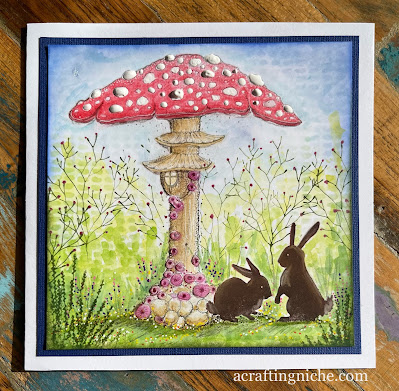
Lavinia Stamps "Easter Bunnies" card


I made a little Easter card using an assortment of Lavinia Stamps and one of their stencils. 

I stamped the "Forestcap Toadstool" in Versafine Clair "Morning Mist" grey ink.  I then stamped the "Midnight Meandering" bunnies stamp in Verafine Clair "Acorn" brown ink.

I coloured the background using a selection of blues and green shades of Distress Oxide Inks, applied with a paint brush. Over the top, I added detail using the Lavinia "Cryptic" stencil.

I coloured the toadstool using Derwent Inktense water colour pencils, applied with a brush.  

In the background, I used the "Small Branch" stamp with Versafine Clair "Shady Lane" green ink, stamped in first and second generation stamping.

I used coloured pencils and Posca Pens to create the impression of flowers around the toadstool, using Van Goch Pastel Pencils for shadows.

In the foreground, I used the Lavinia "Foliage Set" to create the long grasses in the bottom corners of the card using Versafine Clair "Shady Lane" green ink.

I added touches of Ranger "Enamel Accents" to the toadstool and "Glossy Accents" on the flowers on the trunk of the toadstool.

Tuesday, 21 February 2023

An inky Clarity stencil play session


I was recently reminded that I have a few Clarity Stencils which have not seen the light of day for at least a couple of years.  As I have been away for a few days, I was keen to get inky again, making this card.   The still photo doesn't really do it justice, so I've taken a little video too.


Because some of my Clarity crafting stuff has been around for a while, I didn't write the name of the stencils on the packs, so that will be a little job for tomorrow, so for now, you'll just have to enjoy the card without description.

Saturday, 17 December 2022

Day 12 of "24 Days of Tags 2022" with Karen Telfer


Today has been one of "those" days!  So it has been nice to come home and unwind with a bit of easy crafting.

Here is my Day 12 tag of the "24 Days of Tags 2022" with Karen Telfer.  You can find her Day 12 tutorial here if you want to have a go yourself. I would have posted info and a photo of my tag earlier but I have been waiting for the Glossy Accents to dry and become clear.  I know from experience, if I start handling wet Glossy Accents I always manage to drop it or put my finger in it, so I have left it alone.

I decided to do the background of my tag slightly different to Karen's by making it tonal, going from dark to light.  I used two shades of Distress Oxide Inks "Scattered Straw" and "Rusty Hinge" blending one colour in to the other.


Over the top of the blended tag, I placed the Lavinia Stamps "Charming" stencil, spritzed water side down, gently pressing mopping up any surplus water.  Once the stencil was lifted, it left a bleached pattern of the stencil on the tag.  I set it aside to dry.

When I receive an order from Lavinia Stamps, I keep the chocolate wrappers with various images of their stamps on them.  I guess it's the hoarder in me.  You never know when you may need something and today was the day I needed one of the wrappers.


I used a one inch circle punch to cut the sweet wrapper into a disc.  I then cut a piece of card using the same punch and stuch the two discs together with the image on the top. I inked the edge of the disc with Versafine Clair "Acorn" brown ink.  By this time the tag was dry, so I used the same ink to edge the tag and then stamped the verse vertically using the Lavinia Stamps "Talk to the moon" stamp.

I mounted the punched disc on to the tag using a foam pad, then coated it in Ranger "Glossy Accents" and set aside to dry.

Wednesday, 18 August 2021

Day 18 of #thedailymarker30day colouring challenge (August 2021)


Here's my Day 18 for #thedailymarker30day colouring challenge, I am at last up to date! 

I've used a Hobby Art Ltd stamp called "Ornate Owls" for the main image, stamped in Versafine Clair "Morning Mist" grey ink.

I've coloured the image using a combination of products, including Arteza coloured pencils, Distress Oxide Inks, Posca Pens and metallic Signo pen.

The sentiment is by Lawn Fawn, called "Simply Sentiments" and is stamped in "Morning Mist" Versafine Clair Ink.

Finally, I added  a touch of Ranger "Glossy Accents" to each eye.

Friday, 18 June 2021

Funky Fossil Designs "Ferns" Dies release day


Funky Fossil Designs are launching several new products this Friday, 18th June 2021, including stamps, patterned papers, dies and washi tape. 


For this sample I have used a sheed of the new patterned paper called "Neutrals" for the base. I have then die cut some ferns and adhered to the patterned paper.

I stamped a snail on to white card, using the Funky Fossil "Snail Mail" stamp set.  I then coloured it with Distress Oxide Inks and a Sakura sparkly pen.  I then adhered to the card.

Finally, I added the "You Snailed it" sentiment (also from the Snail Mail stamp set) stamped in Versafine Clair "Shady Lane" green ink and added Ranger Glossy Accents to the shell and eyes of the snail.

Wednesday, 6 January 2021

Funky Fossil "Furry Friends" on a "Simply Stripes Stencil" background


Today I've been playing with the Funky Fossil "Simply Stripes" stencil, which I often over look, opting for a more decorative design.

I used an off-cut of white card in the size of 9.5cm (3 3/4") square. Positioned the stencil on the diagonal ensuring that corners were included, then used some low tack tape to hold the stencil in position.

Following the lines (from top to bottom) of the stencil I used a foam blending tool with "Tumbled Glass" Distress Oxide Ink.  I then lifted the stencil and repositioned it, so that the stencil lines covered teh "Tumbled Glass" lines I had just created.  I then used the same technique with "Cracked Pistachio".


I lifted the stencil and rotated the card a quarter (as I like to work in the same direction), repositioning the stencil with tape to secure.  I then used "Peacock Feathers" Distress Oxide Ink using the same technique used previously.  Once the tape and stencil are removed you can see the finished background grid, which I think is really pretty as they're some of my favourite colours.

I then mounted the background onto a piece of black paper and trimmed to size.

I then moved on to the stamping using Versafine Clair "Nocturne" black ink with the Funky Fossil "Furry Friends" stamp set.  I stamped the sentiment and then thedog on the bottom right corner, stamping the same dog image on a small piece of card.

Using the small piece of card, I coloured the dog image by using two shades of Distress Oxide Inks (Spun Sugar and Weathered Wood), applied with a paint brush.  I then cut out the image and adhered it over the stamped image on the card. Finally sticking the topper to a white 6x6" card blank.

P.S. after I had taken the photograph, I decided to add Glossy Accents to the eyes and nose, just to give a bit of dimension.

Friday, 10 July 2020

Day 10 of #thedailymarker30day colouring challenge using a Woodware "Bubble Bloom Felicity" stamp


This is my Day 10 make for #thedailymarker30day colouring challenge.  

I've used a Woodware Stamp called "Bubble Bloom - Felicity JGS290", stamped in Versafine Clair "Shady Lane" and "Morning Mist".

I have painted the leaves using three shades of Distress Oxide Inks:  Crushed Olive, Peeled Paint, and Mowed Lawn.

I've used a purple and a silver glitter coloured Signo Pens for the bubbles which I covered in "Glossy Accents".

The sentiment is by "Lawn Fawn" part of their "Simply Sentiments" stamp set, stamped in Versafine Clair "Monarch" purple ink.

Tuesday, 3 December 2019

Funky Fossil - Pugs and Hugs Pawesome Card


I've used a selection of Funky Fossil stencils and stamps to create this card.

I had quite a session creating the background.  In my head I was thinking of tartan.  It ended up ok but not quite what I originally had in mind, in hindsight maybe I should have used a red and the light brown rather than a brown and a dark green, but we learn from our mistakes.

I started with plain white card which I covered with Twisted Citron Distress Oxide Ink, applied with a blending tool to cover the whole area.

I lay the Funky Fossil "Crackle Background Stencil" over the green base, using low tack tape to keep in position and covered with "Mowed Lawn" Distress Oxide.  Then removed the stencil.

I then taped into postion the "Simply Stripes Stencil" and used a "Peeled Paint" Distress Oxide ink through the stencil.

I lifted the stencil, rotated the card and then re-adhered the stencil into postion, this time using a "Brushed Corduroy" Distress Oxide Ink, then removed the stencil.

I still felt that the pattern needed something more, so I used a further Funky Fossil Stencil called "Micro Dots" this time with a "Walnut Stain" Distress Oxide Ink.


I then turned my attention to the stamped dog, which is part of the Funky Fossil "Pugs and Hugs" clear stamp set using Versafine "Vintage Sepia" ink.  

I then used a paint brush and a selection of Distress Oxide Inks (Tea Dye, Brushed Corduroy and Spun Sugar) to colour in the image.  I used a black marker pen for the eyes.  I fussy cut the pug image and adhered onto the bottom right hand corner of the card.

I used Verafine Clair "Acorn" ink to stamp the "You're Pawsome" sentiment, which is also part of the "Pugs and Hugs" clear stamp set.

Finally, I mounted the image on brown card before adding it to a cream card base.  I then added "Glossy Accents" to the eyes to give the impression of them being wet and watery looking.


Sunday, 22 September 2019

Week 39 - 52 Week Mini Art Card / Tag Challenge 2019


The prompt for Week 39 is "Sorry".

For my tag, I masked off the moon and started with a background of Distress Oxide Inks to create the night sky in Stormy Sky, Faded Jeans, Chipped Sapphire and Blueprint Sketch.


After removing the moon mask, I filled the circle with Antique Linen Distress Oxide ink.

I created the landscape at the base of the tag, by using the torn edge of a piece of card and Distress Oxide Ink, dragging the ink along the torn edge.

Using Versafine Clair "Nocturne" black ink, I stamped the "Spring Trees" by Lavinia Stamps.  

Using the same ink, I stamped the word "Sorry" which is part of the Funky Fossil Designs "Pugs and Hugs" clear stamp set.  

Using a Versafine ink called "Vintage Sepia", I stamped the image of the Pug dog on an off-cut of card, colouring it with Arteza Brush Pens and a black fine liner pen.  I cut out the shape of the dog and adhered onto the tag.  I added highlight edges to the dog image using a white Signo Pen.  I coloured the eyes black and then covered the eyes with Glossy Accents so that they appear more realistic.

Finally, I added some stars to the sky and some high lights to the trees using a white Signo Pen.

~~~

Click Here for more information about the challenge and also a list of the previous challenge prompts.

Click Here for the challenge Facebook Group.


Sunday, 9 June 2019

Week 24 - 52 Week Mini Art Card / Tag Challenge 2019


The challenge prompt for Week 25 is "Under Water".

To create my tag I've used two stamps from Lavinia Stamps and a stencil, it was a quick make.


First, starting from the middle of the tag, I used a Distress Ink in the shades of "Mustard Seed".  The next colour I used from the edge of the tag and blended to the yellow was "Peacock Feathers", then "Mermaid Lagoon" and finally "Chipped Sapphire"

I lay my prepared tag background on a piece of kitchen roll. Using an Andy Skinner stencil called "Tornado".  I lay it on my work desk and spritzed the surface with water.  I then flipped the stencil and lay it wet side down onto the prepared tag background.  I left it for a minute or so then lifted the stencil.  The area where the water has been leaves a sort of bleached look.  

If you find there are little pools of water on your tag, then lightly blot them with the edge of a piece of kitchen towel. 


Once the tag is dry, I then stamped the Lavinia Stamps "Seahorse", a fab stamp with so much detail, in Versafine Clair "Blue Belle" ink.  At the base of the tag, I added the fish using the Lavinia stamp called "Shoal of Fish", stamped in Versafine Clair "Twilight" ink.  I also went around the edge of the tag using this ink, just to darken it a little more.

Finally, I added some bubbles using a white and a silver Signo Pen.  I also added some white areas to the seahorse with the white pen and to give the eye a glassy look, popped on a little droplet of "Glossy Accents" and left to dry.

~~~

Click here if you would like to know more about this challenge.

There is a Facebook Group for this challenge, where you are more than welcome to join and take part.  In the group, you can upload your creations to the weekly prompt albums and talk to others who are taking part in the challenge.  It is very relaxed, with no pressure to take part, just do what you can, when you can.  I hope you will join us.  Sam x

Monday, 18 February 2019

Lavinia Stamps Design Team Samples for Hochanda TV on 21st February

This is the fourth set of  Design Team samples I have created for Lavinia Stamps, to be shown on Hochanda TV on 21st February 2019 at mid-day and 4pm


Sample 1

I created the background using a Gelli Plate and Brusho inks.  I stamped Sebastian the Seahorse and the sentiment in Versafine Clair "Monarch" shade of ink. I used Distress inks to create the rock shapes at the bottom foreground.  Then stamped "Lunar Buds" (from set 3) to create a fossil/lichen look.  Finally, I added spots of glossy accents to the eyes of the seahorse and to the water background and touches of white with a Signo Pen.

Here are the links to the Lavinia Stamps I have used for this sample:  Sebastian the Seahorse, Deeper than the ocean sentiment and Lunar Buds.

Sample 2


For Sample 2, I created a background using a combination of Distress Oxides and Distress Inks.  I masked off a circle for the moon and applied a Cosmic Shimmer "White Clouds" Blending Ink and left to dry.  I have only used one stamp for this card and that is Sebastian the Seahorse.  I stamped the main image in Versafine "Black Onyx" ink.  I then used the spines of the seahorse to stamp around the edge of the card, in Versafine Clair "Monarch".  Finally, I used a Signo Pen in silver to make dots through the water.  I used a white Signo Pen for areas on the seahorse too.  I added a spot of Glossy Accents to the eye area to make it more glass looking.

Here is the link to Sebastian the Seahorse if you would like to buy one too.

Sample 3


As the two other samples are quite busy with colour, I wanted the third to be clean and simple.  I used a Stix2 Masking Sheet and cut a circle aperture in it using a die.  I used the aperture/hole to mask off the edge area of the card and filled with Distress Inks using the following shades "Spun Sugar", "Picked Raspberry" and "Wilted Violet".  Both the seahorse and the sentiment were stamped in Versafine Clair "Monarch" shade of ink.

Here is the link to "Sebastian the Seahorse" and the "Deeper Than The Ocean" sentiment.


Monday, 28 January 2019

Lavinia Stamps "Shaylee" Card


This weekend we have had our son and his family staying with us.  we planned a fairy hunt in the garden for Willow, our Grand daughter who is five, and she loved it, so I've made this card to remind Willow of her stay with us.

I started the card, by creating a background using various shades of Distress Oxides. 

All the stamps I have used are by Lavinia Stamps.  I stamped the main fairy "Shaylee" in Versafine "Black Onyx" ink.  I then created the landscape Shaylee stands on by using Distress Oxides and a mask.

I then stamped the "Foxglove" and the "Fern Heads" in Colorbox and Memento inks.

I stamped the "mini snail", "Fairy Bugs" and the "ball/bubble" the fairy is holding in Versafine Ink. I added touches of white and silver glitter to the card by using Signo Pens.  Finally, I added "Glossy Accents" to give the bubble a more crystal ball look and a handful of clear Nuvo sequins to add quiet interest to the background.

Thursday, 13 December 2018

Let It Snow Christmas Card (Craft Box UK)


Today I have played with some of the goodies from the November Craft Box Signature collection. I used a sheet of patterned paper from the box and stamped horizontal lines across the page.  I then inked the edges in three shades of ink.  

I decided the area I wanted to work with and die cut a circle of that area. I then covered the circle with Glossy Accents and left to dry.

I then mounted a co-ordinating card on the underside of the square paper.  Once the circle area was dry, I added foam pads to the underside and stuck it back in the place it had originally been cut from.  The highlighted the area.

Finally, I added drops of liquid pearls in shades of silver and white.  Stuck some blue sticky gems across the page and then added the "Let It Snow" Snip Art that came in the Craft Box.

Saturday, 24 November 2018

Snow Globe Wish Tag


As I mentioned in my earlier post, I fell in love with the goodies in the November 2018 Craft Box, so I got busy making this tag.

For the base, I cut down a sheet of the patterned paper that came in the box of goodies.  I then dragged a white and a black small ink pad across the surface of the tag so that some of the background detail isn't quite as obvious.

Using a small script stamp, I shadow stamped across the surface.

Using a small snowflake stamp that came with a magazine, I stamped the snowflake in Versamark and coated with clear embossing powder and then used my head gun to melt the powder.

I added the silver snowflake trim to the base of the tag, but it was looking a bit too new and sparkly, so I inked over it in black to dull it down a bit.

Using Glossy Accents, I covered the snowglobe and the eyes of the girl.  I also used the Glossy Accents to adhere the sequins.

Finally, I added some pearls and sticky gems to the hat area.

Sunday, 28 October 2018

IndigoBlu Dinkie Poppy - Just Wanted To Say...Card


Today I have played with an IndigoBlu Dinkie poppy stamp.

I stamped two images of the poppy and then coated them in Versamark and then clear embossing powder, then heated to give a lovely raised look.  I then painted both with layers of Brusho.

For the base layer, I stamped another flower and made a mask, then splattered green and mauve dots of Distress Ink using a paint brush.  I then left to dry.

I returned to the other poppy and cut out some of the petals.  In the middle I used a metallic pen to add a little gold/green shimmer.  I curled some of the petals and used foam pads to keep some of them lifted. The remainder I stuck flat on top of the main poppy image.


I stamped the sentiment using Hobby Art Stamps "General Greetings CS016D) in Versafine "Black Onyx".  Finally, I added some dew drops to the poppy using droplets of Glossy Accents.

I decided that the Poppy looked odd just kind of floating in the middle of the card, so I added a couple of leaves

Wednesday, 17 October 2018

Hope Card using IndigoBlu Colour Me Daisy


I made this card with a certain friend in mind that has a lot on her mind at the moment.

I used the IndigoBlu "Colour Me Daisy" stamp, coloured with Distress Inks.  I die cut the word "Hope" using a Stampin' Up set called "Sunshine Wishes".  I added droplets of "Glossy Accents" to give a raindrop look to the flower.