52 Week Mini Art Card/Tag Challenge

Showing posts with label Funky Fossil Queen Bee. Show all posts

Sunday, 30 June 2024

52 Week Mini Art Card / Tag Challenge 2024 - Week 27


The Crafting Niche 52 Week Mini Art Card/Tag Challenge 2024:

This is a weekly challenge. I provide you with a prompt/theme each Sunday morning through out the year.  The challenge is very relaxed.  You can do as much or as little as you like.  You can create cards, tags, Artist Trading Cards (ATC's) or index cards, the choice is yours. You just go with what ever is in your head at the time.  You can stamp, get inky, use patterned papers, texture, embellish it is all down to you.

There is a dedicated private Facebook Group, with a lovely bunch of people who are already sharing their makes from previous challenges.  You can find the group by clicking this link.  I'd love you to join in.

The prompt for Week 27 is "Summer"

*****

This is the tag that I have made for the Week 27.  I decided to go with a bee, as nothing sums up summer to me, than the sound of the low hum of a bee in the distance.

I used Versafine Clair "Medieval Blue" ink, coated in Wow! Clear Embossing Powder and heat set for the Funky Fossil "Hello Gorgeous" flowers and sentiment.

I coloured the flowers by painting the flowers with different shades of Distress Oxide Inks.  I also used Posca Pens and gel pens.

The bumble bee is part of the Funky Fossil "Queen Bee" stamp set, I stamped the bee on to the tag and then on to an off-cut of white card, using Versafine Clair "Nocturne" black ink, I then coated the stamped image in Wow! Clear Embossing Powder and heat set the image.

I fussy cut the bee, inking the edges of it in black ink, then coloured the body using Posca Pens, using "A Wink of Stella" on the wings.  I used wet glue on the underside of the head of the bee, but for the rear end added some black foam pads to stick the bee into position, this gave it a more 3D look.

Friday, 3 March 2023

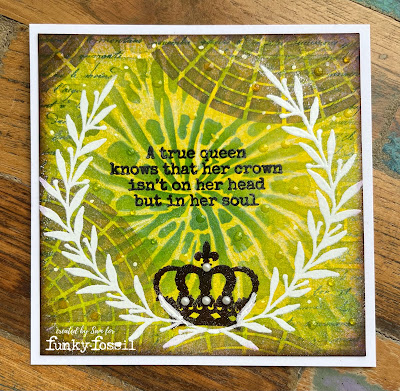
Funky Fossil Designs "Queen Bee" mixed media card


I've gone from a clean and simple card to a very busy mixed media style card in one day! 

I found a spray ink background in yellows and greens in my stash, so decided to use it as it's been in the file for ages.  I cut it to size then used a selection of products from Funky Fossil Designs to create this random piece of work.

I started with the Funky Fossil "Tie Dye Stencil" with two shades of Archival Inks:  Garden Patina and Blue Bird, fading the colours out to the edges.

Next, I used the Funky Fossil "Slimline Brick Wall Upright Stencil" with "Shadow Grey" Archival Ink around the edges of the card.

I then used the Funky Fossil "Vintage Script" stamp with "Warm Breeze" Versafine Clair ink over the brick wall stencilled area.

I then used another stencil called "Radius" with "Violet" Archival Ink, in several areas going off the edge.

I rubbed an anti-static bag over the surface of the card, then using Wow! Clear embossing ink I stamped the foliage wreath, which is part of the Funky Fossil "Queen Bee" stamp set.  I coated the ink with Wow! Opaque, Bright White Embossing Powder and then heat set.

I then stamped the crown (also part of the Queen Bee stamp set) in Versafine Clair "Monarch" purple ink, coated it with Wow! Clear embossing powder and heat set.I repeated the process with the sentiment in the middle of the card.

I inked the edges of the card using Versafine Clair "Monarch" purple ink.  Added a few white dots of Posca Pen around the wreath then mounted the card onto a white piece of card.  Finally, adding dots of Ranger Glossy Accents and sticky pearl gems to the crown.

Wednesday, 15 February 2023

Funky Fossil "Queen Bee" Birthday Card


Today, I've been playing with my Funky Fossil goodies to create this card. 

To start, I put three shades of Element's Inks on to my glass mat, I used Sundance, Confetti and Mulberry.  I then spritzed the ink and lay a piece of card over the ink.  I picked the card up and moved the diluted ink around on the card, till I was happy with the colour coverage. I used my heat gun to fully dry the inked card.

Once dry, I rubbed an anti-static bag over the surface of the card and lay the Funky Fossil "Geometric Circles Stencil" over the top, securing with a bit of low tack tape.  Using a finger dabber and Wow! Clear embossing ink pad, I coated the gaps in the stencil.  Removing the stencil, I then coated the inked image with Wow! "White Puff Twinkle" embossing powder and heat set.  

Next I positioned the Funky Fossil "Honeycomb Background Stencil" and used "Orange Blossom" Archival ink around the heat embossed area.

I then positioned another Funky Fossil stencil, called "Hex Dots" and applied "Vibrant Fuchsia" Archival Ink through the stencil to create a dotty design.

I inked the edges of the card with Versafine Clair "Charming Pink" ink.

In the middle of the heat embossed flower, I have used two shades of Paper Artsy Fresco Finish Acrylic chalk paint (Cerise and Candy Floss) applied with a dotting tool.  Once the middle was dry, I used white Ranger Enamel dots to creats the centre of the flower.

While everything was drying, I turned my attention to the bee, which is part of the Funky Fossil "Queen Bee" stamp set.  I stamped the bee in Versafine Clair "Nocturne" black ink, then quickly coated it with Wow! Clear Embossing Powder and heat set.

I coloured the Bee with a mixture of Posca Pens and Derwent Intense Water colour Pencils and then fussy cut it.  To elevate the Bee from the card, I cut a slim strip of card and adhered it to the underside of the bee.

Using Versafine Clair "Nocturne" black ink, I stamped the Happy Birthday sentiment which is part of the Funky Fossil "Happy Words" stamp set.  I layered the card on to a card base and then glued the Bee into position over the flower.


Funky Fossil Designs "Queen Bee" Card


 Funky Fossil Designs recently released a new stamp set, which I knew I had to have.  It's called "Queen Bee" and is designed bu "Mo's Art UK".  It features a big fat bumble bee which I fell in love with.  Strangely, when the stamp set arrived the first card I made using the set, didn't feature the Bee!

To make this card, I used a circle mask with two shades of Distress Oxide Inks:  Lost Shadow and Iced Spruce, only using the Iced Spruce colour at the lower section of the circle.

I then stamped the foliage and the crown from the "Queen Bee" stamp set in Versafine Clair "Morning Mist" using second generation stamping.

Using the same ink, but in first generation stamping for the wording in the middle of the circle.

Around the edge of the stamped area I used the same shades of Distress Oxide inks (Lost Shadow and Iced Spruce), but used the Funky Fossil "Hex Dots Stencil" to add some extra interest to the border.

I coloured the foliage wreath and the crown using Derwent Inktense water colour pencils.  I added touches of gold shimmer pen to areas and then topped the berries in the foliage with dots of Ranger Glossy Accents