52 Week Mini Art Card/Tag Challenge

Showing posts with label Visible Image Shape It Up. Show all posts

Thursday, 6 July 2023

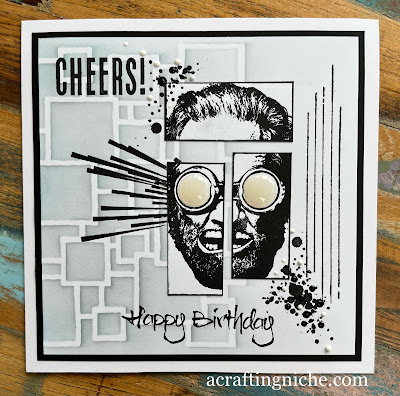
Visible Image "Art Rebel" Birthday Card


It's that time of year when I needed to make a birthday card for my Hubby.  I've been putting it off for a couple of weeks, but time is running out so I bit the bullet and made this card for him.

I used a piece of white 6x6" card for the base and lay the Visible Image "Square Route" stencil over to the left hand side of the card. I used two shades of Archival Inks through the stencil, first using "Shadow Grey" and then "Garden Patina" fading the colours out towards the right hand side of the card.

On a separate piece of white card, I used Versafine Clair "Nocturne" black ink to stamp the three face sections from the Visible Image "Art Rebel" stamp set. I then cut the three pieces down along the stamping line and inked the bare edge with a finger dabber and "Nocturne. Then glued the three sections into position slightly to the right of the central point of the card.

Once the glue was dry, I mounted the card onto a piece of black paper and then on to a 7x7" white card blank.

Now it was time to add the extra details.  I added the horizontal lines from the left of the face  and the large dot/splatters at the bottom right of the face from the Visible Image "Set the tone" stamp set with Versafine Clair "Nocturne" black ink.

I used the same ink with the vertical lines on the Visible Image "Shape It Up" stamp set.

I then moved on to the sentiments.  I used the "Cheers" from the Visible Image "Bring on the beers" stamp set and the "Happy Birthday" sentiment from their "Happy Birthday" stamp set.

Finally, I added some black and white dots using Ranger "Enamel Accents" and used Ranger "Glossy Accents" for the lenses of the goggles.
Saturday, 1 July 2023

Visible Image "Wings of Change" Card


I was awake early this morning, so decided to have a play with my Visible Image Stamps.  I don't use them often enough!

I started by masking of the edges of a piece of white card.  In the un-masked area I used two shades of Distress Ink:  Wild Honey and Abandoned Coral.  I used a heat gun to dry the area then added splatters of more "Abandoned Coral" ink. I then removed the masking tape.

I used dots from the Visible Image "De-strerssed" stamp set with "Abandoned Coral" Distress Ink diagonally across the coloured background.

Using Versafine Clair "Nocturne" black ink, I stamped the "Grunge Flourish" and then stamped the wording, which is part of the "Wings of Change" stamp set.  I also added some extra rings using the Visible Image "Shape It Up" stamp set.

On a piece of white card, I stamped three butterflies, also part of the "Wings of Change" stamp set, using two shades of Versafine Clair inks (Summertime and Charming Pink) over the top of each other to create the shade I wanted.  I then fussy cut the butterflies and stuck them on to the card.

Finally, I added black and white Ranger "Enamel Accents" to add a little dimension.


Thursday, 7 January 2021

Visible Image "Love" gel plate card


A few days ago, I had a gel plate making session.  This evening, I decided to use one of the backgrounds with a selection of my Visible Image stamps making this card.

I'd used two shades of PaperArtsy chalk acrylic paint, "Caribbean Sea" and "Gold".  I had attempted to get a pattern onto the plate, but it was drying quickly so I took an impression while I could, resulting in the background you can see.

I used the Visible Image fingerprint stamp from their "Bloom and Grow" stamp set with Versafine Clair "Acorn" brown ink.

I then used a stamp from the Visible Image set called "Creative Chaos" with "Vintage Photo" Distress Oxide Ink.

I used the Visible Image "Shape It Up" stamp set for the lnes and some of the mid size cluster of circles and the hearts were stamped using the "Have I Told You" set.

I heat embossed the word "Love" and the "star" both part of the Visible Image "Peace, Love and Hope" stamp set, using Wow! Metallic Gold Super Fine embossing powder.

Finally, using a Signo red glitter pen and a gold coloured Sakura gelly roll pen, I filled in some of the smaller circles.

Sunday, 31 May 2020

Visible Image "Break Free" Daisy Tag


I had decided to have a day off crafting, but found myself drawn to my craft desk, so decided to make a little tag.

I used a tag with a Distress Oxide Spray background that I had prepared a while back, I had already used the Visible Image "Meshine Around" stencil on it, so that really dictated the way I went with the whole tag.

I used the Visible Image "Break Free" stamp set for the vase and flower, coloured with Distress Oxide Inks.

In the background I used the dotty circles from the Visible Image "Creative Chaos" stamp set and the straight lines form the Visible Image "Shape it up" stamp set.  The words are from the Visible Image "Random Art of Kindness" stamp set, all stamped in Versafine Ink.

I added some white areas to the dots, which turned pale blue due to the base, using a Posca Pen.


Monday, 20 April 2020

Visible Image - Rainbow Challenge - using Total Chaos and Creative Chaos


This is another entry for the Visible Image "Rainbow Challenge".

For the base, I used Distress Oxide Inks on water colour paper which allowed the colours to run into each other beautifully.

I stamped everything with Versafine Clair "Nocturne" black ink.  The sentiment using the Visible Image "Own It" stamp set, the flowers yusing "Total Chaos" and "Creative Chaos".

I then used the "Ripples" stencil with a white Posca pen and then stamped the cluster of black circles using the "Shape It Up" stamp set.  The DNA coding on the right hand side is part of the "Creative Chaos" set.

Sunday, 17 November 2019

Week 47 - 52 Week Mini Art Card / Tag Challenge 2019


The prompt for Week 47 is "Bright".  My reasoning behind this prompt is that this week the weather has been so grey and grim, that I found myself wanting to create something with pretty, bright colours.

I started by using "Peacock Feathers" shade of Distress Oxide Ink through a Clarity Stamp Stencil called "Orbit".

Using Versafine Clair "Nocturn" black Ink, I stamped the Visible Image flowers and circle detail.  These stamps are part of their "Creative Chaos" clear stamp set.  I used some additional circles from another of their sets called "Shape It Up".

I stamped the flower heads again, this time on white card, which I painted with a pink shade of Distress Oxide Ink called "Picked Raspberry".  I then fussy cut the flower heads and adhered over the ones already on the tag.

Finally, I stamped the Always Cool words, using some magnetic word stamps by Rubbadubbadoo.  I added additional white cirles to the tag using a Signo Pen.


Sunday, 27 January 2019

Week 5 - 52 Week Mini Art Card / Tag Challenge 2019


The prompt for Week 5  is "Geometric Shapes".

For my tag, I started by making a background of three shades of Distress Oxide Inks:  Squeezed Lemonade, Twisted Citron and Tumbled Glass.  Once dry, using a Visible Image stencil called "Two Tone" I covered the service with dots of Twisted Citron Distress Ink.

Using a Versafine Clair ink pad called "Paradise", I stamped concentric circles from the Visible Image "Shape It Up" stamp set across the surface of the tag.

In Versafine "Stormy Grey" ink, I stamped three images of artist supplies, using IndigoBlu sets: Collector's Edition no.17,18 and 20 (Pencils, Brushes and Paint Tubes.  Which I then die cut into circle shapes. I also die cut different blue cardstock in different size circles.

Returning to the stamped, circle images, I coloured them using Distress Inks, using a silver Signo Pen on some areas too.

I arranged the blue discs and the stamped images into a pleasing arrangement and stuck them into position.  Some are flat, others are elevated on foam pads.  To finish, I lightly inked the edges of the tag.

~~~

Would you like to know more about this challenge?  Click this link to find the info you will need.

There is also a Facebook Group for this challenge, where you can share your makes and chat to others taking part in the challenge.  It is a very relaxed group.  There is absolutely no pressure to keep up, you do what you want, when you want to do it.  The weekly albums are there to be added to when ever is convenient to yourself.  Why not pop by and say hello.  The more the merrier.  Sam x

Tuesday, 1 January 2019

Male Teen Birthday Card


It's time for me to get cracking on cards needed in the next few weeks and here is the first.  A birthday card for a male teen - a theme that I have difficulty with.

I created a background using three shades of Distress Oxides (Tumbled Glass, Spiced Marmalade and Blueprint Sketch).  Once dry, I stamped circles using a Visible Image stamp from their "Shape It Up" set.

Using a stamp from a Stampin' Up set called "Epic Celebrations" I stamped the trainer image in black Versafine ink.  I then stamped the same image on a piece of white card.

I coloured the shoe laces on both images of the trainers, then cut the shoe shape from the white card (but not the dangling laces).  I ran a black pen around the edge of the shoe image then stuck it to the card base using foam pads to elevate the trainers.

I finished by mounting onto black card and trimming to size.  To add a little more interest, I used a silver glitter Signo pen to add dots across the surface of the card - these are not really picked up very well in the photograph.