52 Week Mini Art Card/Tag Challenge

Showing posts with label Challenge. Show all posts

Monday, 19 February 2024

Tiffany Johnson Creative #100daysartplay Challenge - Day 2 (b)


On my previous Day 2 post, I mentioned I was taking part in the Tiffany Johnson Creative #100daysartplay Challenge.  I enjoyed the "wax resist" technique so much, I had another go, making this card.


Again, I started by using the Brusho "Wax Resist" crayons, this time to draw broken horizontal lines across the face of a piece of white card.

I then sprayed two shades of Dylusion Spray Inks:  Bubblegum Pink and Crushed Grape.

Once dry, I trimmed the card to size.

I used the Waffle Flower "Oversized Hello Die - 271309" to cut the "Hello" word in white card.  I cut two layers of the word and stuck them together, then glued them on to the card.  This allows the die cut to sit proud of the card base.

I inked the edges of the card using Versafine Clair "Monarch" purple ink and then mounted it on to a white card blank.

Sunday, 14 January 2024

52 Week Mini Art Card / Tag Challenge 2024 - Week 3


The challenge for 2024 is weekly.  I will provide you with a prompt/theme each Sunday morning through out the year.  The challenge is very relaxed.  You can do as much or as little as you like.  You can create cards, tags, Artist Trading Cards (ATC's) or index cards, the choice is yours. You just go with what ever is in your head at the time.  You can stamp, get inky, use patterned papers, texture, embellish it is all down to you.

There is a dedicated private Facebook Group, with a lovely bunch of people who are already sharing their makes from previous challenges.  You can find the group by clicking this link.  I'd love you to join in.

The Crafting Niche 52 Week Mini Art Card/Tag Challenge 2024:

The prompt for Week 3 is "Blocks of Colour"

*****

I've opted for what should be a relatively straight forward tag to make, so if anybody is a little behind, it should be a quick make, also it allows for a little scrap busting, using up some of those small pieces of paper and card that we don't like to throw away.  Here's how I made my tag.

Starting with a plain white tag base, I lay the Clairty stencil called "Framework Circle Stencil" over the top of the tag.  Using a blending brush, I applied "Lost shadow" Distress Ink through the stencil and removed the stencil.

I then raided my drawer of paper and card scraps, opting for plain colours that I felt worked well together, cutting them into strips and rectangles then sticking them in to position.

I then used a sentiment from a Lawn Fawn stamp set called "Simply Sentiments", stamping the word "Hello" in Versafine "Monarch" purple ink.  I used the same coloured ink to  edge the tag, then mounted the tag on to a piece of dark blue coloured card.


Sunday, 1 October 2023

Country View Crafts "October - Autumn Magic" challenge entry card


Country View Crafts are now holding their challenges on a dedicated Facebook group rather than their blog.  October is the first challenge on the group and has a theme of "Autumn Magic".  This is my challenge entry.

I started by using a gel plate background. using a 4" round gel plate with Lavinia "Sundance" and "Olive" Element inks. I splattered water droplets across the surface of the gel print which bleached the area where the droplets were and dabbed dry with a piece of kitchen roll and then used my heat gun to completely dry the surface.

I ran an anti-static bag over the surface of the card before stamping the leaf over the gel print.  The leaf is part of a Tim Holtz / Stampers Anonymous cling stamp set called "Pressed Foliage - CMS376".  I stamped in Versafine Clair "Acorn" brown ink, then coated the stamping with Wow! Embossing "Metallic Rich Gold" embossing powder and heat set with the heat gun.

I used assorted gel pens and two Derwent Inktense pencils to add colour to the leaf area.  I also added gold dots to the gel plate area too.

In the background, I used two Tim Holtz/ Stampers Anonymous stencils.  I used Versafine Clair "Shady Lane" green ink through the "Stripes Layering Stencil - THS004" and "Rusty Hinge" Distress Ink through the "Dot Layering stencil - THS006".

I inked the edge of the card using Versafine Clair "Shady Lane" green ink and then added some gold gel pen too.

I mounted the card on to a piece of brown card, then on to a white card blank.  Finally, I added a Tim Holtz Idea-ology "Small Talk" sentiment sticker.


Wednesday, 19 April 2023

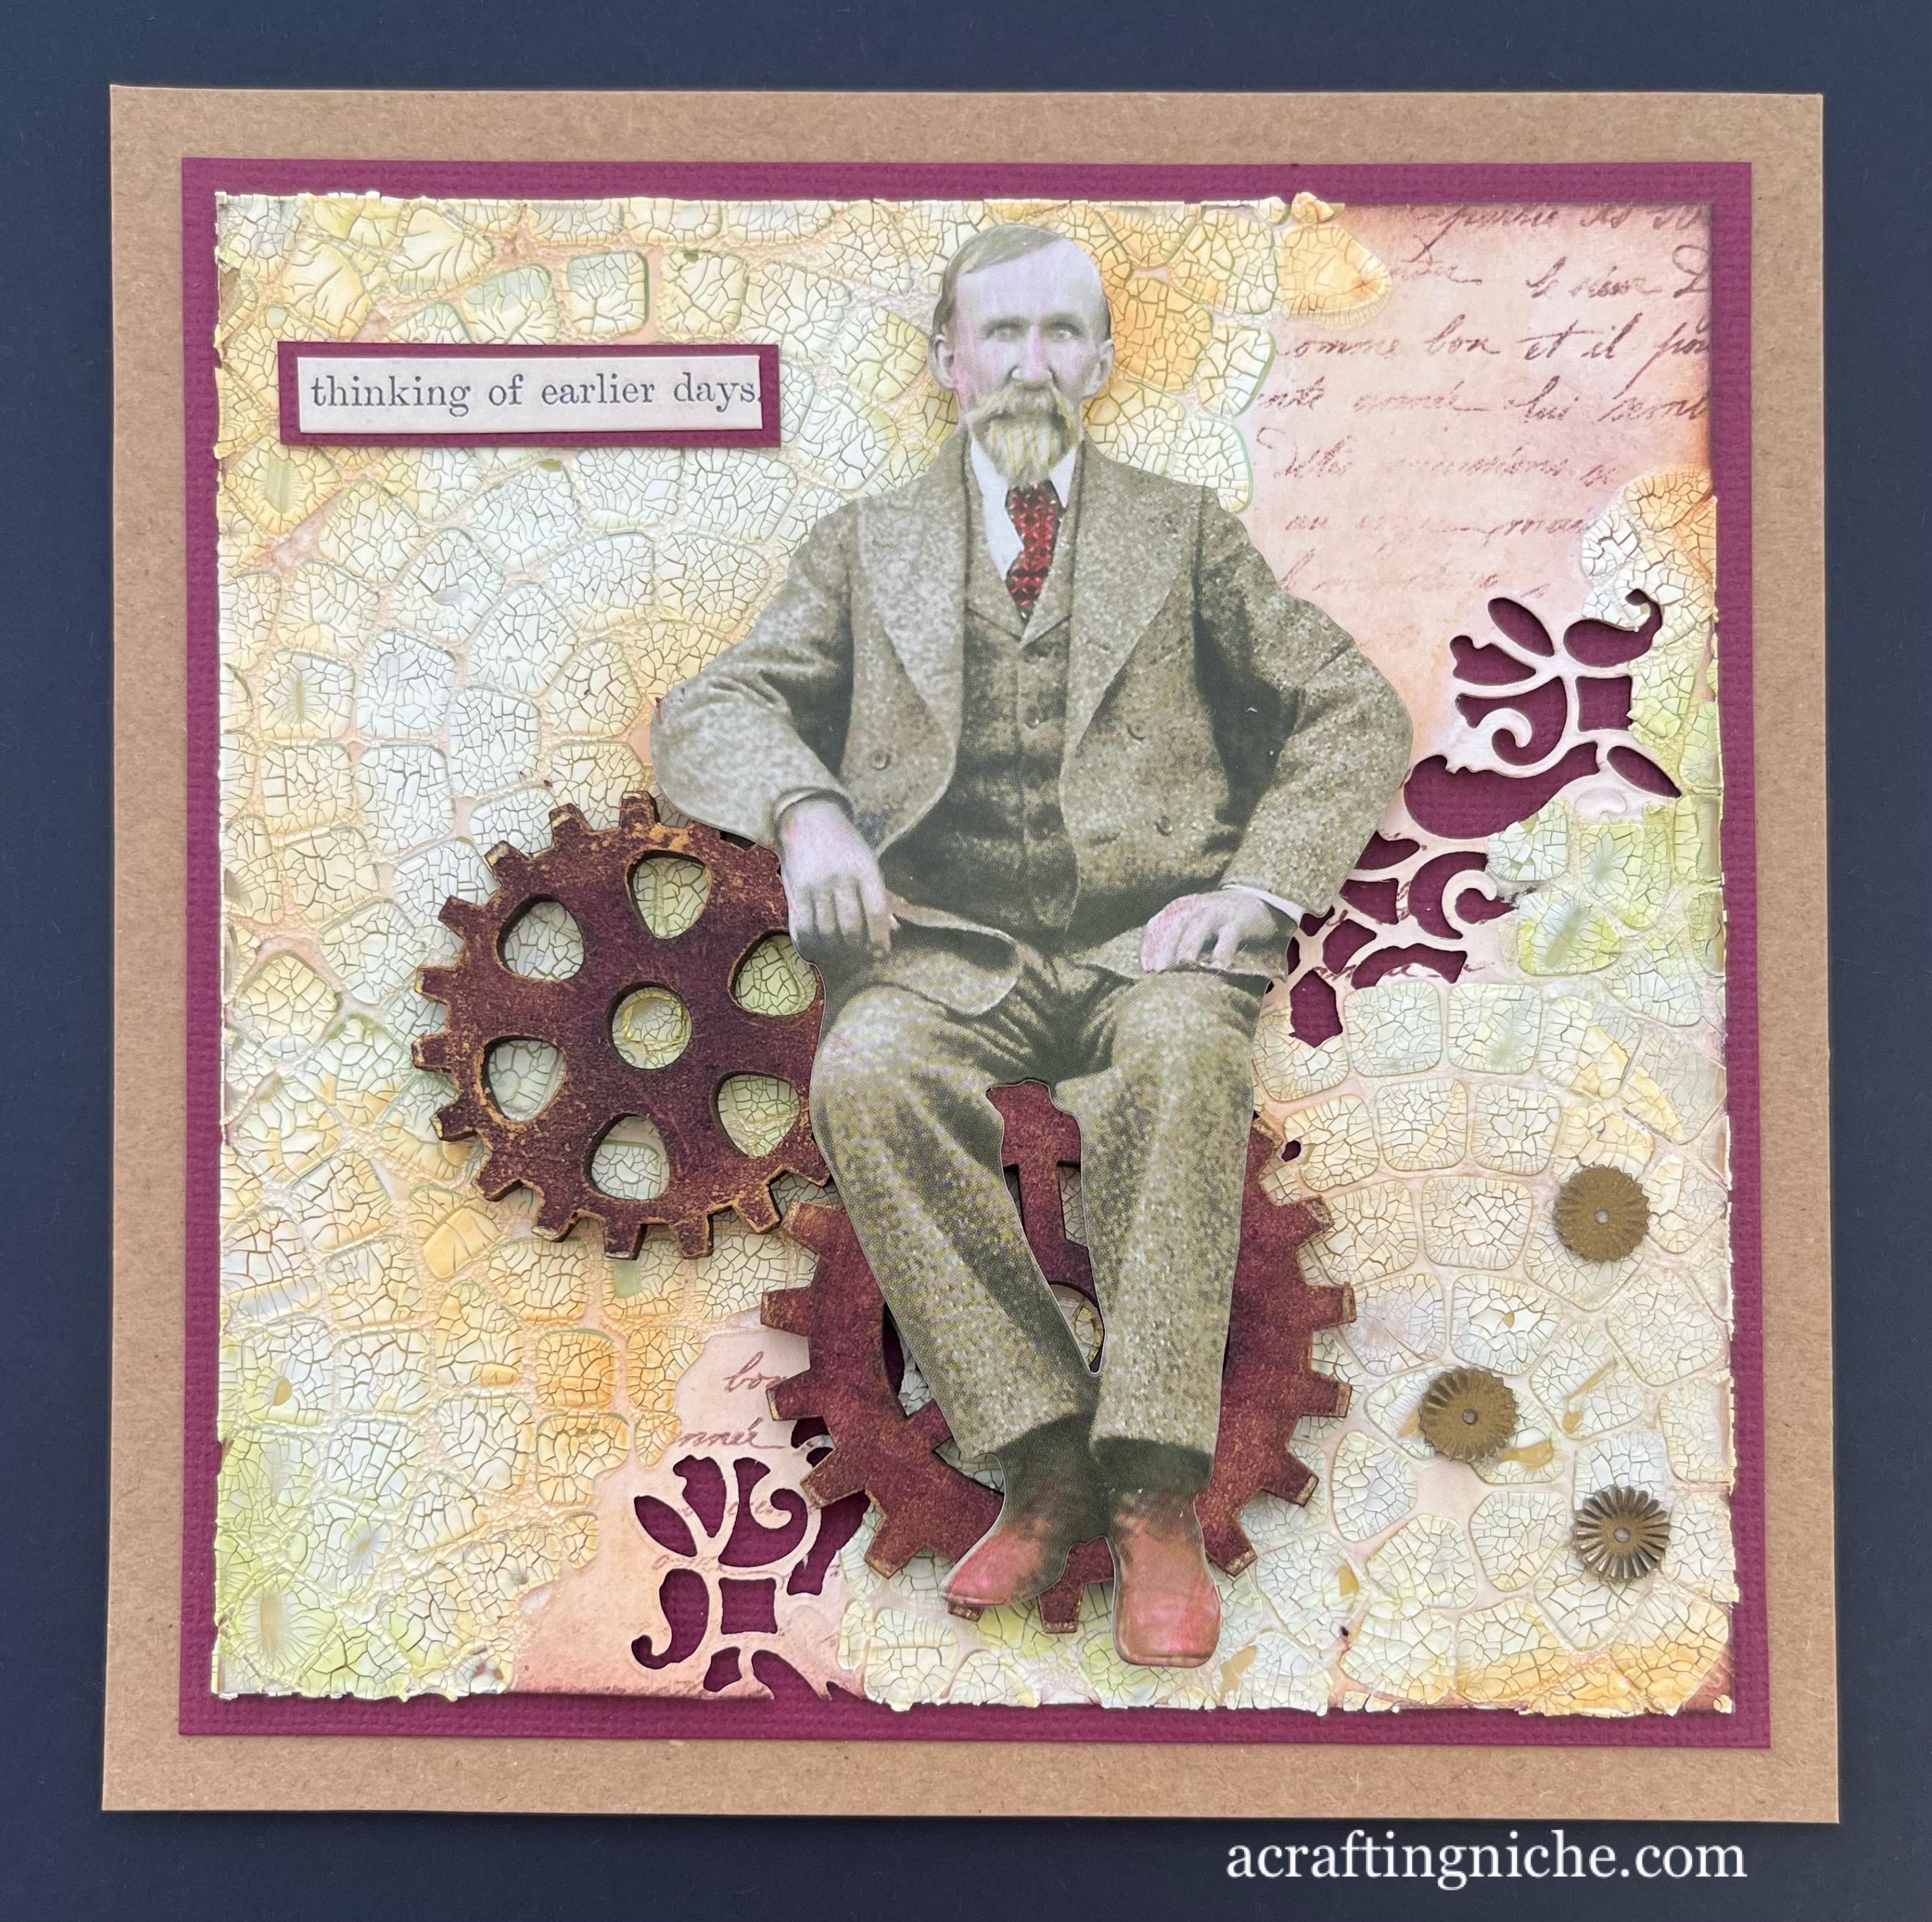
Texture Challenge Card


Today, Wednesday 19th April, Eileen Godwin set a challenge of "Texture".  This is the card that I made.  I was totally out of my comfort zone using the texture paste! 

I started this card doing one thing but it morphed into something quite different as I wasn't sure how to use a product and winged it.  Lesson learnt, check Google first.  

I made a beautiful background thinking it would crackle, but it  didn't as I'd used "Crazing" which was clear when I applied it.  I then put the stencil back on and added the"Crackle" paste, which was very white when applied and stayed white, so I lost the nice background, which resulted in working with what I had left!

I decided to use the inks left on my blending brushes to provide colour to the crackled area.  I'd used a Funky Fossil stencil called "Broken Mosaic" with the Tim Holtz "Crackle" Texture Paste. A small area of the base remained and that was where I had stamped the Funky Fossil "Vintage Script" using Versafine Clair "Acorn" brown ink.

I decided I would die cut a section of the surface, using a Sizzix Tim Holtz die, but due to the depth only some of it actually cut, which I actually don't mind as it is more informal.

I found some MDF cogs in my stash, so coated them with "Plum" Archival Ink and then added touches of gold gilding wax.  I stuck them into position using Glossy Accents.

I used a Tim Holtz "Paper Doll" and gave the gentleman a bit of colour by using felt tips pens and rubbing off the surface ink, which left just a suggestion of colour.  I used double depth foam pads to adhere the upper body of the paper doll and Glossy Accents for the legs, positioning him as if he were sitting on the cogs.

I found a Tim Holtz/Stampers Anonymous "Sticker Word" which was suitable, mounted it on dark red card and cut to shape.  Finally, I had some little dark gold looking metal embellishments which I thought worked well, so added these by using some dots of Glossy Accents.

Monday, 20 April 2020

Visible Image - Rainbow Challenge - using Total Chaos and Creative Chaos


This is another entry for the Visible Image "Rainbow Challenge".

For the base, I used Distress Oxide Inks on water colour paper which allowed the colours to run into each other beautifully.

I stamped everything with Versafine Clair "Nocturne" black ink.  The sentiment using the Visible Image "Own It" stamp set, the flowers yusing "Total Chaos" and "Creative Chaos".

I then used the "Ripples" stencil with a white Posca pen and then stamped the cluster of black circles using the "Shape It Up" stamp set.  The DNA coding on the right hand side is part of the "Creative Chaos" set.

Saturday, 18 April 2020

Visible Image - Rainbow Challenge #2 using their Butterfly Ink stencil


I decided to make a second entry for the Visible Image "Rainbow Challenge".

I used the Visible Image " Butterfly Ink" stencil with blended Distress Oxide Inks to create the rainbow on the butterfly.


I used a selection of Visible Image stamps for the remainder of the card, stamping in Versafine "Nocturne" and "Morning Mist" ink

Friday, 17 April 2020

Visible Image - Faerie Magic "Rainbow Challenge" Card


This is a card I have made as an entry for the Visible Image "Rainbow Challenge".

I've used the Visible Image "Butterfly Ink"  stencil in the background and "Faerie Magic" stamp set for the fairy itself.  I've used the Visible Image "Stay Weird" stamp set for the sentiment.

I have coloured the card using Distress Oxide Inks with Posc Pens and Signo pens.  I think I have used all the colours of the rainbow on this card.

Friday, 28 February 2020

AAA Cards CAS Challenge - Inchie Weekend Workout


AAA Cards CAS Challenge Facebook Group are holding a "February Inchie Weekend Workout".  The idea is that you are challenged to create a 1" square decorated tile in the middle of a white background (the white area is totally plain, no embossing or embellishments).

I used the Lavinia Stamps tiny hare called "Pipin" for the central image, stamped in Versafine Clair "Pinecone" brown ink.

I used "Tumbled Glass" and "Twisted Citron" Distress Oxide Inks for the background.  Using Arteza Inkonic fineline pens for the grass and flowers.

I then used a Spellbinders square 1" die to cut the image to the 1" required for this challenge and adhered the tile on to the front of a card blank.

Friday, 20 September 2019

Design Team make for "My Time To Craft Challenge Blog" #406 - Birds


It's time for a new challenge prompt on the "My Time To Craft Challenge Blog".  The theme for #406 is "Birds".  If you get the chance, please do pop over to the blog and take a look at some of the fab makes by my Design Team colleagues

Here's the card i've created: a snowscape with a crow on the fence post.

For the sky, I masked off a circle and filled it with three shades of Distress Oxide Inks, using the shades of Antique Linen, Mustard Seed and Wild Honey.

I then covered the moon shape with a mask and coloured the surrounding sky, using the following Distress Oxide inks:  Spiced Marmalade, Picked Raspberry, Abandoned Coral and Chipped Sapphire.

For the fence post, I used a stamp by Lavinia Stamp that actually has a pheasant sitting on the top of the fence post, so I stamped the fence post using Versafine Clair "Nocturne" ink on an off-cut of card, then cut the shape of the fence out.

I created layers of the snow landscape, cutting hills and adhering onto the card.  I gave the snow a pink/orange blush to create a slight reflection of the sky on the white snow.

I used one of the crows from the Lavinia Stamps "Crows Set" stamping it over the moon and snowscape.  I then adhered the fencepost below the claws of the crow.

The birds in the sky, is a stamp also by Lavinia Stamps called "Birds"

The "Winter Wishes" sentiment is part of a Papertrey Ink set called  "Winter Hills", again stamped in Versafine Clair "Nocturne" ink.

Friday, 23 August 2019

Design Team make for "My Time To Craft Challenge Blog" #405 - "Fantasy"


It is time for a new challenge prompt on the "My Time To Craft Challenge Blog".  Challenge #405 theme is "Fantasy".  If you have a spare minute, please do pop over and take a look at the other fabulous makes by my fellow Design Team colleagues.

For my card, I started with Distress Oxides inks in the shades of :  Antique Linen, Picked Raspberry and Wilted Violet, spritzed with water on a glass mat and the swooshing the card through the colours to create the coloured background.

Using various shades of Versafine Clair Ink in the following shades:  Purple Delight, Fantasia and Monarch, I stamped the following Lavinia Stamp images:  "Dandelions", "Felicity" and "Flutterbies".

I used a white Posca Pen and a silver glitter Signo pen to add highlights to various areas.


Friday, 26 July 2019

Design Team Make for "My Time To Craft" Challenge #402 Christmas


It is time for another challenge theme on the "My Time To Craft Challenge Blog".  The theme for challenge #402 is "Christmas".  

If you do have a spare moment, please do pop over to the blog and take a look at the fab makes by my Design Team colleagues.

For my card, I have used a background that I created using a circle gelli plate, Colourbox inks and Brushos.  Once the background was dry, I die cut a large snowflake using a Sizzix/Tim Holtz Bigz die, sticking the snowflake over the coloured circle.

Using a Woodware Christmas sentiment stamp, I stamped the "Seasons Greetings" in Versafine Clair "Medieval Blue" shade of ink.  Die cut into a rectangle and positioned on the top of the die cut snowflake.

Friday, 31 May 2019

Design Team Make for "My Time To Craft Challenge Blog" #398 Kraft


It's time for another challenge on the "My Time To Craft Challenge Blog" . Challenge #398 has a theme of "Kraft".  If you have a moment, please do pop over and take a look at the fab makes my Design Team colleagues have produced.

I decided to use Kraft card as the base and used a Tim Holtz Distress Ink in the shade of "Barn Door" through a Funky Fossil "Orb" Stencil.

I stamped the Papertrey Ink sentiment in Versafine Clair "Nocturne" ink.  Finally, I die cut a flower in black card using the Sizzix/Tim Holtz Thinlits set called "Wild Flower Stems #1".

Friday, 17 May 2019

Design Team Make - "My Time To Craft Challenge Blog" #397 "Tag You're It"


It's time for another challenge on the "My Time To Craft Challenge Blog".  Challenge #397 is "Tag You're It".  This is the tag that I have made as part of the Design Team.  If you have a minute to spare, please do pop over and take a look at the other fab creations by my Design Team colleagues and maybe even enter yourself.

For my tag, I started off by using Dylusions Spray Ink in the shades of "Fresh Lime" and "Squeezed Orange" onto a manilla coloured plain tag.  I then used masking tape to keep a stencil in place and used three shades of Distress Inks with a blending tool through the stencil to create the background pattern.  I then inked the edges in black ink.

Both the stamps used on this tag are by Stampers Anonymous and are from two different sets.  The butterfly is part of "Perspective (CMS213)" and the sentiment is from the "Random Quotes (CMS182)" set.  Both were stamped in Versafine Clair "Nocturne" ink.

Finally, I added white high-light areas using a Signo Pen and a slight gold shimmer to the butterfly spots using a Sakura Gelly Roll pen.