52 Week Mini Art Card/Tag Challenge

Showing posts with label Lavinia Stamps Feather Leaf Stencil. Show all posts

Friday, 12 July 2024

Lavinia Stamps "Flower Divine" butterfly card


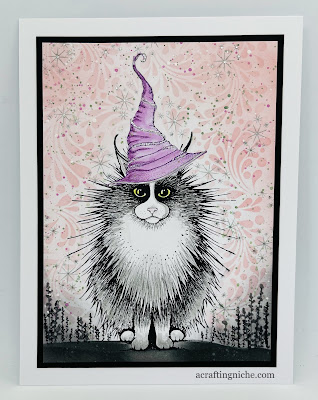
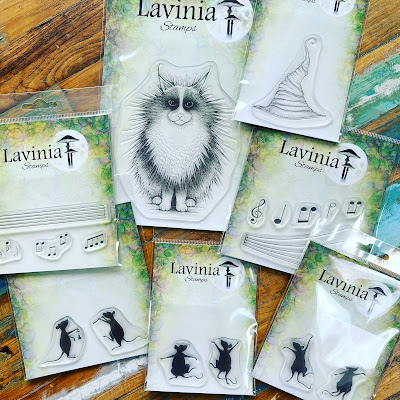
While I was away this past week, my order of the new stamps from Lavinia arrived.  They're lovely and I of course had to have an immediate play.

For this card, I used Versafine Clair "Medieval Blue" to stamp the "Flower Divine 1 & 2", as if they were hanging from the top righ of the page.  I then covered the stamped image with "Pebeo Masking Fluid" and set aside to dry.

I then used the butterfly from the Lavinia "Sticker Stencil 4 set" with a stripe stencil by Clarity stamps and added some stripes around the butterflies using two shades of Ranger Archival Ink (Garden Patina and Prickly Pear) colours.

I then used the other piece of the sticker stencil and filled in the butterfly shape using a very fine covering of "Shadow Grey" Archival ink.  I then added more colour to the edges using "Aquamarine" Archival Ink before returning to the "Shadow Grey" ink which I used through the Lavinia "Feather Leaf Stencil".

In the top and bottom corner, using second generation stamping, I stamped the Lavinia "Words of spring" in Versafine Clair "Morning Mist" grey ink.

Then using a white Posca pen and the Lavinia "White Orbs" stencil, I added some white dots.  They seemed to disappear in the background, so I decided to go round each one with a fine liner pen.

After removing the masking fluid, I used a couple of Derwent Inktense coloured pencils to add colour to the flowers and added touches of "A wink of stella", white gel pen, a 2b pencil and a gold shimmer pen.

Monday, 1 July 2024

Lavinia Stamps "Dancing Till Dawn" gel plate card


I enjoyed the gel plate technique Eileen Godwin shared on her "Live" last night that I decided to make another card using the same principles.

I used Versafine Clair "Avocado" green ink and a brayer to put a thin base layer of ink on the gel plate.

Then I used two shades of Ranger Archival Inks to stamp the Lavinia Stamps "Berry Leaves" multiple times in first and second generation stamping using "Periwinkle" blue innk and "Paradise Teal" a green coloured ink, direct on to the gel plate.  I then placed a piece of card over the top of the gel plate and took the impression.

Round the top and bottom, I added extra foliage using the Lavinia Stamps "Arctic" blue ink with the "Wild Vines" stamp.

Next, I stamped the Lavinia "Dancing till dawn" ladies, using Versafine Clair "Twilight" dark blue ink.  I used the same ink to stamp the "Vine Branch" at the top of the card, also to ink the edges of the card too.

Using Versafine Clair "Arctic" blue ink and a Lavinia Stamps "Hill Mask" I created the landscape behind the dancing ladies.

I then used a large Lavinia "Moon Mask" with "Rose Madder" Ranger Archival ink to create the impression of the pink dawn sun.  I used the same ink through the Lavinia Stamps "Feather Leaf Stencil" too, within the sun area.

I used a 2B pencil to add shadows and a white and a gold gel pen for highlights.  I used a white and coral coloured Posca Pen for the dots to create the impression of flowers.

Finally, I added the "Have an amazing day" greeting, which is part of the Funky Fossil Designs "Stripped Back Sentiments" stamp set, stamped in Versafine Clair "Twilight" ink.

Wednesday, 6 March 2024

Tiffany Johnson Creative #100daysartplay Challenge - Day 18


It's Day 18 of Tiffany Johnson Creative #100daysartplay Challenge.  This week is all about using a palette knife.

For this tag, I have used four colours of Dylusion Spray Inks, using Lemon Zest, Fresh Lime, Bubblegum Pink and London Blue.

I then used That's Crafty "Black Texture Paste" through the Lavinia Stamps "Feather Leaf Stencil".

Once the texture paste was dried, I rubbed Cosmic Shimmer "Old Gold" Gilding Wax over some areas of the black texture paste, it shows quite dull in the photograph, but actually shows up quite well in real life.

I mounted the tag on to a piece of black card, then on an off cut of black card added one of the Lavinia Stamps "Sentiment Sticker 6" cutting a border around the word sticker, before adding it to the tag with black foam pads to elevate the sentiment.

Sunday, 29 October 2023

Lavinia Stamps "Winter Whispers release" Christmas Joy Tree Card


This is my tenth make using the new Lavinia Stamps "Winter Whispers" release of stamps.  I can't believe I've made so many since Friday tea time!

I started off with a 6x6" white piece of card and masked off the edges. I lay the Lavinia Stamps "Feather Leaf Stencil" over the top and applied "Shadow Grey" Ranger Archival Ink through the stencil using a blending brush.  I deliberately made the central area lighter as I didn't want the pattern to detract from the lovely design of the tree. I then removed the masking.

Using Versafine Clair "Medieval Blue" ink, I stamped the new "Christmas Joy" tree and one of sentiments from the "Christmas Greetings" stamp set.

I used a pastel pencil to ground the tree.  I then used a selection of colours of gel pens to colour the baubles on the tree.

Friday, 21 July 2023

Lavinia Stamps "Lupin" the hare card


A quick play from me this morning using a Lavinia Stamp and stencil.

I stamped "Lupin" the hare using Versafine Clair "Acorn" brown ink, stamping it very lightly as I didn't want hard/solid lines. I used a mask to cover Lupin, while I applied green ink through the Lavinia Stamps "Feather Leaf" stencil.  I don't know which colour Archival Ink it was as I just used what was still on the brush, but I suspect it was "Peat Moss".

Removing the mask, I then coloured "Lupin" using a selection of Derwent Inktense pencils, applied with a brush.  The colours I used are:  Pink Flamingo, Amber, Mustard, Natural Brown and Dark Mink.  I then used a touch of white gel pen in a couple of areas too.

To ground Lupin, I used "Pumice Stone" Distress Oxide Ink, applied with a paint brush.  Then right under the feet, I used a pencil to create more depth of shadow.

Finally, I used a birthday greeting using the Clarity Stamps "Entwined Sentiments" stamp set, stamped in Versafine Clair "Shady Lane" green ink.

Monday, 10 April 2023

Lavinia Stamps "Fairy Thistles" Sympathy Card


I sadly heard of the passing of one of our parents of our friend, so made a sympathy card to pop in the post first thing tomorrow.

I started this card by stamping the Lavinia Stamps "Fairy Thistle" in Versafine Clair "Monarch" purple ink.  I then coated the stamping in Wow! Clear Embossing Powder and heat set.

Over the top of the card, I lay the Lavinia "Feather Leaf" stencil, applying "Shadow Grey" Archival Ink through the stencil, fading the ink out across the card.

I stamped the sentiment, again using "Monarch" purple ink.  The sentiment is part of a Stampin' Up cling set called "Heal Your Heart".

Finally, I coloured the thistles using Derwent Inktense pencils applied with a brush and added touches of silver and purple Uniball Signo pens.

Tuesday, 6 December 2022

Lavinia Stamps "Mistletoe" Christmas Card


I've made another quick Christmas card this afternoon, using a Lavinia stamp and stencil. 

For the central area, I used a stitched edge die cut square and stamped the Lavina Stamps "Mistletoe" on to it using Versafine Clair "Rain Forest" ink.  I used the same ink to stamp the small sentiment, which is part of the Simon Says Stamps "Tiny Words - Christmas" stamp set.

I then used two shades of Distress Oxide inks (Mowed Lawn and Rustic Wilderness) through the Lavinia Stamps "Feather Leaf stencil".

I then matted and layered the pieces on to a card blank.

Monday, 4 April 2022

Lavinia Stamps "Indra" on a Brusho Gel Plate background


This morning I used one of my lesser used Lavinia Stamps to create this card. 

In my stash, I found a background I had made many months ago, using a circular Gel Plate and Brusho paints, so I decided that this would be my base.  

I used the Lavinia "Indra" large moth stamp, stamped in Versafine Clair "Nocturne" black ink and then coated in Wow! Clear Embossing Powder and heat set.

Around the edge of the circle and moth, I used "Shaded Lilac" Distress Oxide Ink through the Lavinia "Feather Leaf Stencil".  I decided this was too pale, so I then used both the large and the small "Maple Leaf" stamps, in two shades of Archival Inks "Fern Green" and "Prickly Pear".

I used a white Gelly Roll Pen to add highlights to areas of the leaves and the moth.  I added two shades of Liquid Pearls "White Opal" and "Lavender Lace" to areas of the card too.

Friday, 4 March 2022

Lavinia Stamps "Noof" the cat


This morning I received my order of the seven new stamps released by Lavinia Stamps on Thursday.  Included in the seven is a fabulous stamp of a cat called "Noof", so I obviously had to try him out!


Noof Is a large stamp, which I inked and stamped the image with Versafine Clair "Nocturne" ink.  I also stamped the new "Witches Hat" that Noof is wearing in the same ink.

I grounded Noof using "Graphite" Elements ink and more Nocurne.

Around Noof, I used the Lavinia Stamps "Feather Leaf Stencil" with "Saltwater Taffy" Distress Oxide Ink.

I coloured the hat using Derwent Inktense pencils and coloured Noof using the Elements Ink "Graphite" applied with a paint brush.

At the base of the card, I stamped foliage using the Lavinia "Foliage Set".

I added splatters of colours to the background using "Seedless Preserve" and "Rustic Wilderness" Distress Oxide ink,  I also diluted some white Gesso and splattered that around Noof too.

Finally I added touches of sparkle using a glitter gelly roll pen.

Monday, 1 February 2021

Lavinia Stamps Feather Leaf Stencil & Fox Valentine's Card


Karen Telfer created a fab little tutorial for a Valentine's card that she shared on her Facebook Group, so I thought I'd have a try. 

In Karen's demo she used some of the small Lavinia Stamps hares, but I've used those quite a lot, so decided to opt for a different animal - the fox!

I masked off an area of the blank card an filled the central area with shades of pinks.  I used Spun Sugar, Picked Raspberry and Festive Berries Distress Oxide Inks.

I spritzed the Lavinia Stamps "Feather Leaf" stencil with water and then positioned the wet side down on to the inky surface for a few seconds.  I lifted the stencil off and blotted the area dry before removing the masking tape.

I used fox stamps from two Lavinia Stamps sets - Fox Set 1 and Fox Set 2, stamped in Versafine Clair "Nocturne" black ink,  Using the same ink, I stamped the hearts (one of the Lavinia Stamps pound stamps) and the word "Love" from the Lavinia Stamps "Live the life" stamp set.

Finally, I positioned the "Feather Leaf" stencil over the top of the card and added a little subtle colour using the "Picked Raspberry" Distress Oxide Ink to ground the foxes.

Monday, 18 January 2021

Lavinia Stamps Rory and Darcy "Love you More" Valentine's Card


Karen Telfer produced a fabulous demonstration on how to make a Valentine's card at the weekend on her Facebook page.  This is my take on that demonstration.

For this card, I have used the Lavinia Stamps "Feather Leaf" stencil with "Weathered Wood" Distress Oxide ink on the surrounding area of the heart.  The area within the heart, I have used "Festive Berries" Distress Oxide Ink.

I have stamped Lavinia "Rory" and "Darcy" in Versafine Clair "Nocturne" ink.  I have used the same ink to stamp the "Love You More" sentiment, which is part of a "My Favourite Things" stamp set called "Essential Elements CS-137"